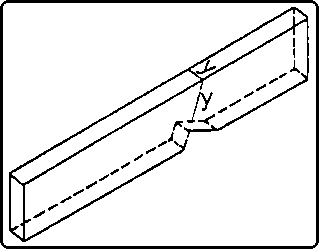
Instruction Example 3.3.: Template Making for a Rafter Foot
The template for the rafter foot of a purlin roof to be built
shall be made and the real rafter length be determined.
Dimensions
Width of building: 8000 mm
Height of roof: 3000 mm
Cross
section of rafter: 80/140 mm2
z (horizontal distance of eaves
flashing) = 500 mm
n (height of inferior purlin above surface of attic beam)
= 80 mm
o (square attachment timber) = 100 mm
Figure
Hand tools
Frame saw
Measuring and testing means
Folding rule, carpenter's steel square
Auxiliary accessories
Paper, pencil, hand sketch, abrasive paper, board approx. 1600
mm long and 140 mm wide
Necessary previous knowledge
Reading of drawings, measuring and testing, scribing, sawing,
smoothing
|
Sequence of operations |
Comments |
|
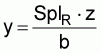
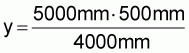
1. Determine real rafter length.
Req.: Spl
Known:
SplR = b2 + h2 |
Formula: Spl = SplR + y
(See also Fig. 16 in
"Trainees' Handbook of Lessons") |
|
|
|
|
|
|
|
h = 3000 mm |
|
|
z = 500 mm |
|
|
SplR = (42 + 32) m2
|
|
|
SplR = 5000 mm |
|
|
|
|
|
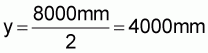
y = 625 mm |
|
|
Spl = 5000 mm + 625 mm |
|
|
Spl = 5625 mm |
|
|
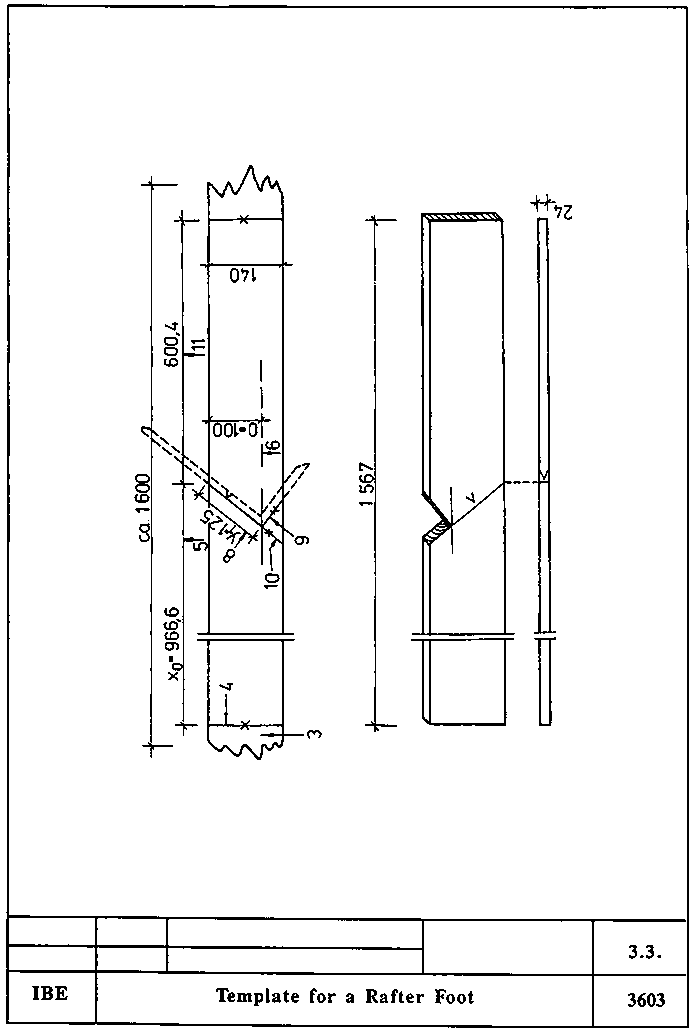
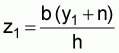
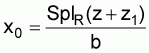
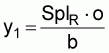
2. Determine x0
Req.: x0
Known:
SplR = 5000 mm
z = 500 mm
|
x0 is the size from the inferior purlin line up to
the rafter foot, not the length for the template!
(See also Fig. 16 in
"Trainees' Handbook of Lessons")
Formula:
 |
|
b = 4000 mm |
|
|
|
|
|
n = 80 mm |
|
|
h = 3000 mm |
|
|
o = 100 mm |
|
|
|
|
|
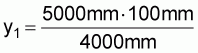
y1 = 125 mm |
|
|

|
|
|
z1 = 273.3 mm |
|
|

|
|
|
x0 = 966.6 mm |
|
|
3. Put straight board of approx. 1600 mm length on work bench.
|
Board width to comply exactly with rafter height. |
|
4. Scribe angular line at left end and mark with section mark.
|
Use steel square.
Go to the right only as far as to produce a
square cut. |
|
5. Measure in and mark the size x0 from the angular
line. |
Scribe only thin and short line. |
|
6. Measure in and scribe square attachment timber. |
Do not scribe over the entire length but only scribe thin line
in the area of the rafter foot line. |
|
7. Mark the size y1 on the long leg of the square.
|
Scribe thin line.
Mark it at the outside of the square. |
|
8. Place square with marked size y1 at x0
mark and swivel the square until point of intersection with square attachment
timber is reached. |
Place it exactly! |
|
9. Scribe surface of inferior purlin and front face of inferior
purlin. |
Scribe a thicker line at the short leg of the square and a thin
line at the long leg. |
|
10. Scribe front face of inferior purlin. |
Place long leg of square at thin line and scribe bird's mouth
depth. |
|
11. Scribe template length. |
Measure from x0 line. Use a square.
Use maximum
length but at least 500 mm! |
|
12. Saw out template. |
Saw exactly and perfectly square.
Special care is required
for sawing the bird's mouth! |
|
13. Smooth cut surfaces with abrasive paper. |
Use fine-grained abrasive paper!
Smooth very gently - no
chamfers must be produced! |
|
14. Transfer scribed lines of bird's mouth to upper narrow side
of template. |
Scribe thin line. |