Instruction Example 3.1.: Working of Boards for a Roof Base Facing
The face and bottom boards for a couple roof base facing are to
be worked.
Material
Boards with tongue and groove planed on one side, board lengths
between 3000 mm and 4100 mm
Figure
Hand tools and machines
Smoothing plane, circular saw bench
Measuring and testing means
Folding rule, measuring tape (if necessary)
Auxiliary accessories
Pencil, work bench (working table)
Necessary previous knowledge
Reading of drawings, measuring and testing, planing, operation
of the circular sawing machine, fundamental arithmetic operations
|
Sequence of operations |
Comments |
|
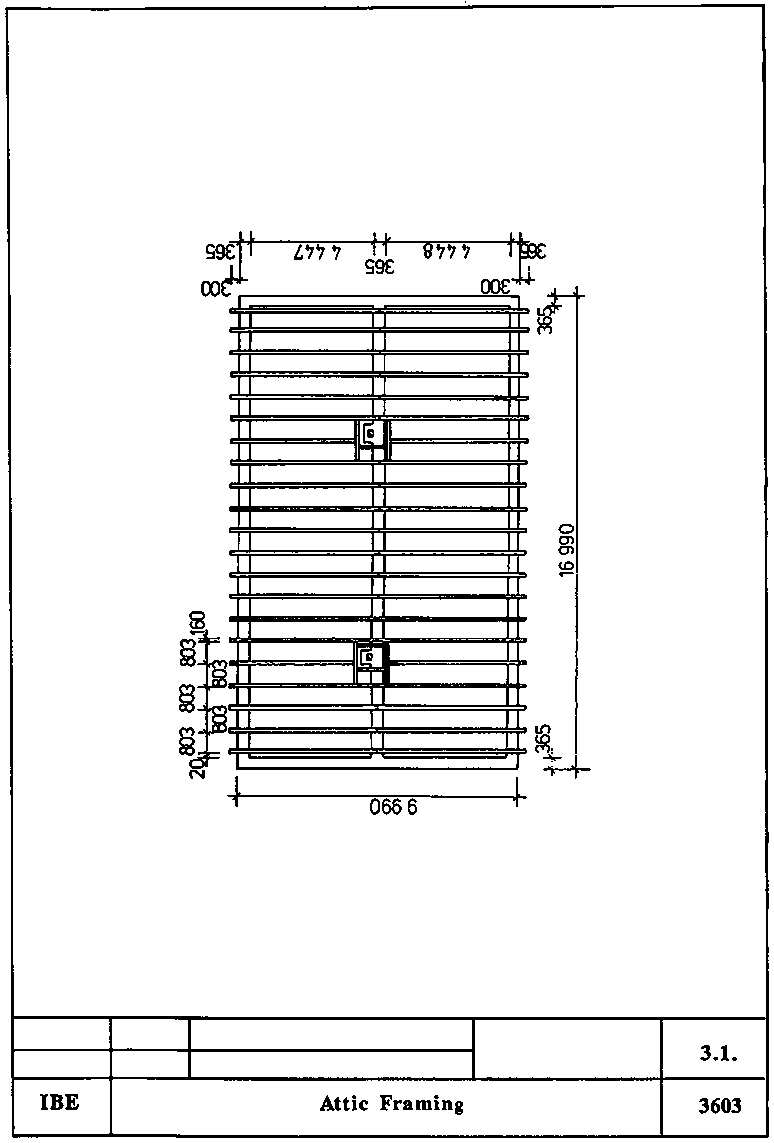
1. Determine the board length.
- 4100 mm long boards cover 5
bays
5 · 803 mm = 4015 mm |
Use attic framing drawing! |
|
- 20 bays would be 4 board lengths
4 · 4015 mm = 16060 mm. |
Roof base facing must cover the total length of the
building.
Length of building = 16990 mm.
4 board lengths are not feasible!
|
|
- Initial board

365 mm =
2874 mm
Length selected: 3000 mm |
Use attic framing drawing!
Initial board over 3 bays. Beam
distance from centre to centre! |
|
- Intermediate board 5 · 803 mm
= 4015 mm
Length selected: 4100 mm |
over 5 bays,
three joints = 15 bays |
|
- 
20 mm + 365 mm = 2071
mm
Length selected: 3000 mm |
over 2 bays, since 3 + 15 + 2 = 20 bays
The difference of 929
mm is required for closing the roof base facing. |
|
2. Determine the board width.
- Lay out eaves flashing in
scale 1:1, determine and measure the width:
face boards: 120 mm
width
bottom boards: 130 mm width |
Consider maximum board width.
See drawing of Instruction
Example 3.2.
Add about 10 mm for tongue and groove to be cut off. |
|
3. Determine the number of boards.
- Face boards: 120 mm
wide
2 · 2 = 4 boards 3000 mm long
3
· 2 = 6 boards 4100 mm long |
Use laid-out eaves flashing and determination of step 1 above.
|
|
- Bottom boards: 130 mm wide
2 · 2 = 4 boards 3000 mm long
3 · 2 = 6 boards 4100 mm long |
Roof base facing is to be provided at both sides of the couple
roof. |
|
- List of boards:
8 boards of 3.0 m length and 12 cm
width
12 boards of 4.1 m length and 12 cm width
8 boards of 3.0 m length
and 13 cm width
12 boards of 4.1 m length and 13 cm width. |
|
|
4. Select boards of adequate length and width in timber yard.
|
Consider surface quality, too! |
|
5. Store boards according to width at the side of the circular
saw bench. |
Make sure that there is enough freedom to move! |
|
6. Saw boards to width.
Board (1) 120 mm
Board (2) 120 mm
+ tongue length
Board (3) 111 mm + tongue length
Board (4)
110 mm |
Use laid-out eaves flashing.
(See drawing of Instruction
Example 3.2.).
Think of tongue length.
Use stop at circular saw
bench!
1 mm on board 3 is needed for smoothing of the surface.
(See
drawing of Instruction Example 3.2.) |
|
7. Chamfer boards
- Chamfer boards (1) and (4) at the groove
side.
- Chamfer board (2) at the tongue side.
- Chamfer board (3) at three
sides and smooth visible projection. |
Put board flat on work bench.
Maximum chamfer 3 mm. Planed
side to be on top.
Clamp board edgewise on work bench and plane off to 110
mm. Lay board flat and chamfer at tongue and groove sides.
Turn board over
(rough side on top) and smooth visible areas. |
|
8. Store boards for transportation. |
Protect stored boards against possible damage during storage!
|