Instruction Example 3.2.: Making of a Roof Base Facing
The wooden beam heads projecting by 300 mm are to be covered by
a roof base facing.
Material
Prepared face and bottom boards
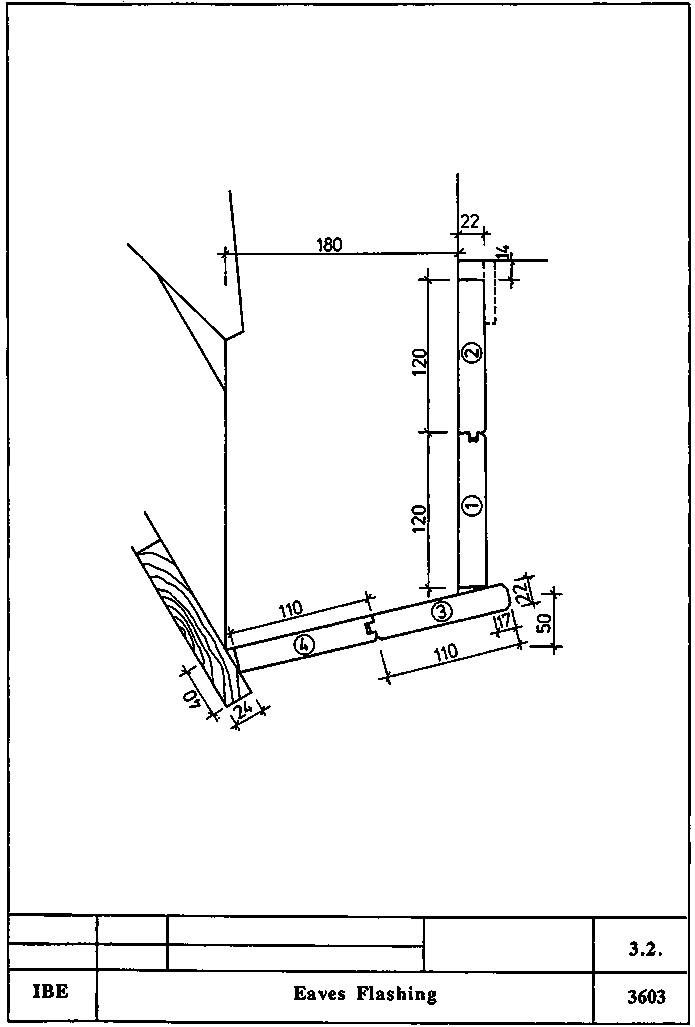
Figure
Hand tools
Hammer, frame saw, wrecking bar with claw, nail punch
Measuring and testing means
Folding rule, bevel protractor
Auxiliary accessories
Pencil, measuring rod 4015 mm long, cleat, nails 3.1/80, 2.8/70
Necessary previous knowledge
Reading of drawings, measuring and testing, sawing, scribing,
nailing, nail punching.
|
Sequence of operations |
Comments |
|
1. Check the scaffolding. |
Working direction from left to right.
Stability, bracing,
covering of uprights, guard rail. |
|
2. Store boards on scaffolding.
Store face and bottom board,
as well as different lengths separately. |
Ensure freedom of movement! |
|
3. Cut square initial board (1) at right end. |
Use try square.
Saw off only as much as necessary to produce
a square section. |
|
4. Place and fasten provisionally board (1). |
Place right end of board centrically at 4th beam head.
Place
cleat as stop at cross-grained end of beam head.
Fasten board provisionally
on beam heads 1 and 3.
Use nails 2.8/70. Drive nails in only as deep as to
permit their removal later on! |
|
5. Scribe initial board. |
Align over gable wall and scribe-mark. |
|
6. Take off initial board and scribe angular line. |
Use a try square.
Don't remove provisionally fastened
nails!
(Nail holes in beam heads and nails in board guarantee exact fit!)
|
|
7. Saw initial board to length. |
Saw square! |
|
8. Place measuring rod at initial board (1) and transfer size.
|
Do it exactly! |
|
9. Nail initial board (1). |
Locate points of nails in the board in nail holes in the beam
head and drive in the nails.
Do not completely drive in the nail at the
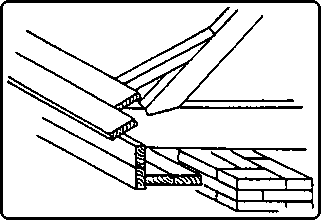
groove side of the board to permit insertion of the tongue of board (2). |
|
10. Scribe and saw to length initial boards (2), (3) and (4).
|
Measuring rod to be placed flush.
Use try square.
Saw
exactly square! |
|
11. Nail initial board (2). |
Insert tongue in groove of board (1) and press it in with lever
pressure.
Place cleat at plasterwork. Exert gentle pressure with wrecking
bar.
Drive in two 2.8/70 nails per beam head.
Make sure it is flush with
board (1). |
|
12. Nail initial boards (3) and (4). |
Insert tongue in groove of boards and place boards.
Set
marking gauge for projection (15 mm) and adjust board (3).
Make sure it is
flush with board (1).
Drive in two 3.1/80 nails per beam head. |
|
13. Place measuring rod of 4015 mm length over the next beam
heads and check the size. |
Place it from centre to centre of beam heads.
Check over the
entire facade. |
|
14. Scribe and saw to length all four boards for the other
joints of the roof base facing according to the checked size. |
Use a try square.
Saw exactly square. |
|
15. Nail roof base facing boards. |
Nail the boards joint by joint proceeding similarly as with the
first joint (initital boards). |
|
16. Saw square at left end and fasten provisionally final board
(1). |
Use a try square.
Do not drive in nails completely. |
|
17. Scribe length of board. |
Align over gable wall and scribe size. |
|
18. Take off, scribe and saw to length final board (1). |
Use a try square. |
|
19. Place measuring road at final board and transfer length.
|
Place flush at one end.
Place measuring rod parallell. |
|
20. Scribe and saw to length final boards (2), (3) and (4)
according to size taken. |
Place measuring rod exactly.
Use a try square.
Do not let
the cuttings break off when sawing off!
(Cuttings are to be used for closing
the roof base facing) |
|
21. Nail final boards. |
09 Consider type of nails! |
|
22. Close roof base facing at both ends. |
Use the cuttings.
Place, scribe, saw and insert the board
pieces individually.
Use 2.8/70 nails. |
|
23. Nail the roof base facing. |
Nail in the centre of the beam bays
- through board (3) in
board (1)
- through eaves board in board (4).
Use 2.8/70 nails. |
|
24. Clean the work place. |
Pick up wooden cuttings and clean scaffolding. |