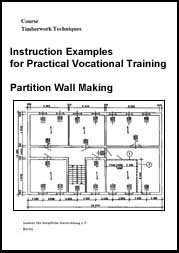
Instruction Example 5.6.: Assembly and Erection of the Partition Wall
The partition wall shown in the detailed drawing shall be
built-in.
It is assumed that:
- all structural components have been provided with
the necessary wood joints,
- all structural components have been made available in the
existing room, where the partition wall is to be built in, in assorted
stacks.

Figure
Hand tools
Hammer, hand saw, firmer chisel
Measuring and testing means
Folding rule, carpenter’s square, water-level
Auxiliary accessories
Pencil, 3.4/80 nails, wooden wedges, cover strap 80 mm wide, 20
mm thick and 450 mm long, scaffolding material (two one-ell trestles,
scaffolding boards 200 mm wide, 4000 mm long, 5 pcs.), cleats, drawing
Necessary previous knowledge
Aligning of timberwork
|
Sequence of operations |
Comments |
|
1. Scribe alignment lines on the floor. |
- Lay out the foot runners.
- Mind the joining side of runner
(1) (door size is fixed).
- Read the sizes for the position of the walls in
the drawing and set the runners accordingly.
- Scribe along the runners at
the joining side and provide scribed lines with mark (bird’s-mouth).
-
Decide on the wall to be erected first based on how the foot runners meet and on
the existing building clearance (see drawing)! |
|
2. Put the foot runner (1) on the floor near the scribed line.
|
- Think of door size!
- In this example the joining side lies
on the floor. |
|
3. Mount wall post in foot runner. |
- Pay attention to joining side and jointing mark of post.
-
Plug tenon into mortise and, if necessary, hammer in gently.
- When hammering
put cleat on tenon parapet.
- Do not forcefully hammer the post into the
mortise to avoid splitting of the wood!
- If tenon does not fit in spite of
gentle hammering, re-work tenon or mortise by means of firmer chisel. |
|
4. Mount stiffening transom in wall post. |
- Pay attention to the joining side.
- See comments on step 3
above! |
|
5. Mount post 2 in foot runner. |
- Plug tenon of stiffening transom into mortise of post.
-
See step 3. |
|
6. Mount stiffening transom in post 2. |
|
|
7. Mount post 3. |
|
|
8. Mount door post and door fixing post in foot runner. |
|
|
9. Mount door lintel transom. |
- Pay attention to joining side! |
|
10. Mount posts and stiffening transoms successively up to
corner post. |
- See comments on step 3. |
|
11. Mount tail posts in door lintel transom. |
- Pay attention to joining side.
- Plug mortises on tenons
from the left end of the runner and hammer-on the runner.
- Underlay cleat
when hammering.
- Hammer sensitively, otherwise joints may part again.
-
Slightly enter all tenons into mortises successively first and then hammer-on
the runner tightly. |
|
13. Nail the tenons. |
- Check the joint for close fit, press together again, if
necessary.
- Drive-in the nail in oblique but horizontal position.
(There
must be sufficient wood at the joining side but the nail must still penetrate
the tenon!) |
|
14. Erect the wall (1). |
- Press the wall upwards at both sides.
- Ensure equal
pressure at the corner post and wall post! The nailed joints must not loosen
again. |
|
15. Align wall (1) to alignment line and perpendicularly. |
- Move foot runner according to scribed marking on the floor
(hammer gently, if necessary).
- Joining side must be flush with scribed line
on the floor.
- Use water-level for perpendicular alignment. |
|
16. Wedge the erected wall. |
- Drive-in wooden wedges between ceiling and head runner.
-
Do not shorten wedges yet. |
|
17. Put foot runner of wall (2) on the floor near the scribed
line. |
- Pay attention to joining side. |
|
18. Mount the corner post. |
- Pay attention to jointing mark.
- See comments on the
assembly of wall (1)! |
|
19. Mount posts and stiffening transoms successively up to wall
post. |
- Pay attention to joining side and jointing mark. |
|
20. Nail the tenons. |
- Place nails in oblique position. |
|
21. Align wall (2) to alignment line on the floor and
perpendicularly. |
- If necessary, drive wall (1) a little outwards at the corner
post so that wall (2) can be driven in.
Then drive wall (1) to wall (2)
again. |
|
22. Wedge the two walls between ceiling and head runner. |
- Work from trestle scaffolding.
- Slightly hammer the wedges
and scribe the runner edge.
- Successively loosen, saw-off and drive-in again
the wedges, one after another.
- For tightening, use a wooden section to be
put on the cross-grained wood of the wedge.
- Do not drive in the wedges
forcefully.
- Wedge at both sides of the head runner. |