4. Tool Guiding Possibilities
Stop strips or a stop rule can be attached to the machine table
surface for tool guidance.
The table surface features tap bores to retain the holding
screws for the stops. In addition, the stops can be held by means of screw
clamps.
Curved models can be prepared at the locator pin.
Commensurately, the locator pin can be raised at various heights above the table
surface.
The tool shall not touch the locator pin. Tool and locator pin
can otherwise be damaged and there is a considerable accident risk. The model
only has a very small bearing surface at the locator pin and should, therefore
be of particularly hard and durable material.
Special guide facilities must be prepared for milling operations
with varying milling directions within the range of broad surfaces and for
milling contours. Thereby, the sequence of the milled profile is determined by
the sequence of the locator slot in the lower face of the guidance facility.
During this process the locator pin is in the locator groove and serves as stop.
The top side of the guide facility features stops and holding possibilities for
the workpiece being processed.
In the Instruction Example 05.3. “Quarter Chamfer and Half
Chamfer” the handling of a copying facility as guide device is described.
The following should be heeded when setting up this facility:
- the device must be easy and safe to handle
-
during processing the workpiece shall not change its position in the device
-
the locator pin must slide easily into the locator groove
Stops and guide strips are screwed, glued or nailed to the base
plate.
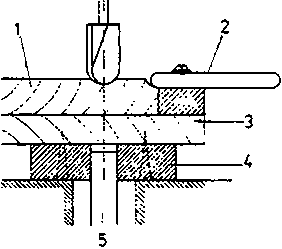
Figure 9 - Cross-section of a
copying device
1 workpiece, 2 workpiece chucking facility, 3
base plate, 4 guide strip, 5 locator
pin


