3. Preparations for Planing
Sharpening of Plan Irons
Planes having a dull cutting edge require strenuous planing
efforts and leave improper surfaces.
Dull plane irons have to be sharpened!
For sharpening of the plane iron, it is removed from the plane
stock by means of blows of a hammer on the impact button.
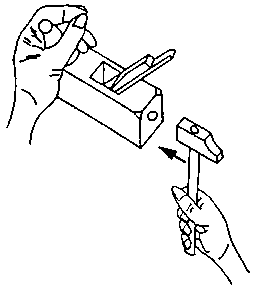
Figure 6 Removal of the plane iron
from the plane stock
Double plane
It is not allowed to beat onto the
cutting edge of the plane iron!
- The flap at the plane iron is loosened and removed
by means of a screw driver.
The plane iron is sharpened in two working steps:
- The plane iron is ground by means of a grinding
wheel.
. The plane iron cutting edge has to be
kept in opposite direction to the direction of rotation wheel.
. In order to avoid burning out of the cutting edge, the
grinding wheel is permanently moistened with water.
. The plane iron is clamped into a movable clamping device, if
possible.
. The wedge angle to be adjusted in this connection at the plane
iron shall be 25° to 30°.
. The wedge angle at the plane iron can be checked by means of a
protractor.
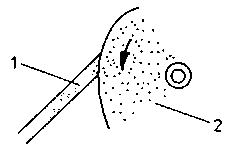
Figure 7 Grinding of the plane iron
by a grinding wheel
1 plane iron cutting edge, 2 grinding wheel
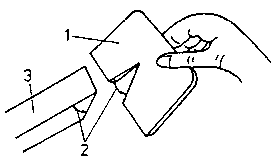
Figure 8 Checking of the wedge angle
at the plane iron
1 protractor, 2 wedge angle, 3 plane iron
Task
Manufacture a reference gauge with an opening angle of 30°
from a piece of plywood or similar solid material.
- Grinding of the plane iron has to be effected
until the flank has uniform concaving and the cutting edge is square to the
plane iron edge.
Figure 9 shows correctly and incorrectly ground cutting edges.
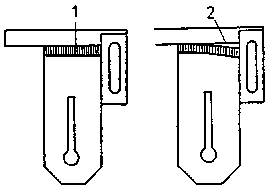
Figure 9 Square grinding of the plane
iron cutting edge
1 correctly ground, 2 incorrectly ground
- Subsequently, the plane iron is stoned on a
whet-stone made of natural or synthetic material and the burrs produced by
grinding are removed. In order to achieve the required sharpness of the cutting
edge, the following working steps have to be carried out:
. moisten the whet-stone with oil or
water;
. place the flank and the cutting face of the plane iron onto
the stone in alternating mode and move them over the entire surface with
circular moves until the burrs are taken off and the cutting edge is
sharpened.
- When stoning the plane irons of the double plane
and the adjustable iron plane, the edge corners have to be slightly rounded.
- Plane irons for jack planes or planes having shaped faces are
ground by means of special devices and grinding stones according to their shapes
of the cutting edges.
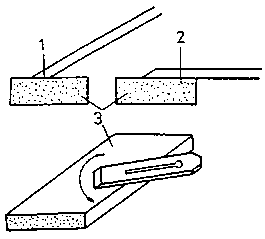
Figure 10 Stoning of the plane iron
1 flank, 2 cutting face, 3 whet-stone
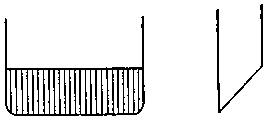
Figure 11 Rounding of edge corners at
the plane iron
What characteristic features must a well sharpened plane iron
have?
__________________________________________________
Why is it necessary that the edge corners (between primary and
secondary cutting edges) are slightly rounded?
__________________________________________________
After sharpening, the plane iron is inserted. In this
connection, it has to be taken care for:
- adjusting the shaving thickness intended until the
desired excess length of the plane iron at the face is achieved;
- final wedging of the plane iron.
The correct adjustment of the flap with its breaking
edge to the plane iron cutting edge and to the breaking edge in the face opening
is very important for reaching a smooth surface when planing! Exactly adjusted
and sharp planes "hiss" during planing!
Maintenance of Planes
The face of a plane has to be completely flat. But after having
used it for a long period, it is worn before the cutting edge to a greater
extent than behind it and that is why it has to be levelled at certain
intervals.
Levelling is effected as follows:
- retract and wedge the plane iron,
- place
abrasive paper onto a solid and even surface,
- grind the face on the
abrasive paper until it is flat again,
- oil the face.
In case of greater unevenness at the face it has to be planed by
means of a plane prior to grinding. The face opening is enlarged and the
distance between the breaking edges is also increased by frequent levelling of
the face. In order to re-establish the right distance it is possible to insert
an appropriately shaped piece of hardwood into the face. The face must be
levelled, ground and oiled after the adhesive is hardened.
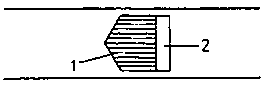
Figure 12 Insertion of a piece of
hardwood into the plane face
1 inserted piece of hardwood, 2 face opening
Preparation of Workpieces and Workplace
Workpieces to be planed must completely be free of:
- impurities caused by sand, coarse dust or sticking
impurities of other kind;
- paints and paint traces soaked into the
wood;
- nails, bolts or other metallic parts.
The following wood is not suited to be planed:
- Wood showing growth defects such
as:
. great knots,
. splits,
. arched
or wrenched grain structure;
- organic defects such as:
. insect
pest,
.decay,
- too high moisture content.
For planing, a working height of 700 mm to 800 mm is advisable.
In the workshop, the workpieces are fixed into a carpenters' bench. Long
workpieces are supported by a stand adjustable in height at the end which is not
fixed.
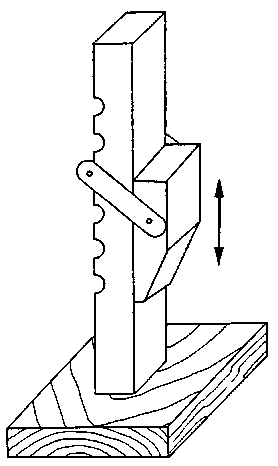
Figure 13 Adjustable workpiece stand
For site work, the trainee can manufacture a workbench by
himself. It consists of:
- stand made of squared timber,
- braces made of
slats or boards,
- plate made of boards, at least 30 mm thick.
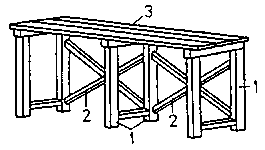
Figure 14 Site workbench
1 squared timber, 2 braces, 3 plate
A clamping board and a stop strip nailed onto the plate hold the
workpiece in place in working direction and laterally when planing. The
thickness of the clamping board and of the stop strip should always be smaller
than the workpiece to be planed.

Figure 15 Clamping board to plane on
sites
1 clamping board, 2 stop strip, 3 workpiece
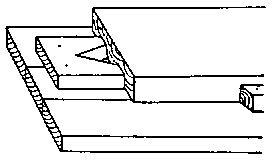
Figure 16 Clamping board and strip as
stops for planing of the work-piece thickness
Working Rules for Planing
The correct working direction for planing of workpieces in
longitudinal direction is always in the direction of the ascending wood grains.

Figure 17 Correct working direction
for planing
1 direction of wood grains, 2 working direction
When planing against the direction of the grains, no
smooth surface can be achieved!
It is possible to plane across the direction of the grains up to
an angle of 45°.
When planing narrow faces of cross-cut wood (sectional area) the
plane must be moved only up to the centre of the face. The thickness of the
shavings to be cut is dependent on the plane iron's excess length over the face.
The excess length is varying according to quality requirements
and its adjustment must be tested:
- great excess length of the plane iron requires
strenuous effort for planing and leaves uneven surfaces;
- little excess length requires little efforts and leaves flat
and smooth surfaces.
The following rules are valid for working with planes:
- The workpiece has to be fixed or has to be secured
immovably in working direction.
- The plane iron has to be sharp and the
plane must be in working order.
- Both hands press and push against the
plane:
. When starting pressure is applied at
the front on the plane.
. The face must always be placed on the wood with its
entire surface.
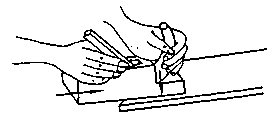
Figure 18 Applying the plane
(starting of planing)
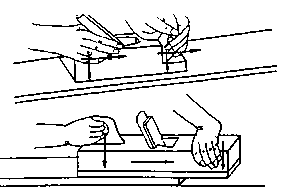
Figure 19 Moving the plane
. When finishing, pressure is applied at
the rear on the plane;
. when returning, the plane is tilted
laterally.

Figure 20 Taking off the plane
(finishing of planing)

Figure 21 Returning the plane
What basic rules have to be observed when planing?
__________________________________________________
The flatness of planed surfaces is checked by:
- Comparison of the planed surface with a straight
strip (straightedge) according to the light-gap method.
- Sighting over two parallel strips arranged
crosswise
. the surface is flat when the edges of
the strips are congruent;
. the surface is not flat (inclined) when the edges
are not congruent.
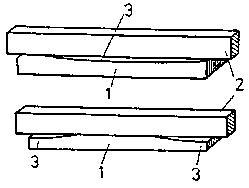
Figure 22 Checking of straightness of
the workpiece
1 workpiece, 2 strip (or straightedge), 3 light gap
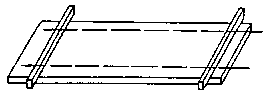
Figure 23 Checking of flatness of the
surface by sighting over 2 strips
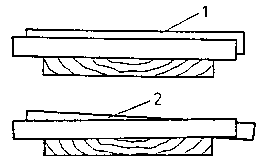
Figure 24 Checking of flatness of the
surface by sighting over 2 strips
1 surface is flat, 2 surface is not
flat