
| Carpentry for Vocational Schools - A Teacher's handbook (GTZ, 252 p.) | ||||
| 10. BRACING | ||||
| (introduction...) | ||||
| 10.1. Structurally | ||||
| 10.2. Wallframe | ||||
| 10.3. Braces | ||||
|
| ||||||||||||||||||||||||||||||
TOPIC: 10. BRACING
INTRODUCTION: This topic teaches students the purpose of braces and how braces are fitted correctly.
OBJECTIVES: Students should be able to define the purpose of braces and how braces are fitted correctly to give the wallframe the strength necessary to carry the load of the roof.
METHOD: We prepare four boards, nails and a hammer for this lesson.
For better understanding of the purpose of braces, demonstrate the weakness of an rectangle by nailing the four boards into a rectangle. Let students try to press it from two opposite corners and they will realise that the shape has not much strength.
Now nail the boards into a triangular shape and let students try to press it out of shape. They will realise that it is not possible.
When possible show students walls which are already braced to give some idea of how braces are fitted correctly.
NOTE: At the end of this section we prepare a worksheet to reinforce this topic.
a) Rectangle: - If you press a rectangle from two opposite corners together, you find that the frame is easily distorted and the rectangle is structurally weak.
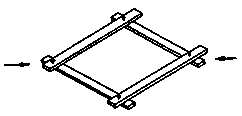
Figure
b) Triangle: - If you press a triangle from two corners together, you find that the frame does not give. It is rigid. The triangle is structurally strong.
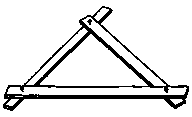
Figure
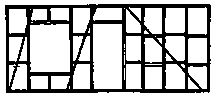
a) Rectangle: - The wall frame of a house is a rectangle made of many smaller rectangles and squares and is therefore weak.

Figure
b) Triangle: - To make a wall frame stronger we must include some triangles in the frame. We do this by fixing braces to it.
Figure
The more braces that are fixed to the wall frame the more rigid it becomes. Braces must go from bottom plate to top plate at as low an angle as possible. Before braces are fixed to the frame you must check that the frame is square. This is best done by measuring the diagonals while the frame is lying horizontal on a flat surface.
If the frame is squared and braced before it is erected, you can be sure the external corners are plumb.
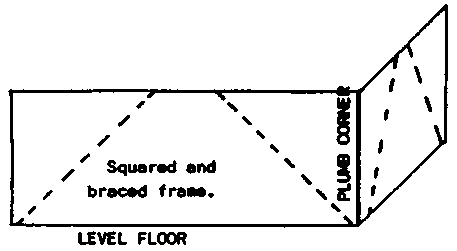
Figure
 |
 |
