Back to Home
Page of CD3WD Project or Back to list of CD3WD Publications
 |  |  | Surface Water Drainage for Low-Income Communities (UNEP - WHO, 1991, 98 p.) |  |  | 3. Rehabilitation and maintenance | |  | 3.1 Causes of drainage failure | | | 3.2 Rehabilitation of existing systems | | | 3.3 Maintenance - technical aspects | | | 3.4 Maintenance - institutional aspects | | | 3.5 Selected reading |
|
Surface Water Drainage for Low-Income Communities (UNEP - WHO, 1991, 98 p.)
3. Rehabilitation and maintenance
3.1 Causes of drainage failure
Some communities suffer from drainage problems not because they
have no drains, but because the existing drainage system has collapsed, become
blocked, or is otherwise in need of repair and rehabilitation. Many more will
find that the nearest convenient point of discharge for a new drainage system is
an existing primary drainage pipe or canal that needs attention if it is to
function properly.
Collapse and blockage are the principal types of drainage
failure. Each of these can have several causes. Collapse of drains can occur
through:
- erosion of the bottom and sides of the drain
(scouring);
- excessive pressure of water in the ground beneath and beside
the drain lining;
- vehicles passing over or too close beside the
drains;
- root growth, especially from nearby trees;
- crown corrosion in
closed drains containing sewage.
The causes of blockage can be:
- accumulation of refuse, leaves and earth in the
drain;
- structures such as houses or bridge piers erected in the drain and
obstructing the flow;
- excessive vegetation growing in drainage
channels;
- silt deposited in low sections owing to misalignment or where the
slope is insufficient and cleaning is not regular enough.
If rehabilitation of a failed system is to have a good chance of
success, diagnosis and elimination of the original causes of failure are
required as well as treatment of the immediate symptoms. Each possible cause of
collapse has its cure.
(a) Erosion in an unlined channel is
illustrated in Fig. 21 (page 39) along with the appropriate remedies. In a lined
drain, erosion can mean the lining itself is not robust enough, and a more
resistant lining is needed. A common weak point is at the joints between channel
or pipe elements, which should be sealed with cement mortar. Where the slope is
greater than 10%, baffles or steps of some kind are needed (see Fig. 6, page
17). Scouring on the outside of a channel lining can mean that water is not
entering the drain but running parallel to it. If the lining rises above ground
level, it needs notches in the sides so that the water can flow in. Small earth
banks running diagonally across the road will also help to divert water to the
drain at the side. Alternatively, scouring beside the drain can mean that it
overflows during storms, indicating that more frequent cleaning, a larger drain,
or more frequent turnouts are required (see Fig. 5, page 16). In closed drains
that are overloaded, water can escape into the ground through the joints owing
to the pressure inside the pipe. When the pressure drops, the water runs back
into the drain, carrying soil with it and excavating a cavity over the drain
which will eventually collapse. The solution is to seal the joints with cement
grout or, preferably, to build a larger drain.
(b) Water pressure from the outside or pressure
resulting from the swelling of clay can be controlled by using a sand bedding
(see Fig. 15, page 29) and providing weepholes in the lining (see Fig. 11, page
25).
(c) Vehicles can easily damage open drains. If
vehicle damage recurs frequently, the drains should be protected by some form of
barrier such as a rail or a kerbstone. If the damage is due to vehicles
attempting to cross the drain, then an adequate vehicle crossing should be built
over it. Vehicle damage to covered drains indicates that they should either be
laid deeper or be protected by concrete.
(d) Roots from nearby trees will tend to grow into
drains, especially if they contain standing water and the linings are not
impermeable. The most effective protection, if the problem persists, is to
remove all trees within 5 m of the drain.
(e) Crown corrosion occurs in closed drains
containing sewage, where gases from the sewage can attack and weaken cement,
particularly over the crown or cover of the drain.
The cures for most of the causes of blockage are fairly easy to
see: collection of refuse, removal of structures, and clearing of vegetation. If
the drains have an even and adequate slope, it should not be necessary to remove
silt; clearing the vegetation, whose roots hold the silt in place, should enable
the next heavy flow in the drain to wash it away.
However, the slope is not always even. The drain may have been
badly laid, the sand bedding beneath some sections may have been eroded causing
them to sink, or the lack of weepholes or a sand bedding may have caused the
lining to be lifted by the pressure of water from the surrounding ground. Uneven
settlement of the ground is common in flat areas of clay soil, and is another
cause of uneven slope. Damage by vehicles and earthquakes can also cause
distortion, or even misalignment of sections of drainage channel or pipe,
resulting in blockage by sediment or other solids. In such cases, the drains
should be rebuilt to an even slope, although slight irregularities can be
corrected by filling in the depressions with cement mortar.
Finally, the drain itself may be in good condition, but may fail
to function correctly owing to insufficient capacity. Even a drain that was
large enough when built may prove to be too small for the increases in runoff
flow which accompany increased building development in the catchment
area.
3.2 Rehabilitation of existing systems
There are many drainage systems in urban areas that are
functioning imperfectly or not at all owing to one or more of the causes of
failure listed in the previous section. Before a new system is envisaged, the
first step is to ascertain whether a drainage system already exists and whether
it can be rehabilitated. Local residents will normally know if one exists in
their area, but they may not be aware of existing main drains, especially closed
drains, which are outside their neighbourhood, and into which a future local
micro-drainage system could discharge.
Municipal records, including old drainage master plans, should
be consulted for details of any previous drainage construction in the vicinity,
and the area should be visited on foot to check their accuracy and to look for
tell-tale signs such as old manholes, or pieces of pipe or concrete exposed by
erosion, especially along major streets and downstream of the area where better
drainage is needed.
Remove cover slabs from drainage channels, taking care that
there is no risk of pedestrians' or vehicles' falling into them accidentally.
Starting at the downstream end, remove silt and solids. Special tools for
cleaning channels are described in section 3.3. After clearing, flush the
drainage line with water. The fire services may be able to help with this.
Inspection of closed drains
The inspection of closed drains is more difficult and dangerous,
and should be carried out under expert supervision. The first step is to draw a
sketch map of the system, if record drawings are not available. The map should
show all existing manholes, inlets and other drainage structures. If the gap
between any two manholes is very long compared to that between most others, it
is likely that one or two other manholes have been buried or destroyed between
them. From the regular manhole spacing, it should be possible to calculate the
most likely location of a missing manhole. Local residents, who may know of
buried manholes, should also be consulted. The probable sites of missing
manholes should be excavated, to uncover them.
No one should enter any manhole until it has been adequately
ventilated. As a precaution, the manholes upstream and downstream of the section
to be inspected should be opened at least two hours beforehand. To save time, a
number of manholes can be opened simultaneously. Further ventilation can be
achieved by introducing the air hose from a compressor, if one is available.
Inspection should start as far downstream as possible, and work upstream. Water
in flooded manholes should be pumped out to the next manhole downstream using a
sump pump, of the type used by construction firms for excavations.
Alternatively, the water could be baled out with buckets or removed with a
siphon, but this is likely to take a very long time.
Once the manhole has been ventilated, a further safety check is
necessary to ensure that it is safe to enter. A lighted candle or a miner's
safety lamp is lowered into the manhole. If the flame dies, it means that there
is insufficient oxygen inside and that anyone entering the manhole could be
suffocated by the gases produced by sewage and sediment. However, no naked light
should be used until the manhole has been ventilated, as it could cause those
gases to explode.
A final safety precaution, no less necessary, is that no one
should enter a manhole without a lifeline. A spare lifeline should be ready for
use if necessary. Access steps in an old manhole are liable to be seriously
corroded and much less secure than they appear. They are often slippery. At
least two people should remain above ground to pull out the third member of the
party in case of emergency. They should never follow the third member
into the manhole, even in an emergency, as they could all be killed. Even if the
manhole is properly vented, the person inspecting it should disturb the settled
sludge and silt as little as possible. These sometimes contain poisonous gases,
which could be released when the sediment is agitated. If a drain is completely
blocked so that it cannot be inspected, material should be removed only from the
upstream end. These safety precautions are illustrated in Fig. 22.
The alignment of a closed drain can be checked by two people in
consecutive manholes using a flashlight and a mirror, as shown in Fig. 23. First
the flashlight and the mirror are held within 5-10 cm of the bottom of the pipe
(known as the invert), and then they are both raised to just below the crown. If
there is any irregularity in the vertical alignment of the drain pipe, it will
be detected in one of these positions, since it will obscure the flashlight
beam. This procedure will also make minor defects and obstructions visible.
The most likely place to find cracks and misalignment is
immediately adjacent to the manhole, owing to uneven settlement of the ground
after pipe-laying (Fig. 24). Another problem to look for is crown corrosion,
which can easily be discovered by attempting to dig into the pipe material at
the sides and top with a penknife or a large nail.
Drainage pipes of less than 1 m in diameter cannot be entered
safely, and great care should be taken in entering larger drains. The dangers
include poisonous gas, cave-ins, sudden rushes of water from clogged sections or
from storms, and even wild animals. Naked lights such as matches or candles
should not be used in a closed sewer or within 3 m of any open manhole. A
miner's safety lamp is preferable to a flashlight, to avoid the risk of
explosions.
Fig. 22. Safety in entering closed
drains
Fig. 23. Checking the alignment of
closed drains
Rehabilitation
Some sections may require complete rebuilding, but others may
only need to be cleared of obstructions and flushed with water. Deteriorated or
cracked concrete or masonry should be made good, care being taken to avoid major
irregularities, especially at joints, which may hold back solid objects and
cause blockage. The surface to be repaired should be roughened by hitting it
with a sledge hammer, and then plastered with good quality cement mortar. If
plastering is needed on the bottom of the drain, first divert the water flow
away from the working area by building a small dam of earth or sandbags and
digging a temporary parallel channel or by pumping.
Fig. 24. Common failure sites in
closed drains
Some fittings may be damaged or have disappeared, especially
metallic ones such as manhole covers, inlet screens and grilles, which may have
been stolen and sold as scrap metal. The community may decide to replace these
with concrete equivalents, or to fix metal screens into concrete. This makes
drain maintenance a little less easy, but minimizes theft if it is a problem. If
closed sections are frequently blocked by refuse, additional screens should be
installed at the upstream end to keep the refuse out (see section 2.5). Existing
covers and inlets should be cleaned, and repaired or replaced if necessary, and
steel fittings painted with two coats of tar or primer paint.
If the drainage system has sluice gates (Fig. 25), the handle,
plates and guide channels in the frame should be checked. Rust and old paint
should be removed with a steel brush. Any holes should be patched by welding a
steel plate over them. The gate and frame should be painted with three or four
coats of an epoxy or other equally durable type of paint. The stem and guide
plates should be well greased.
Fig. 25. Requirements for
maintenance of sluice
gates
3.3 Maintenance - technical aspects
The most important maintenance task is to remove refuse, silt
and other solid material from the drains. All drains should be cleaned at least
twice a year, preferably at the start and end of the rainy season. Some drains,
especially the secondary drains and house connections, will need to be cleared
more frequently. Small open channels in flat areas are likely to require
cleaning on a weekly basis. Unlined channels need to be regularly cleared of
vegetation.
It is important to establish the cleaning of drains as a routine
activity at regular intervals, and not wait until the system fails as a result
of blockage. Repairing the damage done when the system fails, including damage
to the drains themselves, can cost far more than regular preventive maintenance.
Drain clearing must be coordinated with the collection and
disposal of solid waste, so that solid material removed from the drains will not
be left where rain can wash it back or where it can be a nuisance and a health
hazard, encouraging the breeding of rats and flies.
Open channels
Cleaning of open channels is usually done manually, with the
help of spades, hoes, shovels and scoops. It can be disagreeable and strenuous
work if it is done with the wrong tools, especially if the drains are deep. It
is worthwhile having some special tools that can clean the drains over their
whole length, such as shovels that just fit into the drain.
One tool that has proved to be useful for cleaning deep and
narrow drains is an agricultural hoe with an extra-long handle (Fig. 26).
Fig. 26. Tools for cleaning
drains
Another tool, also shown in Fig. 26, is the Ahmed-Davis shovel.
This was developed in Tunisia, where it was found to reduce cleaning time by
30%. One person pushes the shovel deep into the drain using the handle, and then
the other pulls it forward and upward using the steel wires attached to the
front end. The size and shape of the shovel are determined by the size and shape
of the drains. It may help to pierce several small holes in the bottom of the
shovel so that water in the solids from the drain can run out when the shovel is
lifted.
The responsibility for maintenance of a system of drainage
channels is often divided between several residents, neighbourhoods or work
teams, each responsible for a particular section. If so, it is advisable to
install grilles across the channels at the downstream end of each section. This
ensures that solids are not carried along to the next section, imposing an
excessive burden on that section's team.
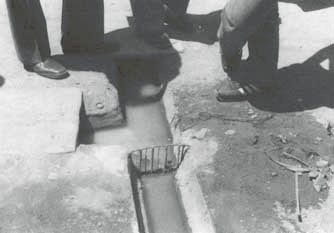
A grille in a small drainage
channel. Grilles such as this retain rubbish near the point where it enters the
channel, so that the responsibility for cleaning each section can be fairly
divided.
Photo: S. Cairncross
Closed drains
In the cleaning of closed drains, all the safety precautions
described in section 3.2 should be scrupulously observed.
The most common tool used in removing silt and solids is a
bucket tied in the middle of a steel cable (Fig. 27). The cable should be at
least twice as long as the longest distance between manholes. One end is
threaded into the drainage line with the bucket facing downstream, and wound on
to a windlass on the ground beside the next manhole. As the bucket is pulled
down the line, it scoops the solids and silt. The bucket diameter must be at
least 5 cm smaller than the internal diameter of the drainage pipe to allow
excess solids to pass around it, and ensure that the bucket does not become
jammed against obstructions.
Excessive force should not be used to pull the bucket if it
sticks, as this may compress the solids, making them still more difficult to
remove. Instead, it should be winched back and a smaller bucket or an auger
(described below) used for the first pass. When the bucket reaches the
downstream manhole, it should be removed with the solids and detached from the
cable. The cable is wound back and the bucket reattached. The procedure is
repeated until the drain is cleaned.
If the drainage line is blocked, or the solids are too stiff to
be removed using the bucket, the line can be cleared by an auger (Fig. 28). The
auger is like a large drill bit, and is rotated by means of a lever inserted
into one of a chain of connected driving rods. The rods are normally 10-15 mm in
diameter and made of stainless steel. Water trapped upstream of the blockage
does not have to be removed. When the auger penetrates the solids obstructing
the line, this water will help to flush the solids away.

Fig. 27. Cleaning of closed drains
using a bucket
Fig. 28. Cleaning of closed drains
using an
auger
3.4 Maintenance - institutional aspects
The need to coordinate drainage maintenance with solid waste
disposal has already been mentioned. Coordination is necessary for two reasons.
First, the solids removed from the drain must be adequately disposed of. Second,
the drains cannot be kept clear without effective solid waste disposal. If solid
wastes are not collected regularly, residents will have little choice but to
throw their rubbish into the drainage channels, or to dump it in the streets and
open spaces where it will be dispersed by stormwater, wind and animals, much of
it eventually reaching the drains. The most effective way to ensure good
coordination between drainage maintenance and refuse disposal is for both these
activities to be the responsibility of the same municipal department or
neighbourhood committee.
Maintenance, including the inspection, cleaning and repair of
the drainage system, must be institutionalized if it is to be kept up throughout
the life of the system. For this reason, the ultimate responsibility should
preferably be with the municipality, which has paid staff who can carry out the
work. It is much more difficult to mobilize a community on a voluntary basis to
carry out a routine task, year after year, than to win their active
participation for the limited period required for construction. Nevertheless,
there is ample scope for participation by the community in drainage maintenance.
Section 4 describes how this can be
organized.
3.5 Selected reading
Safety in sewers and at sewage works. London, Institution
of Civil Engineers, 1967.
FLINTOFF, F. Management of solid wastes in developing
countries. New Delhi, WHO Regional Office for South-East Asia, 1984 (WHO
Regional Publications, South-East Asia Series No.
1).


