6. Selected Technological Operations for Making Keyed Joints
The sequence of operations for making keyed joints are different
according to the respective type of key that shall be put in.
6.1. Taper Sunk Key Joints
Prefabrication of the slots
If keyed joints shall be made with the help of taper sunk keys,
grooves must be prepared in the parts to be joined, in order to receive the key.
These parts are machined by “milling”, “broaching” and
“shaping”. Mostly, the grooves are given the D 10 fit and must have
the taper of 1 in 100 in the hub.

Figure 19 - Individual parts
with prepared grooves
Testing the individual parts
The external condition and accuracy to size of the hub and shaft
have to be checked. In doing so, make sure that
- the shaft has a clean surface quality without
embossments;
- the bore of the hub is free of shoulders or ridges;
- length, width, depth and alignment of the shaft keyway as well
as the taper of the hub keyway (1:100) are true to size;
- the accuracy of fit of shaft and hub have been exactly
observed (check by external limit gauge or plug limit gauge).

Figure 20 - Checking of the
individual parts
1 length of shaft keyway, 2 depth of shaft
keyway, 3 fit of shaft, 4 alignment of shaft keyway, 5 width of shaft keyway, 6
width of hub keyway, 7 depth of hub keyway, 8 fit of hub, 9 inclination taper of
hub keyway
The clearance between shaft and hub must be kept very small,
otherwise the hub moves off the centre by as much as the size of play and cants
when the wedge is pressed in.
With high rotational speeds it may therefore come to great
balance errors. In order to prevent this it is recommended to joint shaft and
hub by a slight interference fit.
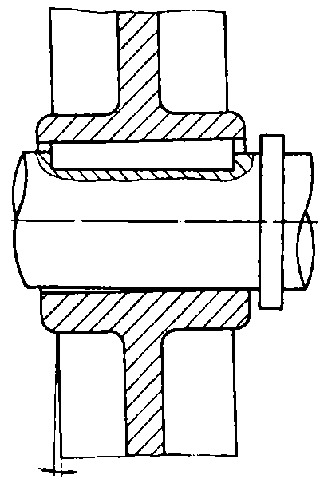
Figure 21 - Canting of hub and
shaft due to too much play
Deburring of the individual parts
The keys as well as the keyways in shaft and hub are checked for
burrs. Deburring is done by using a file or triangular scraper.
Fitting the key in the keyways
By slight driving-in of the tapered driving key in the keyway of
the joined machine parts by way of trial it is found out whether the back
surface carries well. For this purpose, one searches for drag marks or rubs the
back surface with chalk; in order to find out the bearing contact pattern.
Reworking is done by filling or scraping.

Figure 22 - Bearing contact
pattern
1 surface areas required
reworking
A similar procedure is followed with laid-in keys. As
distinguished from the tapered driving key, the laid-in key is inserted into the
shaft keyway and then the hub is driven on to the key.
Hints on the length of tapered driving keys
- After the test fitting, the respective key
is sawn to the required length, so that it does not project from the hub.
- The length of gib-head keys is fixed in such a way that after
the wedge is driven in the nose projects from the hub by the measure of the key
width.

Figure 23 - Gib-head key put
in place
1 width of gib-head key
Projecting gib-head keys must be protected by
suitable protective caps. Freely rotating machine parts with gib-head keys may
easily be the cause of an accident.
Assembling the individual parts
The shaft journal, the hub bore and the key are slightly
greased.
Laid-in keys and Woodruff keys are put in the shaft keyway; then
the hub is driven on to the shaft by press.

Figure 24 - Pressing-in of the
hub using laid-in keys
1 pressing-in force
Tapered driving keys are driven into the previously joined
individual parts with the help of a locksmith’s hammer and a cotter driver.
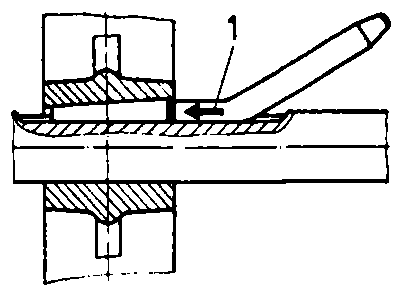
Figure 25 - Pressing-in of the
tapered driving key by means of cotter driver
1 pressing-in force
Long and big tapered driving keys are forced in by about sledges
and with the help of light metal backings. Neither the wedge nor the shaft and
hub must be damaged when the wedge is forced in.
Testing the joint
After the key is driven in it has to be made sure that
- the key fits tightly
- the hub is in the right
place on the shaft
- the hub rotates in truth on the shaft.
By what techniques are the grooves made in the
shafts?
_________________________________________________________________
_________________________________________________________________
_________________________________________________________________
By what techniques are the grooves made in the
hubs?
_________________________________________________________________
_________________________________________________________________
_________________________________________________________________
What qualities of the individual parts have to be examined if a
taper sunk key joint shall be
made?
_________________________________________________________________
_________________________________________________________________
_________________________________________________________________
What kind of fit is required between shaft and hub in case of
taper sunk key
joints?
_________________________________________________________________
_________________________________________________________________
_________________________________________________________________
6.2. Hollow Key and Flat Key Joints
- Preparation of the keyways:
Only hub keyways have to be made.
- Checking of the individual parts:
The external condition and accuracy to size of shaft
and hub as well as of the hub keyway have to be inspected.
- Deburring of the individual parts:
Key and hub keyway have to be deburred.
- Fitting the key into the keyway:
By way of trial it is found out whether the key fits
in the joined machine parts.
When using flat keys, the shaft has to be
flattened corresponding to the bottom surface of the wedge.

Figure 26 - Fitted in hollow
and flat keys
1 hollow key, 2 flat key
- Assembling the individual parts:
Shaft and hub are slightly greased and put together.
The key is driven in by a locksmith’s hammer and a cotter
driver.
- Testing of the joint:
After assembly, the firm fit of key and hub as well
as the true running are tested.
6.3. Tangential Key Joint
- Preparation of the keyways:
In each shaft and hub two oblique (tangential)
keyways have to be made which are staggered by 120°.
- Checking of the individual parts:
The external condition and accuracy to size of shaft
and hub as well as of the keyways have to be checked.
- Deburring of the individual parts:
Wedges and keyways have to be deburred.
- Fitting the keys into the keyway:
At first, keys 2 and 4 are put in, then keys 1 and
3; they are slightly forced in and reworked after their bearing contact pattern
has been inspected.
The inclined surfaces of keys 1 and 2 as well as 3
and 4 must be placed against one another for assembly.
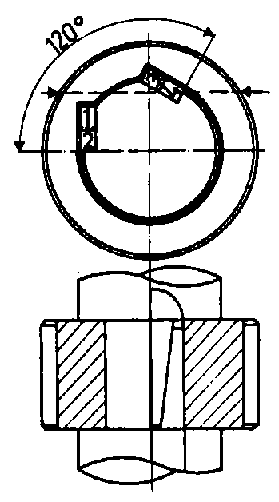
Figure 27 - Fitted in
tangential keys
- Assembling the individual parts:
Shaft and hub are slightly greased and put
together.
After that, keys 2 and 4 are inserted and then keys 1 and 3 beaten
in alternately.
- Testing of the joint:
After assembly, the firm fit of the keys and the hub
as well as the true running have to be tested.
How is the fit of the keys
examined?
_________________________________________________________________
_________________________________________________________________
_________________________________________________________________
What is tested after a shaft and hub joint is
made?
_________________________________________________________________
_________________________________________________________________
_________________________________________________________________
6.4. Particularities when Making Conical Connections
- Taper sleeves are adapted to conical shaft butts attaining
full bearing capacity by ink-marking and subsequent grinding and scraping.
- Taper pins as longitudinal keys are fitted in shaft and hub
joints by the tecique of reaming. For this purpose, shaft and hub are clamped
and bored and then reamed by taper reamers. Attention has to be paid that the
front ends of shaft and hub level with each other so that they are bored
accurately on the line of the shaft circumference.

Figure 28 - Conical joints
1 taper shank in taper sleeve, 2 taper pin
as key
6.5. Joining by Using Cotters
- Making of elongated holes:
By the techniques of milling or mechanical filing
elongated holes with the required taper of the side faces are made in both
machine parts.
- Assembling the individual parts:
The individual parts are deburred and cleaned and
put together with the oblong holes being aligned.
- Fitting in the key:
The key is beaten in slightly (on trial) in order to
find out the bearing capacity of the inclined surfaces.
- After having been reworked the key is forced into the
elongated hole by systematic hammer blows.
- Shall the key stand heavy and changing loads it must be
secured against coming loose.
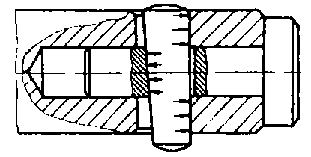
Figure 29 - Fitted in cotter
6.6. Joint Made by Using Tightening Keys
- Mounting the premanufactured individual parts:
The bearing shells are put into the mechanically
made through hole. Thin sheet metal insets are placed between the two bearing
shells.
The tightening key is put in such a way that a displacement of
the key would cause also a displacement of one of the bearing
shells.
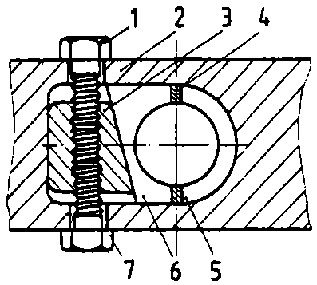
Figure 30 - Mounted adjusting
key
1 adjusting screw, 2 casing, 3 tightening key, 4
plate insets, 5 bearing shell I, 6 bearing shell II
- Coarse adjustment of the tightening key:
The adjusting screw is screwed in and tightened till
the bearing shells are pressed together. The locking screw is loosely screwed in
- if tightened, it secures the tightening key against coming loose.
- Fine adjustment of the tightening key:
The shaft journal is put between the bearing shells.
By tightening the adjusting screw the bearing shells are pressed together, but
only to such an extent that a fine clearance remains between shaft and bearing
shells.
If the shaft journal rattles, parts of the sheet metal insets
have to be removed and the tightening key has to be retighten. Then, the
tightening key is secured with the help of the locking
screw.


