Back to Home
Page of CD3WD Project or Back to list of CD3WD Publications
 |  |  | Compressed Earth Blocks - Volume II. Manual of design and construction (GTZ, 1995, 148 p.) |  |  | The project's building dispositions | |  | (introduction...) | | | Types of wall | | | Types of structure | | | Foundations and footings | | | Openings | | | Reinforcement | | | Floors: structures | | | Jack arches and vaulting | | | Roof classification | | | Finishings | | | Installing technical systems | | | Characteristic strength of CEBS | | | Safety and height to width coefficients | | | Permissible constraints | | | Building economics |
|
Compressed Earth Blocks - Volume II. Manual of design and construction (GTZ, 1995, 148 p.)
The project's building dispositions
"Design skill" and "Building skill" are worth more than
"Shielding skill"
Good architectural design and good building work depend on the
knowledge and skills of designers and builders. it is by renewing links with a
long tradition of earth "design skill" and "building skill" and by making good
use of recent technological inputs, that high quality earth architecture can be
produced. There are a number of regional sayings which reflect this popular
common sense and wisdom, such as this saying from Devon in England: "All cob
wants is a good hat and a good pair of shoes", in other words a good roof and
good footings.
This "architectural skill" and this "building skill" are
unfortunately often overshadowed by what we will call here "shielding skill",
that is to say a current trend in building with earth which draws more on
sometimes very sophisticated engineering with the aim of increasing the water
resistance of "earth", whilst overlooking the tried and tested traditional
approach, which consists in making the "building" water resistant, i.e. in fully
integrating the central role of architectural design to ensure the quality, the
performance, the strength and the durability of structures. This shielding
approach is unfortunately very often used to provide an elaborate disguise to
mask the defects of a poor architectural design or of a design which is not
specific to earth as a building material and which borrows inappropriately from
concrete or hollow cement block construction.
The main problems to resolve
These fall into two categories:
- On the one hand, structural problems which force one to
respect the principles of good compressive strength and, by contrast, the poor
tensile and shearing strength of earth as a building material. In respecting
these principles, the designer must choose between appropriate structural
designs and construction details.
- On the other hand, problems of water and humidity, resulting
from what is know as the "drop of water system": erosion, streaming water,
splash-back, infiltration, absorption. These problems make the designer respect
certain fundamental principals: protecting the top and the base of the walls ("a
good hat and good shoes"), allowing the earth building material to breathe and
incorporating suitable details into the design principles.
EXAMPLES OF STRUCTURAL PROBLEMS
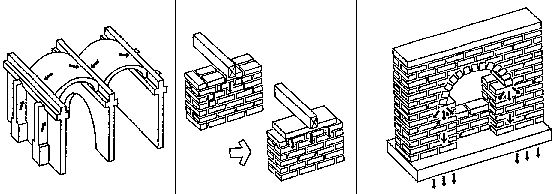
(FIG.71;72;73)
Fig. 71: Absorbing the forces exerted vaults.
Fig. 72:
Spreading the load of the forces exerted by floors on the wall.
Fig. 73:
Absobing the arches.
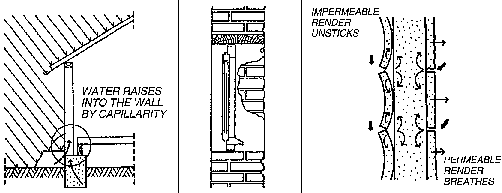
EXAMPLES OF HUMIDITY PROBLEMS
(FIG.74;75;76)
Fig. 74: Problems of humidity at the base of wals.
Fig. 75:
Problems of humidity at the level of the openings.
Fig. 76: Allowing the wall to
breate
Types of wall
Compressed earth block masonry enables one to build either
loadbearing walls, both thick and thin, or non-loadbearing walls such as
partitions which divide up the space within a building. This simple
classification offers great architectural flexibility.
Main problems
For masonry wall systems as a whole, the main problems result
from the nature of the stresses which are applied to them.
- Crushing: under the effect of the weight of the wall itself or
of a concentrated vertical load.
- Vertical excentric loads resulting from a tensile force
(bending out at floor level, for example).
- Horizontal excentric loads resulting from the pressure of a
vault on the walls for example.
- Buckling resulting from the accumulated effect of a load
stress and from the settling of a wall which is too thin and too high by
comparison for example.
- Horizontal loads. These fall into two kinds. On the one hand
the uniform pressure of winds on the walls, and on the other the concentrated
pressure of earthquakes (i.e. high tensile and bending stress).
Solutions
For non-loadbearing walls, infill masonry (of a concrete
framework of wooden lattice) limits the risk of crushing occuring.
For loadbearing walls, there are several solutions which enable
the forces of excentric loads, of buckling or of horizontal loads to be reduced.
These include:
- using the thickness of the walls;
- improving the stability
of thin walls by using buttresses;
- improving the stability of thin walls by
using ring-beams;
- adding horizontal and vertical reinforcement to the
masonry, (earthquake-resistant systems).
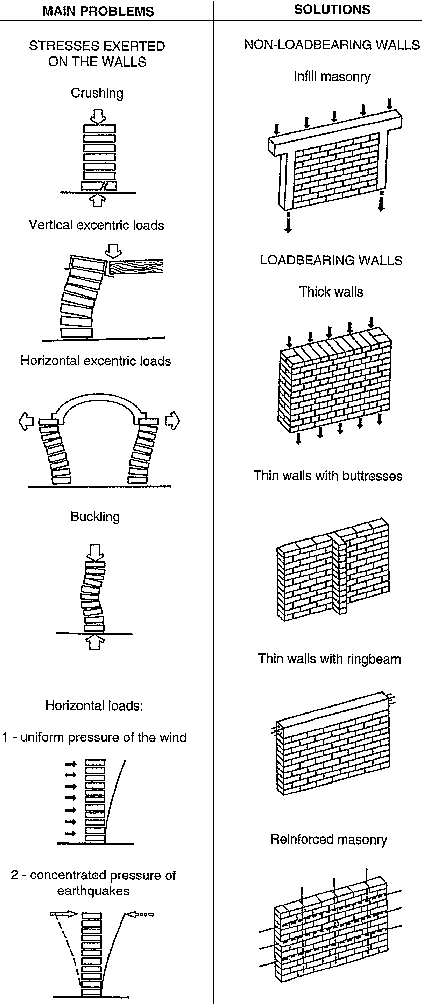
FIGURE (FIG.77;78)
Fig. 77: Five great problem.
Fig. 78: Five good solutions.
Types of structure
Five essential rules of good practice
Building in compressed earth blocks, over and above the specific
factors common to all techniques of masonry using small elements, sends the
designer and builder directly back to the rules of "good practice" for designing
and building with earth.
These essential rules of good practice can be summarized under
five headings:
- Knowing the material, its physical characteristics, properties
and mechanical performances.
- Knowing the particularities of the earth building technique
employed, the special equipment it requires and the specific ways in which it is
applied.
- Adopting simple building systems which are compatible with the
way of using the material: good compressive strength, poor tensile, bending and
shearing strengths.
- Adopting design principles and building solutions which are
proper to building with earth, taking care to protect the parts of the building
which are exposed to the main causes of degradation (water for example).
- Ensuring that the execution of the building work is carefully
carried out.
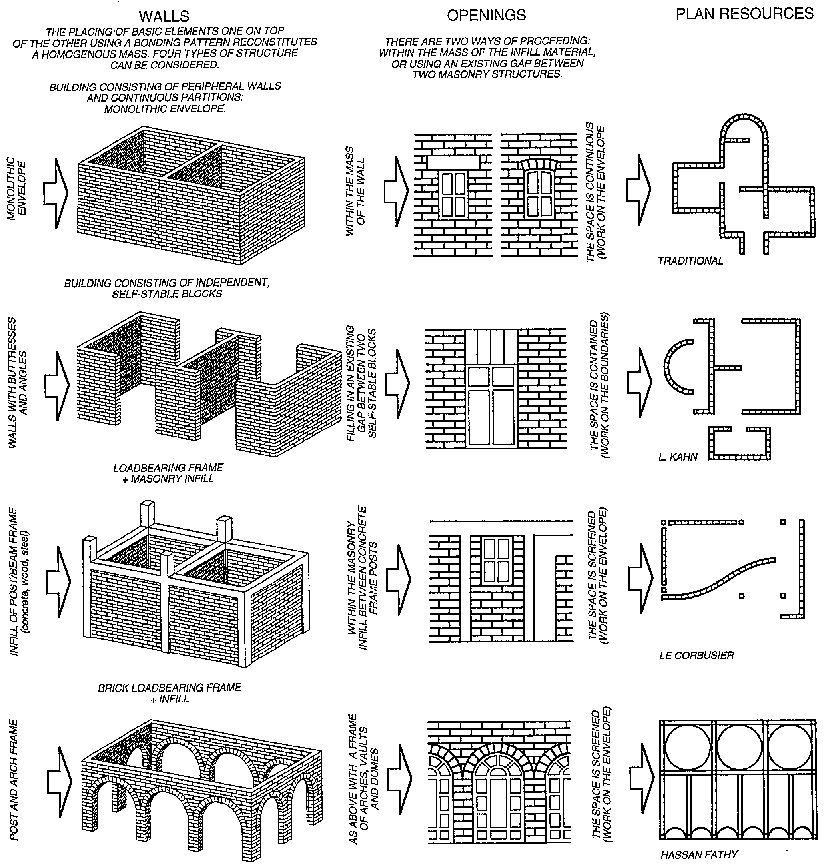
Fig. 79: Table showing the links
between structural principles, types of wall and openings and the architectural
resources of the
plan.
Foundations and footings
Two types of problem
Particular care should be taken with the foundations and
footings of a compressed earth block building and the building should be
protected from two main types of problem:
- structural problems,
- problems linked to
humidity.
This is because buildings constructed from compressed earth
blocks, by the very nature of the material, are vulnerable to inherent
structural risks or to humidity which can cause very serious damage. One must
therefore be particularly vigilant in respecting the rules and codes of good
practice which are specific to building with earth. This does not mean, however,
that problems stem only from the nature of the material; they can arise because
of external factors - differential settling, landslides, and natural disasters
such as earthquakes and floods - which will be even more damaging if the
building has been badly designed or built.
Choosing a system of foundations and footings
This will depend on the nature of the ground on which the
structure is to be built and the type of structure envisaged. There is a danger
of structural weakness when building on unstable or weak sites. This danger can
be increased by a poor design (underdimensionning or insufficient strength for
example) or if the foundations are badly built (located excentrically to the
downward loads for example). On poorly-drained sites, humidity can increase the
risk of structural weakness as this can considerably weaken the cohesion of the
material, its strength and therefore that of the wall.
The problems outlined here should not, however, lead one to
overdimension the foundations and footings, nor to make too great a use of
reinforced concrete. The choice of foundations and footings should above all be
well-suited to the nature of the ground, the nature of the building (private or
open to the public), the nature of the loads and permissible overloads, the
climatic constraints of the environment (rain, snow, wind, etc.), the building
principles of the structure (the type and thickness of wall, whether or not
there is a cellar or a sanitary pit, etc.).
The table in fig. 81 suggests structural designs for foundations
and footings given the nature of the wall systems and the site ground.
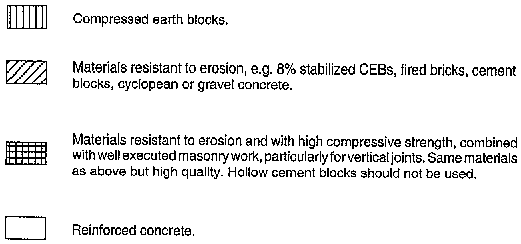
Fig. 80: Key to figure 81.
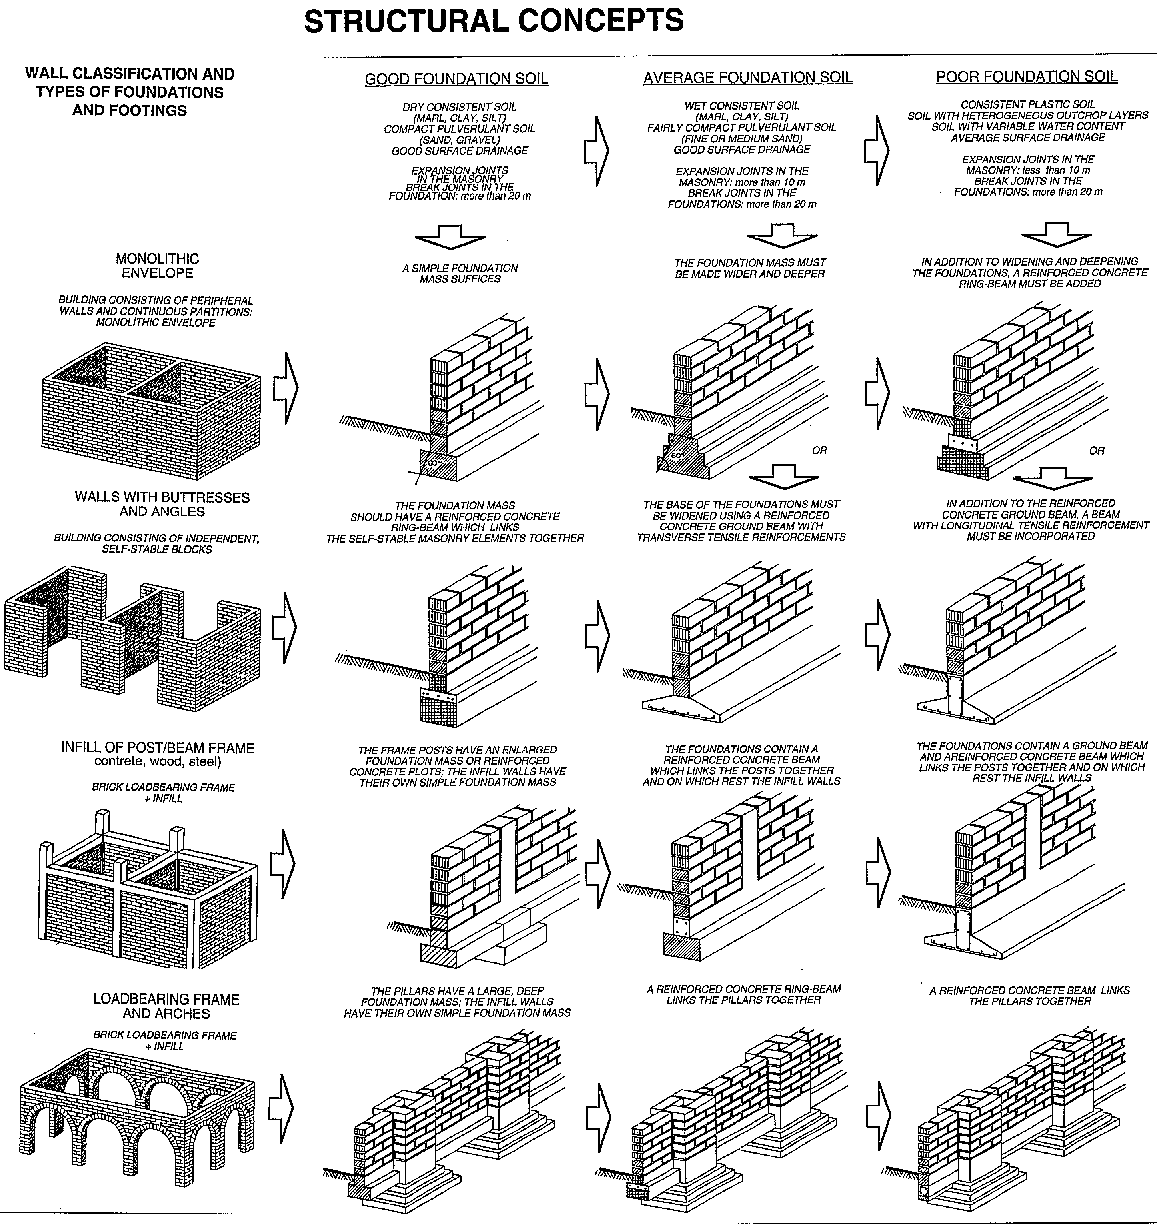
Fig. 81: Summary table of
structural concepts depending on the type of wall and the nature of the ground
for the foundation.
Water and humidity: a danger not to be underestimated
Earth buildings, whether built from compressed Barth blocks or
from other earth building materials, remain particularly vulnerable to water.
The designer of earth buildings must be well aware of this danger and must not
underestimate its importance. He should take appropriate measures to eliminate
it. It is vital to remove sources of humidity, particularly at the base of walls
and at the level of foundations and footings.
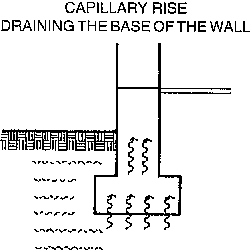
Fig. 82: Weakness due to prolonged
exposure to humidity
Problems with foundations
At the base of the walls, from the foundations upwards, the
danger of capillary rise can stem from several sources: seasonal fluctuations in
the water table, water retention by plants or shrubs growing too close to the
walls, damage to the clean water supply or waste water system, absence of
drainage, a damaged drainage system, or stagnation of water at the base of the
walls. A lengthy period of humidity can weaken the base of earth walls, notably
when the material loses its cohesion and passes from a solid to a plastic state.
The base of the wall may then no longer be able to support the loads and will be
in danger of collapsing. Humidity also encourages the emergence of saline
efflorescences which attack the materials and hollow out cavities where small
animals can nest (insects, rodents, etc.) and this can further aggravate the
process of wearing away which has already started.
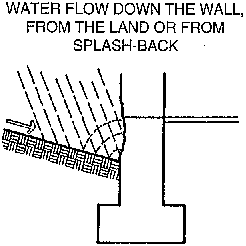
Fig. 83: Weakness due to humidity
undermining the base
Problems with footings
Above the natural ground level, the base of the wall can be
attacked by water. This can be due to water splashing back, waterspouts, badly
designed or damaged gutters, puddles being splashed by passing vehicles, washing
the floors inside, morning condensation (or dew), a roadway gutter flowing too
close to the wall, surface waterproofing (cement pavement) which prevents
evaporation from the soil, a water-proofing render which causes moisture to be
trapped between the wall and the render or the growth of parasitical flora (such
as moss) and saline efflorescences.
All these problems are well-known and completely solvable. The
informed designer should not on the other hand adopt a "shielding" approach,
which might not only be very expensive but could also provoke the very
weaknesses it seeks to avoid by excessive water-proofing. Above all the building
must be allowed to breathe. The correct attitude is to resolve the problems by
attacking their causes, not their effects. Appropriate solutions can only emerge
from a good understanding of the nature of the various risks which we detail
below.

Fig. 84: Weakness due to humidity
resulting from excesive waterproofing.
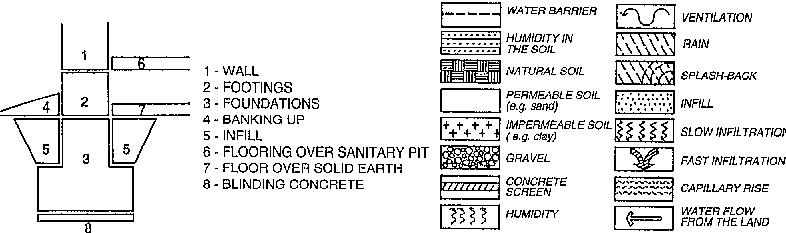
Fig. 85: Key to figs. 82 to 93.
HUMIDITY RISKS
Infiltration without accumulation
This humidity risk is very common where the foundations are
built on a permeable site, the geotechnical composition of which is
predominantly sand and/or gravel. This type of site ensures good drainage away
from the building. When it rains, water infiltrates rapidly from the surface to
underground. This infiltrated water does not therefore get the chance to
accumulate and stay in contact with the foundations. There is therefore no risk
of sufficient capillary rise to reach the wall and cause damage.
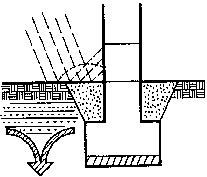
Fig. 86: Infiltration without
accumulation.
Infiltration with temporary accumulation
This risk frequently occurs in cohesive clay or silty soils. If
the way the foundation is built is combined with good surface drainage, such as
the one shown in diagrammatic form in fig. 87, in the form of an incline
draining water away from the building, then this humidity risk is less great. In
a cohesive soil, water penetrates less quickly from the surface to underground
and towards the infill material. The latter, when it consists of permeable
material (sand and gravel, for example) will only accumulate water temporarily,
but this water will have difficulty in disappearing from the adjacent cohesive
soil. Nevertheless, this kind of temporary accumulation can result in water
suction occuring in the foundations for a short time.
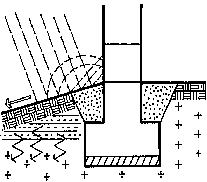
Fig. 87: Temopary accumulation.
Infiltration with prolonged accumulation
This risk can occur in all types of soil with poor surface
drainage, even permeable, sandy and or gravelly soils when the ground slopes
towards the building (a situation to be avoided at all costs). In this event,
the slope acts as a captor and accumulator of water, which then stays in
prolonged contact with the foundations. Capillary rise follows, and this can be
significant during the rainy season. This capillary rise, depending on the
design of the building, can even reach the footings and the base of the wall.
Serious damage can occur.
Fig. 88: Prolonged accumulation.
Capillary rise with or without infiltration
The most serious humidity risk occurs when the structure is in
contact with or in close proximity to the water table. When the foundations are
directly in contact with this water table, capillary action is continuous. This
phenomenon is all the more sensitive when the soil is cohesive as the latter,
once saturated with water, remains in a permanents/ate of humidity. In a
permeable soil when the foundations are always above the level of the ground
water, a normal cycle of evaporation can take place and the danger is less, but
still present. The permanent exposure of the foundations to the risk of
capillary rise represents a great danger of damage to the base of the structure.
Fig. 89: Capillary rise.
Infiltration without accumulation
Since the water disappears very quickly underground, all that
needs to be done is to evacuate as quickly as possible the same amount of
remaining water which penetrates towards the foundations. In this case, the
foundations and footings can be subjected to the weak capillary risk resulting
from the infiltration, but they must without fail be able to withstand the risks
of water flow and/or water splash-back occurring at the base of the structure,
at the surface. The use of materials such as stone, fired brick or rendered
sand-cement block can reduce this risk. Any rendering can be restricted to the
interior surface of the footing in order to leave the way open for evaporation
towards the outside to occur and to avoid any humidity traces on the inside. It
is not necessary to use impermeable materials for the foundations nor to install
a drainage system.
Fig. 90: Several examples of how to
treat a humidity risk resulting from infiltration without accumulation.
Infiltration with temporary accumulation
Since in this case the cohesive soil absorbs water, good surface
drainage is required in order to evacuate water from the vicinity of the
building. A pavement or banking up may suffice but care must be taken not to
make these impermeable to migrations of humidity or moisture. This is
unfortunately what often occurs when, with the best of intentions, a pavement
made of too high dosage cement is built. This prevents even the small amount of
water which remains at the level of the foundations from escaping, since it is
trapped by the impermeable surface and so naturally moves towards the footings
and the base of the wall. There is no need to use an impermeable render, or even
a bitumen one, on the vertical face of the foundations, nor to build impermeable
foundations, nor even a deep drainage system, since the water accumulation is
only temporary. The structure must be allowed to breathe.
Fig. 91: Several examples of how to
treat a humidity risk resulting from infiltration with temporary accumulation.
EXAMPLES OF SOLUTIONS
Infiltration with prolonged accumulation
When there is a danger of prolonged water infiltration, the
water must be intercepted before it penetrates underground and evacuated as
quickly as possible. The principle of drainage is perfectly appropriate here.
Drains can be built right against the foundations but then the external vertical
surface of the foundations will have to be rendered or made impermeable. They
can also be installed at a distance in the order of one metre from the
foundations, but on condition that they are located deeper than the foundations.
These more distant drains are more efficient if they are used in conjunction
with an evacuation incline at the base of the wall and if the top layer of the
drain layer is bowl-shaped to aid evacuation. It is also prudent to add a
horizontal anti-capillary barrier (e.g. polythene, bitumen, or high dosage
mortar) between the footing and the earth block wall.

Fig. 92: Several examples of how to
treat a humidity risk resulting from infiltration with prolonged accumulation.
Permanent capillary rise
The source of humidity is permanently present and occurs on both
sides of the foundations which are in contact with the water table. On the
outside, this humidity occurs as a result of the accumulated effect of rain and
capillary rise. On the inside, it occurs as a result of capillary rise. Drains
must be built against the foundations (which should be water-resistant) and even
under the floor covering of the ground-floor if this is directly on the ground.
Distant drains are not recommended. Water-proof horizontal barriers are also
needed between the footing and the earth block wall. If the floor covering is
directly on the ground it can be laid on a water-proof film which is itself
unrolled on a rough surface of stones and rolled gravel which acts as an
anti-capillary barrier. It is preferable to previously dig up the ground
supporting the building and make sure that some permeable materials (e.g.
gravelly-sandy soil) are present. If the building is over a sanitary pit, this
must be ventilated.

Fig. 93: Several examples of how to
treat a humidity risk resulting from permanent capillary rise.
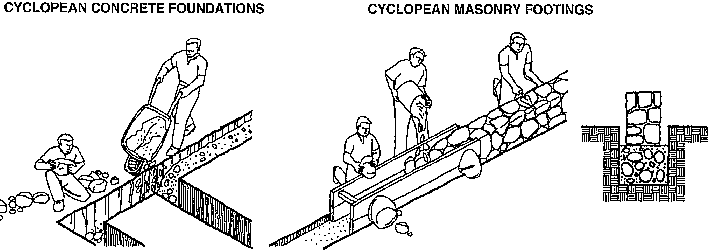
Fig. 94: The use of cyclopean
concrete for foundations and footings is an attractive solution from the
technical and economic point of view.
Choice of materials and specifications
When digging foundation trenches, the first thing is to dig them
as regularly and cleanly as possible. This means both looking for good ground,
as far as possible, without having to dig too deep (which costs more) and making
sure the sides of the trenches are straight. Traditional principles of laying
out a building using wooden stakes and strings are very useful for ensuring that
the foundation trenches are correctly traced out.
The second thing is to avoid allowing the newly-dug trenches to
be exposed to bad weather for too long. This is why 4 to 5 cm of blinding
concrete, dosed at 150 kg/m³, is recommended at the bottom of the trench.
This will also help to start off the masonry work of the foundations. On top of
this blinding concrete, the body of the foundations can be built from stones,
fired bricks, full sandcementblocks, cement or cyclopean concrete, and in
exceptional cases from compressed earth blocks stabilized at 10% if the risk
from humidity is not too great. The footings can also be built from stone, fired
bricks, rendered sand-cement blocks, cyclopean concrete masonry or compressed
earth blocks stabilized at 8% there is not too much risk of humidity occuring as
result of splashback. Concrete foundations should be dosed at 200 kg/m³; if
they contain reinforcement, at 250 kg/m³; and if they consist in a
reinforced concrete footing plate or ground-beam, at 300 kg/m³. In the
latter case, the quantity of steel can be estimated at between 50 and 70
kg/m³, including 25 to 40 kg for the transverse reinforcement which absorbs
tensile stress.
Using cyclopean concrete
For cyclopean concrete foundations, rubble stones are
incorporated in successive layers of cement mortar which coats each layer of
stone with a covering at least 3 cm thick. This type of structure is perfectly
suitable for. a low-cost construction on good ground, but must be well done.
Notably, the rubble stones should not touch each other, nor be located only at
the sides of the foundations, in which case the central part of the foundation
would be filled only with mortar, giving a weak structure.
Stones which take up the whole width of the foundation should be
laid at regular intervals, forming a kind of toothing.
The other aspect to be considered is how much cement to use in
cyclopean concrete which should be dosed at 250 kg/m³ (250 kg of cement,
400 litres of sand and 800 litres of gravel). Once the rubble stones have been
laid in layers of concrete, 1 m³ of cyclopean concrete ultimately contains
less cement that solid concrete (approximately 125 kg) which is interesting from
an economic point of view. All in cases, the total width of the foundations
should be at least 40 cm, and at least 20 cm thicker than the wall thickness,
divided between both sides of the wall faces starting from the longitudinal
axis. The height of the body of the foundations should be at least equal to half
the width. If the foundations require an anticapillary water-proof layer, this
can be made using highly dosed cement mortar (500 kg/m³), bitumen-based
paint or a bitumen or plastic film if these materials are available.
Cyclopean concrete can continue to be used for the footings ;
above the foundations, in which case the cyclopean concrete must be shuttered
and the stones placed right up against the shuttering. The principle of toothing
stones (approximately every 60 cm and in alternate rows - one at each corner and
one in the middle) to ensure the solidity of a cyclopean concrete footing should
be carefully checked on site.
Ring-beam at foundation level
When building on poor soils which are unstable and which may
cause differential settling, a foundation ring-beam is recommended. This will
stabilize the sides against potential movement in the foundations. These
movements are essentially vertical, and as a result the foundation ring-beam
will be designed like a beam with vertical bending moment. Such a ring-beam
therefore has to be a beam with reinforcement running from top to bottom. At the
same time if the body of the foundations is mainly built from masonry, it is
possible to reduce the amount of steel used. By locating the reinforced concrete
ring-beam halfway up the body of the foundations, one can assume that there is
an area of compression above and below this reinforced steel and the whole can
therefore act in both directions. This means using masonry which has perfect
compressive strength and hollow sand-cement blocks cannot be used.
MATERIALS AND SPECIFICATIONS
To take one example, 3 cm² steel rods or 2 cm² high
adherence steel rods, can be sufficient. The concrete coating of these steel
rods should be at least 4 cm thick. The height of the reinforced ring-beam can
therefore be reduced to 10 cm using 212 rods or 310 rods. The cement dosage
should be a minimum of 250 kg/m³.
The principle of using a ring-beam in the foundations cannot be
applied to small, single-storey buildings founded on good to medium strength
soils (rocky soils, compact sandy-gravelly soils, or cohesive soils) and if
loads are evenly distributed. In other cases, it is preferable to use the
solution of a reinforced concrete ringbeam which is integrated into the
foundations.
Openings
Good structural bonding
Care should be taken with the structural bonding of frame
openings with CEB walls in order to limit the danger of cracking which could
lead to water infiltration and therefore a process of erosion.
Structural weaknesses of openings
It is important to compensate for shearing stress loads to the
lower edge which is transmitted directly down the jambs of the reveals from the
lintels.
The following classic mistakes should be avoided:
- making openings too big, placing too great load a
on the lintel;
- too many openings of too many different sizes on the same
wall, which weakens the wall;
- locating an opening immediately next to the
corner of a building, making the corner buckle;
- two openings too close
together with too slender an intermediate pier, making the pier buckle;
-
insufficiently strong frame jambs, leading to buckling;
- insufficient
anchoring of the lintel or of the supporting base into the wall, leading to
shearing;
- poor earth block bonding patterns near the openings, leading to
cracking through superimposed vertical joints.
Lintel
The lintel is subjected to the high load exerted by the masonry
it supports and which it transmits through the frame jambs towards the sill or
the threshold of the opening. To eliminate the danger of shearing, it is
therefore preferable to increase the length of the part of the lintel which is
held in the wall, allowing a minimum of 20 cm for small openings. The jambs must
have high compressive strength and care should be taken with this by using earth
blocks of equal strength. The construction materials used for lintels include
wood or reinforced concrete or even, to preserve the structural homogeneity of
the wall, various forms of earth block arches (Dutch, depressed or other) which
replace the lintel by helping to transmit loads to the jambs.
Sill
This serves notably, for a window, to absorb the loads
transmitted by the reveal jambs. Reinforcement can be added below the sill.
Another problem to resolve is that of the breast shearing. A preferable solution
is to use dry joints between the breast and the wall, so that the window frame
is in fact built in the same way as a doorway, and the breast added later. The
dry joints can be filled in later when the initial shrinkage and settlement of
the masonry has occurred.
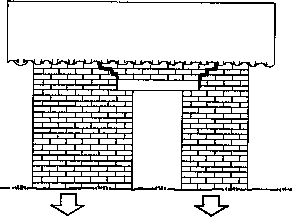
Fig. 97: Take care with the
anchoring of the lintel in the wall.
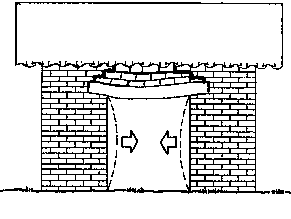
Fig. 98: Make sure the lintel is
the correct size for wide openings.
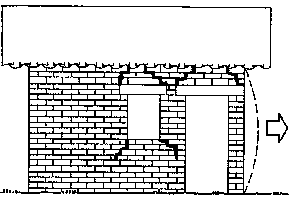
Fig. 99: Make sure the pier between
two adjoining oppenings is the correct size.
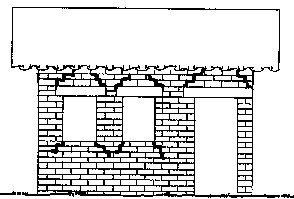
Fig. 100: Avoid too many openings
in any one wall.
GOOD DESIGN
Vulnerability to humidity at openings
Structural weakness, most often marked by cracking, leaves the
way open for the erosion of openings as a result of vulnerability to humidity.
This vulnerability near the frames of openings occurs as a result of the "drop
of water system" which refers to the combined effect of water streaming,
splashing-back or stagnating.
The weak spots are the bond between the lintel, the jambs, the
sill and the masonry. Particular care must be taken with toothings,
anchor-points and masonry fixings. Similarly, with rebates and embrasures, as
well as with all the fixings of frames, hinges, and sockets.
The following are recommended:
- a drip under the lintel and under the sille, or a system of
fillets to project water away. All projections must be avoided;
- solutions to problems of condensation which could arise at
thermal bridges;
- reinforced stabilization, rendering, or covering joints in the
external facade, flush with the sides of the openings (in high rainfall
regions);
- water-proofing under the sill.
Dimensioning the openings
There are certain rules for dimensioning the openings in an
earth masonry structure, which do not preclude variety in the design of their
shape and size.
- In any one wall, the ratio of voids to total surface area
should not exceed 1:3 and voids should be evenly spaced. Too great a
concentration of voids or openings which are too large should be avoided, unless
the structure has been designed with these in mind.
- The overall length of openings should not exceed 35% of the
length of the wall.
- Standard opening spans should be restricted to 1.20 m for
standard section lintels. For wider openings, the lintel must be increased in
size and it must be more deeply anchored into the wall.
- The minimal distance between an opening and the corner of a
building should be 1 m. This distance can, however, be reduced by taking
appropriate measures in the construction.
- The width of a pier common to two openings should not be less
that the thickness of the wall and should be equivalent to a minimum of 60 cm
(two standard blocks). The pier is not loadbearing unless it exceeds 1 m in
width (lintel common to two openings for a less wide pier).
- The height of the masonry above the lintel and of the breast
below the supporting base should respect a balanced ratio depending on the width
of the opening.

Fig. 101: Vulnerability to
humidity: the "drop of water" system

Fig. 102: Rules for dimensioning
openings.
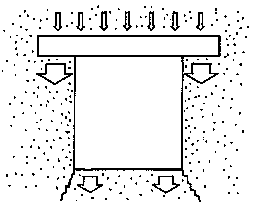
Fig.103: Transmission of loads,
cracks at the sill.

Fig. 104: Well dimensioned sill or
independent breast.
Materials for the reveals
As with any construction system using small masonry elements,
with compressed earth block construction it is perfectly possible to use the
same material for the reveals of openings as for the walls. If this is done, it
is preferable to use stabilized compressed earth blocks in order to ensure good
resistance to any risk of vulnerability to humidity and in compression,
particularly for the jambs. A compressed earth block arch can replace a lintel
and the supporting base can be made from fired brick or from concrete. Whatever
is used, a frame made from blocks must be perfectly coursed in order to
guarantee the quality of the bonding and thus overcome the risk of structural
weakness.
The other standard solution is to built a complete reveal in
wood the width of which in section is equal to the thickness of the wall, taking
care to dimension the anchoring of the lintel and of the sill into the masonry
correctly (the anchor should be at least equal to the length of a block.)
Other solutions, which combine, for example, the use of a fired
brick masonry with compressed earth block masonry, are possible, giving great
flexibility in use and an attractive appearance, but great care should be taken
in applying these.
Fixings and anchorings
Fixing ready-made frames of doors and windows directly into
compressed earth block masonry must without fail be well anchored. Vibrations
and blows as the woodwork is handled can cause cracking to occur. Similarly, the
fixing must be compatible with the maintenance, repairs and possible replacement
of the woodwork without damaging the structure of the wall.

FIGURE (FIG.106;107)
Fig. 106: Holding the door-frame in place as the walls are built
up.
Fig. 107: Using wooden blocks integrated into the jambs.
TREATMENT OF DETAILS: SOME EXAMPLES
Two solutions are possible:
- Holding the ready-made frames in place as building the masonry
is built up and anchoring them in mortar (using barbed wire or anchor-points).
- Integrating wooden blocks, («gringos blocks»), into
the coursing of the masonry frames. These then make it easy to nail, plug or
screw in ready-made frames.
Protecting the frames
Reveals must be protected from the risk of erosion resulting
from the «drop of water system», and from wind which can be very
significant in an area liable to cracking. Taking great care when building the
reveals of openings, good structural bonding of the materials making them up and
the improvement which surface stabilization or rendering all around the reveals
(whitewash or paint) can provide, are capable of guaranteeing this protection.
In a 2-storey building and in the case of facades which are
exposed to the prevailing winds' first floor openings are more exposed than
those at ground floor level, particularly at their sill. The exposed parts
should be stabilized and care should be taken to ensure that the sills of the
first floor openings do not project too far (risk of erosion due to turbulence).
Waterproofing should also be used between the lower edge of the opening and the
CEB wall, as well as drip-stones or fillets underneath the lintel and the sill.
Woodwork
This should be very carefully made and if possible include drip
ledges under the lintel, supporting pins and a way of evacuating condensation.
It is always preferable to locate woodwork flush with the exterior facades to
eradicate the “drop of water system” as much as possible. Care must
also be taken when fixing the hinges of shutters and with any kind of external
occultation.
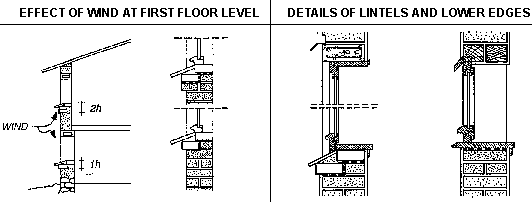
FIGURE (FIG.111;112)
Fig. 111: Reinforcing water-proofing between the bases and the
wall.
Fig. 112: Window fillets and drips project water away from the edge of
the
wall.
Reinforcement
Why reinforced masonry?
Systems for reinforcing earth block walls have been developed in
order to improve the resistance of earth buildings to earthquakes. Most of the
regions exposed to this risk have imposed norms which require the use of
vertical and horizontal reinforcement (e.g. Peru, Turkey, USA). The building
systems exploited use the principle of a wooden or steel ring-beam sunk into the
walls, and also reinforcement of the corners of walls and opening frames. The
existence of reinforcement considerably improves the tensile and bending
strength of the masonry.
Special blocks
It is possible to reinforce masonry using ordinary compressed
earth blocks but it is preferable to use special blocks which make it easier to
incorporate reinforcing elements. Blocks with channels, hollows or holes allow
for vertical and horizontal reinforcement.
Upper ring-beams
The ring-beam is the ultimate earthquake resistant building
system. Indeed if there is no ring-beam, any other earthquake resistant building
approach is rendered practically useless, particularly with thin, high walls.
The ring-beam ensures good transmission of loads and allows a highly organized
masonry structure to be formed.
Horizontal and vertical ring-beams are the reinforcement systems
most used. They can sometimes consist in very localized reinforcement, located
in the weakest parts of the masonry structure, either at the corners, or at the
reveals of openings. Such localized reinforcement is most often sunk into mortar
beds and is made of wood, steel, metal mesh or grids.
The part played by the reinforcement is particularly important
to ensure the stability of compressed earth block masonry, as it is for all
types of masonry using small building elements (e.g. fired bricks). It remains
indispensable even in regions which are not exposed to seismic risk particularly
for thin wall construction.
Reinforcement reduces the danger of cracking which is the effect
notably of dlfferential settling, shrinkage; swelling, thermal expansion,
rotation or shearing stress (at openings and walls junctions), stress caused by
the pressure of flooring, the lateral force of the wind, sloping roofs, arches
or vaults. Reinforcement enables the harmful effects of these stresses to be
reduced by containing the wall in all directions, continuously.
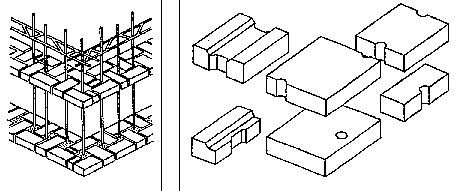
FIGURE (FIG.115;116)
Fig. 115: Bonding pattern enabling vertical reinforcement to be
incorporated.
Fig. 116: Special blocks for reinforced masonry and ring-beams.
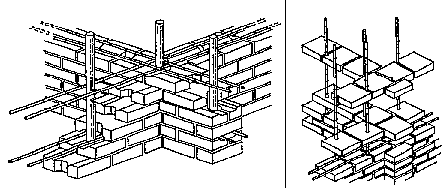
FIGURE (FIG.117;118)
Fig. 117: Masonry using special blocks and reinforced with
wood.
Fig. 118: Reinforced masonry using bamboo with special square blocks.
The main role of reinforcement is to bond the walls together,
notably to absorb horizontal loads, as vertical loads are absorbed by the
foundations. This bonding effect can be ensured only if the reinforcement is
perfectly connected to the wall and if it is perfectly rigid and impossible to
deform, particularly to ensure good tensile strength.
Reinforcement can also be used for other purposes to reduce
deformations due to the risk of buckling (in which case it is preferable to
locate it at an intermediate height in the masonry, under the lower edge of the
openings or at the level of the lintel), to ensure that loads are evenly
distributed, to provide a continuous lintel or to serve as a support and
anchor-point for the floors and roof.
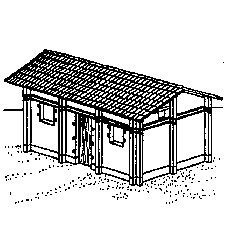
Fig. 119: Thin walls, buttresses and
reinforcement.
Reinforcement materials
The main materials used are wood, steel and concrete. These
materials must possess good adherence with the earth block masonry to ensure the
efficiency of the reinforcement. Reinforcement made of wood (bamboo, eucalyptus)
or of steel are generally laid in a bed of mortar within the thickness of the
walls. Steel must be correctly tied, especially at the corners of walls and
sufficiently well covered with concrete. Concrete reinforcement is either poured
at the top of the thickness of the wall (leaving the problem of a thermal bridge
to be resolved), or into special hollow blocks or used in a block bonding system
of lost formwork.
Thin masonry
For thin walls (fig. 119) buttresses can be integrated into the
facades, notably at the corners and in the vicinity of the reveals of large
openings. The walls are also horizontally reinforced at the level of the floors
and/or the roof and these upper and lower reinforcements are linked together by
vertical elements at the corners and at adjacent walls.
For gable-end walls, integrating a pillar into the axis of the
wall, taking care with precise bonding and toothing with the wall masonry
ensures good reinforcement. This pillar makes the wall panel rigid and improves
its resistance to wind pressure. Reinforcement at the base of the gable-end wall
absorbs the wall loads.
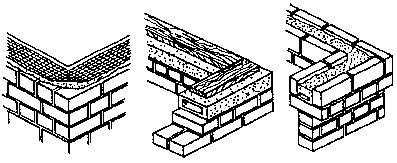
Fig. 120: Ring-beams and reinforced
comers using wood or steel embedded in the wall.
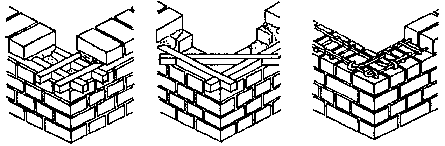
Fig. 122: Ring-beams of mesh
embedded in the mortar or in reinforced concrete.
Floors: structures
Compressed earth block floors
Most commonly, compressed earth block masonry is intended to
support floors of standard design, with wooden beams, or precast concrete beams
covered with sand-cement or fired bricks, or even load-bearing concrete floors,
either shuttered in place or prefabricated and placed on reinforcements. But
compressed earth blocks allow floors to be made using the building principle of
jack-arches on concrete or wooden beams, or even on steel (IPN).
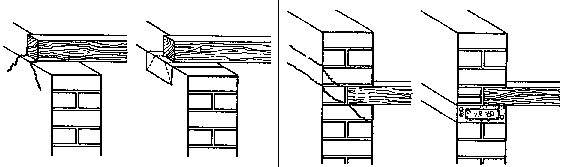
FIGURE (FIG.124;125)
Fig. 124: Effect of point-roading.
Fig. 125: Rotation within
the support.
Requirements and constraints
From a structural point of view, a floor must withstand static
loads caused by use, concentrated loads (and the danger of pointroading) and
should transmit these loads down to its support in the load-bearing compressed
earth block wall. These loads, through the support, should be evenly spread and
directed towards the centre of gravity of the load-bearing wall.
One should also take into account the fact that a floor is
subjected to vibration, rotation, hydrous and thermal expansion and even the
danger of lifting at the corners in the case of a concrete floor fixed on its
four sides. Tolerances are therefore necessary as any partial embedding in the
wall or any junctions out of true must also be avoided.
From the point of view of finishings, apart from the structural
aspect, there is the floor (above) and the ceiling (below). The floor should be
hard-wearing, with a carefully finished flat surface which is easy to maintain
and durable. The under-face of the ceiling should also be attractively finished.
The floor-wall bonding
The bonding of a floor with its support (wall or pillars) is
ensured by a base which also transmits loads to the support.
The main problems are as follows:
1. Point-roading: this occurs when the base is too small and
when it fails to transmit loads evenly. It takes the form of differential
stresses and cracks. To avoid this risk, the surface area of the base should be
increased and the loads should be brought back to the centre of gravity of the
support.
2. Rotation: this occurs when the floor flexes. One can then
observe lifting, loads no longer being central, cracks and crushing of the
support. To prevent rotation, the correct ratio of load to span to section must
be re-established and the floor must be laid on a ring-beam.
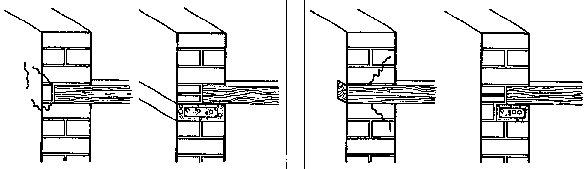
FIGURE (FIG.126;127)
Fig. 126: Dimensional variation.
Fig. 127: Thermal bridge,
condensation.
3. Dimensional variations: generally these have a thermal origin
or result from differential flexing between the floor and its support.
4. Thermal bridge: this arises because of the variation in
hydrous and thermal behaviour of the materials of which the floor and wall are
made and provokes condensation. Avoiding direct contact between the body of the
floor beams and the wall, reinforcement integrated into the wall leaving an
external earth block cladding, limits this risk.
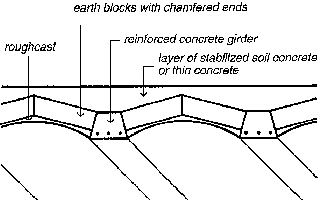
Fig. 128: Chamfered earth block,
easier to lay.
Laying the floors
The best way to ensure that floors are carefully laid is to
leave gaps beforehand to receive the beams or their bases in the wall. This
problem should be taken into account as soon as the working plans for the
structure are being prepared, notably during the coursing of the building plans.
On site, the most important problem to resolve is that of protecting the floor
structures from rain in order to avoid any water
infiltration.
Jack arches and vaulting
Jack arches and vaulting
A compressed earth block floor made of jack arches acts like
lost formwork. This is a solution which reduces the amount of sand, gravel,
cement and reinforcements used compared with concrete floor systems.
Vaulting floors have the advantage of making the compressed
earth block work in compression' with bending stresses being taken up by the
wooden, concrete or steel beams or struts. The span for receiving the beams
varies from 0.50 m for small systems to 2 m for the largest which can require
the use of metal tie-rods. CEB vaulting rests on the lower wings of the IPNs or
on the spines of the concrete struts. A small curve (1/1 0 of the span) allows
the struts to take up the stresses well. The floor is finished by filling in
with stabilized earth concrete or light concrete. These floors are still,
however, heavy, and the load they exert must be evenly spread and transmitted to
the bases.
Building vaulting can be done using formwork, most often sliding
formwork, or without shuttering using a laying technique similar to that of the
Nubian vault (successive inclined courses) or on a plank supported by props
(located in the axis of the vault) and on which the blocks are placed on either
side of the axis (fig.
130).
Roof classification
The importance of the roof
Compressed earth block structures must be protected by a good
roof, particularly in regions where the climate is marked by an heavy rainy
season. The roof is the "good hat" of compressed earth block structures. it
diverts the flow of rain away from the wall and plays an essential part in
preserving it from the problem of humidity which is a major risk.
Using compressed earth blocks for the roof
Traditionally, in most of the regions of the world, the
compressed earth block is only rarely used to build roofs. Regions with a desert
or semi-desert climate have inherited a tradition of adobe roofs, in the form of
vaults and domes, but changing to the use of compressed earth blocks is not yet
very marked. Over the last decades, architects and builders have confirmed their
interest in building roofs using earth blocks in several projects, notably in
contexts where the cost of traditional roofing materials (wood, concrete) is an
important handicap. Earth roofs have a definite economic advantage, as the cost
of the roof alone can reach up to 50% of the overall building cost.
Main roof types
Flat roofs
These are generally built following the floor principle
described before, either using wooden beams, concrete or steel struts and
compressed earth block vaulting. The main problems are waterproofing, thermal
expansion (in hot climates), drainage of the flat roof (minimum slope of 1 to
2%), evacuating water using suitable systems of spouts or channels and
protecting the edges of the roof with parapets.
Sloping roofs
These are built in very conventional ways, with timber frame
covered with tiles, felt or corrugated iron sheets. The slope must be
sufficiently great and the roof overhang must be sufficiently wide (minimum 30
cm) for the rainwater to be projected away from the wall. The main problems are
those of the stability of the gable-end walls (slenderness ratio) and the
anchoring of the timber frame in the loadbearing walls (use of a ring-beam).
Curved roofs
These are built in the form of vaults or cupolas. The main
problems are of the same kind as those of flat roofs, notably water-proofing,
thermal expansion and removing water away from the walls. Peripheral protection
is ensured by parapet systems.
COMPRESSED EARTH BLOCK ROOFS
An inherited tradition
Compressed earth block roofs are inherited from a tradition of
adobe roofing developed in regions with dry climates where good roofing timber
was scarce (Mesopotamia, Egypt, Iran). By building earth vaults and cupolas,
builders were exploiting the inherent potential of the material, i.e. its
ability to work in compression. This type of roof also has an undoubted
aesthetic appeal both with regard to the architectural forms and the inner
spaces which architects and their clients find attractive.
The problem of stresses
Earth block roofs are generally heavy and exert very great
lateral stresses on the walls, which have to regain their verticality. The use
of ring-beams, post-compression loads (parapets), thick walls or buttresses, and
sometimes tie-rods for wide span vaults, overcomes the stresses exerted on the
walls and directs them towards the foundations.
Other problems
Calculating the structure of these vault and cupola roofs must
be dealt with beforehand. This can be done graphically (by tracing the tension
of the stresses or using Mery's diagram). Another very important problem is
water-resistance. Vaults and cupolas are often very vulnerable to thermal
expansion (hot climates, wide diurnal temperature ranges) which can cause
cracking leading to infiltration. They must be carefully protected by
water-proof renders regularly maintained (layer of bitumen-based paint, followed
by a highly dosed cement mortar on a mesh and finally a water-proof paint or
lime wash). This type of roof is in the end used more for its attractiveness and
for the thermal comfort it provides and is more and more protected by a
traditional design over-roof.
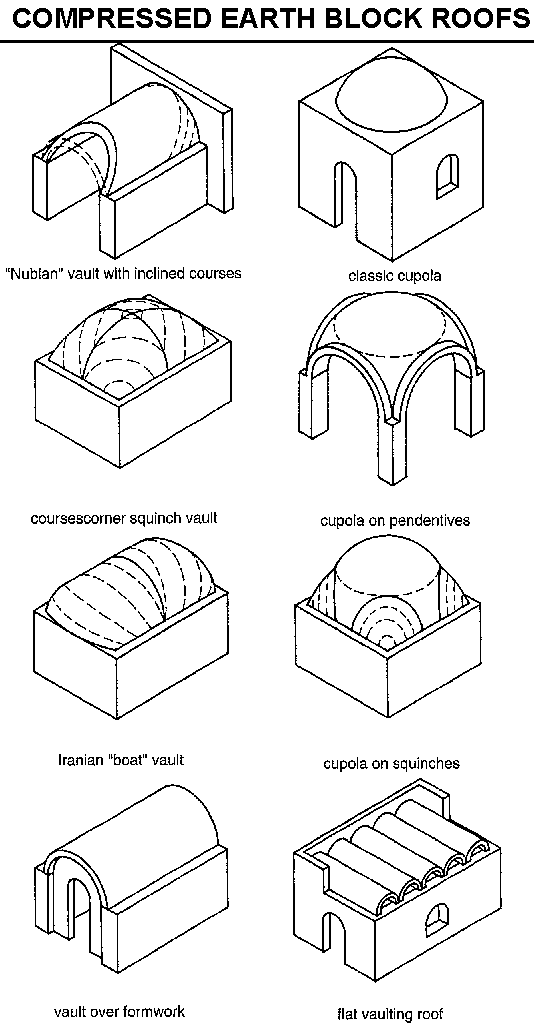
Fig. 136: Various forms and
structures of moulded or compressed earth block roofs derived from the vault and
cupola tradition.
SINGLE-SLOPE ROOFS
SECTION OF PLAYGROUND
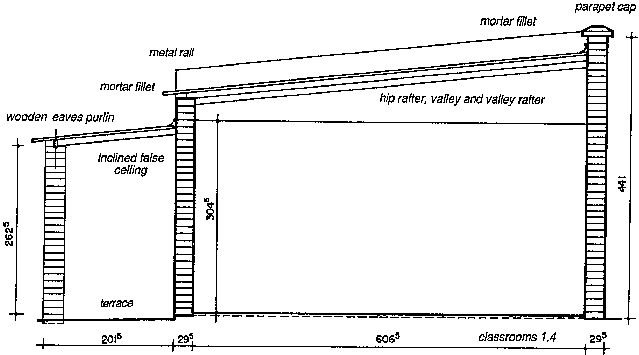
Fig. 137: Plan for an SOS children's
village, Sanankoroba, Mali. Arch. C. Robin and O. Scherrer, Acroterre.
Single-slope roofs have the advantage of needing a simpler
roof-structure (purling and rafters) and thus reduce the cost of the roof. The
simplicity of their design makes them easier to build and fairly easily resolves
the essential problem of protecting the compressed earth block walls. There are
two possible approaches. Either a single-slope roof with a peripheral overhang
all around the walls, where there must be a good anchoring of the roof at the
top of the walls (using a roof-plate or a ring-beam), or having an overhang only
on the lower edge and attaching the roof to the rest of the perimeter of the
walls which form a parapet (e.g. fired bricks or concrete). This latter solution
needs a fillet to be built between the roof and the parapet wall which must be
protected on top (fired bricks or concrete). The attachment channel must be
clean and shallow to not weaken the parapet.
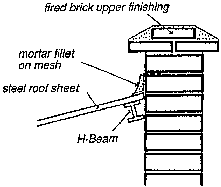
Fig. 138: Detail of joint between
roof and acrotere.
DOUBLE-SLOPE ROOFS
SECTION OF ROOF SLOPE
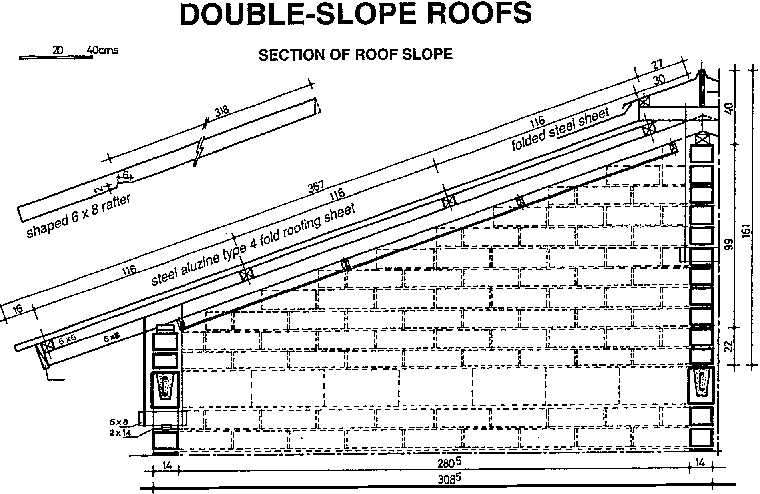
Fig. 141: Ruralhouse, Afatobo, Ivory
Coast. Design by CRATerre, S. Maini. A double sloping roof of steels heets rests
on a roof-structure of rafters. These are attached to the masonry of the gutter
walls, at the lower side, under a ring-beam made of special sand-cement blocks
used as lost formwork, by a stainless steel tie-beam linked to the roof rafter
and on one section of rafter passing through the masonry, under the ring-beam.
At the top, a ridge ventilator is itself fixed to the partition wan using the
same principle.
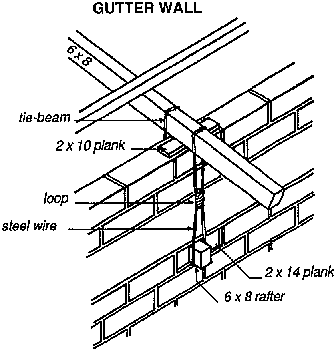
Fig. 142: Detail of anchoring the
rafter at the lower end using a system of stainless steel tie rod and stainless
steel wire tension strap.
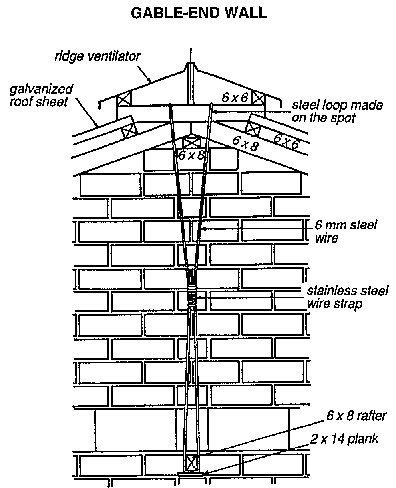
Fig. 143: Detail of fixing the ridge
ventilator to the gable-end wall. The metal tie-beam is clipped to a section of
the rafter crossing through the masonry, under the sand-cement ring-beam.
DETAIL OF OVERHANG CONSOLE

Fig. 144: Housing project, Cameroon.
Design CRATerre, arch. P. Rollet and V. Rigassi. The anchoring of the lower side
of the roof uses the principle of an overhang console with a bracket against the
wall. On the outside, the bracket is itself attached to the ring-beam with a
fixing Iron.
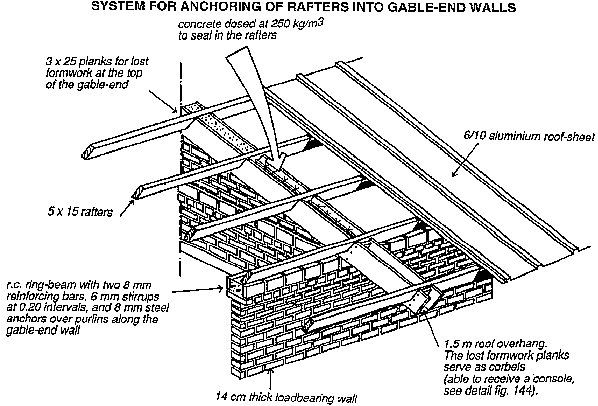
Fig. 145: Housing protect, Cameroon.
Anchoring of rafters into the gable-end wall using a concrete seal poured at the
top of the wall in a lost formwork made of planks.
FLAT ROOFS
Drainage of flat roofs
Flat roofs must in fact be regarded as sloping roofs. The
question of drainage and evacuating rainwater run-off is essential.
Thus flat roofs should have all over their surface a minimum
slope of 1 to 2% in order to evacuate water towards the edge. This slope can
even be slightly greater in countries where there is more rainfall, provided one
is sure that the surface render of the roof offers good resistance to erosion.
The water run-off should be directed and channelled in such a way as not to
disperse the entry points of spouts too much.
Water-proofing flat roofs
Good drainage is no substitute for the roof being water-tight
and great care should be taken with this, particularly with flat earth roofs.
The water-proof layer should be sheltered from too direct exposure to the risk
of thermal expansion (direct exposure to heat or to external temperature
variations). It is therefore preferable to apply it to the structure of the roof
itself and to cover it over with a protective finishing material or coating
(render, gravel, stabilized earth, etc.) which will ensure both mecanical and
thermal protection.
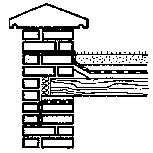
Fig. 146: Detail of
water-proofingbetween roof/ parapet and roof/wall. Note the flexible system of
laying of beams into the wall with insulation (thermal bridge) and waterproofing
of the receiving base.
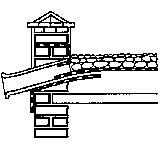
Fig. 147: Totally water-proof entry
and exit points of spout Protection of the top of the parapet (fired bricks,
concrete poured in situ etc.).
Parapets and water-spouts
The water-proof layer should be perfectly and evenly banked up
against the parapets, without any flaws. It is advisable to have a gutter at the
base of the parapet to drain the water towards the rain water spouts or
downpipes. These are designed in hard, durable materials and should evacuate the
water well away from the facades, not be located facing the prevailing wind
(water throw-back) nor over an opening. The junction between the roof, the
parapet and the systems of evacuation must be perfectly
water-tight.
Finishings
When protecting the walls of a compressed earth block structure
is desirable, even necessary, one can have recourse to various technical
solutions suited to a great many local contexts. But these solutions are alas
often badly executed and paradoxically help to give rise to or aggravate the
very problems they are intended to resolve. Choosing a solution for protecting a
surface should above all be suited to the local economy of the project context
as they are still often solutions the costs of which are prohibitive. One should
therefore start by making sure that it really is necessary to protect the wall
surfaces, bearing in mind that the great advantage of the compressed earth block
compared to the sand-cement block is that it offers a greater capacity to resist
the direct or capillary infiltration of rainwater or flowing water. In
along-cost housing project, the render can represent up to 25% of the overall
cost of the construction. A compressed earth block wall with a good bonding
pattern and built with high quality mortar binding together all the elements in
all directions and resistant to erosion, is not permeable. One can therefore
manage without a render and ultimately reduce the cost of construction as well
as the amount of cement used. We explain here the areas and conditions for
applying a surface protection. If, for one reason or another, such protection is
needed, than it must be applied following the guide-linesforapplication which we
specify below. Above all, the protection must remain supple and moisture
permeable to avoid the risk of it peeling off or separating.
CONDITIONS OF APPLICATION
Preparing the support
Removing dust:
The wall to which a render is to be applied must be free of all
loose, crumbly or dusty material. It should be carefully brushed (using a metal
brush.)
Moistening:
The wall must not absorb the water contained in the render or it
will not set or harden so well and it will stick less well. The wall must
therefore be moistened in order to avoid capillary suction occurring, but it
should not be too wet as a film of water at the surface would limit the
adherence of the render.
When to apply the render
An earth wall must never be rendered before:
- The shrinkage of the masonry during drying out has stabilized
and the water and moisture has completely dried out. This can take several
weeks.
- The wall has been allowed to settle. This means waiting for
all structural work to be complete, including all the loads of floors and roofs.
Application conditions
- Do not render in very cold or very hot weather. Avoid driving
rain, direct sun, violent winds or very dry conditions. Slightly humid weather
is ideal.
- Apply the render in panels of 10 to 20 m² at a time and
complete each facade in one day.
- Take care with the edges (corners) and reveals of openings. On
a mixed support (earth and wood), incorporate a mesh nailed on. Do not render
right down to ground level (capillary suction).
- Avoid allowing the render to dry out too quickly by spraying
water onto the surface in the morning and/or evening for the first few days.
|
AREAS OF APPLICATION |
OUTSIDE |
INSIDE |
|
Without protection |
yes |
yes |
|
Quick-lime-based render |
yes |
yes |
|
Hydraulic cement or lime render |
not to be used |
yes |
|
Gypsum plaster render |
to be avoided |
yes |
|
Lime wash |
yes |
yes |
|
Cement shurry |
yes |
yes |
|
Paint |
to be avoided |
yes |
|
Water-proof treatments |
not to be used |
not to be used |
|
Water-repellant treatments |
to be avoided |
to be avoided |
|
Highly diluted varnishes |
to be avoided |
yes |
|
Highly diluted wood glue |
to be avoided |
yes |
Fig. 152: Various areas of application for renders, distempers
paints and impregnations on outside or inside walls.
RENDERS
Renders are generally applied in three layers, but sometimes two
layers suffice.
The first layer, known as a rough coat or "primer", is made up
of a fairly fluid mortar which is thrown with force onto the support using a
trowel. Between 3 and 5 mm thick, the surface of this layer is rough so that the
next layer will stick more easily.
The second layer, known as the "coating" or the "body of the
render" is applied a few days after the primer (minimum 2 days) in one or two
passes. This layer is 8 to 20 mm thick and is carefully smoothed using a ruler;
it should. display no cracks.
The third layer, known as the "finishing render", completes the
rendering process and fills any shrinkage cracks which might have appeared in
the coating. It is applied when the coating has completely dried out. It is only
a few mm thick and it can be finished with a plasterer's hawk without applying
too much pressure.
Cement or hydraulic lime render
A render may consist of hydraulic lime and cement if low dosages
are used. One should limit the composition to something in the order of 1 volume
of binding agent to 5 to 10 volumes of sand. Renders which are too stiff should
not be used on the outside as they often fail to adhere well to earth walls.
Gypsum plaster
These are fairly compatible with earth walls but should
preferably be used on the inside. For the plaster to adhere, a primer of lime or
a diluted cement wash should first be applied. Using plaster on the outside is
possible only in a dry climate. This means adding quicklime which hardens the
render and improves its water-resistance (a first layer with 1 part gypsum
plaster to 0.10 to 0.15 part lime, 0.75 to 1 part sand, a second layer with the
same proportion of binder but no sand.)
Lime washes
These are made of lime diluted in water (1 volume of slaked lime
to 1 to 3 volumes of water), and are applied like paint. They need regular
(annual) maintenance. They are applied in at least two layers, lightly at first,
and then more and more thickly. Additives can be used (the amounts suggested
here are given for 25 kg of slaked lime), including linseed oil (1 litre), alum
(0.6 kg), calcium stearin (2.5 kg). Lime washes provide efficient, attractive
and economical surface protection, provided they are regularly renewed.
Cement shurry
Made up of 2 to 3 volumes of sandy or clayey soil mixed with 1
volume of cement, very diluted in water, these are brushed on in at least two
coats 24 hours apart. They should be used within 2 hours of being mixed.
Colouring can be added (mineral oxides) or water-repellents (2% calcium
stearin).
Paints
These are generally fairly efficient but they must be able to
breathe and be elastic (latex or acrylic). Rigid paints must not be used.
|
LIME-BASED RENDER |
VOLUME OF LIME |
VOLUME OF CEMENT |
VOLUME OF SAND |
|
First layer |
1 |
- |
1.5 |
|
Second layer |
1 |
- |
2.5 |
|
Third layer |
1 |
- |
3.5 |
|
or |
|
|
|
|
First layer |
2 |
1 |
4 |
|
Second layer |
2 |
1 |
6 |
|
Third layer |
2 |
1 |
9 |
Fig. 153: Composition of lime-based renders or lime-cement-sand
renders.
Using compressed earth blocks for decorative purposes
The use of compressed earth blocks for decorative purposes is in
the great building and architectural tradition of small masonry elements. The
size of the earth block, its texture and its variety of colours, which differ
according to the soils used in their production, are all features to be
exploited in the imagination of the designer and the builder, linking
flexibility in use to an attractive appearance.
Thus the compressed earth block, apart from its structural role,
can be used to great effect for the ornamentation, decoration and finishings of
buildings. Simply using a bonding pattern which alternates stretchers and
headers is in itself already an attractive feature. On a large exposed wall,
such a bonding pattern laid by highly skilled masons confers its beauty to the
wall simply through the regularity of the horizontal courses with shadows
playing discreetly on the joints or under a roof overhang.
The basic material of the compressed earth block can itself be
worked with imprints at the moulding stage (reliefs or bumps, scoring). This
imprinted texture is enhanced by the grainy quality of the material. But it is
also in chain corners, cornice ornamentations, the worked reveals of openings,
in the building of imaginatively shaped claustra-work, as in the great fired
brick tradition, that the compressed earth block emerges as a decorative
material par excellence. A pierced claustra-work wall, creating an artificial
frontier between a load-bearing wall and a peripheral gallery, and allowing
light to pass through, with the play of light and shade, dancing to the rhythm
of the sun as the day unfolds from dawn to dusk, is of unsurpassable beauty.
EMBELLISHMENT AND DECORATION
Fig. 158: Simple claustra-work
designs with cries-cross motifs (full and half blocks) or the woven effect of
stretchers with vertical blocks.
Installing technical systems
DESIGNING THE SYSTEM
The design of technical electrical or plumbing systems should be
specifically suited to earth-built constructions.
There are three main rules to be followed:
- The systems must be as centralized as possible.
- Any
incorporation of pipelines for supplying and removing fluids into the walls must
be avoided.
- Making grooves in the walls to take electricity cables should
be avoided.
Following these three rules necessarily implies that the
technical installations must be designed in advance and not on site, at the last
minute.
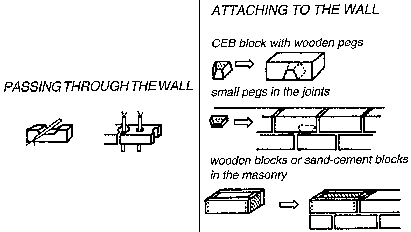
FIGURE (FIG.163;164)
Fig. 163: Ways of channeling electrical systems.
Fig. 164:
Ways of attaching items to the walls.
ELECTRICITY
Electrical systems are either visible or integrated into the
masonry.
Visible
These are either cables, or casings, or electrical skirting
boards. The main problem is how to attach them. There are several solutions:
- Maximum use can be made of materials other than earth, such as
wood or visible cement for example: wires can be run along skirting boards, then
up alongside wooden frames, along the ceiling, the ring-beam or other building
systems.
FIGURE (FIG.167;168)
Fig. 167: Special hollow blocks.
Fig. 168: Precautions for
bathrooms.
- Wooden blocks of the same size as the earth blocks can also be
used, integrated into the bonding pattern. Wedge-shaped pieces of wood can be
integrated into the bonding pattern in the thickness of the mortar joints where
cables are to be run. Then all that needs to be done is to attach collars or
pins to them (figs. 169 and 168).
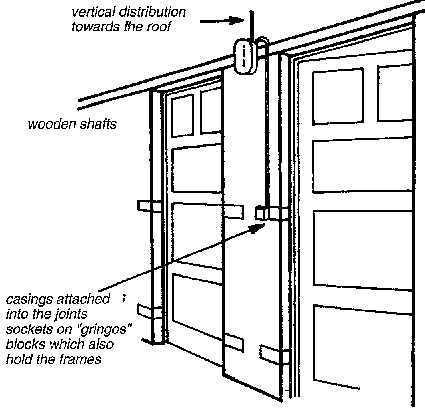
Fig. 169: Attaching cables near
wooden frames.
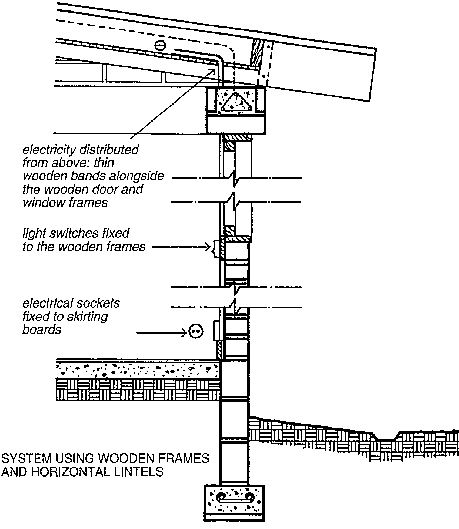
Fig. 170: Vertical sections showing
the integration of the electrical network alongside the woodwork and skirting
boards.
- One can also mould special sand-cement blocks of the same size
as the earth blocks and then fix the cables to these using rawl-plugs.
Integrated into the walls
The cables are protected by casings which are integrated into
the thickness of the walls during construction and the junction boxes are
integrated into the surface of the walls. The casings can be run horizontally in
special hollow blocks or behind grooved skirting boards. Gaps can also be left
in the ring-beam and these then covered up using a joint-cover on the facade.
Maximum use must be made of wooden frames to run casings vertically. The
integration of plug sockets, light switches, and junction boxes can be done by
cutting into the blocks and then fixing them with mortar or using special blocks
moulded in sand-cement, incorporating the sockets and tubing to connect the
cables (figs. 166 and 167).
PLUMBING
Water supply
The pipework should be integrated into the thickness of the
floor to the maximum extent possible and where pipes pass through the walls, a
protective pipe-sleeve should be used. Any other pipes, horizontal or vertical,
should remain visible and the same principle as for electrical cables can be
used for attaching them to the surface of the walls.
Water removal
The principle is the same as for water supply but inspection
hatches must be included with very long pipes, and where there are bends or
junctions.
Bathrooms
The walls close to bathroom fittings (handbasin, shower, bath)
must without fail be rendered or tiled. A floor syphon should also be fitted to
make it easier to clean the floor and to evacuate water in the
event of a
leak. Good ventilation is also recommended to avoid
condensation.
Characteristic strength of CEBS
Simplified structural calculations
To carry out simplified structural calculations, the
characteristic compressive strength (fk) of earth blocks must be known. The term
"characteristic strength" refers to a strength value which is independent of the
shape of the block. Thus a tall block will break more easily than a thin one.
Characteristic strength takes account of the average strength results but also
of the dispersal of these results around the average value. To obtain this
strength, a series of at least 5 blocks must be broken, either by bending or in
compression. This strength can be determined on dry blocks made at least 3 weeks
before (dry compressive strength) or on blocks of the same age which have been
previously sunk in water during 24 hours (wet compressive strength and for
stabilized blocks only). Wet compressive strength enables one not only to
determine the level of performance of the block but also to verify the
efficiency of the stabilization. It is estimated that if the wet compressive
strength is not at least equal to half the dry compressive strength, then the
stabilization is inefficient and stabilizer is being wasted, bearing in mind
that the stabilizer can account for up to half the cost of the block. To know
the permissible constraints (adm A) in the masonry, safety coefficients must be
applied which take account of the quality of the production and of the
construction as well as correction factors which take account of the
configuration of the masonry as a structure.
Bending strength
A test block is placed (on one of its larger faces) across two
25 mm diameter tubes laid 20 cm apart. In the upper axis of the block, parallel
to its smaller face, a further identical tube is placed with a loading plate
balanced on top of it. The plate is carefully loaded at a rate of 250 kg/minute
with other blocks, until the test block fails. This gives a bending strength
value. Multiplied by 5, this value indicates the minimal compressive strength.
Compressive strength
Blocks can be crushed using a site or laboratory press. The
block is placed between the two plates of the press, in the direction in which
it would be laid in the masonry. Either the plates are brought together at a
constant rate of 0.001 mm/ second or the load is increased at a rate of 0.05
MPa/second, until the total failure of the block. To avoid problems of friction
between the block and the plates of the press, sheets of neoprene greased on the
side which is in contact with the plates are placed between the plates and the
block.
When the block has been crushed, its compressive strength (of)
can be calculated. The average strength of the blocks (om) must then be
calculated. In order to allow a comparison between different sized blocks, the
average strength is divided by a conversion factor (f) for the actual shape of
the block. The strength obtained is then multiplied by a factor taking account
of the dispersal of the results around the average (1 -1.64 6). From a
statistical point of view this ensures that 95% of the results are higher than
the value expressed.
|
CONVERSION FACTOR FOR BLOCK SIZES (f) |
|
Size in cm l × w × h |
(f) |
|
29.5 × 14 × 9 cm |
1.65 |
|
29.5 × 9 × 14cm |
1.15 |
|
29.5 × 14 × 14 cm |
1.18 |
|
29.5 × 19 × 19cm |
1.00 |
|
19 × 14 × 9cm |
1.47 |
|
19 × 14 × 14 cm |
1.12 |
|
19 × 19 × 9cm |
1.56 |
Fig. 171: Block-breaking equipment
to test bending strenqth.
Fig. 172: Strength testing machines.
The apparatus consists of a steel frame, an hydraulic jack, pressure plate and
approving ring.
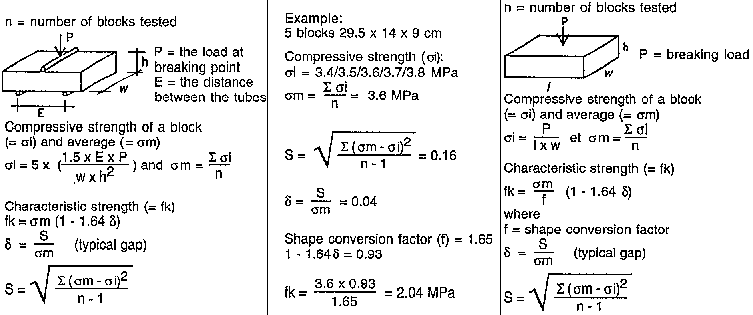
FIGURE
Safety and height to width coefficients
SAFETY COEFFICIENT
The characteristic compressive strength does not in itself
suffice as there are other additional constraints or stresses exerted on the
block. In order to take account of these constraints or stresses, the
characteristic strength (fk) is divided by a safety coefficient. This is not a
single, invariable figure: it can vary between 10 and 15.
The safety coefficient takes account of dispersion in the
quality of masonry workmanship, the logic of the architectural design and of the
structure, the nature of the material and of the mortar, and the nature of the
site-work. The more these various factors are mastered, the lower the safety
coefficient. To decide on the design of a structure, one can refer to the
following parameters.
Structural concept
An even distribution of loads and of openings spreads the loads
well, avoids areas of concentration and allows the masonry to work at lower
rates.
HEIGHT TO WIDTH (l)
A thin, high wall is vulnerable to the risk of buckling, even if
the blocks are strong. The wall should therefore have a maximum height to width
value of 20.
l = hef / tef < 20
l = height to width
hef = effective height
tef =
effective thickness
The effective height of a wall (hef) depends on the type of
integration used between the wall, the foundations and the floors. The table on
the right (fig. 173) shows that a perimeter wall, considered to be freestanding,
has twice the height to width value of a wall of the same height on which rests
a concrete floor. For effective thickness (tef), as we can see a wall 14 cm
thick with 29.5 cm buttresses every 1,5 m has a height to width value
approximately 1 .5 times lower than that of an identical 14 cm wall without
buttresses.
Building details
A good footing and a good roof protects the building against bad
weather and deterioration, making its stronger.
Climatic conditions
Depending on the climatic conditions, the building will be more
or less exposed to bad weather conditions and the quality requirements of the
blocks will need to be more or less high.
Types of building
There are two main types of building.
Single-storey buildings: minimal load stresses, little
aerodynamic effect, little surface area exposed to bad weather conditions.
Multi-storey buildings: significant load stresses, aerodynamic
effects due to high exposure to wind, large surface area exposed to bad weather
conditions.
Intended use of the buildings
Individual private use such as a house: the quality of
workmanship takes account of the maintenance factor which will vary depending on
whether it is rented accommodation (limited investment) or owned property
(investment guaranteed).
Public use: collective facilities. Particular care should be
taken with the quality of workmanship as these buildings have a social role to
play and serve as examples. Their maintenance must be well ensured.
Protecting the building
An earth building should be able to resist the effect of water.
The quality of the materials is important but the design of the building is even
more so. One should bear in mind, in order of priority:
- a special design for the building with high footings and large
roof overhangs.
- surface protection: renders and washes. - special treatment of
the material by stabilization or by impregnation.
The use of all of these solutions together is of course not
incompatible.
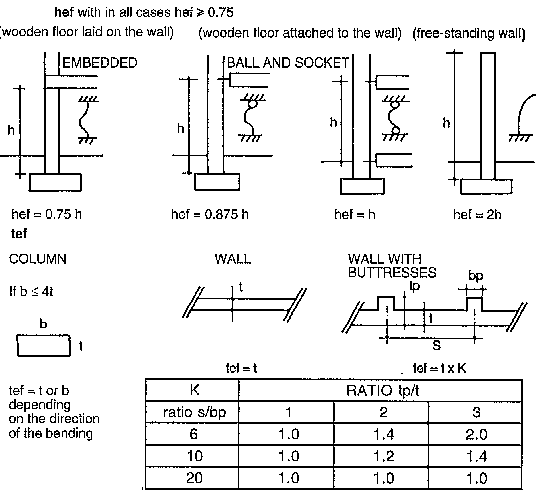
Fig. 173: Comparison of values of
effective height and thickness for walls varying in design but sharing a common
height and
thickness.
Permissible constraints
Small section walls (W < 0.3 m²)
For walls with a section less than 0.3 m², take the
characteristic strength, multiply it by a correction factor for the height to
width value (c), divide by the safety coefficient and multiply by a reduction
factor for the small section. This applies for example to a pier wall between
two openings.
The reduction factor is ( )
where W= surface area of the section in m².
)
where W= surface area of the section in m².
Walls with low height to width values (l < 6)
Here, the permissible load is obtained by dividing the
characteristic compressive strength of the blocks (fk) by the safety coefficient
which can vary between 10 and 15. These are fairly severe conditions as this is
a simplified calculation and because several factors are often neglected: the
quality of the mortar, the quality of the bonding, for example. Greater mastery
of these factors and a detailed calculation of the downward loads enables this
safety coefficient to be lowered. This permissible constraint must therefore be
regarded as a rapid calculation right at the initial pre-project planning stage.
In many cases this anticipated knowledge of the constraints will suffice except
in extreme situations (regions subject to seismic risk or to cyclones for
example).
Walls with high height to width values (6 < l < 20)
For walls with high height to width values, the permissible
constraint is calculated in the same way as above and the result multiplied by
an additional correction factor (c) which takes account of the height to width
value of the wall and of the waythe loads are applied. A wall subjected to
excentric loads will buckle faster than a wall loaded on its axis. Excentricity
can have two sources:
- loads applied out of true with the axis e.g. a cantilever
floor attached to the wall
- horizontal loads (e.g. wind is turned into
vertical loads out of alignment)
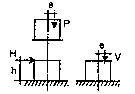
FIGURE
Excentricity is expressed by the factor m =6e/tef which takes
account of the position of the vertical loads vis-�-vis the central third of the
wall.
The examples (fig. 174 to 176) illustrate how permissible
constraints vary with the thickness of the wall and the section of the wall: a
wall using a header bonding pattern (30 cm thick) can support 4.5 times the load
of a pier wall using a stretcher bonding pattern (14 cm thick).
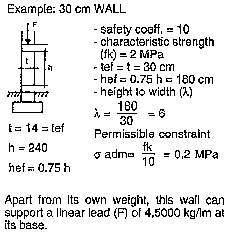
Fig. 174: Example of a calculation
of constraints for a wall with a low height to width value.
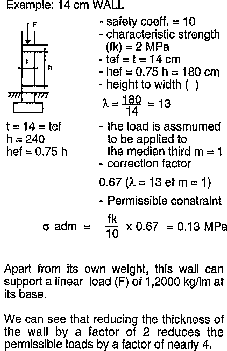
Fig. 175:Example of a calculation of
permissible load for a wall with high height to width value.
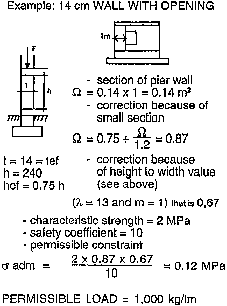
Fig. 176: Example of a calculation
of permissible loads for a small section wall.
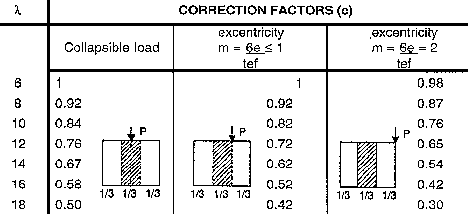
FIGURE
EXAMPLE OF SIMPLIFIED CALCULATION
For single-storey buildings, the downward load is approximately
0.10 MPa, and for two-storey buildings 0.15 MPa. Let us take the example of
fairly unfavourable conditions and see what kind of block could be used for a
two-storey building. This unfavourable case is that of a pier wall between two
openings, the height of which between floors is 2.40 m (see fig. 176).
The table on the right (fig. 177) shows the necessary
characteristic strength of the blocks taking various configurations of masonry
and for various safety coefficients, assuming excentric loads (m = 1). In the
most unfavourable case, the characteristic strength (fk) needed is 4 MPa, which
corresponds to blocks with a compressive strength on crushing of 7.5 MPa which
must be regarded as very severe. On the other hand, as can be seen, a simple
modification of the masonry configuration helps to considerably lower the
strength needed and very quickly this becomes reasonable, even with very high
safety coefficients.

Fig. 177: Relationship between
characteristic strength and masonry configuration.
To give some indications, we have drawn up here a table of the
typical values which can be expected of a compressed earth block. This data
refers to stabilized blocks. If the blocks are not stabilized, the wet
compressive strength drops until it is virtually nil. Similarly, the tensile,
bending and shearing strengths drop slightly. Remember that these simplified
calculation guide-lines apply only to the pre-project stage and that they cannot
be applied to extreme situations (earthquake areas or typhoon risk). In these
cases, reinforced or strengthened masonry solutions requiring specific
calculations will need to be used.
|
Typical values for stabilized CEBs measuring 29.5 × 1 4
× 9 |
|
Dry compressive strength (obtained by crushing in a press) |
sm = 4 to 5 MPa |
|
Wet compressive strength |
sm = 2 to 2,5 MPa |
|
Characteristic wet strength |
fk = 2.2 to 2.7 MPa |
|
Bending strength |
0.5 � 1 MPa |
|
Parallel bending at horizontal joints |
0.5 MPa to 1 MPa |
|
Shearing strength: |
0.5 Mpa |
|
Poisson's ratio: |
m = 0.5 |
|
Modulus of elasticity |
E = 50 to 70,000 kg/cm² |
|
Compression at a given point: |
6 to 7 Mpa |
Building economics
Comparative cost analysis
A comparative cost analysis must take account of a number of
factors, on several levels.
Clearly, the comparison cannot be carried out taking a single
unit cost for the compressed earth block alone.
The examples considered here show that for 1 m² Of wall,
the cost of the block alone is not enough.
This is because the feasibility of a compressed earth block
industry and its advantages from an economic point of view depend on:
- the cost of the raw materials (quarrying, transport);
- the cost of the blocks (production);
- the costs of labour (brick-makers, builders, etc.);
- the type of production and construction organisation
(self-help building, hiring skilled labour, using a building contractor);
- the type of building system used for the structures;
- the quality of finishings.
The examples we take compare 1 m² of finished wall, one in
stabilized compressed earth blocks and the other in sand-cement blocks with a
reinforced concrete supporting framework, and this in various contexts.
Analysis of the results clearly shows that it would be difficult
and totally arbitrary to draw universally applicable conclusions. When all the
factors are taken into account, a solution selected as viable in one context,
may not be so in another.
Although interesting, this analysis cannot be regarded as
complete if it fails to take account of the final objective, which is to build a
complete building. A cost comparison of the whole process must therefore be
carried out taking account of the production process of materials and the
construction process of the structures in a specific socio-economic context.
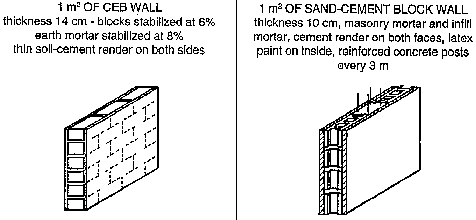
FIGURE
|
COST BY TYPE OF ORGANIZATION |
|
U.S. $/ m² |
GUINEA BISSAU |
PHILIPPINES |
|
self-help building |
3.90 |
2.95 |
|
hiring skilled help |
4.87 |
5.99 |
|
building company |
5.73 |
8.26 |
|
BREAK-DOWN FOR SKILLED HELP |
|
TOTAL $ / m² |
4.87 |
5.99 |
|
investment |
23 % |
12 % |
|
wages |
20 % |
51 % |
|
raw materials |
57 % |
37 % |
|
COST BY TYPE OF ORGANI7ATION |
|
U.S. $/ m² |
GUINEA BISSAU |
PHILIPPINES |
|
self-help building |
5.42 |
5.43 |
|
hiring skilled |
6.88 |
10.01 |
|
help |
|
|
|
building |
10.12 |
18.62 |
|
company |
|
|
|
BREAK-DOWN FOR SKILLED HELP |
|
TOTAL $ / m² |
6.88 |
10.01 |
|
investment |
7 % |
3 % |
|
wages |
21 % |
46 % |
|
raw materials |
72 % |
51 % |
|
COST OF RAW MATERIALS |
|
U.S. $ / m² |
GUINEA BISSAU |
PHILIPPINES |
|
water |
0.02 |
0.01 |
|
cement |
2.74 |
1.86 |
|
earth |
0.03 |
0.34 |
|
COST OF RAW MATERIALS |
|
U.S. $ / m² |
GUINEA BISSAU |
PHILIPPINES |
|
water |
0.03 |
0.01 |
|
cement |
3.14 |
2.13 |
|
gravel |
0.12 |
0.59 |
|
sand |
0.21 |
1.10 |
|
steel |
0.67 |
0.57 |
|
paint |
0,49 |
0.29 |
|
wood shuttering |
0.30 |
0.42 |
|
COST BY BUILDING ELEMENT |
|
% |
GUINEA BISSAU |
PHILIPPINES |
|
CEB blocks |
62 % |
53 % |
|
mortar |
11 % |
8 % |
|
whitewash |
5 % |
11 % |
|
masonry |
22 % |
28 % |
|
COST BY BUILDING ELEMENT |
|
% |
GUINEA BISSAU |
PHILIPINES |
|
sand-cement |
21 % |
23 % |
|
block |
|
|
|
mortar |
3% |
2% |
|
infill |
16 % |
12 % |
|
reinforced |
22 % |
17 % |
|
concrete |
|
|
|
posts |
|
|
|
render |
20 % |
29 % |
|
paint |
8 % |
6 % |
|
masonry |
10 % |
11 % |
Fig. 179: Cost comparison of 1 m² of wan in CEBs and on
sand-cement blocks, according to various factors.
COMPARATIVE ANALYSIS
Total cost comparison
(The context is a project in Senegal.)
Significant saving in the cost of the wall masonry does not
necessarily translate into a saving which is as significant in the total cost of
the building.
The example that we consider here illustrates that for the same
type of simple house plan with various wall building systems, the house with
compressed earth block walls costs 30% more than the house with adobe walls,
whereas taken on its own the cost of the masonry is 73% higher.
Similarly, the compressed earth block house costs 32% less than
that built with sand-cement blocks, whereas the wall masonry represents an
economy of only 32%.
The difference results from the fact that the sand-cement block
walls require finishing renders, the cost of which have a big impact on the
total cost of the building.
The potential economy of the compressed earth block disappears
altogether if a different roof is used, as shown on the lower table. One must
compare like with like. If more expensive choices are made for the other
elements of the building (here the roof), the advantage of having used CEBs may
be lost.
On the other hand, given a similar price and quality, one can
choose between a compressed earth block house to which additions can be added
(public utilities, out-buildings, etc.) and a house in sandcement blocks with no
additions.
In this case, there are other arguments in favour of the CEB,
including:
- creating skilled jobs,
- the foreign currency
economy,
- the economy of raw materials,
- better thermal
comfort.
The last table illustrates/his possibility: for the same cost as
the sand-cement block house, one can have a more comfortable CEB house.
Finally, it should also be mentioned that the structural and
architectural design of the building has a determining effect on the total cost.
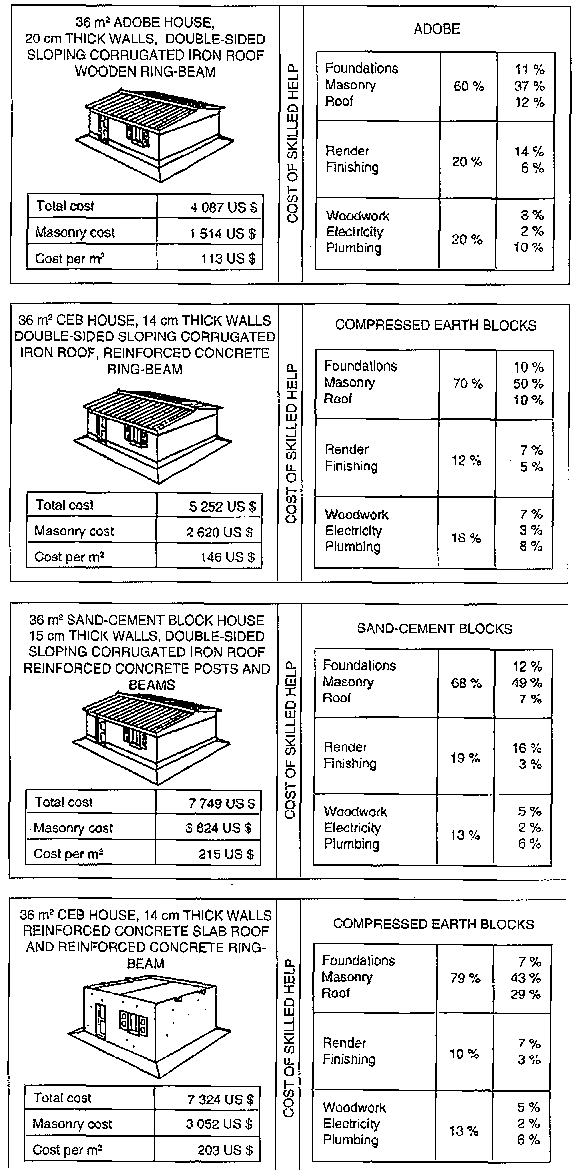
FIGURE Fig. 180: Comparison of total
costs of similar buildings for a project in
Senegal.


