A drill
Sometimes you may need to make a small hole through a piece of
wood. The following tool will help you do this.
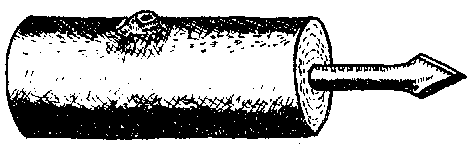
Fig. 9
You will need these materials to make the drill:
One nail, 8 cm long
One piece of wood such as a branch of a tree
The wood should
be very hard
Length: about 12 cm
Thickness: between 10 and 12 cm (See page
1 for instructions on measuring the thickness.)
Hammer
The first step is to flatten the point of the nail as
you did when making the chisel. Hammer the point until flattened as shown in the
diagram.

Fig. 10
The flattened point is then hammered into the center of the end
of the piece of wood as shown in the following diagram. Cut the head off the
nail with a hacksaw blade. This exposed end of the nail is hammered until it is
flattened.
Nail with head off before being flattened:
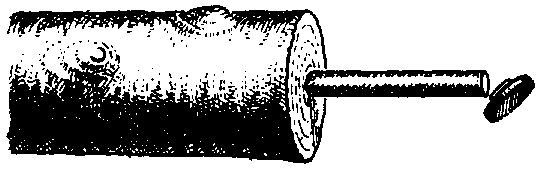
Fig. 11
Nail after being hammered:
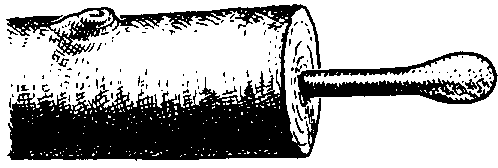
Fig. 12
Finally, sharpen the end using a hard stone, or by rubbing it on
a hard cement floor until the point looks like this:

Fig. 13
The same procedure can be used to make drills of various sizes,
using different sized nails. When using large nails, make sure the wood for the
handle is thick enough in diameter so that it will not crack or split when the
drill is being used.
To use the drill, grasp the butt of the handle with the palm of
the hand as shown in the diagram. Press down as you twist the nail back and
forth through the wood.
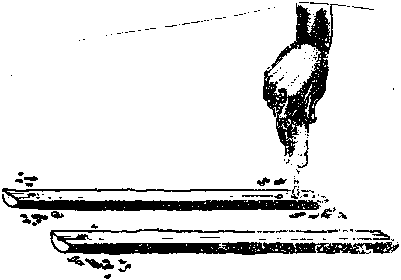
Fig. 14
The drill also can be used to prepare a piece of wood for a
nail. If a hole is made in a piece of wood before a nail is pounded into it, the
wood will be less likely to split. Choose a drill which will make a hole that is
slightly smaller in diameter than the nail that you want to use. Drill the hole
not quite through the other end. When joining two pieces of wood, do this for
both pieces. Then bang the nail through the holes in the two
pieces.


