A screwdriver
In certain schools, children may be able to use screws, instead
of nails, for joining pieces of wood. If screws are available in your school,
your pupils will find this screwdriver useful.
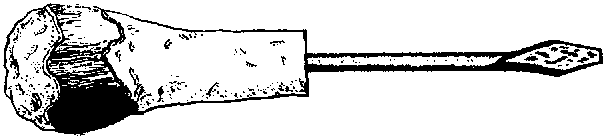
Fig. 39
You will need the following materials:
One piece of wood
Length: more than 9 cm but less than 14 cm
Circumference: If a string is put around the wood and marked the
marks should be more than 12 cm but less than 15 cm
One nail, 10 cm long
Saw
Hammer
Chisel
Bench Hook
Drill
Making the Screwdriver
Use the bench hook as a support. Then, with a chisel and hammer
or a heavy knife, shape the piece of wood so that it looks like the handle shown
in the diagram.
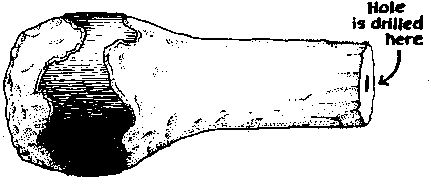
Fig. 40
Use a drill that will make a hole a little smaller than the
nail. Make a hole in the end of the handle as deep as it is possible to make
with the drill. Use the saw to cut the nail near the head of the nail, as shown
in the diagram.

Fig. 41
Flatten the part of the nail where you have cut it until it
looks like this:
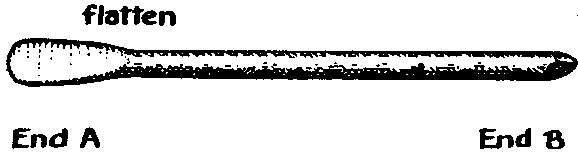
Fig. 42
This end will be the one which is banged into the wooden handle.
Flatten the other end of the nail (End B) until it looks like this:

Fig. 43
Decide how thick the point of the screwdriver will be. This
controls where you will cut off the flattened part of the nail. Use a saw to cut
off the end of the nail.

Fig. 44
A little rubbing on a piece of stone, or some filing, may be
needed to remove sharp pieces of metal.

Fig. 45
When the point of the screwdriver is complete, it should look
like this:

Fig. 46
Too much rubbing on a stone can destroy the usefulness as a
screwdriver; if the point looks like this, it is not good.

Fig. 47
Most nails that you will buy are probably of a soft metal. When
you use the screwdriver, the point of it will become damaged or twisted quickly.
You can harden the point by using the method which is described in making the
chisel point hard ( Section B.).
It is only necessary to harden the end of the nail which will be
the blade of the screwdriver. The other end, which has been roughly flattened,
does not need hardening.
Now put the blade of the screwdriver on a large piece of soft
wood and hold the handle so that the flattened part of the nail (End A) is in
the hole in the handle. Use a hammer to hit the other end of the handle so that
the flattened end of the nail goes into the hole in the handle. When the nail
seems firmly attached in the handle, stop hammering. Twist the screwdriver
gently to remove the blade from the large piece of soft wood. The screwdriver is
now ready to
use.


