Extraction
Once you have located your source of good quality clay (see
Appendix 1 for more information on how to analyse the clay), the work of
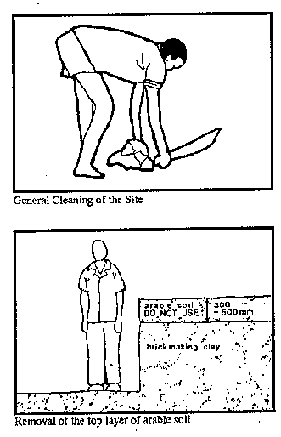
extraction begins. The first step is to cut the grass and do a general cleaning,
removing all surface vegetation, and stones from the area where you will dig the
clay.
When the area is clean, remove the top layer of soil which will
probably contain rocks, dead vegetation, and roots until you reach the layer of
clay below. This top layer of soil will be at least 300 mm to 500 mm deep.
Remove it all; none must remain.
Figure
After removing the top soil, you can begin digging and
transporting the dry clay soil to the preparation area. A word of caution though
- it is not unusual to find the clay deposited in layers with sandy soil. Take
care not to mix the different layers as you dig deeper. If you hit a large layer
of non-clayey soil, rather than digging deeper you may find that you have to dig
your hole wider. Check your soil every day while digging.

Figure
Depending on the situation, the equipment which you will
probably find most useful for digging the soil is the following:
- machetes
- picks
- hoes
- shovels
-
wheelbarrows
-
buckets