| Village Level Brickmaking (GTZ, 1989, 124 p.) | ||||
| Building A Field Kiln Which Uses Firewood As Fuel | ||||
| How To Layout The Kiln | ||||
| Construction Of The Kiln | ||||
|
| ||||||||||||||||||||
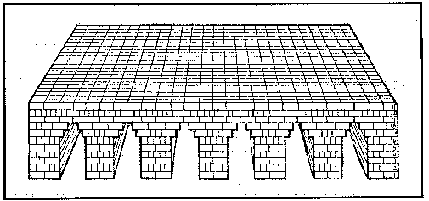
Before beginning to build a field kiln, which is sometimes called a scove kiln, it is necessary to know the following:
- the number of bricks you will be firing;- the fuel you will be using (Note: How to build and fire a kiln that uses coal as a fuel can be found in pages 91 to 99);
- the dimensions of the field kiln; and
- the direction of the wind.
Calculate the Size of the Field Kiln (using Firewood)
Count the number of bricks you want to fire very carefully. When you know the number of bricks, use the following table to determine the approximate size of the field kiln and the number of tunnels it will have.
|
Number of Bricks |
Number of Tunnels |
Length in Bricks |
Width in Bricks |
Height In Layers |
|
3,000 to |
2 |
10 |
10 |
20 to 25 |
|
5,000 | |
(250 cm)* |
(250 cm)* |
(250 to 300 cm)* |
|
7,000 to |
3 |
14 |
10 |
25 to 30 |
|
9,000 | |
(350 cm)* |
(250 cm)* |
(300 to 375 cm)* |
|
9,000 to |
3 |
14 |
12 |
25 to 30 |
|
11,500 | |
(350 cm)* |
(300 cm)* |
(300 to 375 cm)* |
|
11,500 to |
4 |
18 |
12 |
25 to 30 |
|
15,000 | |
(450 cm)* |
(300 cm)* |
(300 to 375 cm)* |
|
14,000 to |
4 |
18 |
14 |
25 to 35 |
|
17,000 | |
(450 cm)* |
(350 cm)* |
(300 to 400 cm)* |
|
17,500 to |
5 |
22 |
14 |
25 to 35 |
|
22,000 | |
(550 cm)* |
(350 cm)* |
(300 to 400 cm)* |
|
22,000 to |
6 |
26 |
14 |
25 to 35 |
|
27,000 | |
(650 cm)* |
(350 cm)* |
(300 to 400 cm)* |
|
27,000 to |
7 |
30 |
14 |
25 to 35 |
|
32,500 | |
(750 cm)* |
(350 cm)* |
(300 to 400 cm)* |
|
32,500 to |
8 |
34 |
14 |
25 to 35 |
|
37,000 | |
(850 cm)* |
(350 cm)* |
(300 to 400 cm)* |
|
37,500 to |
9 |
38 |
14 |
25 to 35 |
|
42,000 | |
(950 cm)* |
(350 cm)* |
(300 to 400 cm)* |
* assumes an unfired brick size of 250 m × 125 mm × 80mm
For example, if you want to fire 22,000 bricks, the field kiln will have 6 tunnels with a length of 26 bricks (bricks laid end to end), and a width of 14 bricks (laid end to end). The overall height of the kiln will be approximately 30 courses.
If the dimensions of the unfired bricks are 250 mm by 125 mm by 80 mm, the field kiln would have a length of 6.5 meters (26 bricks × 250 mm), a width of 3.5 meters (14 bricks × 250 mm), and a height of about 3.7 metres (30 layers × 125 mm) [Note: the bricks are laid on edge].
The width of the field kiln should not be more than 4 metres. If it was wider, it would be very difficult to throw the logs deep into the tunnels. For fuel efficiency, the field kiln should not be less than 2.5 metres wide and the height should not be more than 4 metres or less than 2.5 metres.

Figure
Orientation of the Field Kiln
Before beginning to build the kiln it is necessary to know the direction of the prevailing winds. The general rule is that the length of the field kiln (the side with the tunnel openings) should be laid out in the same direction as the wind. This will prevent the wind from blowing down into the tunnels and reducing the heat during firing. This simple orientation of the kiln to the wind can save many cubic metres of firewood.

Figure
Level the Site
Once the overall dimensions of the field kiln are known, you can select and begin to prepare the kiln site.
Step 1: Clean the site well and remove all rocks and surface vegetation. To prevent the field kiln from collapsing, make sure that the ground is very smooth and level.

Figure
If you have underfired bricks from the last kiln, you can use them to build a strong level base for the field kiln. Simply lay the bricks on their flat side (frog side down) with no space between them, making a brick floor base slightly larger than the overall size of the field kiln. This will make a good flat surface on which to build the kiln.
Lay Out the Boundaries of the Kiln
Using the table on page 50 for calculating the size of a field kiln, determine the length and width of the kiln (using brick lengths as a measurement). These dimensions will be marked with a string and the field kiln will be built within these boundaries.
Step 2: Drive a stake into the ground and tie a string or cord to it. Stretch the cord in the same direction as the prevailing wind. This cord will mark the length of the kiln and the distance will be measured using bricks. Beginning near the first stake, place the correct number of bricks on the outside of the cord. These bricks are placed on edge with their ends touching. For example, if you have 22,000 bricks to fire in a kiln with six tunnels, the length will be 26 bricks. Note. These bricks are placed temporarily and are used only to mark the boundaries of the kiln. They will be removed later.

Figure
Step 3: With another cord, lay out the second side of the field kiln. The cord is stretched perpendicular to the first cord and should just touch the end of the last brick. Make sure the corner is a right angle (90°) by either using a large builder's square or using the 3:4:5 method. (See Appendix 3 for more detailed information on the 3:4:5 rule.)

Figure
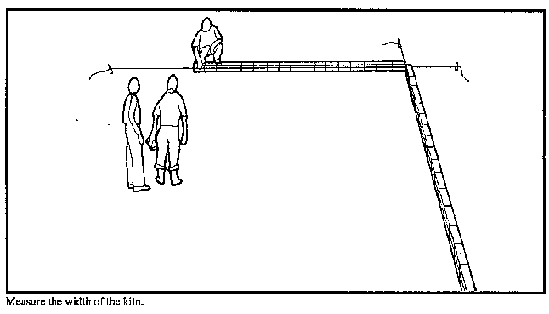
Step 4: When the corner is square, begin to measure the actual width of the kiln with bricks.
Starting at the point where the strings cross, lay the correct number of bricks end to end along the outside of the string. For example, a 22,000 brick kiln with 6 tunnels has a width of 14 bricks.
Figure
Step 5: With another cord, lay out the third side of the field kiln. The cord is stretched perpendicular to the second cord and should just touch the end of the last brick. Make sure that the corner is a right angle (90°) by either using a large builder's square or using the 3:4:5 method.

Figure
Step 6: Measure out the length of the kiln as you did for the first side, placing the bricks end to end and using the same number of bricks.

Figure
Step 7: With another cord, lay out the fourth and final side of the kiln to form a large rectangle. The cord should just touch the ends of the bricks on the first and third sides.

Figure
Step 8: Check that the corners are square or right angles (90°) by measuring the two diagonals. If the length of the diagonals are equal, this indicates that all the corners are right angles. If the diagonals are not the same length, go back and check each corner individually, using the 3:4:5 rule, to see if they were correctly made.

Figure
Step 9: The bricks used to measure the length of the field kiln are also used to mark the location of the firing tunnels. Beginning in the corner and counting along the length of the kiln, leave the first two bricks standing as they are but the turn the next two onto their flat side. Leave the next two bricks standing as they are but the turn the next two onto their flat side. Continue until you finish that side. If you have laid the correct number of bricks for the kiln, the last two bricks should be standing on edge in their original position. Repeat on the other long side of the kiln in exactly the same manner.

Figure
Where the bricks have been turned on their flat side indicates the location of the firing tunnels. Therefore, the tunnel walls are two bricks wide and the tunnel openings are two bricks wide.
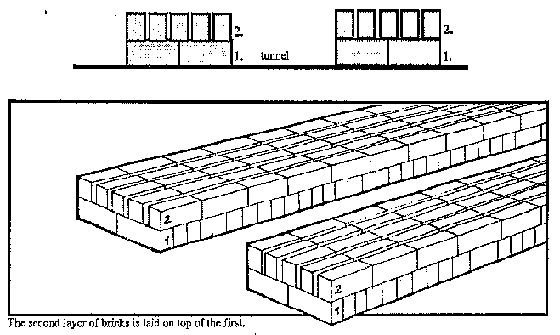
Layer 1
Using the cords which show the tunnel position as a guide, start to place the bricks on edge, end to end, in a 2-brick row with a 10 mm space ("finger-width") between them along their length. Do not place any bricks in the area of the firing tunnel.
When the first layer of bricks has been completed, remove all the bricks which were used to measure the dimensions of the kiln and the position of the firing tunnels and put them aside.

Figure
To build a strong field kiln that will not collapse, it is especially important to use good quality (uncracked and regular in form and shape) unfired bricks in layers one through nine.
Important: All the bricks used to construct the field kiln are placed on edge and not placed on their flat sides because they are stronger in this position.

Figure
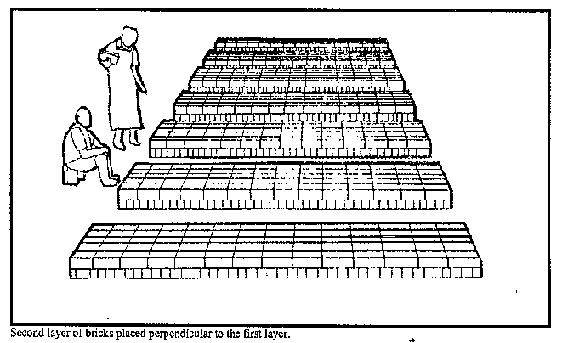
Layer 2
The second layer of bricks is placed perpendicular to the first layer. Note that there is no space left between the ends of the bricks. There is a space though along the sides.
Figure
In the tunnel wall, five perpendicular rows of bricks are placed on the two lower bricks in the first layer. Note how the middle brick covers the joint of the bottom two bricks; this is very important for building a strong kiln.
Figure
To allow heat and the hot gases from the fire to move through the kiln, it is necessary to leave small spaces between the bricks when building the kiln.
For layers 1, 3, 5, 7, 8, and 9, the bricks are placed as shown in the diagram. Where a space of 10 mm is indicated, the width of your small finger can be used as a measure.

Figure
For layers 2, 4, and 6, the space between the bricks may be greater than 10 mm, depending on the size of the bricks. Regardless of the size your bricks, there should be five rows on top of the two bottom ones, and the spaces between the rows should be equal.

Figure
Remember that when building the field kiln, all bricks are laid on edge because the brick is stronger in this position.
Layer 3
Place the same number of bricks in the same position as the first layer.

Figure
As you are laying the third layer, try not to have the brick joints line up with the joints from the layer below.
Layer 4
For the fourth layer, place the same number of bricks in the same position as the second layer.

Figure
Layer 5
The fifth layer is similar to the first and third layer but there is a slight difference at the beginning and end of the rows. Examine the drawing carefully to see how it is done. The objective of this slightly different arrangement is to give more strength to the kiln and to prevent the bricks from collapsing outward as they shrink during the firing. The rest of the bricks in this layer are placed in the same way as in the third layer.

Figure

Figure
Layer 6
The sixth layer is laid the same way as the second and fourth layers.
Layer 7
Beginning with the seventh layer, and continuing until the ninth, the bricks are progressively stepped out to form the tunnel roof. This stepping out pattern of the bricks is called corbelling.
The corbelling for the seventh layer is shown in the diagrams. Note that there is a difference in the arrangement between the exterior and interior tunnel walls.

Figure
Layers 8 and 9
The eighth and ninth layers close the roof of the tunnels and are laid at the same time. When laying the bricks, it will be easier if there is one person in each tunnel. Place 4 bricks of the eighth layer followed by four of layer
9. Repeat this to the end of the tunnel. Note that the inner tunnel walls in layer 8 are slightly different from the outer ones in the eighth layer.
Remember to leave the correct amount of space between the bricks.

Figure
Layer 10
Place a row of bricks over the joint of the two bricks in the ninth layer which closed the roof of the tunnel.
Place the remaining bricks perpendicular to these rows as shown in the drawing, leaving a small space between the bricks to allow the heat and gases to pass through the kiln.

Figure
Layers 11,13,15,17,19, etc.
Place the bricks for layer 11 as shown the drawing below. The bricks in all the following odd- numbered layers (13, 15, 17, 19, etc.) will be placed in the same way. As in the other layers, the bricks touch at their ends but a 10 mm space is left along the sides.
Figure
Layers 12,14, 16,18, 20, etc.
For the twelfth layer, place the bricks as shown in the drawing below. The bricks are laid in rows perpendicular to the bricks in the layer below. The bricks in all the following even- numbered layers (14, 16, 18, 20, etc.) will be placed in the same way.
Beginning with the twelfth layer and for each subsequent layer, the bricks will be stepped in slightly to give the kiln a modified pyramid form This shape will increase the stability of the kiln and will prevent the kiln walls from collapsing outwards when the bricks shrink during the firing.

Figure
Along the width of the kiln (the sides which do not have tunnel openings), step in the bricks approximately 40 mm on each layer. Along the length of the kiln (the sides with the tunnel openings) step in the bricks 20 mm on each layer.
To allow the hot gases and heat from the fires to move through the kiln, it is necessary to leave small spaces between the bricks when building the kiln. Place the bricks as show in the drawing below. Where spaces are indicated, the width should be about 10 mm or approximately "finger width".

Figure
Final Layer
The last layer of bricks is quite different from all the previous layers. First lay a three brick high wall around the outer edge of the kiln top. The bricks are laid flat, without mortar, and without spaces between the bricks. Inside this wall, place a layer of bricks laid flat side down, leaving a 10 mm space around each brick. This 10 mm space will allow the steam and hot gases to escape.
After the kiln has finished firing and has reached the correct temperature, it will be sealed off by throwing a layer of sand or soil on top of the kiln. The sand or soil will hold in the heat arid prevent the kiln from cooling off too quickly. The sand or soil will be shoveled up on top of the kiln until it is level with the small wall around the top of the kiln. The small wall will help contain the soil or sand and will indicate the quantity which must be thrown onto the top.

Figure
Insulation
After finishing the construction of the field kiln, and before beginning to fire it, the exterior of the kiln must be insulated with mud and broken bricks.
The insulation is necessary to prevent the excessive loss of heat from the kiln during firing. When a kiln is well insulated, the bricks will be fired better and you will use less firewood.

Figure
The thickness of the insulation should be approximately 150 mm. A simple way to build up this insulation on the outside of the kiln is to use broken or misshapen dry bricks (or better yet broken bricks from your last kiln firing). The bricks are laid with mud mortar in layers around the kiln and then plastered on the outside with mud. If this plastering mud contains a lot of clay, it will crack and fall off during firing; mix a little sand into the mixture to prevent this from happening.
If you do not have sufficient broken bricks to build this entire outer layer up to the last course, build it at least up to the twelfth course. From there use mud plastered to a thickness of at least 100 mm.
The plaster should be applied in two layers, allowing the first to dry before applying the second. Throw the mud with force so that it fills the cracks well. The mud should have sand added to it to prevent cracking when the kiln begins heating up.
When insulating the kiln do not plaster or close off the top of the kiln. It must be left open during the firing.
During the firing of the kiln, have some mud plaster ready to repair the cracks that will form in the plaster. As the heat of the kiln increases, it is not unusual for the plaster to crack and fall off. Be prepared to repair this or heat will escape and more firewood will be needed to bring the kiln up to temperature.

Figure
