When the gas is made
114. Do not burn the first gas that is made in your biogas unit.
It may have air in it and could explode.
115. A few days after the inner tube has begun to swell with
gas, open the valve and let out all of the gas that has been collected.
116. While you are letting the gas out be very careful not to
have fire near the biogas unit.
117. After the valve is open you will have to force the gas out
of the inner tube or tubes.
118. You can force gas out of a tube by rolling it as you were
told to do in Item 63 in this booklet, or by putting a weight on it such as
pieces of wood or stones.
119. The drawings on the next page show you how to force air out
of a biogas unit with one or more inner tubes.
120. When all of the gas is out, close the valve and your biogas
unit will begin to collect gas again.
121. If you have done this carefully, the next gas that is made
will have no air in it and will be safe to burn. Do not open the unit again
until all the gas has been made.

Collect gas
122. Now you can attach the gas line to the top of the valve.
However, do not open the valve until the inner tube is half full. Later, you can
help to push the gas out of the inner tube by putting a few stones or bricks on
it.

Attach the gas line
123. Items 108 to 114 in Booklet No. 31 tell you how to use
biogas for cooking and how to clean the burner.
124. After all the gas has been made, take the unit apart and
empty out the fertilizer. Items 115 to 118 in Booklet No. 31 tell you how to use
the fertilizer.
125. However, be sure to keep about 4 litres of the fertilizer
to be used as a starter for next time.

Keep fertilizer as a starter
126. Clean the unit carefully and check for leaks.

Check for leaks
127. Now fill the unit with new waste material and add the
starter. Close the unit tightly and it will begin to make gas again.
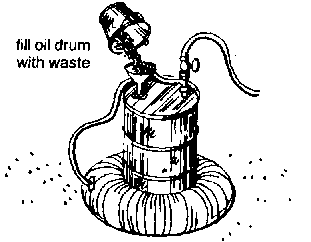
Fill oil drum with waste
128. Remember, every time you start again, do not burn the first
gas that is
made.