Water Storage and Treatment
CISTERNS
Cisterns for family use are most practical in areas of
adequate rainfall and where
ground water is difficult to obtain or where it contains too
many minerals. A
sealed well usually requires no filtration, no chemical
disinfection, and little
upkeep, while a cistern needs all of these. And cisterns
generally cost more to
build than wells. Cistern water has few minerals, however,
and is ideal for
washing clothes.
A cistern water supply has four basic parts: tank, catchment
area, filter, and
pump. (Pumps are discussed in the section on "Water
Lifting.")
Cistern Tank
The tank described here can be used for sanitary storage of
rainwater for family
use. It can be constructed of reinforced concrete sealed
with asphalt sealing
compound.
The cistern tank must be watertight to prevent surface
contamination from
polluting the supply. Reinforced concrete is the best
material because it is strong,
it has a long life and it can be made watertight.
A manhole and drain must be provided so that the tank can be
cleaned. (See Figure 1.)
fig1x130.gif (600x600)

A vent and a place through which chlorine can be added
easily for disinfection
are also necessary. (Note: Chlorine can be added through the
vent by
removing the U elbow. Lubricate the threads of the elbow to
make removal easy.)
The size of the cistern depends on the family's daily needs
and the length of
time between rainy periods. If a family needs 94.6 liters
(25 U.S. gallons) of water
a day and there are 125 days between rainy periods, then the
cistern must hold:
94.6 liters x 125 days = 11,835 liters
or
25 U.S. gallons x 125 days = 3,125 U.S. gallons
A cistern with an inside size of 3 meters x 2 meters x 2
meters (7 1/2' x 7 1/2'
x 7 1/2') holds 11,355 liters (3,000 U.S. gallons). The top
surfaces of the cistern
walls should be about 10cm above ground.
To be sure that the cistern is watertight, use about 28
liters of water per 50kg
sack of cement (5 1/2 U.S. gallons per 94 pound or one cubic
foot sack) when
mixing the concrete. (See section on "Concrete
Construction.") Tamp the concrete
thoroughly and keep the surface damp for at least 10 days.
If possible, pour the
walls and floor at the same time. The manhole entrance must
be 10cm (4") above
the cistern surface and the cover should overlap by 5cm
(2"). Slope the bottom of
the cistern, making one part lower than the rest, so that
water can be more
easily siphoned or bailed out when the cistern is being
cleaned. You can do this
by scraping the bottom to the proper contour. Do not use
fill dirt under the
cistern because this may cause the cistern to settle
unevenly and crack. A
screened drain pipe and valve will make cleaning easier.
An overflow pipe is not needed if a roof-cleaning butterfly
valve is properly used.
If the overflow is installed, be sure to cover the outlet
carefully with copper
window screen. A screened vent is necessary if there is no
overflow, to allow
displaced air to leave the cistern. The hand pump must be
securely mounted to
bolts cast into the concrete cistern cover. The flanged base
of the pump should
be solid, with no holes for contamination to enter, and
sealed to the pump cover,
or the drop pipe must be sealed in with concrete and asphalt
sealing compound.
A small pipe with a screw-on cap is needed to allow for
measuring the water in
the cistern and adding chlorine solution after each
rainfall. The amount of water
in the cistern is measured with a stick marked in thousands
of liters (or thousands
of gallons). To disinfect after each rainfall, add a 5 parts
per million
dosage of chlorine (see section on
"Chlorination").
A newly built or repaired cistern should always be
disinfected with a 50 parts per
million chlorine solution. The cistern walls and the filter
should be thoroughly
washed with this strong solution and then rinsed. A
small-pressure system can be
disinfected readily by pumping this strong solution
throughout the system and
letting it stand overnight.
Catchment Area
A catchment area of the proper size is a necessary part of a
cistern water
supply. Rainwater for a cistern can be collected from the
roof of a house. The
method given here for estimating catchment size should be
checked against the
actual size of nearby catchment installations.
The catchment or collecting area should be a smooth,
watertight material, like a
galvanized sheet-metal roof. Wood or thatch roofs may taint
the water and retain
dust, dirt and leaves; water from these roofs contains more
organic matter and
bacteria than water from smooth surfaces. Stone, concrete,
and plastic film
catchments are sometimes built on the ground. For family
use, roofs are usually
best because humans and animals cannot contaminate them.
To estimate your required catchment area, estimate the
minimum yearly rainfall
and the amount of water required by the family during one
year. Sometimes the
government meteorological section can give you the minimum
rainfall expected. If
they cannot, estimate the minimum rainfall at two-thirds of
the yearly average.
Take the average amount of water needed by the family for
one day and multiply
it by 365 to learn how much is needed for one year. Then use
the chart to find
how much roof space is needed (Figure 2). Add 10 percent to
the area given by
fig2x133.gif (600x600)
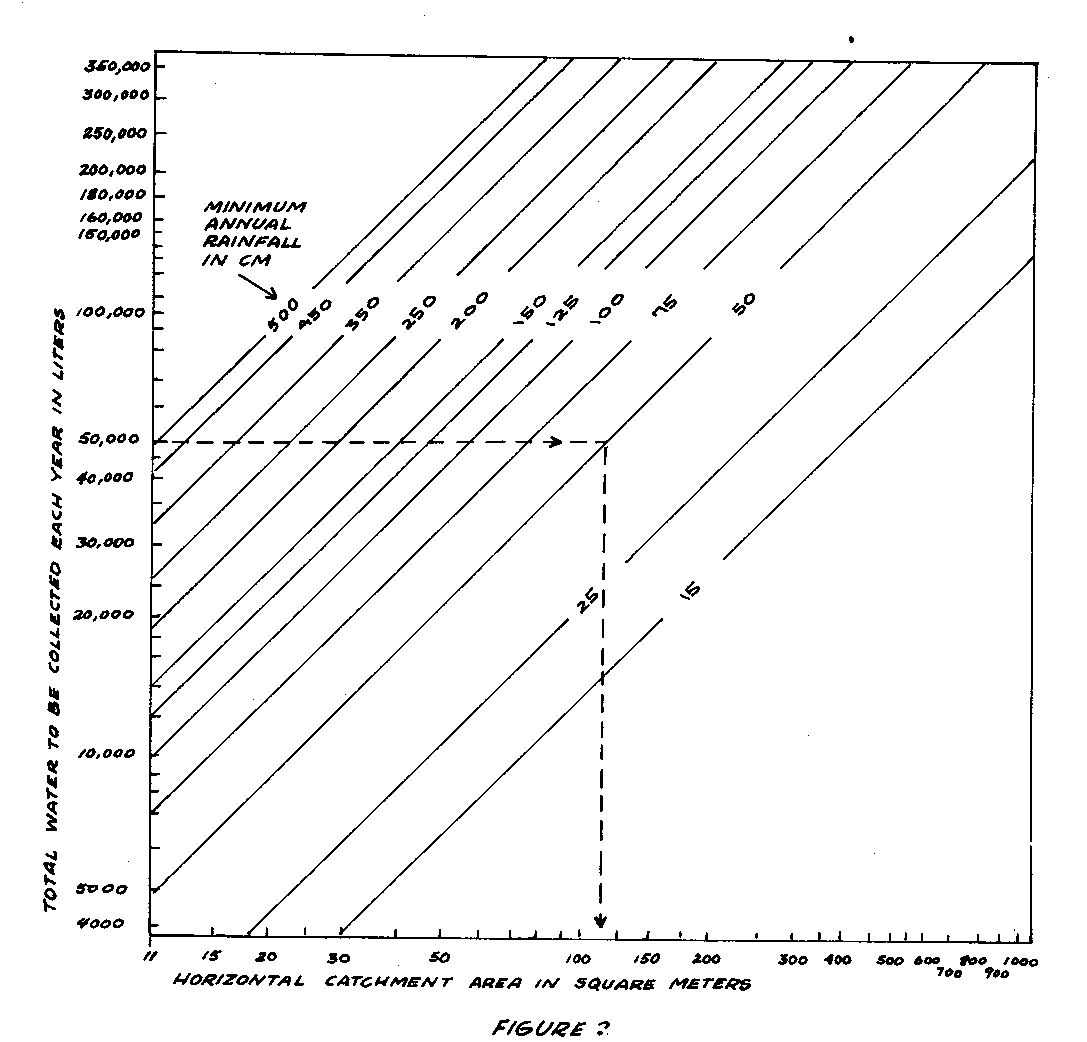
the chart to allow for water lost to evaporation and
discarded at the beginning of
each rainfall.
Example:
With an average
rainfall of 75cm a year, and a family needing 135 liters of
water a day,
then:
2/3 x 75 =
minimum annual rainfall of 50cm
365 x 135 liters/day = 49,275 liters a
year.
Round this figure
off to 50,000 liters a year. The example worked out on the
chart (Figure 2)
shows that a catchment area of about 115 square meters is
needed. Add 10
percent to this area to allow for water loss, giving a total
required
catchment area of about 126.5 square meters.
A collecting trough and downspout are needed. Be sure there
is a good pitch to
the trough so that the water flows freely and does not hold
small puddles that
can attract mosquitoes and other insects. Troughs and
downspouts need periodic
inspection and cleaning. Extending the trough increases the
catchment area.
Cistern Filter
The sand filter described here will remove most organic
matter from water but it
will not produce safe drinking water by removing all harmful
bacteria. Water
collected in the cistern tank should be chlorinated after
each rainfall. A catchment
area always collects leaves, bird droppings, road dust, and
insects. A cistern
filter removes as much of this material as possible before
the water enters the
cistern (Figure 3).
fig3x134.gif (600x600)
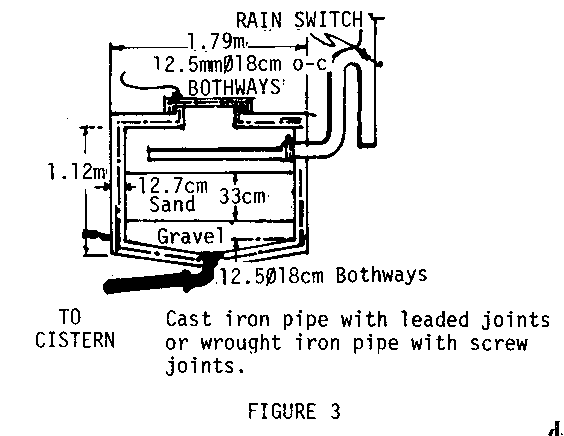
The sand filter is usually built at
ground level and the filtered water
runs into the cistern, which is
mostly underground. The largest
pieces, such as leaves, are caught
in the splash plate. The splash
plate also distributes the water
over the surface of the filter, so
that the water does not make holes
in the sand. Several layers of
copper window screen form the
splash plate.
If a filter is made too small to handle the normal rush of
water from rainstorms,
the water will overflow the filter or dig a channel in the
sand, ruining the filter.
The filter area should be not less than one-tenth of the
catchment area. A typical
filter would be 122cm x 122cm (4' x 4') for a family-sized
unit where rainfall
intensity is average.
About every 6 months, remove the manhole cover and clean the
filter. Remove all
matter from the splash plate and scrape off and remove the
top 1.25cm (1/2") of
sand. When the sand is down to 30cm (12") in depth,
rebuild it with clean sand to
the original depth of 46cm (18").
The first runoff from the roof,
which usually contains a great deal
of leaves and dirt, should be
discarded. The simplest way to do
this is to have a butterfly valve
(like a damper in a stovepipe) in
the downspout. After the rain has
washed the roof, the valve is
turned to let the runoff water
enter the filter. A semi-automatic
filter is shown in Figure 4.
fig4x134.gif (600x600)

In building the filter, it is important
to use properly-sized sand and
gravel and to make sure the filter
can be cleaned easily. The filter
must have a screened overflow.
Sources:
Wagner, E.G. and Lanoix, J.N. Water Supply for Rural Areas
and Small Communities.
Geneva: World Health Organization, 1959.
Cisterns. State of Illinois, Department of Public Health,
Circular No. 833.
Manual of Individual Water Supply Systems. U.S. Department
of Health, Education
and Welfare, Public Health Service Publication No. 24.
SELECTING A DAM SITE
A water reservoir can be formed by building a dam across a
ravine. Building a
dam takes time, labor, materials, and money. Furthermore, if
a dam holding more
than a few acre-feet of water breaks, a great deal of damage
can be caused.
Therefore, it is important to choose a dam site carefully,
to guard against dam
collapse, and to avoid excessive silting, porous soil,
polluted water, and water
shortages because the catchment area is too small. Careful
selection of the dam
site will save labor and material costs and help ensure a
strong dam.
The preliminary evaluation described here will help to
determine whether or not a
particular site will be good for building a dam. Remember
that dams can have
serious environmental consequences and an improperly
constructed dam can be
extremely dangerous. Consult an expert before starting to
build.
Six factors are important in site selection.
1. Enough water to meet your requirements and fill the
reservoir.
2. Maximum water storage with the smallest dam.
3. A sound, leakproof foundation for the reservoir.
4. Reasonable freedom from pollution.
5. A storage site close to users.
6. Available materials for construction.
7. Provision for a simple spillway.
8. Authorization from local authorities to build the dam and
use the water.
One acre-foot of water is equivalent to the amount required
to cover an acre of
land (30cm of water covering 0.4 hectares) to a depth of 1
foot. One acre-foot
equals 1,233.49 cubic meters. The annual rainfall and type
of catchment (or
natural drainage) area will determine the amount of water
the reservoir will
collect.
Catchment Area
A catchment area with steep slopes and rocky surfaces is
very good. If the
catchment area has porous soil on a leak-proof rock base,
springs will develop
and will carry water to the reservoir, but more slowly than
rocky slopes. Trees
with small leaves, such as conifers, will act as a
windbreakers and reduce loss of
water from evaporation.
Swamps, heavy vegetation, permeable ground, and slight
slopes will decrease the
yield of water from a catchment area.
Rainfall
The average catchment area will, in a year, drain 5
acre-feet (6,167 cubic meters)
into a reservoir for every inch (2.5cm) of annual rainfall
falling on a square mile
(2.59 square kilometers); that is, about 10 percent of the
rainfall.
Location
The best location for building a dam is where a broad valley
narrows with steep
sides and a firm base on which to build the dam (see Figure
1). Ground that
fig1x137.gif (600x600)
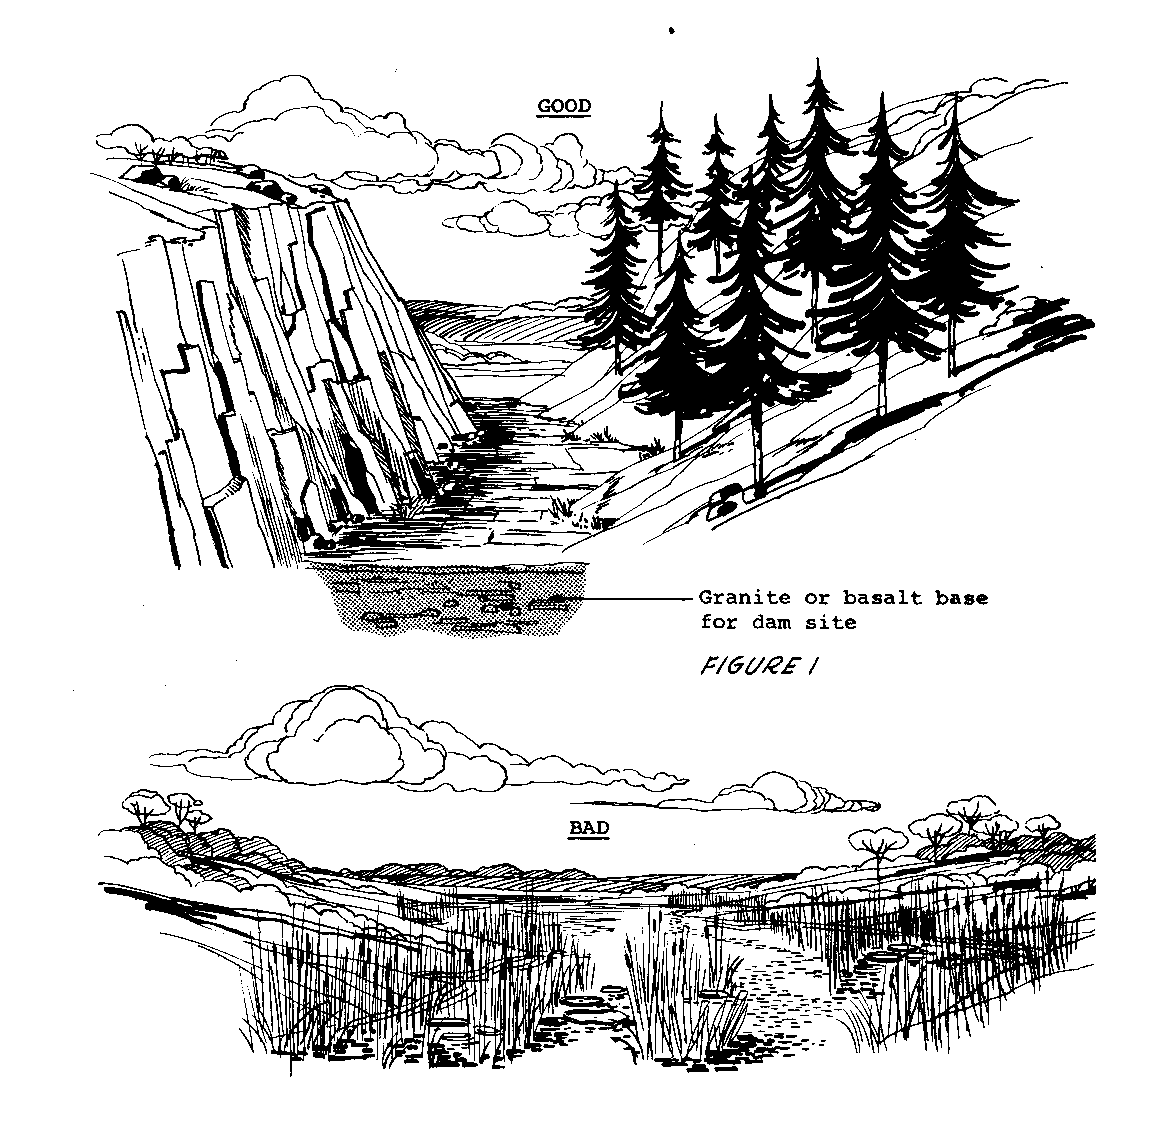
contains large boulders, weathered or fissured bedrock,
alluvial sands, or porous
rock is not good. The best bases for building a dam are
granite or basalt layers
at or near the surface or a considerable depth of silty or
sandy clay.
Location of a dam upstream from its point of use can lower
pollution and may
allow for gravity feed of the water to its point of use.
It is best if stone is nearby when building a masonry dam.
When building an earth
dam, rock will still be required for the spillway. The best
soils for earth dams
contain clay with some silt or sand. There should be enough
of this soil close to
the dam site for building the entire dam of reasonably
uniform material.
Source:
Wagner, E.G. and Lanoix, J.N. Water Supply for Rural Areas
and Small Communities.
Geneva: World Health Organization, 1959.

