Low-cost Windmill
for Developing Nations
multi-vane fan type
Construction details for a low cost windmill are
presented. The
windmill produces one horsepower in a wind of 6.4 miles/sec
(14.3 mph), or two horsepower in a wind of 8.1 miles/sec
(18.0 mph).
The windmill uses the rear axle and differential of a small
car.
Other parts are made from sheetmetal, pipe, steel ribbon,
rod,
angle iron, or channel, welded or bolted together, and
wood. No
precision work or machining is required, and the design can
be
adapted to fit different materials or construction
skills. The
rotor blades feather automatically in high winds to prevent
damage.
A full-scale prototype has been built and tested
successfully.
NOTE: The University
of California, Dr.
Bossel, W. Delameter and P. Miller retain
proprietary rights to commercial exploitation
of lnventions disclosed in the present report.
VITA, Inc.
First
printing 1970
Reprints:
APR
1976
AUG 1976
NOV 1976
FEB
1977
OCT 1977
INTRODUCTION
The VITA
windmill (Fig. I1) is a complete aerodynamic and
08p05.gif (445x594)
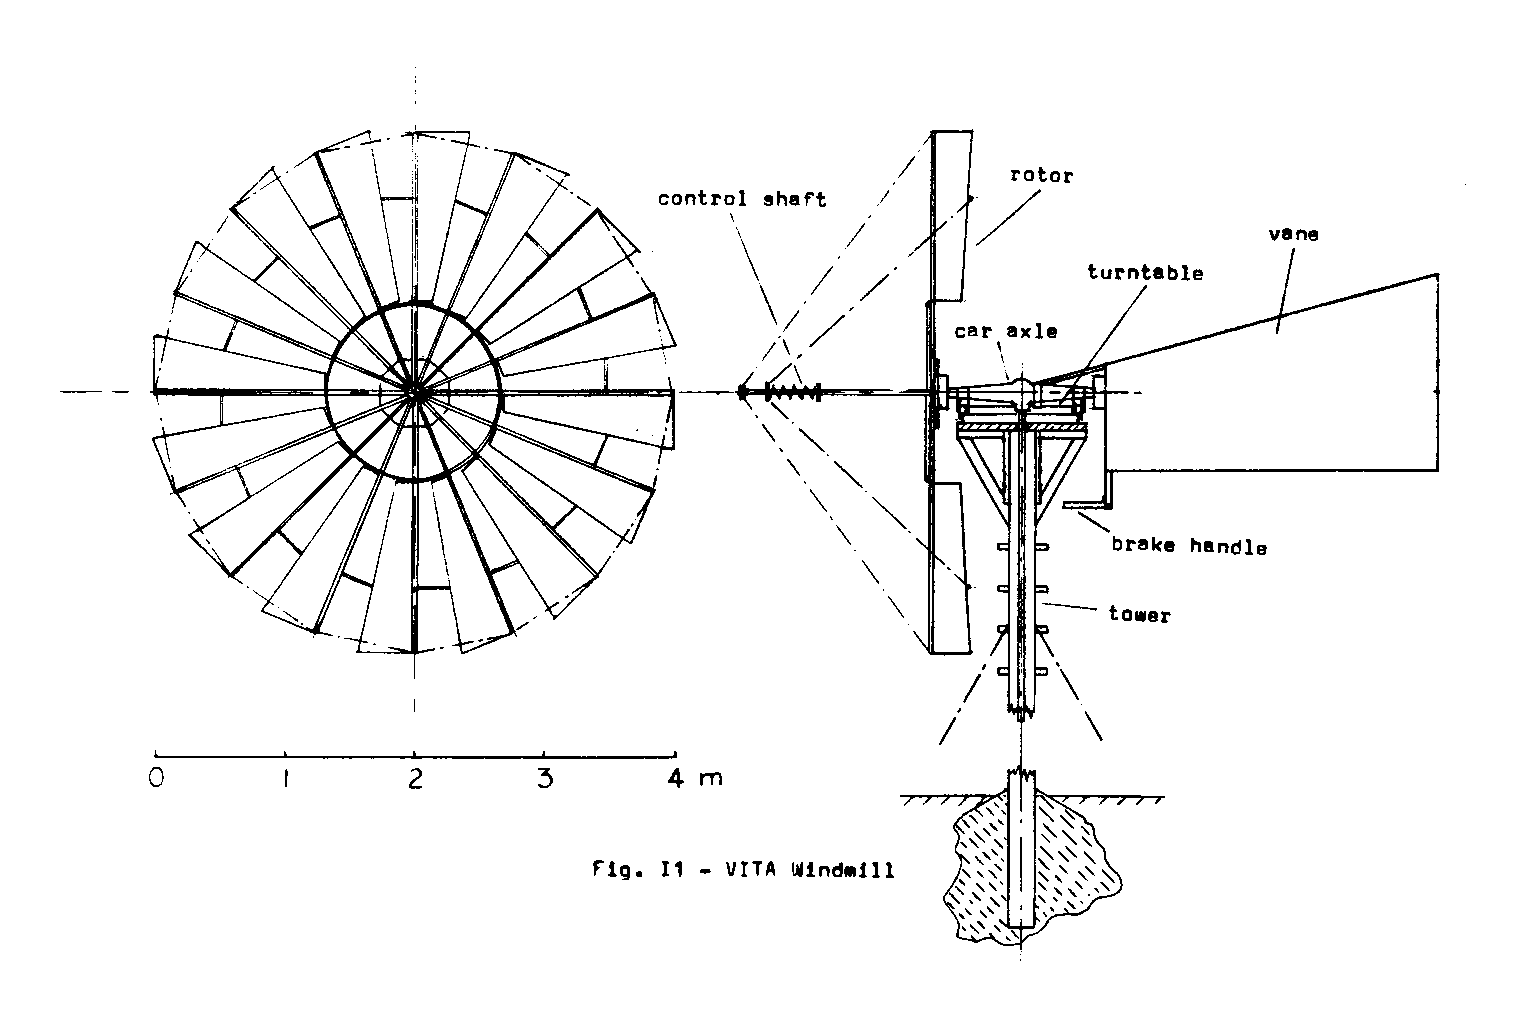
structural redesign of an earlier prototype designed, built
and
tested by W. Delameter and P. Miller under the supervision
of
H. Bossel of the Mechanical Engineering Department.
The fullscale
prototype proved the soundness of the rotor design,
overloading
control (blade feathering), and directional control (vane).
The VITA
windmill consists of five major components:
the
transmission, the rotor with overloading control
(feathering),
the vane for directional control, the turntable (supporting
rotor,
transmission, and vane), and the platform and tower
structure.
The rotor is
constructed from steel rod, support wires, and
sheet metal blades hinged to the spokes.
A simple spring-loaded
mechanism allows the blades to feather in high winds or when
overloaded. The
mechanism is explained in Fig. I2. The rotor
08p06z.gif (450x600)

center plate is bolted to the brake drum of the rear axle of
a
small car. The
wheelbrake stops the rotor when it is not is use.
The other wheel is permanently locked, resulting in a
transmission
ratio of about 1:4 from the horizontal to the vertical.
The
rear axle is free to swivel about the vertical on a
turntable.
A vane, which is set at a small angle to counteract the
torque
transmitted vertically, keeps the rotor pointing into the
wind.
The whole assembly is mounted on a small platform on a
single-beam
tower.
Detailed blueprints
are not presented in this report, since
the design will differ with the materials, parts, and skills
the
builder finds at his disposal.
He should understand that most
dimensions and details (except those stated explicitly) are
not
critical, and can be adapted to suit the needs.
There are a few
exceptions in particular.
First, number, shape, and angles of
the blades should remain unchanged to obtain the specified
performance.
Second, the control spring should come close to the stated
specifications in order to adequately protect the rotor from
possible destruction.
Third, vane area, vane arm from the vertical
axis, and vane angle should remain as given in the report
for the
same rotor and transmission ratio.
More generally, the product
(vane area) x (vane arm) x (vane angle) should remain
constant,
where the vane angle should always be less than about ten
degrees.
This product must remain proportional to the torque
transmitted;
i.e., it should be doubled if a transmission ratio of 1:2
instead
of 1:4 is used for the same rotor.
A few possible
modifications of the basic design might be of
interest.
Automobile
rear axles offer a rather wide choice of transmission
ratios depending on how they are mounted, and whether
one wheel drum or the slip gears are locked or removed. This
range is from approximately 1:4 from rotor to vertical shaft
if
the rotor is mounted on the wheel drum, to 4:1 if the rotor
is
mounted on the drive shaft side. In the first case, a second
rear axle and/or an automobile gear box could be used to
further
increase the rotational speed and drive a centrifugal pump,
circular saw, electric generator, feed mill and the like. In
the second case, the slow rotation would permit driving
directly
a reciprocating pump, or other machninery requiring slow
rotation.
In that case, the torque in the vertical shaft cannot be
counteracted
by the aerodynamic torque of a vane of reasonable size
and the rotor must either be mounted rigidly in the
direction
of prevailing winds, or turned manually and locked, or
turned by
a nonreversible control mechanism (which would greatly
increase
the complexity).
Manual turning should also be considered for
the case of lower torque and higher shaft speed of rotation.
It would eliminate the vane and simplify the central bearing
problem, since less precision and some friction would be
permitted.
Specifications for a smaller 2 meter windmill, and
suggestions for
electric power generation are provided in the Appendix.
PERFORMANCE DATA
Performance at sea level
Windspeed
m/sec
4
6 8
10
km/h
14.4
21.6 28.8
36.0
mph
9.0
13.4
17.9 22.4
Rotor speed
revolutions per
21.0 31.5
42.0
52.5
minute (rpm)
Rotor torque
mkgf
8.8
19.8 35.2
55.0
ft lb
63.6
143.2 255.0
398.0
Starting torgue
mkgf
15.3
34.5 61.4
96.0
ft lb
111.0 250.0
445.0
695.0
Power
mkgf/sec
18.1
61.1 145.0
283.0
kw
0.177
0.60
1.42 2.77
hp
0.24
.81
1.91 3.73
Altitude effects
Altitude
m
0 1000
2000
3000 4000
ft
0
3280 6560
9840
13,100
percentage reduction
of power and torque
%
0
9 18
26
33
(rotor rpm unaffected)
Feathering Information
For control
spring of spring constant 1.5kgf/cm precompressed
to 13.5 kgf:
Rotor braked: Blades
begin to feather at a wind speed V of
6 m/sec. Blades
fully feathered at V = 10 m/sec.
Rotor running under load:
Slades begin to feather at V = 8 m/sec.
Blades fully feathered (and rotor stopped) at
V = 12.5 m/sec.
Rotor running free:
Little or no feathering. Rotor
speed will
increase with wind speed, and damage is likely.
Always brake
rotor when not running under load.
TOOLS
Protractor (to measure angles)
Hack saw
Welder (gas or electric)
Sheet metal shears
Steel drills (approximately 3 to 30 mm)
Hammer
Pliers
Adjustable wrenches, or set of wrenches
General Notes:
All sheet
metal, nuts, bolts, wires, nails should be
gaivanized, if available.
All nuts must
be secured by using spring washers, lock
washers, or a second nut tightened against the first.
CONVERSIONS
1 m = 100 cm = 1000 mm = 3.28 ft = 39.4 in
1 in = 25.4 mm
1 kgf = 2.2 lbf
1 m/sec = 3.6 km/h = 2.24 mph
1 kw = 1.34 hp
BIBLIOGRAPHY
Hutter, U., "Windkraftmaschinen," in Hutte,
Maschinenbau,
Teil A,
28. Aufl., p. 1030 - 1044, Ernst,
Berlin, 1954.
United Nations, Proceedings of the United Nations Conference
on New Sources
of Energy, Volume 7, Wind Power,
United Nations
Publication Sales No: 63.I.41, New
York,
1964.
W. Delameter, R. Sprankle, Park H. Miller III,
Windmill and
Waterpump for Developing Nations.
Mechanical
Engineering Dept., University of California,
Santa Barbara,
Calif., June 1969.
TRANSMISSION
The present
design uses a rigid rear axle and differential
(from a small car) with mechanical brakes.
Other car axles can
be used with corresponding modifications.
If the wheels have
hydraulic brakes, use the master brake cylinder and other
components
from the car brake system to build a rotor brake system.
Lock
permanently the wheel drum on which the vane is to
be mounted, by either locking the brake completely and
permanently,
or by blocking the slip gear.
In most cars the rotational speed of
the drive shaft will then be approximately four times higher
than
that of the rotor mounted on the wheel drum.
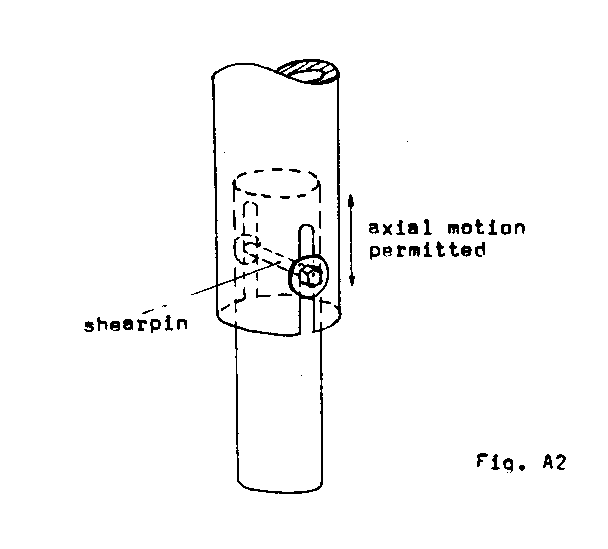
The drive
shaft and the two universal joints are used to
transmit the rotor power to the driven machinery (see Fig.
A1).
08p09a.gif (600x600)

The drive shaft can be lengthened by using pipe of
approximately
20 to 40 mm outer diameter.
Note: Permit some axial motion
of
the drive shaft to allow for thermal expansion and use shear
pin
to prevent damage (see Fig. A2).
08p09b.gif (486x486)
Various
possibilities of transmissions using a second
automobile rear axle and/or automobile transmission are
shown in
Fig. A1.
ROTOR
Part
number
Quantity Remarks (see Figs. R1
- R7)
08p120.gif (600x600)
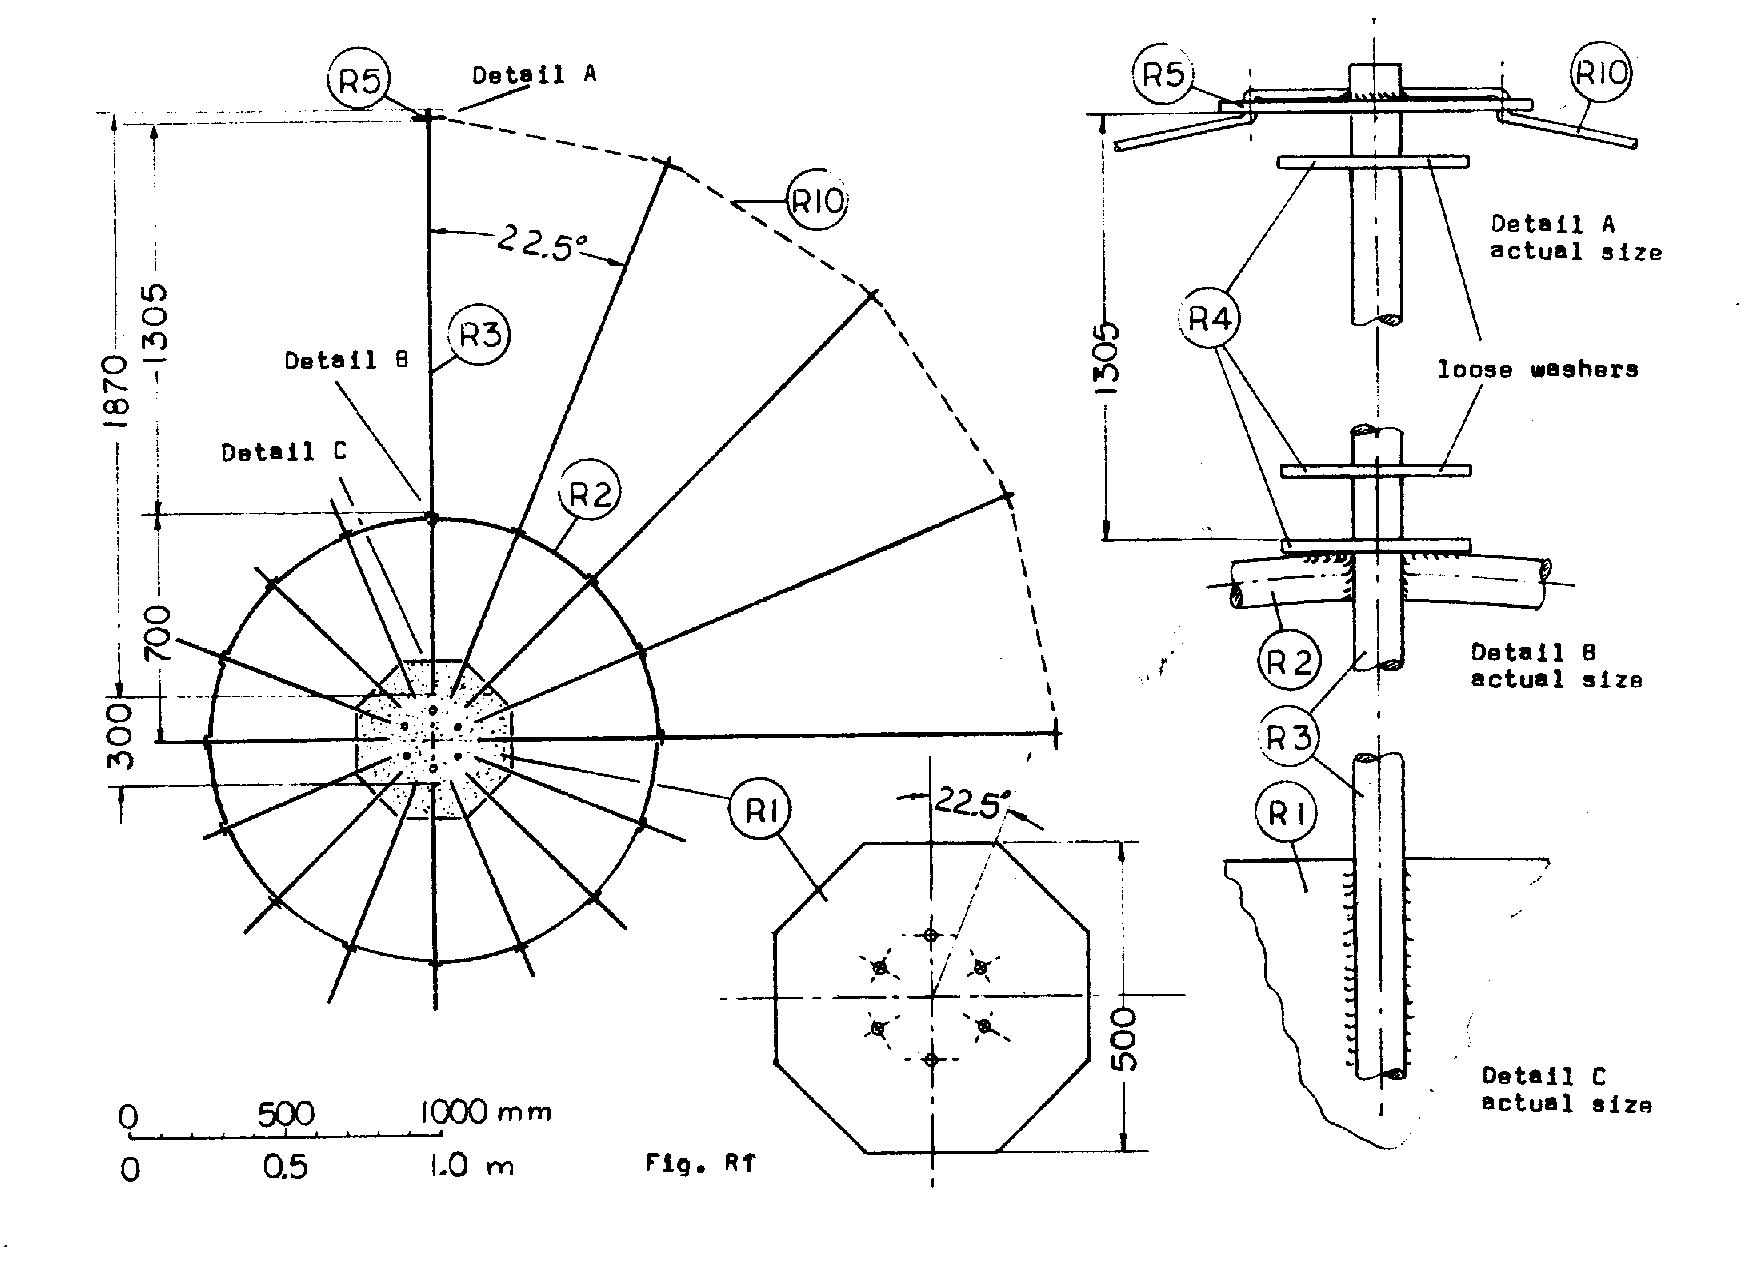
R1 1
Steel plate 0.5m x 0.5m, approximately
5 mm thick.
For mounting on axle, drill same drill pattern as
required for rear wheels
(Fig. R1).
08p12.gif (600x600)
R2 1
Steel rod (same as for spokes), 4.35m
long,
approximately 6 to 8 mm diameter.
Bend into
circle of 1.39m outer diameter, weld ends together
(Fig. R2)
08p13.gif (600x600)

R3 16
Round steel rods for spokes 1.87m
long, approximately
6 to 8 mm diameter (Fig. R1).
R4 48
Washers to fit loosely on spokes,
approximately
2-3mm thick, 30mm outer
diameter. Note:
washers
can be square and home-made from sheet metal.
R5 16
Sheet metal strips approximately 50mm
x 70mm
2-3mm thick. Drill one centerhole
to fit on
spokes (R3) and three holes for wire (R10) and
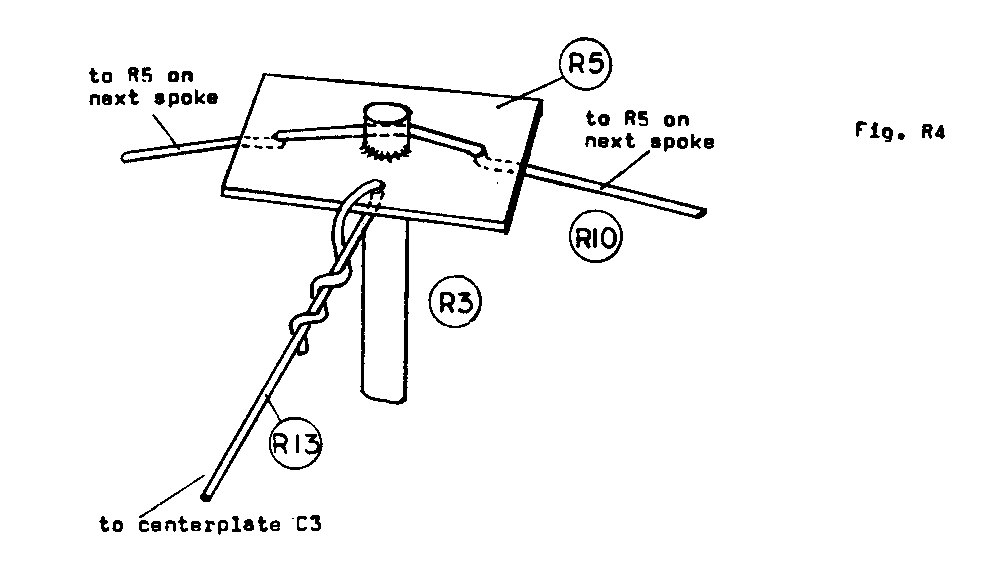
rigging wire (R13) (Fig. R1, Fig. R4).
08p15a.gif (486x486)
R6 16
Galvanized sheet metal blades, made
from 8 pieces
1.3m x 0.75m, approximately 0.5mm thick (Fig. R2).
08p13.gif (600x600)
R7 48
Sheet metal strips, approximately 50mm
x 70mm;
1.5 - 2mm thick. Bend to shape
shown (Fig. R2).
R8 16
Sheet metal strips, approximately 50mm
x 50mm;
same material as vanes (Fig. R2).
R9 16
Rubber strips, approximately 50mm x
100mm, made
from side walls of used car tire Fig. R2).
R10 1
Steel wire or cable, 26m long, 2 - 3
mm diameter.
R11 1
Steel wire or cable, 6 m long, 2 - 3
mm diameter.
R12 8
Steel wire or cable, 2.5m long, 2 - 3
mm diameter.
R13 16
Steel wire or cable, 3 m long, 2 - 3
mm diameter.
Rivets or small nuts and bolts
to fasten hinges
and rubber strips on vane.
CONSTRUCTION OF ROTOR
Prepare parts (R1) - (R10).
Make the blade bending rig (Fig. R3).
Bend blades (R6) into
08p14.gif (600x600)
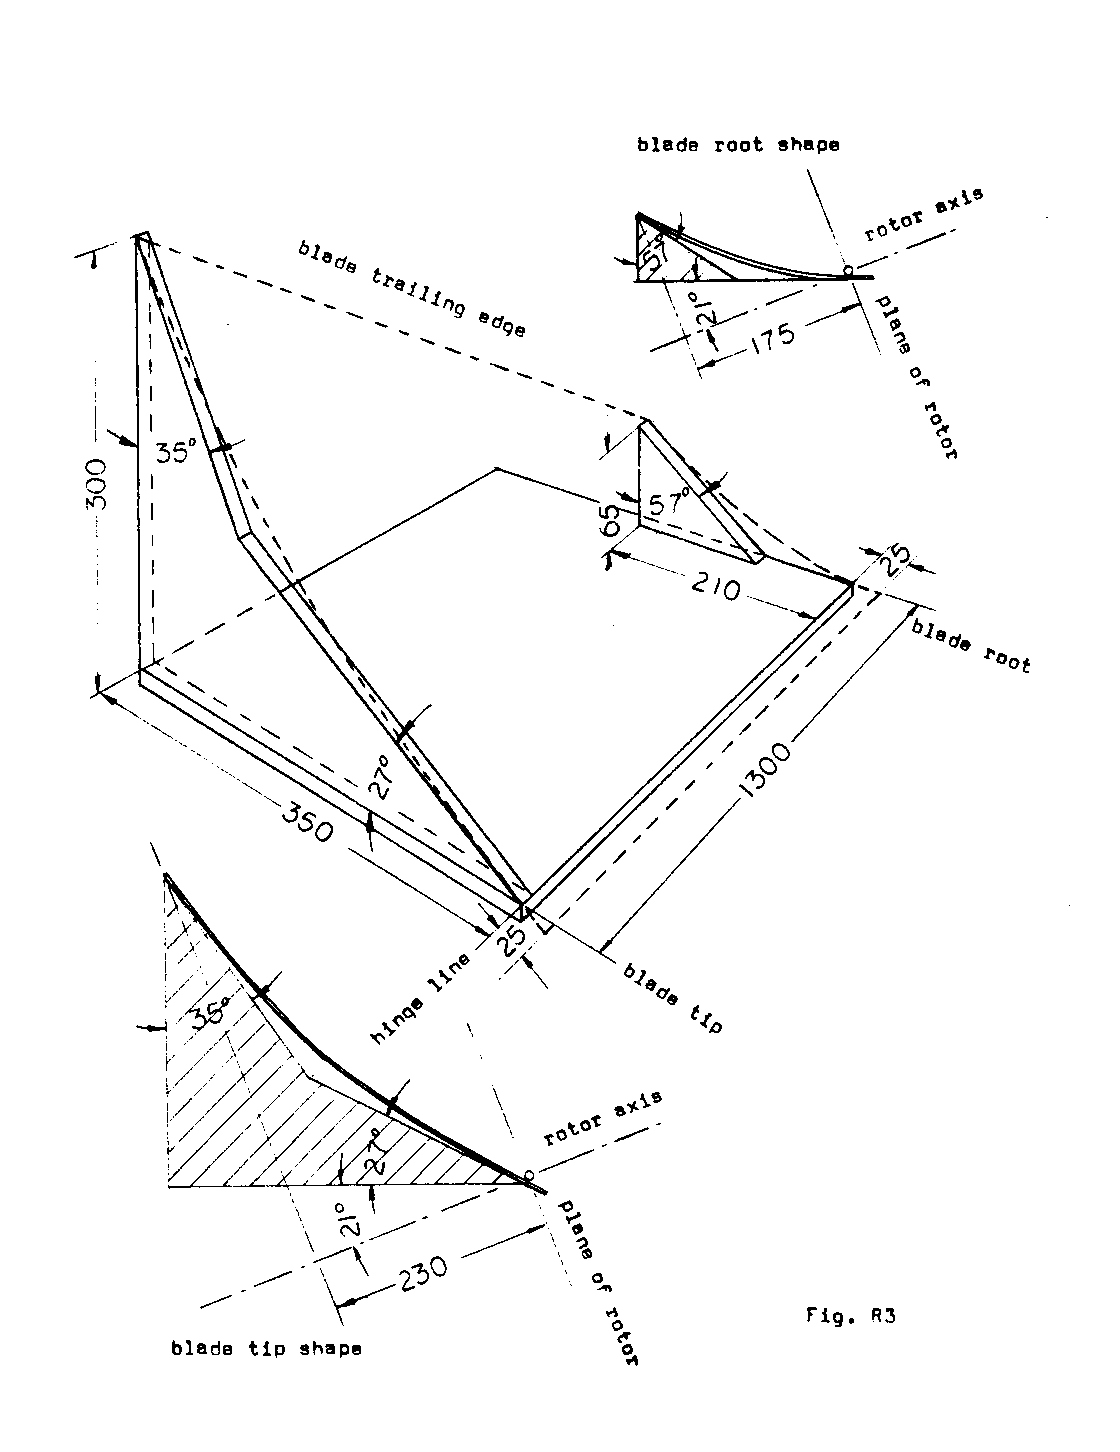
correct shape (see Fig. R3).
Hint: Use rollers, or
bend by
hand over piece of pipe.
Take care that hinge line remains
straight.
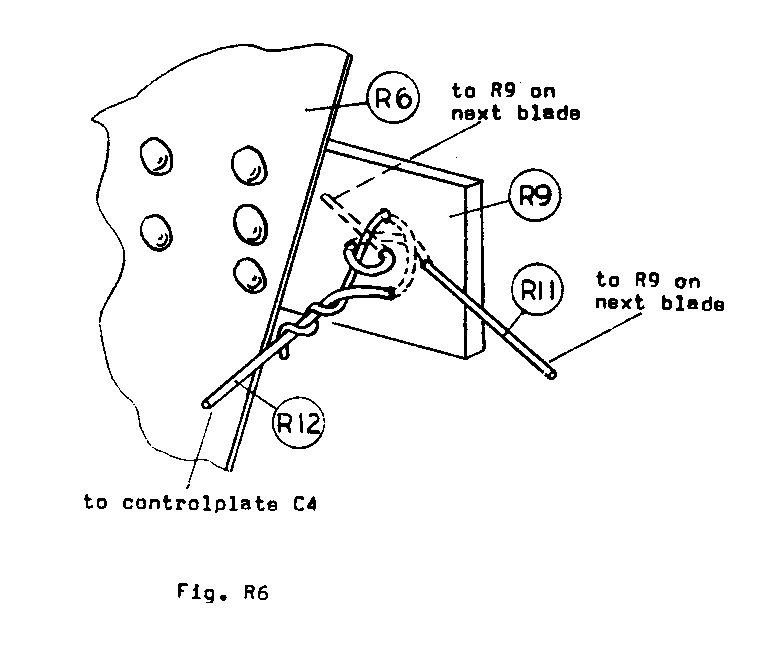
Rivet or bolt hinges (R7) to vanes (Fig. R2).
Very important:
make sure hinges line up exactly.
Rivet or bolt rubber strips (R9) between blade (R6) and
washer
plate (R8) (Fig. R2, Fig. R6).
08p15c.gif (486x486)
Weld spokes (R3) to centerplate (R1) (Fig. R1).
Weld ring (R2) to spokes at correct (22.5 [degrees])
intervals (Fig. R1).
Weld 16 washers (R4) to intersections of ring (R2) and spokes
(R3) (Fig. R1, Fig. R5).
08p15b.gif (353x353)

Slide one washer (R4) on each spoke.
Grease spokes at hinge locations.
Slide blades on spokes with the wider blade tip facing
outward.
Very important: All
blades must rotate freely. If this is
not
the case, adjust blade shape, spokes, or hinge locations.
Slide one washer (R4) on each spoke.
Weld parts (R5) onto tips of spokes, giving about 1 mm play
(blade movement in the direction of the spoke) (Fig. R1,
Fig. R4).
08p15a.gif (437x437)
Thread wire or cable (R10) through holes of parts (R5) and
align spokes at 22.5 [degrees] intervals (Fig. R4).
After completing
circle, stretch taut and connect both ends.
CONTROL SHAFT
Part
number
Quantity
Remarks (See Figs. C1 - C3)
08p18a0.gif (600x600)
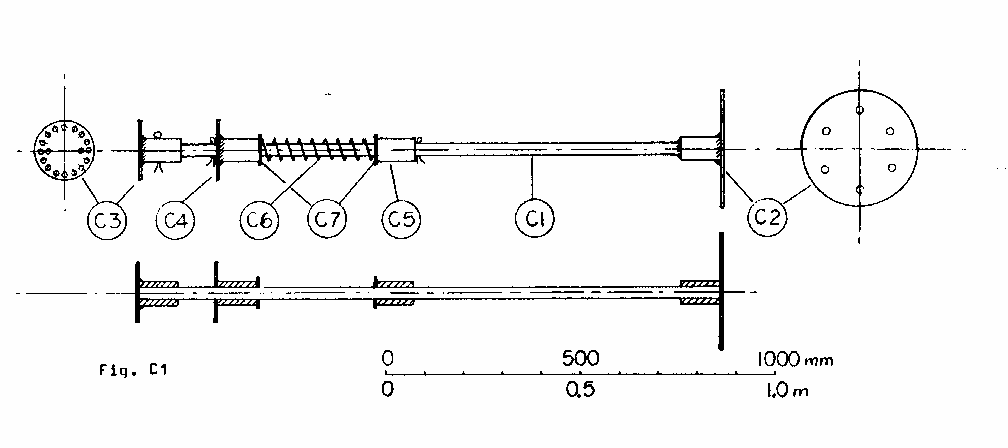
C1
1
Steel pipe, 25 to 30 mm outer diameter, 1.5m long.
C2
1 Inner diameter
same as outer diameter of part (C1).
Use piece of pipe (also
for C3, C4, C5).
Drill end plate for wheel
bolts (same drill pattern
as part (R1)).
C3
1 Inner diameter
same as part (C2). Plate has 16
evenly spaced holes
for 16 support wires, and 2
holes for restraining rods
(C8).
C4
1 Similar to part
(C3), except plate has central
hole and part slides
freely on part (C1).
8 evenly spaced holes for
8 control wires, and
2 holes for restraining
rods (C8).
C5
1 Part must slide
on part (C1).
C6
1 Compression
spring, approximately 330 mm long.
Spring constant must be
approximately 1.5 kgf/cm
(i.e. a compression of 1 cm for a weight of 1.5 kg).
Note:
Make spring from 4 mm steel wire according
to Fig. C2, if suitable
08p18b.gif (353x353)
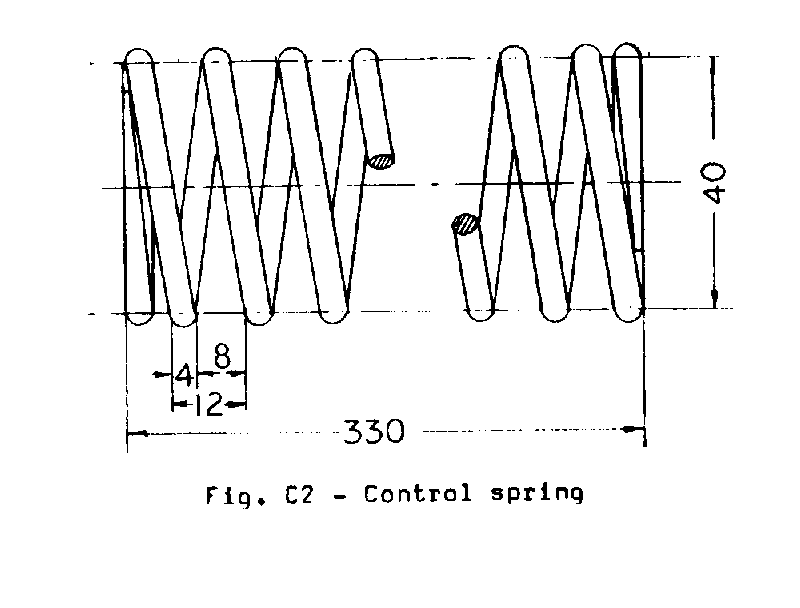
spring cannot be found.
A softer
spring can be used, but it must also
be precompressed to 13.5
[kg.sub.f]. Springs harder
than 2 kgf/cm should not
be used.
C7
2
Washers (if spring diameter is larger than the
outer diameter of parts
(C4) and (C5)). Size
depends on spring
diameter. Make out of sheet
metal approximately 2 mm
thick.
C8
2 Wire,
approximately 3 to 4 mm diameter, 400 mm long.
Bend during installation
(Fig. C3).
08p19.gif (600x600)

4
Cotter pins, bolts, or wire to secure parts
(C3), (C4),
C5) on shaft (C1).
4 small washers
CONSTRUCTION OF CONTROL SHAFT
Make parts (C1) - (C7).
Lubricate shaft with heavy grease at the location of parts
(C4) - (C7).
Mount all parts on shaft (C1) as shown.
Secure parts (C3) and (C4) by cotter pins, bolts, or wire.
Compress spring to a force of 13.5 kgf and secure part (C5)
by cotter pin, bolt, or wire at this location.
Install wires (C8) with washers as shown (Fig. C3).
Bend each
end to a loop. Wires
must stick out 130 mm when pulled.
(These
wires prevent blades from going over dead center.)
ROTOR ASSEMBLY
Lay center
plate (R1) of rotor on blocks to raise it
approximately 0.5 m from the ground.
(Side to which the spokes
are welded "up").
Temporarily bolt the control shaft in place
by two bolts through plates (C2) and (R1).
Make sure control
shaft is exactly vertical.
Connect the 16
wires or cables (R13) to the 16 holes of
centerplate (C3).
Connect the 8
wires or cables (R12) to the 8 holes of
control plate (C4).
Connect the 16
wires from (C3) to the holes in (R5) at the
tips of the spokes (Fig. R4).
Tighten the wires (or cables) at
08p15a.gif (437x437)
each spoke until the spoke is horizontal, then fasten wire
securely.
Note: do this
simultaneously at opposing sides of the rotor to
avoid bending of the control shaft.
Do not proceed to next step
unless all spokes are horizontal while control shaft is
exactly
vertical.
With wire or
rope tied to (C3) pull (C4) up against the
cotter pin. Connect
the 8 wires from (C4) to the rubber strips
on every second blade (Fig. R6).
Adjust the wire length until
08p15c.gif (486x486)
the blade has the required angle (Figs. R3, R7), with the
trailing
edge of the blade tip 230 mm below the plane of the spokes
(leading
edge angle with that plane 42 [degrees] at the tip).
Fasten wire securely.
Using wire or
cable (R11), connect all rubber strips (R9)
with each other (Figs. R6, R7).
Work in the direction shown,
08p15c0.gif (486x486)
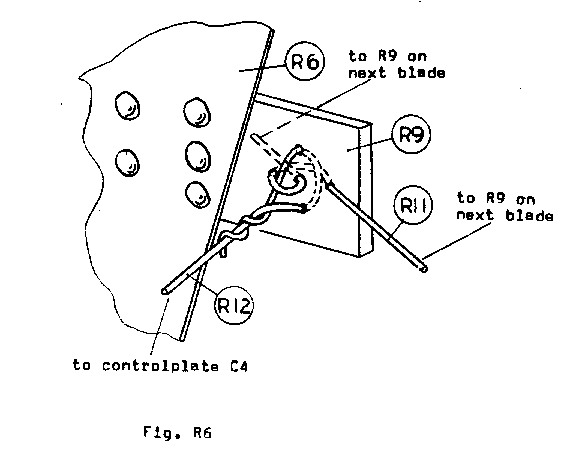
holding up every second blade in the correct position when
connecting
it. When the circle
is completed, all blades must be at the same
angle.
TURNTABLE
Part
number
Quantity Remarks
(See Figs. T1, T2)
08p230.gif (600x600)
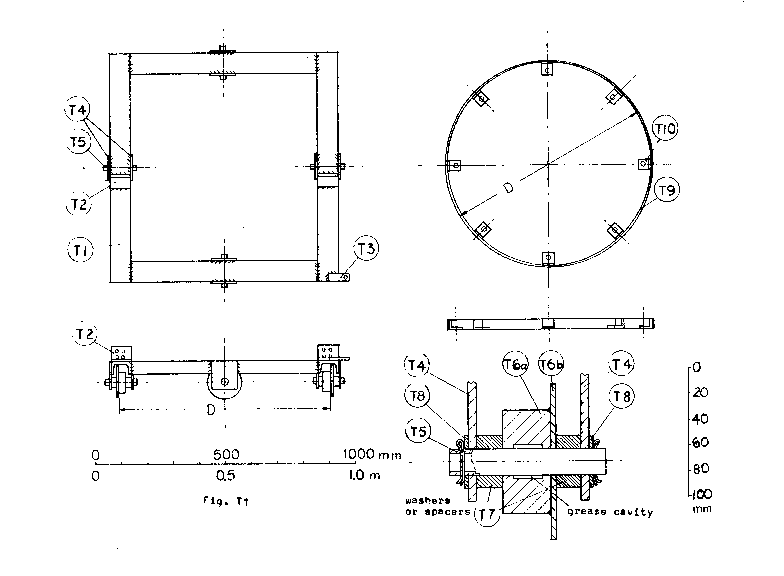
T1 1
Frame welded together from steel
channel,
approximately 50 to 80 mm wide.
Frame is
exactly square.
Note: Dimension
"D" (distance
of brackets (T2), wheel distance, and
outer diameter of circular track) depends on
location of leaf spring mounts on car axle.
T2 2
Brackets made from angle iron (about 5 to 8 mm
wall thickness). Drill pattern
corresponds to
that of leaf spring mounts on car axle.
T3 8
Steel plate approximately 4 to 10 mm
thick.
T4
1
Steel plates approximately 5 to 10 mm thick.
T5 4
Steel axles 20 to 30 mm diameter.
Thickwalled
pipe can be used.
T6 4
Use whatever can be found.
Diameter of wheel
body (T6a) should not be less than 50 mm.
Rim
diameter (T6b) should be approximately 40 mm
greater than that of (T6a).
Prefer ball bearing,
or bronze bearing, but simple steel cylinder
(T6a) acceptable.
Grease cavity reconmended in
this case. Weld or bolt rim
(T6b) to (T6a).
T7 8
Spacers.
Pieces of pipe, or several washers.
T8 20
Washers (can be made from sheet metal 1
- 2 mm
thick).
T9 1
Circular track.
Ribbon steel, approximately 30
mm wide, 5 to 10 mm thick. Bend
and weld together
to form ring of outer diameter "D".
Ring must be
exactly circular to avoid derailing of
turntable.
T10 8
Brackets made from angle iron, or bent
(heat!)
ribbon steel approximately 5 to 8 mm thick.
8
Cotter pins, or wire or nails.
Construction of Turntable and Track
Prepare wheel assembly (parts (T4) - (Tb)).
Make Sure wheels
rotate with little friction.
Weld frame (T1) together.
Weld brackets (T2) onto frame such that car axle is exactly
centered on the frame when mounted to the brackets (T2).
Weld part (T3) onto frame.
Bend and weld circular track (T9) and weld 8 brackets (T10)
to
its inside. Lay
track on flat surface and make sure it has no
waves and is perfectly horizontal.
Clamp wheel assemblies lightly to frame, with wheel rims
facing
outward. Set frame
up on blocks on the circular track on a
flat
floor, with all wheels resting on the track.
Weld parts (T4) to
the frame, checking repeatedly that all wheels rest on
track.
Wheels should have axial play of approximately 1 mm.
Adjust by
adding or removing washers.
VANE
Part
number
Quantity
Remarks (See Figs. V1 - V4)
08p270.gif (600x600)
V1 1
Steel channel, approximately 50 to
80 mm wide,
3 to 5 mm wall thickness, 1.10 m
long. Drill
two holes to fit two wheel bolts on the wheel
drum, and two holes for bolt supportinq brake
handle (V8).
V2 1
Angle iron, approximately 20 x 20 mm "L" shape,
2 to 3 mm wall, 3.30 m long.
V3 1
Angle iron, approximately 20 x 20
mm "L" shape,
2 to 3 mm wall, 2.50 m long.
V4 1
Angle iron, approximately 20 x 20 mm "L" shape,
2 to 3 mm wall, 2.60m long.
V5 1
Ribbon steel, approximately 20 to
30 mm wide,
2 to 3 mm thick, 1.30 m long.
V6 1
Galvanized sheet metal, approximately 0.5 mm
thick, 2.60 m x 1.50 m.
V7 1
Clamp made frgm ribbon steel
approximately 30 to
40 mm wide, 2 to 4 mm thick. To
fit over car
axle.
Weld to part (V2).
Provide holes for
clamping bolt.
V8 1
Brake handle.
Ribbon steel, or angle iron,
approximately 20 to 40 mm wide, 2 to 4 mm thick,
400 mm long.
Hole for supporting bolt is to be
approximately 2 mm wider than bolt diameter.
V9 1
Brake handle stop.
Flat piece about 3 to 6 mm
thick. Weld to (V1).
V10 2
Support wires or cable,
approximately 2 to 3 mm
diameter, each 3 m long.
Rivets or small nuts and bolts to fasten sheet
metal to vane frame (wire could also be used).
<FIGURE V2>
08p28a.gif (600x600)
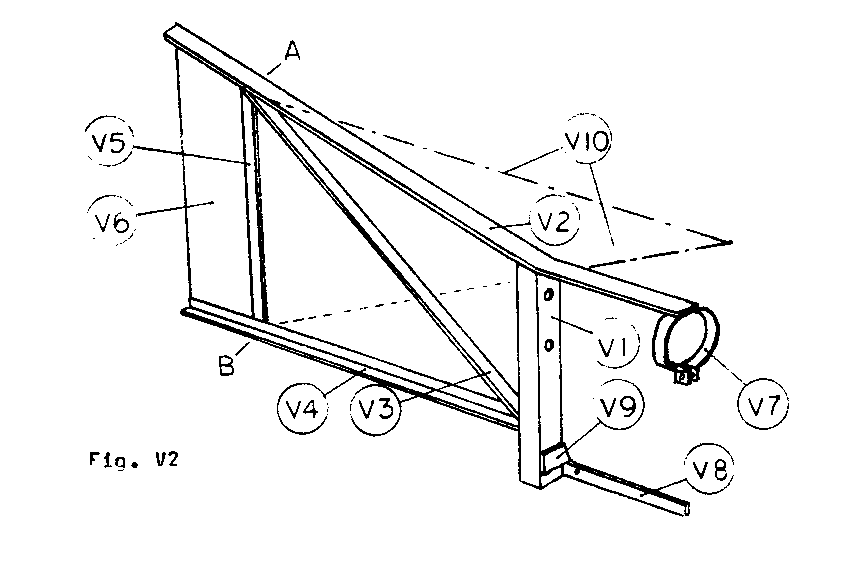
Vane Construction
Prepare parts (V1) - (V10).
Bend (V2) 10 degrees, to one side.
Weld (or bolt) together parts (V1) - (V5), (V7) and (V9).
Fasten sheet metal (V6) to vane frame using rivets, small
nuts
and bolts, or wire no more than 300 mm apart.
Connect brake handle (V8) to channel (VI) (Fig. V3).
08p28b.gif (486x486)
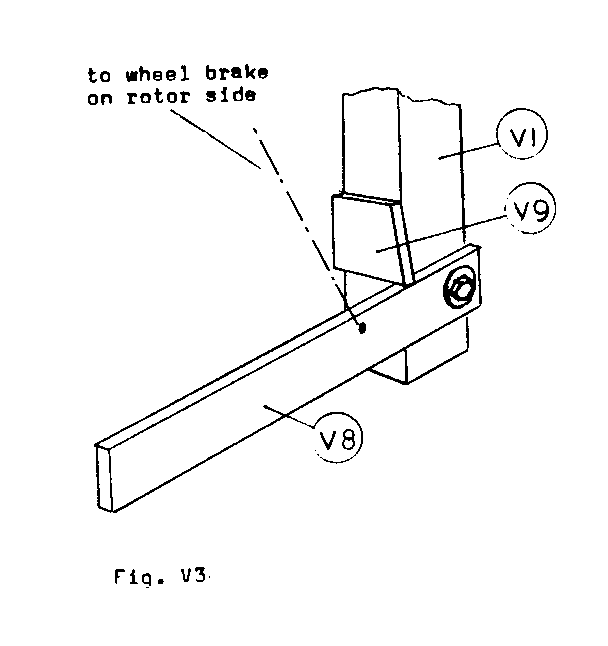
Note:
Hole in (VB) must be large enough to permit handle to be
lifted
over the stop (V9).
Connect wires (V10) to points "A" and
"B".
PLATFORM AND TOWER
Part
number
Quantity
Remarks (See Figs. P1, P2)
08p310.gif (600x600)

P1 1
Beam or pole, 6 to 12 m long,
approximately
10 cm x 15 cm, or 15 - 20 cm diameter.
Shape upper end to 10 cm x 15 cm.
P2 1
Platform:
Thick plywood, or thick boards.
Cut out 15 cm x 15 cm central hole.
Note:
diameter of platform depends on diameter of
track (dimension "D").
P3 1
Galvanized sheet metal cover,
somewhat larger
than platform.
P4 1
Beam, approximately 4 cm x 8 cm.
P5 2
Beam, approximately 4 cm x 8 cm.
P6
2
Beam, approximately 4 cm x 8 cm.
P7 1
Piece, approximately 4 cm x 8 cm.
P8 2
Beam, approximately 4 cm x 8 cm.
P9 2
Beam, approximately 4 cm x 8 cm.
P10 10 -
20 Steps, approximately 4 cm x 8
cm x 35 cm.
Nails approximately 10 cm long (galvanized, if
available).
Nails approximately 4 cm long (galvanized, if
available).
Construction of Platform and Tower
Build platform from parts (P2),(P4) - (P7), with a 15 cm x
15 cm
centerhole.
Shape upper end of tower beam so it fits into the space
between
(P4), (P5), and centerhole.
Nail platform to tower using parts (P8) and (P9).
(Reinforce joints by nailing strips of sheet metal over them
with 4 cm nails).
Cover top of platform with sheetmetal and nail it down on
the
platform and over the sides.
Mount circular track (use nuts and bolts) so that its center
coincides with the center of the square hole.
Check roundness
of the circle.
Nail steps to tower beam approximately 30 cm apart.
WINDMILL ASSEMBLY
The best way
to assemble the windmill will depend on local
conditions, and on labor, cranes, ladders, scaffolds
available.
The steps in the assembly should be well thought through
before-hand,
and all assistants should be fully familiar with the
planned procedure.
The windmill should be erected on a calm
day. The following is one possible assembly procedure.
Soak tower
structure in creosote for a day, in particular
the lower part which goes into the ground.
If creosote is not
available, burn the outside of the lower part to a depth of
approximately
1/2 cm.
Dig a hole
approximately 20% of tower height deep (less
in rocky soil, more in sandy soil).
Place tower vertically in hole,
and fill hole with rocks and/or concrete, compacting
thoroughly
and repeatedly in the process.
It is recommended that the tower
be anchored also by at least 3 cables (mount at a low enough
position
on the tower so that they do not interfere with the rotor).
Mount the
turntable on the circular track, and secure turntable
to tower by wire or rope (temporarily but very rigidly).
Grease all
sliding or rotating parts, and fill differential
1/3 full with heavy oil or light grease.
Rustproof all metal
parts (except aluminum or galvanized) by protective paint.
Mount car axle
(drive shaft removed) on turntable.
Mount vane on
one side of axle and connect the two wires or
cables (V10) firmly from the vane (points "A" and
"B") to part
(T3) on the turntable.
Connect a
cable from the wheel brake lever on the rotor
side to the brake handle (V8) on the vane.
Use wire or cable loops
fixed to the drum or other means to achieve the necessary 90
degree
change in cable direction (Fig. V4).
Adjust the cable length so
08p28c.gif (437x437)
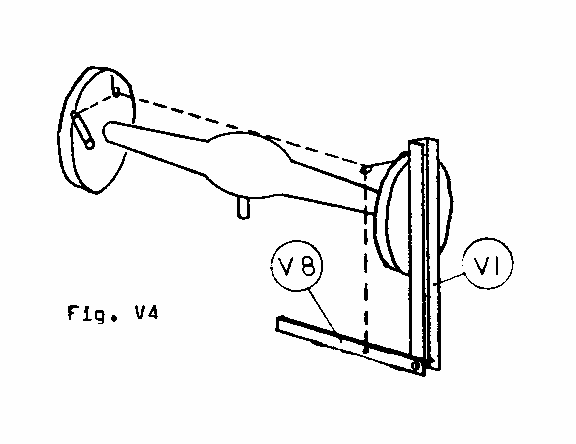
that rotor wheel is completely braked when handle (V8) has
been
pulled down to rest against stop (V9).
Pull the brake handle,
braking the rotor wheel.
Remove the
temporary wires holding parts (C3) and (C4) of
the control shaft together. Raise the rotor assembly.
Remove the
two temporary bolts holding parts (C2) and (R1) together
(but
keep control shaft in position).
Bolt control shaft (C2) and
rotor (R1) to the axle, tightening wheel bolts well.
Remove
restraining wires cautiously from the turntable,
watching for imbalance.
If rotor appears much heavier than vane
assembly, secure heavy rocks or pieces of scrap metal on the
vane
side of the turntable.
Release brake,
and rotate rotor slowly, watching spoke
and blade alignment.
Make corrections where required.
Pull
brake.
Connect drive
shaft and load.
Run windmill
cautiously at first, checking for vibration,
loose parts, misalignment etc., and making immediate
adjustments.
MAINTENANCE AND OPERATION
Grease or oil
all sliding or rotating parts monthly.
Add
oil to differential.
Check for loose components.
Always repair
immediately, if breakages or misalignments occur.
Rustproof all
metal parts (except galvanized or aluminum
parts) once a year.
Remove rust and chipped paint by wire brush,
and scraper, then paint with protective paint.
In some climates,
new rigging wires may be required yearly.
Always brake
rotor fully when windmill is unloaded or not
in use.
If rotor
blades feather at wind speeds considered too low,
increase the precompression in the control spring.
If rotor
blades feather at wind speeds considered too high,
decrease the precompression in the control spring.
SPECIFICATIONS FOR A 2-METER WINDMILL
Construction essentially identical to that of 4 m VITA
windmill, except
that dimensions are to be adjusted accordingly.
Listed below are the
major changes; other secondary changes will be obvious to
the builder.
PERFORMANCE DATA
Compared to the data for the 4 meter windsmill:
rotor speed
becomes twice that for the 4 meter windmill
rotor
torque becomes one eighth (1/8) that for the 4 meter
windmill
starting
torque becomes one eighth (1/8) that for the 4
meter
windmill
power
becomes one fourth (1/4) that for the 4 meter
windmill
altitude
effects remain the same
Feathering Information
Remains the same for control spring of spring constant 0.75
kgf/cm
precompressed to 3.5 kgf.
Fig. I1 - Rotor diameter becomes 2 m.
Control shaft becomes half as
08p05.gif (600x600)
long, vane becomes half as long and half as high.
Fig. A1 - All speeds of revolution become twice that shown.
08p09a.gif (600x600)
VANE
Reduce height of vane to one half (approximately 0.75 m at
tail).
Reduce length of vane to one half (approximately 1.3 m).
No change in vane angle (10 [degrees]).
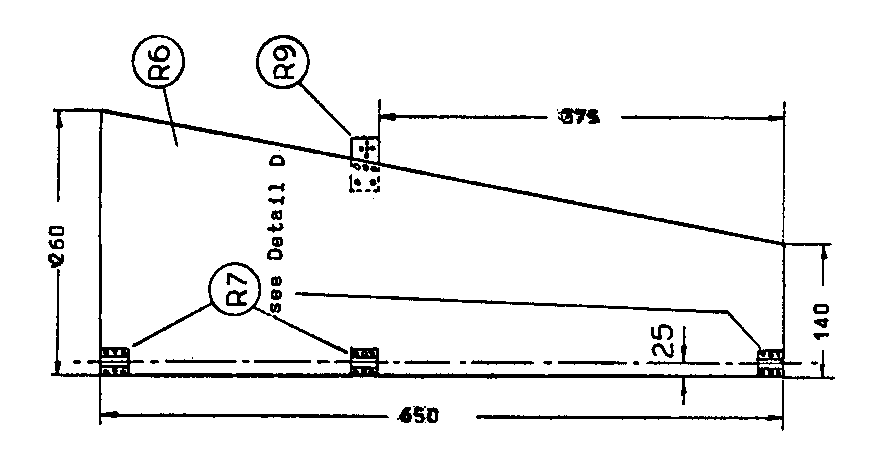
ROTOR
Outer diameter of ring (R2) becomes 0.69 m (length of rod
2.18m).
Length of spokes (R3) becomes 0.87 m.
Blades (R6) made from 8 pieces 0.65 m x 0.4 m.
New dimensions:
<FIGURE A>
08p37.gif (486x486)
Blade bending rig for 2 m rotor (see new Fig. R3/2) has same
08p38.gif (600x600)
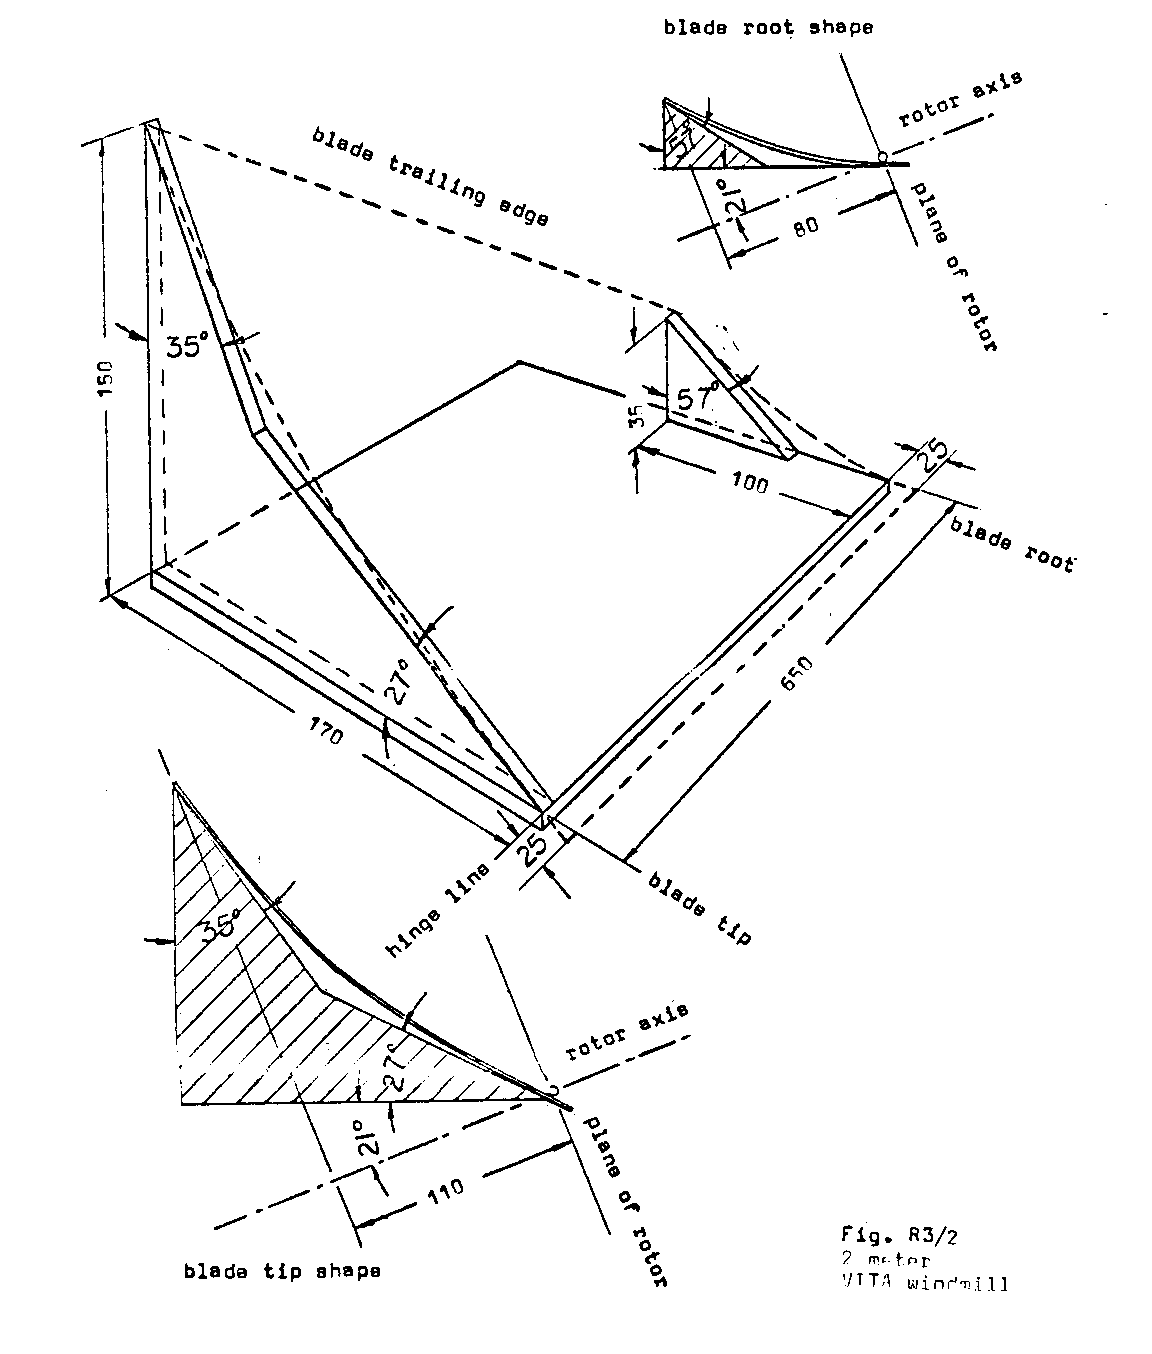
angles as before, but all major linear dimensions are
reduced
to one half.
CONTROL SHAFT
Length of control shaft (C1) reduced to one half (0.75 m).
Compression spring (C6) changed to 169 mm long.
Spring constant
0.75 [kg.sub.f]/cm (i.e. a compression of 1 cm for a weight
of 0.75 kg).
If suitable spring cannot be found, make spring of same
dimensions
as for 4 m rotar, except use 3 mm steel wire.
Control spring precompression changed to 3.5 [kg.sub.f].
Change indicated length of wires (C8) from 130 mm to 65 mm.
(Fig. C3).
08p19.gif (600x600)
Suggestion for
Electric Power Generation Using VITA 2 meter Windmill
<FIGURE B>
08p39.gif (600x600)
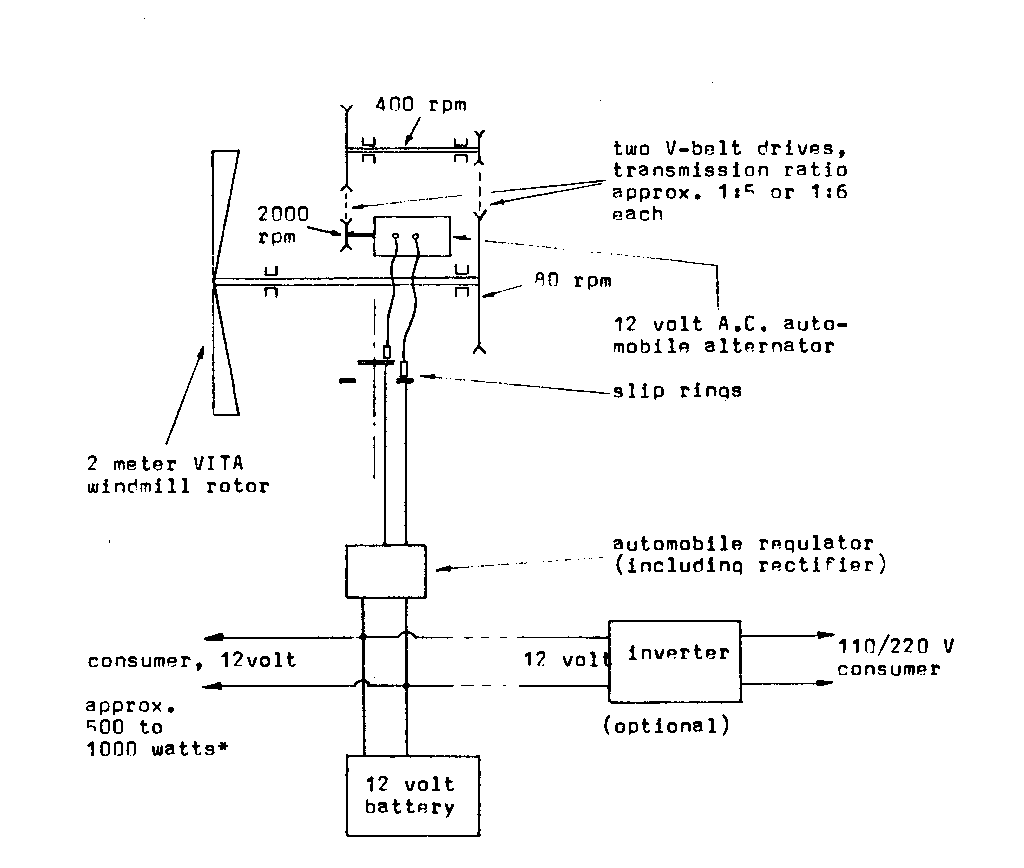
(*) depends on alternator used
Suggestion for
Electric Power Generation Using VITA 4 meter Windmill
<FIGURE C>
08p40.gif (600x600)

VITA Publications
VITA's manuals reflect the organization's emphasis on
designing, developing and distributing
village and community level technologies which are
appropriate for use in developing countries.
At the same time, these technologies have application
wherever people are interested in protecting
resources and in doing things themselves.
VITA makes this technology available throuqh
its Publications Service, which distributes material
worldwide.
VITA's Publications Service seeks to print and distribute
manuals in a form which can be used
easily by the extension agent in a field situation or by the
do-it-yourselfer at home. The
material is offered at low prices, in clear, often fully
illustrated format and in non-technical
language.
Announcing...
SMALL FARM GRAIN STORAGE (1976) 575 pages
English
A complete practical overview of small farm
grain storage questions for use by development
workers and others concerned with small-scale
grain production.
Includes plans for grain
dryer and storage facilities, instructions for
rodent and insect control.
FRESHWATER FISH POND CULTURE AND MANAGEMENT
(1976) 200 pages English
A guide to planning, construction and maintaining
smaller-scale fish pond operations.
Includes information on selecting warm water
fish, choosing drainage systems, treating fish
for disease, fertilizing ponds, and so on.
REFORESTATION IN ARID LANDS (forthcoming)
English
Provides guidelines for planning and carrying
out a reforestation project -- from nursery to
planting site.
Includes information on
planting, transplanting and transporting.
Extensive appendices present a detailed look
at trees, soil, climate, and reforestation
activities in sub-Saharan West Africa.
USING WATER RESOURCES (forthcoming) 150 pages
English
Available for the first time as a separate
offering in response to user demand, this
volume is an excerpt from VITA's ever popular,
highly touted VILLAGE TECHNOLOGY HANDBOOK (also
included on this list).
USING WATER RESOURCES
contains information and plans for tubewells
and dug wells, water lifting, pumps, water
storing and purifying, and so on.
HANDLOOM CONSTRUCTION (forthcoming) English
Contains detailed, fully illustrated step-by-step
construction procedures for three types
of handloom.
RABBIT RAISING (forthcoming) English
A complete guide for the rabbit raiser.
Contains guidelines for breeding rabbits,
treating for disease, feeding stock, building
hutches, keeping records, and tanning skins.
... of
continuing interest
VILLAGE TECHNOLOGY HANDBOOK (1970) 350 pages
English, French, Spanish
VITA's helpful guide to alternative technologies.
Provides detailed technical plans in
the areas of water resources, tools for agriculture,
construction and sanitation, among
others.
AUTOMOTIVE OPERATION AND MAINTENANCE (1975)
202 pages English
A manual for drivers who deal with poor roads
and poor service facilities.
SMOKING FISH IN A CARDBOARD SMOKEHOUSE (1966)
12 pages English, French, Spanish
HOW TO SALT FISH (1966) 10 pages
English, Spanish
SOLAR COOKER CONSTRUCTION MANUAL (1967)
25 pages English, Spanish
FRESH PRODUCE HANDLING AND DISTRIBUTION (1968)
10 pages English
Excerpted from the VILLAGE TECHNOLOGY HANDBOOK
GROUNDNUT (PEANUT) HULLER (revised 1977)
8 pages English, French
HOW TO PERFORM AN AGRICULTURAL EXPERIMENT
(1971) 30 pages English, French
========================================
========================================

