Irrigation
SIPHON TUBES
The galvanized metal siphon tube described here can be used
for irrigation (see
Figure 1). It can be easily made and repaired by tinsmiths.
A siphon can also be
fg1x225.gif (200x600)
made from a piece of rubber hose or by bending a piece of
plastic tubing. Construction
details are given in Figure 2.
fg2x225.gif (540x540)

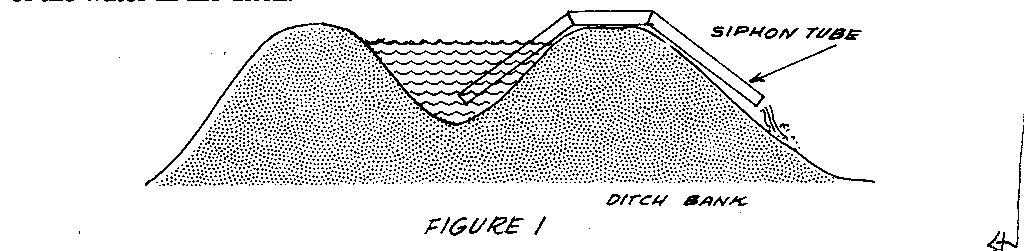
The purpose of this siphon tube is to carry water out of a
ditch without cutting
a hole in the ditch bank. In many soils a small hole cut in
the ditch bank soon
becomes a large hole because of erosion. Imported plastic
siphons are often
expensive, easily broken and usually impossible for local
people to repair.
There are several good ways to start a siphon tube. The
simplest way is to put
the tube in the ditch until it fills with water. Holding one
hand over the end of
the tube, so that air cannot get in, lift the tube out and
place it as shown in
Figure 1. Be sure the other end of the tube does not come
out of the water while
placing the tube. When the tube is in place, remove your
hand and the water will
begin to flow. The end of the tube outside the ditch must be
lower than the level
of the water in the ditch.
USING TILE FOR IRRIGATION AND DRAINAGE
An irrigation or drainage system made with the concrete
tiles described here can
help to keep a garden in production during both wet and dry
seasons. It will
make good use of irrigation water and, during the wet
season, will drain off
surplus water.
The entries that follow explain how to make a concrete-tile
machine and how to
use the machine.
In regions of heavy rainfall, the tile drainage can be
combined with good surface
drainage by making raised beds in gardens, shoveling out
30cm (1') wide pathways
that will be 15cm (6") lower than the beds. Put the
beds over the tile lines and
make them 1 meter (3') wide. Use the pathways also as
drainage ways and
connect them with a good outlet to lower ground.
This system of under-ground irrigation (and drainage) can
serve under fruit trees
or gardens. It can also be used around the foundations of
buildings where
drainage is a problem.
Concrete irrigation tiles, whether for irrigation or
drainage or both are laid 30cm
(12") deep in lines 1.2m (4') apart (the latter
measurement depending on the
texture of the soil: more distance between lines for clay
soils and less for sandy
soils). The garden should be almost level, with good surface
drainage. Upright
"elbows" at the ends of the lines give access to
the tile at either end (see Figure 1).
fg1x226.gif (600x600)
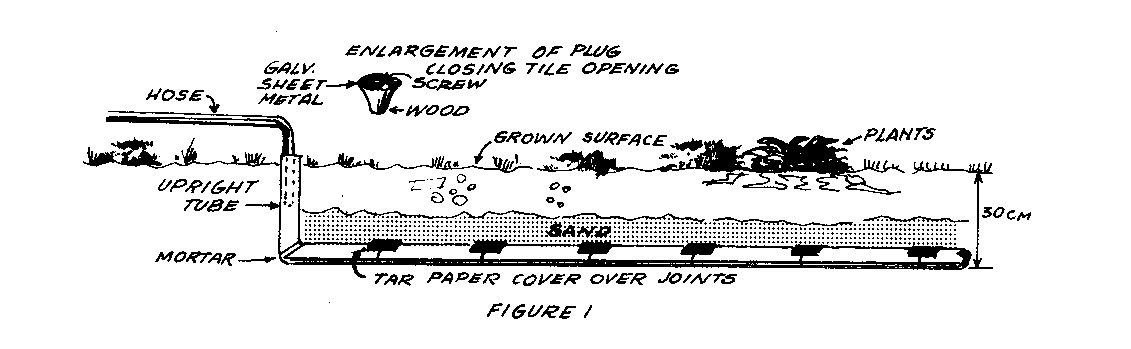
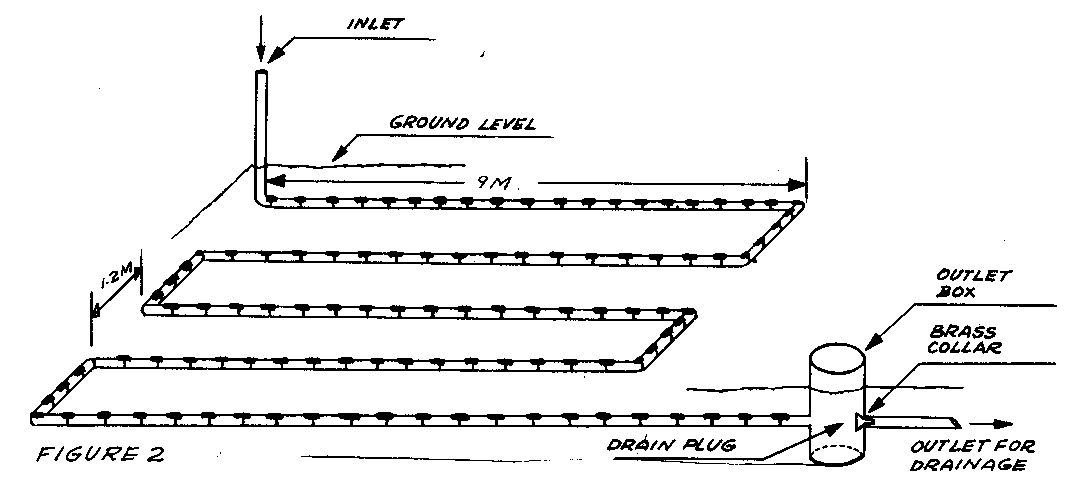
A garden hose can deliver the water from its source to the
upright ends of
the tile lines. While tile lines must be level, they do not
have to be straight; they
can follow a contour line or double back to make a more
convenient system of
installation with four or more lines connected to make one
unit (Figure 2).
fg2x227.gif (540x540)
In dry seasons, the tiles supply water to the plant roots.
In wet seasons, the
water escapes through the sand and gravel around the tile
and follows the
concrete tube formed by the tiles to a drainage outlet (see
Figure 2). While
passing downward through the soil to the tile, the water
draws air into the soil
and supplies oxygen to the helpful bacteria and to the plant
roots.
Tools and Materials
Concrete tile
Wood for plugs
Cement for mortar, concrete
Optional - Brass outlet box collar
Sand for mortar and tile covering
Shovels, concrete-mixing tools
Gravel or crushed stone for concrete
To install the tiles:
o Grade the garden
plot to within 5cm to 7cm (2" to 3") of level and make
trenches 30cm
"12") deep, according to the design in Figure 2. This will give
an even
distribution of the water. Check the bottom of the tile ditches to
be sure they are
level. Only the drainage outlet will have a drop.
o Lay the tile end
to end in the bottom of the trench. Use an "elbow" (made
of two tiles cut
to 45-degree angle) to make a place for putting the hose at
one end, and use
other elbows to turn corners.
o Put a piece of tar
paper or used linoleum over each joint (Figure 3) to keep
fg3x227.gif (600x600)
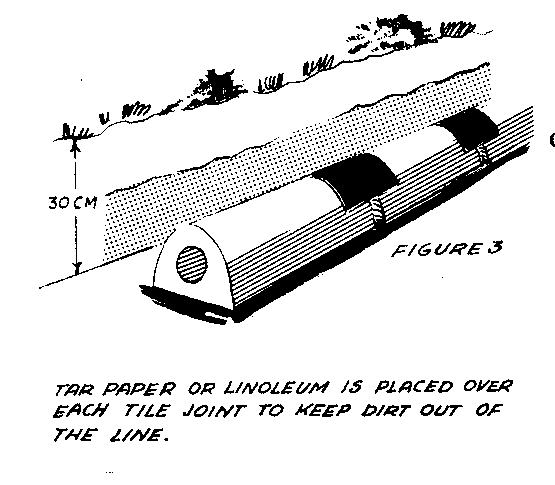
the dirt out of
the line. A
piece 5cm x 12.5cm
(2" x 5")
is large enough. .
o Cover the tile
with sand to
give the water an
opportunity
to soak out into
the soil or
(in the case of
drainage), to
seep into the
tile. The bottom
12.5cm (5")
of the trench are
filled with sand
or gravel
(around the tile)
and the top
17.5cm (7")
are filled with
soil.
o Near the outlet,
make an upright concrete box with two holes near the
bottom to let
drainage water run through and on out to an outlet. The box
should be large
enough so that one can reach into it to install a plug in the
drain side of the
box when the system is used for irrigation. A brass or
aluminum collar
installed in the concrete will make it easier to close this
hole completely
and thus avoid a loss of water.
o Put covers over
both ends to keep out small animals (see Figure 1).
fg1x226.gif (600x600)
o Do not water more
frequently than once or twice a week, so that plant
roots will not
enter the tile line to obstruct it.
o Be careful not to
damage the tile with tillage equipment.
o For irrigation,
the tile system is used with its drain plug securely closed
(see Figure 2).
Water is run into the line once or twice a week, by means of
a hose, until the
soil becomes moist. For drainage, simply pull the plug.
Making a Concrete Tile Machine
This all-steel tile-making machine (Figure 1) can be made of
scrap metal in any
fg1x228.gif (600x600)
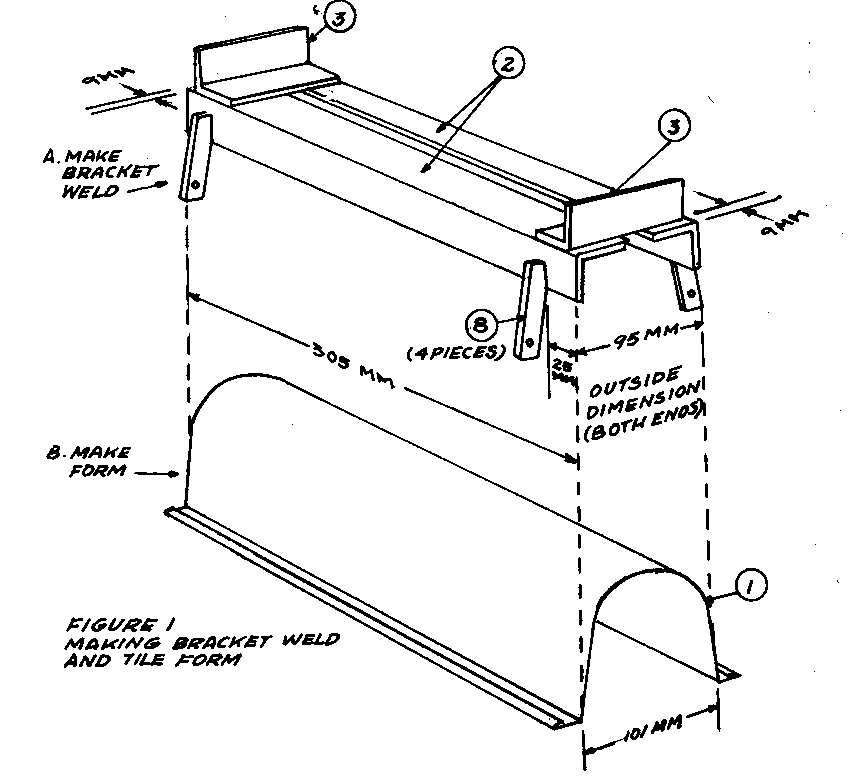
shop with welding equipment. The machine makes 80 to 100
tiles to a sack of
cement. One worker
can make about 300
tiles in an 8-hour
day. Construction of
the machine is a
good welding project
for students.
A tile-making machine
made from
wood is illustrated
in Figure 15. The
fg15x235.gif (600x600)
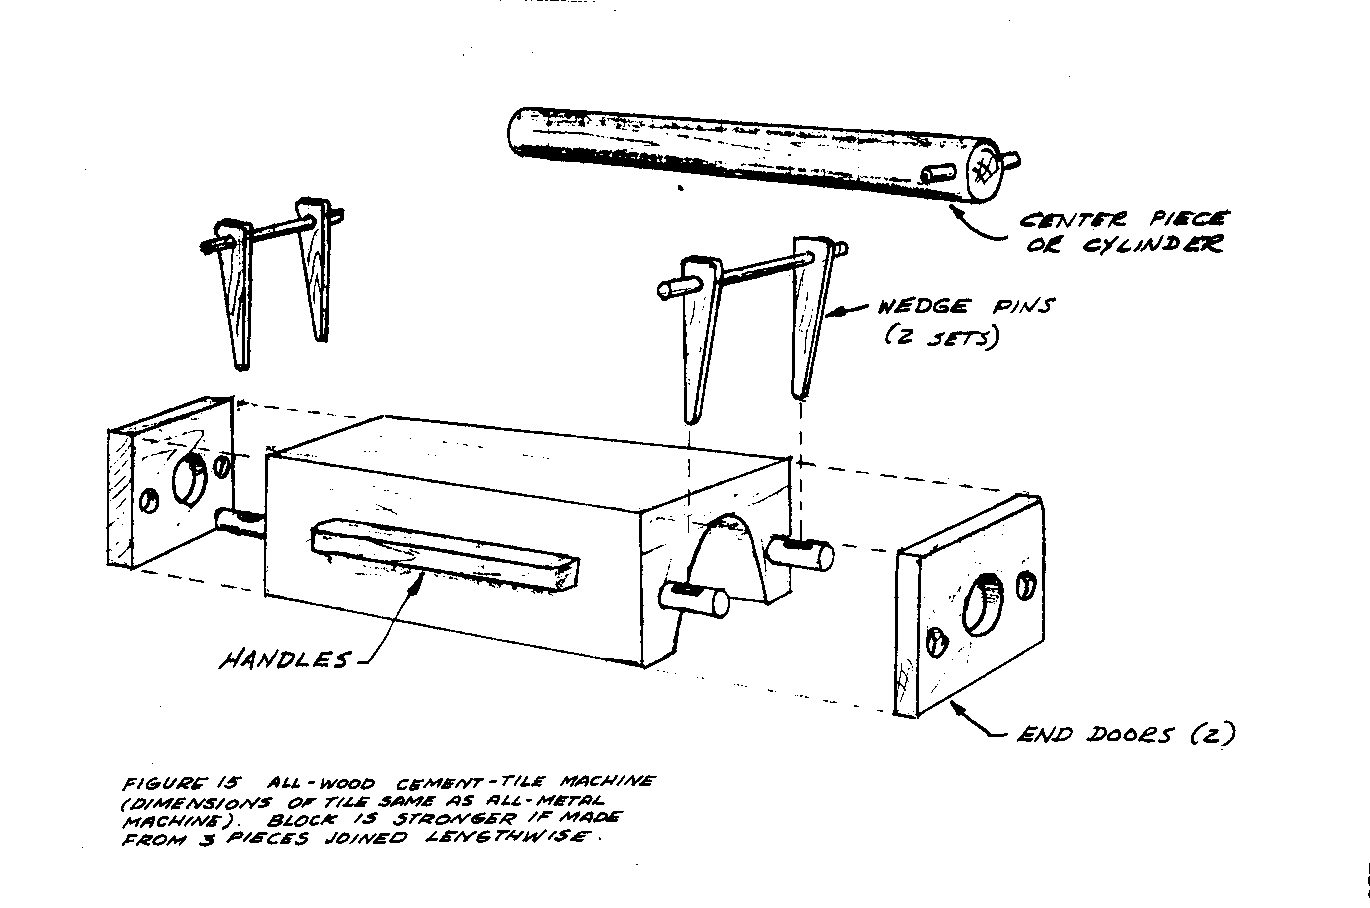
tiles made with this
machine are the
same size as those
made with the all-metal
machine.
All the drawings of the form and its several parts in this
entry show the form in
its upside-down, or emptying position.
The machine can be made of used or new materials. To make the
form, it is
desirable to have both electric and acetylene welding
equipment, although either
will serve. The thicker parts are assembled by arc welding
and the thinner parts
have to be put through other parts before welding, as will
be explained below. We
shall refer to each individual part by its number, which
appears on the sketches.
The assemblies made of parts No. 10, 11, and 12 (Figures 8
and 14) are simply a
fg8x2320.gif (437x437)
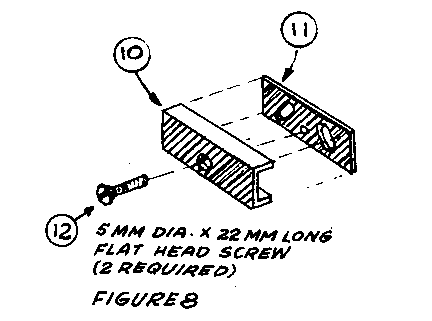
convenient means of taking hold of the levers to open the
end doors. These
levers are made of part No. 5 and 13 as described below and
shown in Figures 9, 10, and 11.
fg112320.gif (600x600)

tension being made sufficient to hold the doors closed
against the force of
tamping.
The hole in the end door is shown as 3mm (1/8") larger
than the diameter of the
pipe that shapes the interior surface of the concrete tubes.
This 3mm (1/8") is an
allowance of clearance necessary to keep the sand particles
from making the pipe
difficult to remove after the mortar is tamped around it.
Greater clearance would
hurt the uniformity of the tile. The finished tile should
have a uniform 13mm
(1/2") wall and part No. 1 must be shaped and so
related to the pipe that the
thickness of the tile wall will be correct (see Figure 6).
fg6x231.gif (600x600)
Parts No. 7 are bronze welded to the sides of No. 1 (see
Figure 6). These parts,
like other parts that touch the hands, should be dressed to
a smoothness sufficient
to avoid injury to the operator. The outside of the form
should be well
painted but the inside cannot be painted, as paint would
cause the mortar to stick
to the inside. When the form is not in use, the inside
should be kept oiled.
The pipe may need to be dressed lightly in the lathe to make
it easier to remove
from the form after the mortar is tamped around it. In
turning, it is advisable to
make the end opposite the handle end 0.5mm (1/64")
smaller, as this will facilitate
its removal in the emptying process. This lathe work should
be done after the end
of the pipe opposite the handle end has been welded shut
with a disc of galvanized
sheet metal. If this end is not closed, cement will enter
the pipe and thus be
spilled into the inside of the tile to become an obstruction
there.
Part No. 19 is a wire of 3mm (3/32") diameter steel
welding rod with the shape
shown in Figure 2, but one of the eyes has to be formed
after the part has been
fg2x229.gif (90x540)
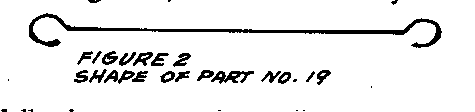
threaded through the hole in part
No. 8 (see Figures 1 and 8).
fg1x2280.gif (600x600)

The following paragraphs are listed by part numbers:
1. The inside walls
of the form are made of 16-gauge galvanized iron. Part No.
1 as shown in
Figure 1 is made from a sheet cut to a true rectangle, 26.6cm
x 30.5cm (10
1/2" x 12"). This is bent to shape by putting a 6mm (1/4") fold
on each of the
30.5cm (12") sides; bending 19mm (3/4") more of same sides
to a right angle;
and then shaping the sheet according to the curve shown
in Figure 3. This
lining is then
fg3x230.gif (353x353)
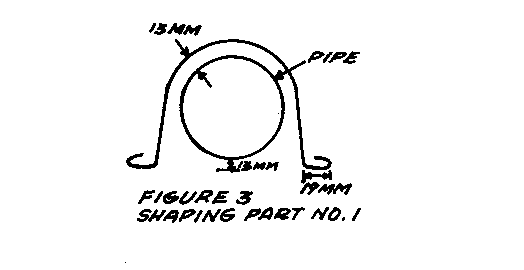
fitted into the
cradle made of parts
No. 2 and 3.
Parts No. 6 will be
the end doors,
which are also made
of 16-gauge sheet
iron. The inside
of the form
should not be painted,
as this
interferes with its operation.
2. For part No. 2,
two pieces of angle iron, 38mm x 38mm x 3mm x 30.5cm (1
1/2" x 1
1/2" x 1/8" x 12") are needed.
3. Angle iron, 38mm
x 38mm x 5mm (1 1/2" x 1 1/2" x 3/16"), 95mm (3 3/4")
long. Two are
needed. Parts No. 2 and 3 are welded together to form the
cradle. Parts No.
8 are welded in place on parts No. 2 and corrections are
made for shape
before No. 1 is tack welded into the cradle thus formed. The
design above
gives some idea of final relationship to be kept between the
sheet metal
lining of the form and the metal pipe. Notice that the tile wall
will be uniformly
13mm (1/2") thick (see Figures 4 and 8).
fg4x2300.gif (600x600)

4. Mild steel rods,
10mm x 15.2cm (3/8" x 6") (see Figure 13). Two are needed.
fg13x234.gif (600x600)
These are welded
in place to make the form stand a little taller so the
levers will not
touch the work bench while the mortar is being tamped into
the form. They
also provide a wider base.
5. Mild steel rods,
10mm x 22.9cm (3/8" x 9") (see Figure 10). Four are needed.
fg10x233.gif (600x600)
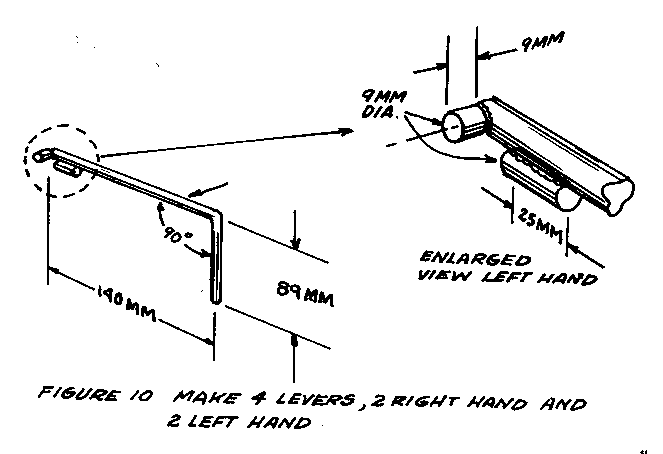
These are bent to
form the levers and are welded into pairs by means of the
connecting piece,
No. 13 (see Figure 9). Notice the tiny tabs welded to the
fg9x232.gif (437x486)
handle end of the
levers. These are to keep the hand hold from turning or
sliding endwise
from its proper position. By the "hand hold" we mean the
assembly made of
Parts No. 10, 11 and 12.
6. Galvanized sheet
metal, 16-gauge, 14cm x 16.5cm (5 1/2" x 6 1/2"). Two are
needed. These are
the doors and the parts that hold the center pipe in its
proper position.
They should be cut and shaped after Part No. 1 has been
tack-welded in
its place (see Figure 5).
fg5x231.gif (600x600)

7. Galvanized sheet
metal, 16-gauge, 38mm x 10.2cm (1 1/2" x 4"), bent to
angle as shown in
Figure 6. Two are needed. These are handles for lifting
fg6x231.gif (600x600)
the form. They
are dressed smooth and bronze welded to the sides of No. 1
after the doors
are properly installed as explained under No. 15 below.
8. Mild steel bar,
19mm x 6mm x 7cm (3/4" x 1/4" x 2 3/4"). Four are needed
(see Figure 1).
They are welded to No. 2 to complete the cradle for the
fg1x228.gif (600x600)
lining of the
form. Then the lining, part No. 1 is welded to No. 8 at the
fold in the edge
of No. 1. Check to see that the space for the thickness of
the tile wall
remains 13mm (1/2").
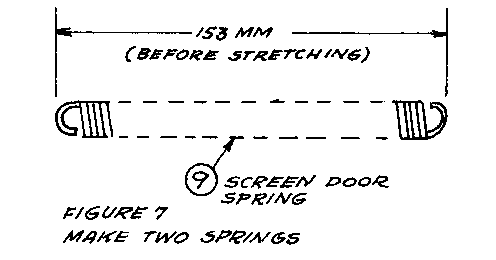
9. Screen door
spring, cut into
coils as shown,
14cm (5 1/2")
long with the end
loops bent
out to form eyes.
Two are
needed (see
Figure 7).
fg7x232.gif (196x393)
10. Channel iron,
31mm x 19mm x 8.2cm (1 1/4" x 3/4" x 3 1/4"). Two are
needed.
Countersink hole for screw head. Dress parts No. 10 and 11 smooth
as they are
handles.
11. Strap iron,
2.5cm x 3mm x 8.2cm (1" x 1/8" x 3 1/4"). Two are needed (see
Figures 8 and
14). Drill and thread hole to match the screw hole in part No.
fg8x2320.gif (393x393)
10. Make guide
holes for the round
tabs that are
welded to the end of
the levers, No.
5. The tabs on No.
5 is made by
sawing off a 10mm
3/8")
length of 10mm (3/8")
diameter rod and
bronze welding it
to the end of
the handle as shown.
12. Machine screw,
flat head, 6mm x 19mm (1/4" x 3/4"). Two are needed. This
unites No. 10
and 11.
13. Mild steel rod,
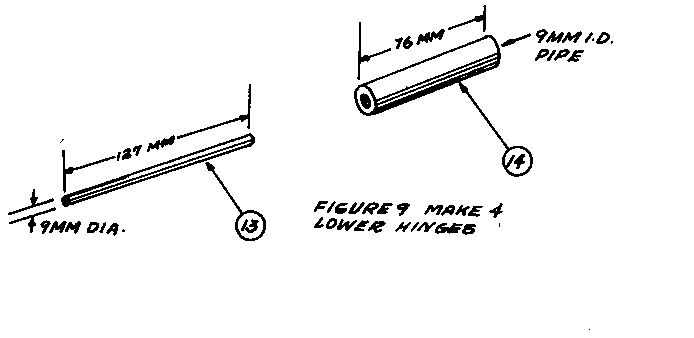
9mm x 12.7cm (3/8" x 5"). Two are needed (Figure 9 and 11).
fg9x2320.gif (432x432)

Parts No. 5 are
made in pairs by welding to the ends of part No. 13. Before
welding, insert
part 13 in the
tube, No. 14,
which will become
the pivot (after
No. 14
is welded to the
inside angle
of No. 3). Thus
we have the
levers that open
the doors.
14. Pipe, 10mm
(3/8"), 7.6cm (3")
long; two are
needed. They
form the pivots
for levers.
15. Steel welding rod, 6mm x
10.8cm (1/4"
x 4 1/4").
The ends are
ground flat
and smooth. Two
are
needed (see
Figure 14).
fg14x234.gif (600x600)
These are the
hinge pins
for the doors.
After the hinge
holes,
No. 16, are
welded to
part No. 3, parts
No. 15
are put in place
in the
holes.
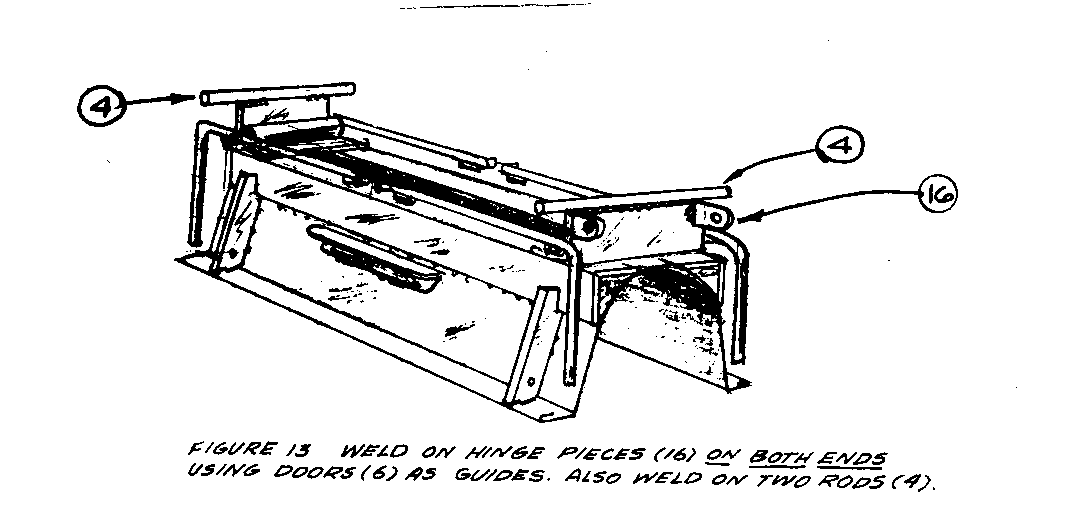
Then parts No. 6, the doors, are put in place, checked for
exact position and
bronze welded to the hinge pins, No. 15. This weld extends
almost the entire
distance between one pivot hole (part No. 16) and the other.
The weld holds
the door to the hinge pin and prevents the hinge pin from
sliding out of
place. <see figure 12>
fg12x233.gif (600x600)

16. Steel bar, 19mm
x 2.5cm x 6mm (3/4" x 1" x 1/4") (see Figure 13). Four are
fg13x234.gif (600x600)
needed. Bore 6mm
(1/4") hole for the hinge rod as shown. No. 15 pivots in
these holes to
make hinges for the doors. Parts No. 16 are welded to part
No. 3 in such
position as to be as far to the outside edge of the door as
possible. It is
best to make a trial positioning of the door and parts No. 15
and 16 by tack
welding No. 16 lightly before welding it permanently. Then it
is possible to
make sure that the door is going to be in such place that the
pipe will have
its proper position.
17. Common nails, 6
penny, with strong heads (see Figure 14). Four are needed.
fg14x234.gif (600x600)
Connect the nail
to the spring by a wire through the hole in No. 8. Put the
wire through the
holes before forming the second end loop.
18. Piston, 5cm
(2") galvanized pipe, 40.6cm (16") long. (The 5cm (2")
measurement
is the inside diameter
of the pipe.) Weld one end shut by bronze
welding a metal
disc to the end. Then dress lightly in the lathe, making the
dosed end 0.5mm
(1/64") smaller than the other. It will serve well without
turning, but
will be easier to operate it dressed.
19. Wire or welding
rod, 2mm (3/32") to make the connection between parts No.
9 and 17 (see
Figures 2 and 14).
fg2x2290.gif (176x353)

Making the Tile
It is possible for one worker to make two tiles per minute,
although a good day's
work would be 300 or more. The mortar remains in the form
only a few seconds.
The cement mixture is tamped into the form with a tamper.
Then the form is
immediately turned upside-down on a (slightly oiled)
concrete floor and emptied,
leaving the tile completed and ready to start its curing
process. The same general
method can be adapted for the wooden tile-making machine in
Figure 15 of the
fg15x235.gif (600x600)
preceding entry. <see figure 1>
fg1x236.gif (600x600)

Tools and Materials
Fresh Portland Cement
Clean sand, screened through a 6mm (1/4") screen
Clean water
All-metal tile machine
Metal tamper
Plastering trowel
Work bench
Shop with concrete floor
One (11-liter) bucket
D-handled shovel (square point)
Large hoe for mixing cement
A strong dust pan without a handle.
Gloves
Make the tile by following these steps:
1. Screen the sand
and spread out 28 liters (1 cubic foot) on the shop floor.
Use a 28-liter
(1 cubic foot) measuring box without a bottom.
2. Spread 7 liters
(1/4 cubic foot) cement over the sand. Measure in the box,
filling it 1/4
full.
3. Mix thoroughly
with shovel and hoe. Turn over the pile four to six times.
4. Spread the pile
out and scatter the mixing water over it. The amount of
water should be
no more than 2/3 the volume of cement, including any water
in the damp
sand. The mix should be as dry as possible and still be plastic.
5. Make the batch
into tile before 45 minutes of time elapses. Cement loses its
strength if put
into the form too long after mixing.
6. Fill the form
(without the pipe) 1/4 full and tamp the ends with two strokes
with the
(gloved) left hand. This gives the tile perfect ends.
7. Insert the pipe
and fill the form with mortar, using one dip from a strong
dust pan without
a handle.
8. Tamp the sides
of the tile, Make three strokes with the iron tamper.
9. Fill the form
again, with another dip from the dust pan.
10. Turn the tamper
over and pack the cement again. Give three strokes with
the flat surface
of the tamper.
11. Use the trowel
to finish the tile. Strike off the surplus with one stroke and
leave the
surface trowelled level with a second stroke.
12. Carry the tile
and form to a place where the floor has been lightly oiled. In
carrying the
form, do not touch the pipe.
13. Place the form
carefully on its side on the floor and then tip it quickly to
an upside down
position. Hesitation in the middle of the tipping action may
cause the mortar
to fall out.
14. Pull out the
pipe, turning it slightly first. Hold the form down with one
hand. If the
pipe is too hard to remove, it may have irregularities and need
to be dressed
lightly in the lathe.
15. Lay the pipe on
top of the form. This gives the form a slight jar.
16. Gripping the
sides of the form with both hands, push down on the levers,
which open the
hinged ends, and then lift the form off the tile. In lifting
use leg action
and hip action. Bending the elbows may knock an end off the
tile.
17. Leave the tile
in its place on the floor over night. Sprinkle very lightly with
water if it
begins to get dry. To dry at this stage would ruin it.
18. The next day the
tile can be picked up by gripping it at its middle with the
hand. Stack the
tile at the side of the shop to clear the center floor space
for another day
of production. The first day, stack only two layers high, as
the tile is not
strong yet. The second day, they can be stacked as high as
desired.
19. When tiles are
one day old, it is a good time to make 45-degree ends on tile
that have been
injured in manufacture. About 5 percent (or more) of the tile
made will need a
45-degree end for use in turning corners in the tile line.
20. Keep the tile
wet at least a week. The strength is increased by each day
that the tiles
are kept wet.
If you need further instruction on the fundamental
principles of good concrete
construction, study the entries on concrete.
Source:
Brown, J. Oscar. A Machine for Making Concrete Tile for
Irrigation and Drainage.
O.T.S. Information Kit, Vol. 2, No. 2. Washington, D.C.:
U.S. Department of
Commerce, 1961.

