Food Processing
and Preservation
fpap.gif (437x437)
Storing Food at Home
You work hard when you grow food and prepare it to eat.
Buying food takes
money that you have worked hard to earn. You do not want to
waste it. To keep
food clean and safe in the home you must have good storage
space, suitable
containers, and a way to keep foods cool and dry.
IMPORTANT
Only water that is pure enough to drink should be used for
washing or
cooking food. If the purity of water is in doubt, it should
be boiled for
10 minutes or disinfected. See section on water
purification, p. 138, for
proper disinfection procedures.
HOW TO CARE FOR VARIOUS KINDS OF FOOD
Different kinds of food need special care. Treating each
food properly will make
it keep longer.
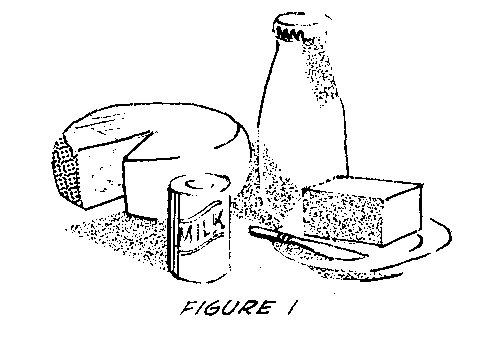
Dairy Foods <see figure 1>
fg1x273.gif (393x393)
Fresh milk is safe if it is boiled. If you do not have
refrigeration, boiled milk
will keep longer than milk that has been pasteurized. Cream
will keep longer if it
is boiled.
After milk and cream are boiled, then cooled, store them in
clean containers.
These foods will keep longer if stored in a refrigerator,
ice chest (see p. 290), or
evaporative cooler (see p. 28). If
refrigeration is not available store
them in the coolest place you can
find.
Use boiled water to reconstitute
canned, evaporated, condensed, or
dried milk or add water and boil
for 10 minutes. Unsafe milk should
not be used for any purpose.
Cooked foods using milk or cream spoil very quickly. Use
them immediately in hot
climates. Do not store.
Dried milk in its original container will keep for several
months in a cupboard or
on open shelves. Close the container tightly after using.
The milk will take up
moisture and become lumpy if exposed to air. Then it is hard
to mix with water
and food. A glass jar with a tight lid, or a tin can with a
press-in lid, are
recommended to store dry milk powder after the package has
been opened,.
After dried milk has had safe water added to it, store it
the same as fresh fluid
milk.
Canned evaporated milk may be stored at room temperature
until opened. Before
opening shake the can to mix thoroughly. After opening,
cover tightly and store
the same as fresh fluid milk.
Canned sweetened condensed milk may be stored in the
cupboard or on open
shelves. After the can has been opened it can be stored in
the same place as the
unopened can but it needs protection from ants and other
insects. Sweetened condensed
milk does not require refrigeration unless it has been
diluted with water.
Butter should be kept in a cool place, in a covered
container.
Keep hard cheese in a cool place. Wrap tightly in a clean
cloth or paper to keep
out air. Put in a box or metal container if possible. Before
using, trim away any
mold that forms on the surface.
Soft cheeses should be stored in a tightly covered container
in a refrigerator or
other cool place.
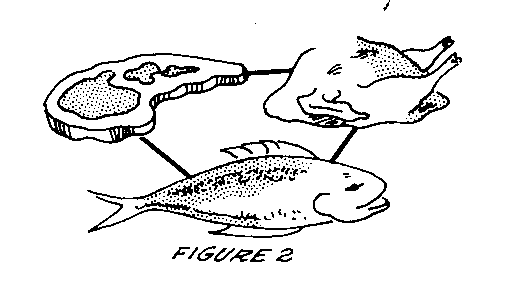
Fresh Meat, Fish, Poultry <see figure 2>
fg2x274.gif (393x393)
The moist surfaces of dressed meats, poultry, and fish
attract bacteria that cause
spoilage. Keep these foods clean, cold, and dry. They should
be allowed some air
when stored. Wrap loosely with a
clean cloth or paper. Wipe or
scrape off any dirt before wrapping.
These foods spoil very quickly.
They should not be kept long in
warm, moist climates.
Rubbing cured or smoked meats with dry baking soda may help
prevent molding.
If meat is attacked by insects or shows spoilage, cut out
the bad part.
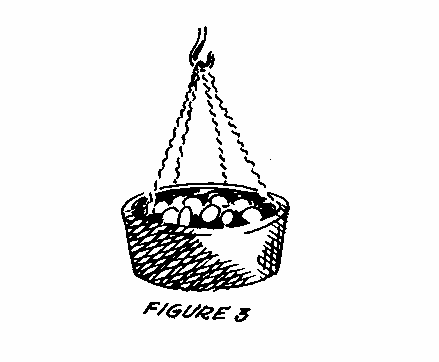
Eggs <see figure
3>
fg3x275.gif (437x437)
Sort eggs as soon as they are brought from the poultry yard
or market. Cracked
ones should be removed and cooked for immediate use. Spoiled
eggs should be
thrown away. Rough handling and high temperatures shorten
eggs' keeping quality.
Keep eggs in a covered container
in a cool, dry, clean place. Eggs
keep fresh longer if stored in an
airtight container.
Don't wash the eggs unless you
want to sell them. Water removes
the thin film on the shell that
protects the egg. This film helps to
stop evaporation, the entrance of
harmful bacteria, and the absorption
of odors. Do wash eggs just
before using them. Wash with
cooled boiled water.
Fresh Fruits and Vegetables <see figure 4>
fg4x275.gif (437x437)
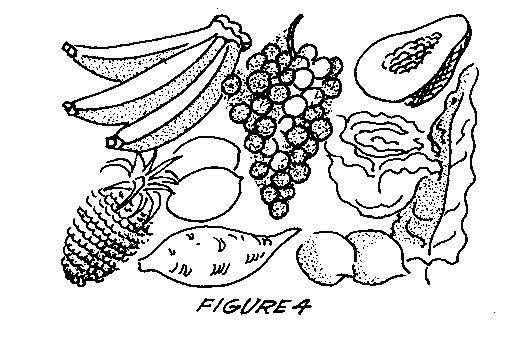
Fresh fruits and vegetables need to be kept clean and in a
cool place with good
air circulation and out of direct sunlight. Such conditions
help to prevent
spoilage. Avoid breaking or cutting the skin.
Sort fruits and vegetables before storing. Use bruised ones
immediately, throw
away decayed or spoiled ones. Ripe fruits and vegetables
should be used in two or
three days. Allow them to ripen in the open air out of the
sun. Wash fruits and
vegetables in clean water before using them.
Fruits and vegetables stored in boxes, baskets, barrels, and
bins should be sorted
frequently to remove decayed or spoiled ones. Some fruits
such as oranges and
apples may be wrapped in separate
papers. The wrappers help to keep
the fruit from bruising each other
and also help to prevent mold.
Soft fruits and vegetables such as
berries, peaches, papayas, figs,
tomatoes, and plums should be
spread out on clean wrapping paper
or in shallow pans or platters
rather than deep containers.
Potatoes and other starchy tubers should be sound, dry, and
free from soil, cuts,
and bruises when put into storage. Wet tubers rot more
quickly than dry tubers.
Store potatoes in a dark place because light promotes the
formation of green skin
and the poisonous glycoalkaloid called solanine in the
potato.
Potatoes keep better if cured within 1-3 days after harvest.
The easiest way to
cure potatoes is to keep them in a container with restricted
ventilation (to
establish a high relative humidity of about 85 percent) for
about 15 days at 15 [degrees]C
(60[degrees]F), or 10 days to 20[degrees]F, or 6 days at
25[degrees]F). After curing, fully
open the container to allow free air movement and store in a
cool, dark place.
Fats and Oils
Keep all fats cool, covered, and in lightproof containers.
Heat, light, and air help
to make fats rancid. Use no iron, copper, or copper alloy
vessels or equipment to
store or handle fats and oils because traces of iron or
copper make them turn
rancid quickly.
Fats and oils should be kept dry with no moisture mixed with
them. Mold on the
surface of fats shows moisture is present. Remove the mold
carefully. If possible,
heat the fat to drive off the moisture.
Foods like nuts and chocolate, which have some fat, may get
rancid. Nuts keep
best when left in shells. Keep these foods cool, clean, and
dry in light-proof
containers.
Peanuts that are much darker in color than the rest of the
batch should be
thrown out. They are probably contaminated with aflatoxin,
which causes cancer
of the liver.
Baked Goods <see figure 5>
fg5x276.gif (437x437)
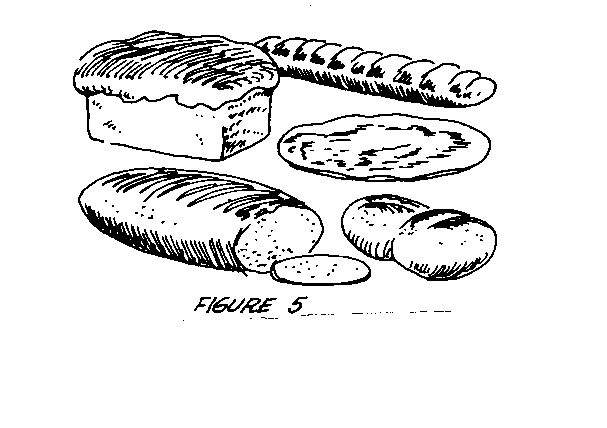
Cool bread, cakes, pies, cookies, and other baked goods
rapidly after they are
taken from the oven. Be sure the place is free from dust and
insects. Wrap bread
with a clean cloth or paper when cool.
Stored baked goods in a clean tin
box or other suitable container off
the floor.
Molds grow on bread. Scald and air
the bread box at least once a
week. In hot humid weather do not
shut the bread box tightly when it
is filled with fresh bread.
Store crackers, crisp cookies, pretzels, and other crisp
baked goods in airtight
containers to retain crispness. A tin can with a press-in
lid is ideal. If not
available use a sealed plastic bag made from thick plastic.
Dried Foods
Dried meats and dried fruits and vegetables may be kept in
closely woven cloth
bags if the bags of food are kept in a cool, dry place. If
these dried foods are
hung in a damp place they are likely to mold.
Properly dried foods are best stored in airtight containers
if you live in a humid
climate. A tin can with a press-in lid or a large glass jar
with a tightly fitting
lid will prevent moisture pickup from the humid atmosphere.
Look at the product
occasionally and check that it is in good condition. If
there is any sign of mold
it means the food is not dry enough.
Open bags of dried foods should be kept in a pottery or
metal container. Seal the
container tightly to keep out insects and rodents.
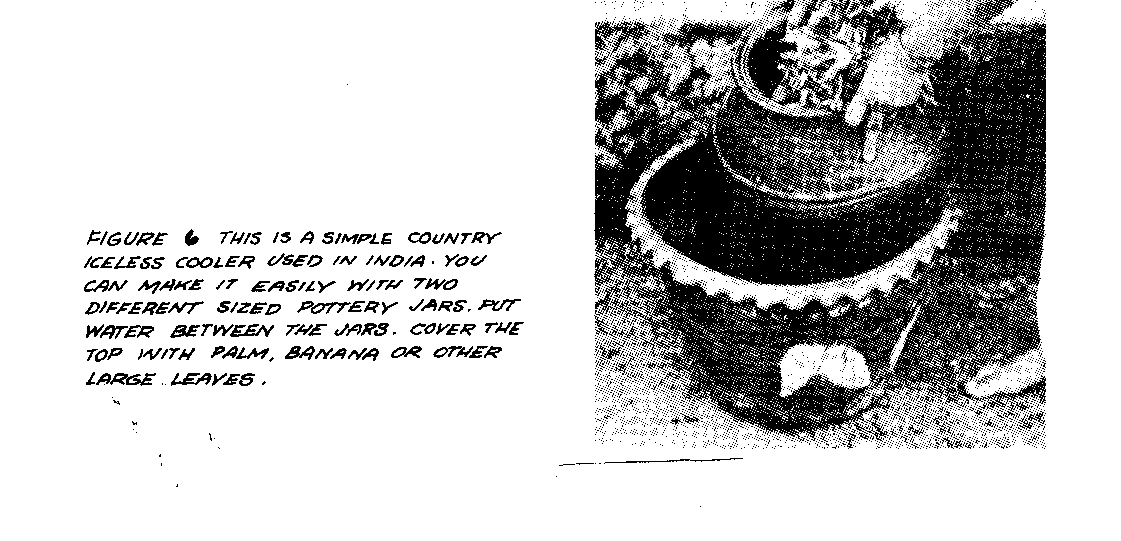
Canned Goods <see figure 6>
fg6x277.gif (437x437)
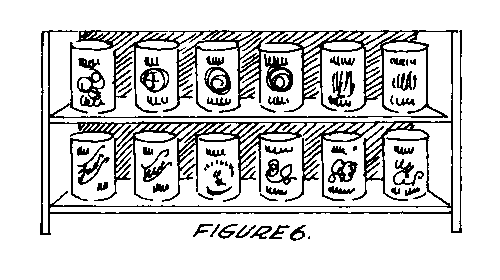
Canned foods should be kept in a clean, dry, cool place.
Destroy any swelled or
leaking cans. Do not eat or even taste the food in swelled
or leaking cans. Don't
even open the can. Dispose of it.
The outside of the cans will
become rusty if they are stored in
a damp place or in humid atmosphere.
The contents of rusty cans
are safe to eat provided there are
no holes, leaks, or bulges in the
cans and the contents appear
normal when can is opened.
Leftover Cooked Foods
Moist cooked foods, particularly those made with milk, eggs,
meat, or fish, spoil
easily. Leftover cooked foods should be cooled quickly.
Store in refrigerator, ice
chest, or evaporative cooler. Use at the next meal if not
refrigerated.
FOOD SPOILAGE
When is Food Spoiled?
Food generally shows when it is spoiled. Check it often. It
may have an unpleasant
appearance, taste, or smell. Look for these signs of food
spoilage:
o slime on the
surface of meats and other moist foods
o bad odors
o sour taste in
bland foods
o gas bubbles, or
foaming
o discoloration
o liquid that has
become cloudy, thick, or slimy
o texture becomes
very soft
o signs of mold
growth
It is important to destroy spoiled foods as soon as they are
found. Throw away
any food that has a bad smell. Chopped meat, eggs, and sea
food usually spoil
rapidly. Watch grains for signs of weevils. Look for insects
and mold in dried
foods. Destroy the part that has insects or mold at once.
Why Food Spoils
Foods may be spoiled by
o
bacteria, molds, and yeasts
o
parasites of meat animals
o
insects and rodents
o
warm air, freezing temperatures, light
o
too little or too much moisture
o
storing too long
Dirt and careless handling increase food spoilage. Good care
of food in the home
can help avoid waste. Keep food in a clean and safe place.
Bacteria are living
things so small you can't seem them. Many are harmful. They
live almost everywhere.
Sometimes food is made unsafe because bacteria causing
disease have
gotten into it. Food can carry these and many other
diseases:
o
amoebic dysenteries
o
tuberculosis
o
typhoid
o
diphtheria
o
botulism
o salmonellosis
People may appear healthy and still carry these disease
bacteria in their bodies.
When they handle food, the bacteria may be passed on to the
food. Then the food
is unsafe for others.
Bacteria need water to live. Removing water prevents their
growth. Foods are
dried to preserve them. Then they are kept dry. Some foods
that are dried are
meat, fish, beans, peas, grapes, figs, currants, cereal
grains, flour, spaghetti,
noodles and other pasta products, dates. They are dried in
the sun or smoked
over a fire.
Bacteria, molds, and yeast in foods may be destroyed by
heating and some
chemical preservatives. They cannot grow in properly dried
foods. They grow more
slowly at refrigerator temperature than at room temperature.
Molds can he harmful. They grow where it is damp. Molds look
like delicate
velvety or powdery growths of various colors spread through
food.
If meat, cheese, or jam have mold on the surface, cut away
the moldy part. The
food that is left may be eaten.
Parasites, such as tapeworm and trichina, live in meat
animals. The tiny larvae of
these parasites may be in the lean meat. They are waiting to
complete their
development in the human body or some other place.
Thorough cooking of meat is the best way to destroy these
parasites. Preservatives
such as salt and smoke do not destroy them. There is great
danger in eating
uncooked or lightly cooked sausages, for example, even
though they have been
smoked.
Many chemical substances either destroy certain harmful bacteria
or prevent their
growth. For food, two of the simplest to use are common salt
and sugar. Salt is
used for meat and vegetables. Sugar is used to preserve
fruits. Sugar and salt
have to be used at a high level to be effective.
Insects and rodents eat some food and damage several times
as much as they eat
with urine, feces, and hairs. They may also leave dangerous
bacteria on them.
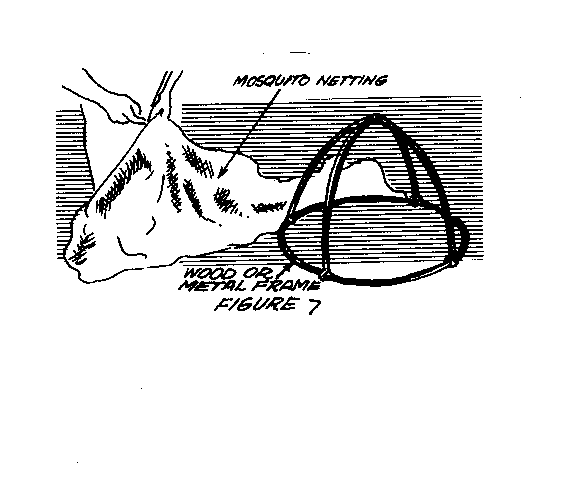
The house fly spreads typhoid
fever, cholera, dysentery,
tuberculosis, and many other
diseases. Keep flies away from
foods. A cloth net fastened to a
simple wire frame keeps flies out
of contact with food (Figure 7).
fg7x279.gif (600x600)
The "fly specks" often found on
food or dishes may have disease
germs and mice destroy many types
of food.
To help keep insect and rodent pests out of food:
o
keep food covered or in closed containers
o
get rid of garbage and trash
o
keep the storage area clean
Poisoned bait, powders, or sprays may be necessary to rid
storage areas of household
insects and rodents. Ask your health department, sanitation,
or other official
what pesticide to use, where to get it, and how to use it.
These people have
special training on how to control household pests. They can
help you.
Use pesticides with care. They are POISONOUS to people and
animals. Keep them
out of reach of children. Never store insecticides in the
same place you store
food. Always wash off any dust, spray, or solution that gets
on you. When spraying,
remove dishes, pots and pans, other cooking utensils, and
food from the
room. If you have a cupboard with solid, tight fitting doors
store the dishes and
cooking equipment there while spraying. Never use oil spray
or solutions near a
fire.
Rats and mice can be caught in traps or killed with poison
bait. Destroy or block
up all places where they are likely to nest and breed.
Rodents cannot chew
through metal, glass, or pottery containers so try to use
containers made from
these materials for storage of food.
Temperature affects food. Fruits ripen more quickly,
vegetables become old and
wilt more quickly, and nuts, fats, and oils become rancid
more quickly as the
temperature increases. Insects, bacteria, molds, and yeasts
grow more quickly at
higher temperature. Therefore, store food in a cool place.
Do not store food near
a hot stove.
Food in direct sunlight gets hotter and spoils more quickly
than food in the
shade. Food should never be left in direct sunlight unless
it has been put there
for a limited time to dry it or to drive out insects.
Freezing temperatures can ruin the texture and flavor of
some foods. Frozen
potatoes, for example, are watery and have an unpleasant
flavor. Frozen and
thawed foods are safe to eat but may have an off flavor or
bad texture.
Moisture in the air is necessary where green leafy
vegetables are stored. If there
is not enough moisture in the air, the moisture from these
vegetables will
evaporate into the air. Then they become wilted or limp and
look bad even
though they are still safe to eat. These vegetables keep
best when stored in a
sealed plastic bag or box and kept in a refrigerator, ice
chest, or evaporative
cooler.
CONTAINERS FOR FOOD
It is very important to have good containers for storing
food. Some foods must be
stored in containers with tight fitting covers. Generally
each food is best stored
in a separate container. Label food containers to save time
and avoid mistakes.
Types of Containers <see figure 8>
fg8x281.gif (540x540)
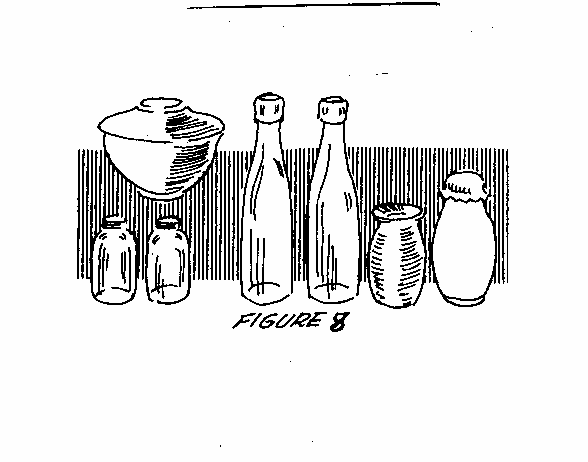
Dry foods should be stored in glass, pottery, wooden, or tin
or other metal
containers. The type of container will depend on the food to
be stored and
whether the container can be washed. Dry tin quickly to
avoid rust.
For moist and watery foods the choice of containers is more
limited. Leakage
must be avoided You must consider the effect acids in watery
foods have on the
container, especially metals. A
container that can be washed and
aired before fresh supplies are
stored in it is best.
Pottery jars are good for storing
many kinds of food. Jars that are
glazed on the inside are best. They
can be washed easily. If the jars
do not have a tight fitting cover,
make one. Use a plate, saucer, or
piece of metal. A good cover helps
to keep out insects and rodents.
Glass jars with tight lids are also good for storing many
foods. Foods that are
affected by light should not be stored in glass jars unless
the jars can be stored
in a dark place. Glass jars can be used again. Wash them in
hot soapy water.
Rinse them with hot water that has been boiled for 10
minutes. Dry them in the
sun if possible.
Bottles are good for storing liquids and some dry foods. In
many countries people
preserve fruit and vegetable juices in bottles.
Coconuts, gourds, and calabashes may be used for storing
some dry foods for a
short time. Covers can be made of closely woven materials.
Insects tend to eat
away the soft lining of these containers, so they are not
good for storing meal
and flour for long. Wash these containers often to keep out
weevils. Dry in the
sun.
A simple cupboard can be made from a wooden box with
shelves. The door is
made of chicken wire so air can circulate. Use it to store
root vegetables and
some fruits.
Tin cans of all sizes are good for storing foods. Sometimes
the lids of cans
containing food have been removed with a hand or mechanical
can opener. Then
the lid does not fit. If you use these cans to store food,
make a cover out of a
plate, saucer, or a piece of metal.
Use a food cover to keep out flies and other insects when
you store food on a
table in an uncovered container. You can make a food cover
out of mosquito
netting and a metal or wooden frame (see Figure 7). Store
foods this way for a
short time only.
A bread box may be made of metal or wood. Punch holes in
each end for air
circulation.
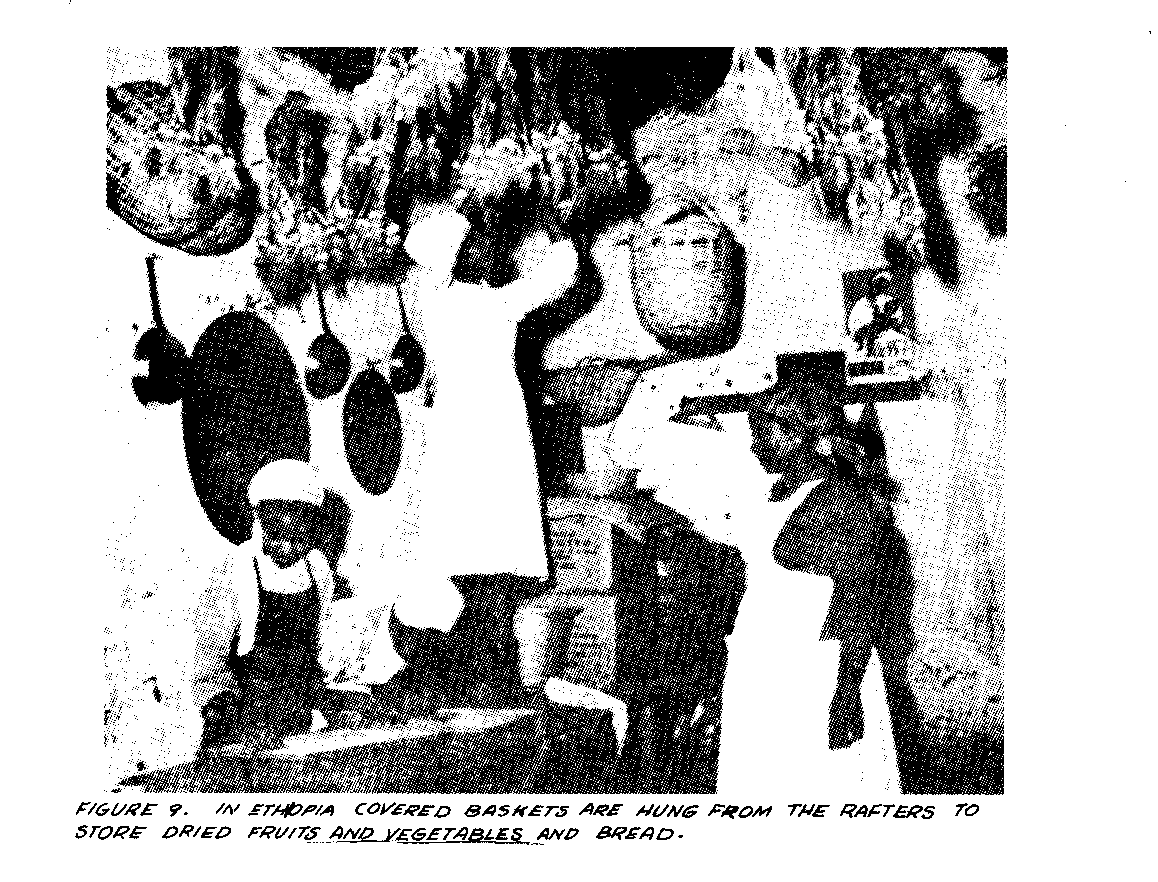
Open baskets are good for storing fresh fruits and
vegetables for short periods. A
light cover is not needed for these foods. <see figure
9>
fg9x282.gif (600x600)
Care of Food Containers
Food containers must be kept clean. Wash and dry containers
before fresh
supplies are stored in them.
Water for washing containers should be clean and hot. Use
soap or detergent.
Rinse the containers carefully with clear clean water. Dry
them in the sun if you
can.
Do not store food in containers that have held kerosene,
gasoline, heavy oil,
chemicals, or pesticides.
Containers holding food that does not need to be kept cool
may be stored on
shelves or on a table.
THE STORAGE AREA
A good storage area is:
o
clean and neat
o well
ventilated
o
cool and dry
o
free of rodents and insects
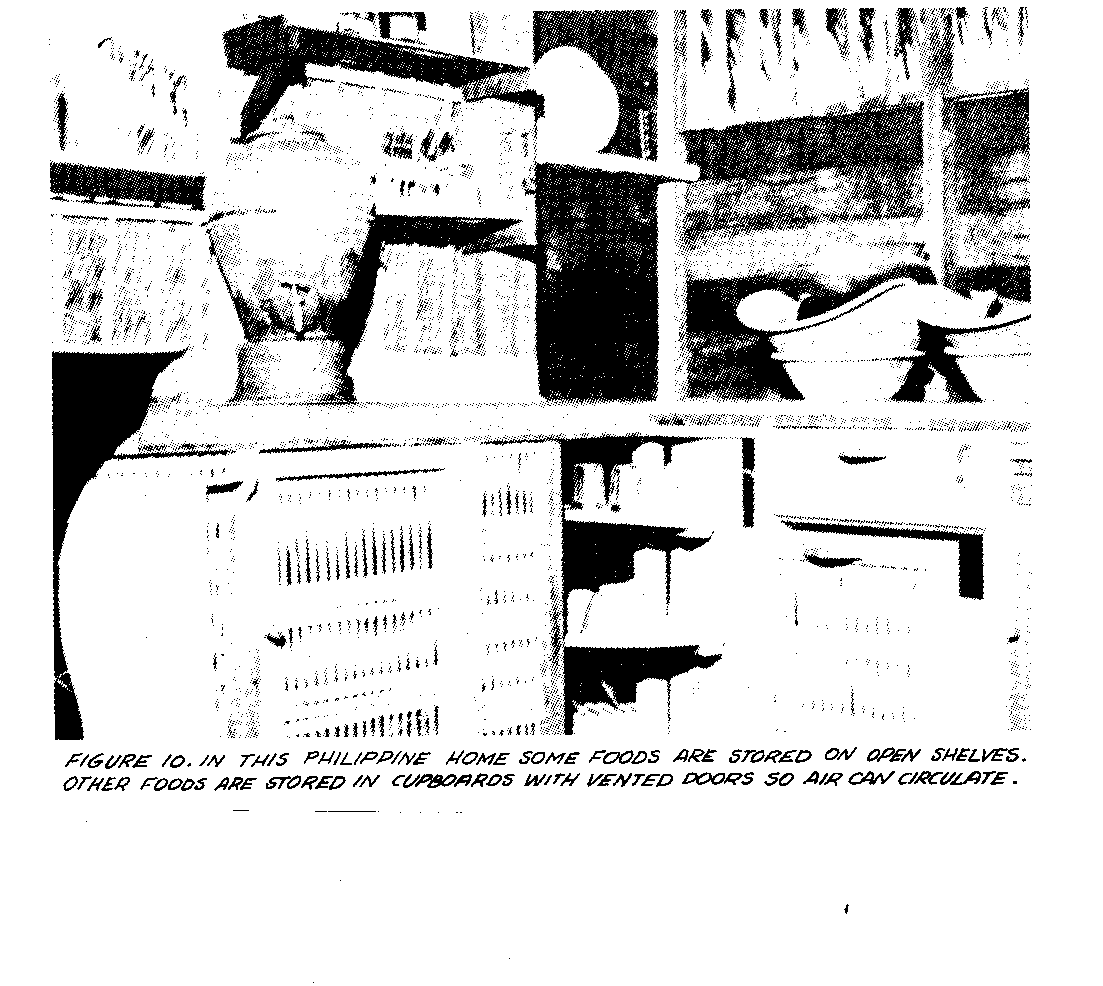
You may store food in the kitchen in cupboards on open
shelves, or in a closet
with shelves. Sometimes a separate room next to the kitchen,
called a pantry, is
used for storing food. Also cellars, caves, and outdoor pits
are used in some parts
of the world for food storage. <see figure 10>
fg10x283.gif (600x600)
Good Ventilation
Ventilation is important for good food storage. Good
circulation is needed around
food to carry off odors and to keep the right temperature
and the right amount
of moisture.
Keep the Storage Area Cool and Dry
Many fresh fruits soon spoil in a warm place. Then they are
unsafe to eat.
Cooking oils, table fats, and other foods with fat in them
may get a stronger
flavor if stored in a warm place. A dry storage area helps
to prevent mold on
foods such as bread, cheese, and berries. It also prevents
rust on tin cans in
which food may be canned or stored.
Keep the Storage Area Clean
There is no substitute for cleanliness. Scrub shelves,
cupboards, and floors often.
Paint, whitewash, or line shelves with clean paper. Clean the
walls, then paint or
whitewash them. Keeping the storage area clean helps to keep
away household
pests.
Remember, cleaning removes insecticides. Apply them again
after you clean, not
before.
Keeping Foods Cool
Some foods are
quite perishable. They are:
o
fresh meat, fish, poultry
o
some fresh fruits and vegetables
o
milk, butter, margarine, cream
o
leftover cooked foods
In a warm
climate it is best to buy these foods in small quantities and
use them quickly
rather than store them. If you have to store these
foods, keep them
as cool as possible. This is one way to keep them
fresh and
prevent spoilage.
There are several ways to keep foods cool. Some ways work
better than others:
1. Mechanical
refrigerators are the most effective in cooling and preserving
foods, but are
expensive and require an outside fuel source.
2. Ice chests come
next; if ice is available they are quite effective.
3. Evaporative
coolers follow ice chests.
4. Window boxes are
the poorest devices.
5. In some
situations, it is possible to enclose food in watertight containers and
place in a cool
stream or spring.
6. Keep food in
shade, out of the sun, if no other means is available to protect
it.
Obviously there is direct relationship between effectiveness
and price. Each family
should install the best cooling system it can afford; that
is, option 1 is better
than option 2, but 2 is better than 3, etc.
The information given in this section will help you to
choose a practical way to
keep foods cool given your particular situation.
EVAPORATIVE FOOD COOLER
The evaporative food cooler <see figure 1> is
fg1x286.gif (600x600)
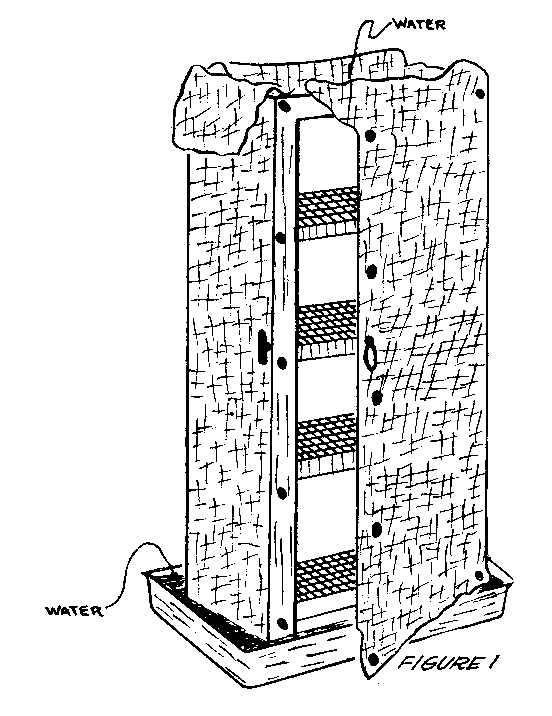
cooled by the evaporation of water
from its cloth cover. The cloth is
moistened as capillary action moves
water from the pans through it.
If the climate is dry and the cooler
is kept in a breezy spot in the
shade, it will cool food considerably
below the prevailing temperature.
To be safe, the cooler must be
kept clean. The cooler's cloth cover
keeps flying insects out. The
water-filled lower pan discourages
roaches and other crawling insects.
It should be emphasized that
coolers based on the principle of
evaporation of water need readily
available water of reasonably good
quality and a low humidity environment.
These coolers do not cool in
a humid climate.
Tools and Materials
Saw
Hammer
Nails, tacks
Burlap or other cloth: 2m x 2m (78 3/4' x 78 3/4')
Wood for frame: 3cm x 3cm x 13m (1 1/4, x 1 1/4" x
42.7')
Pan: 10cm (4") deep, 24cm x 30cm (9 7/16" x 11
13/16") for top
Screen, hardware cloth, or galvanized iron: 2m x 2m (78
3/4" x 78 3/4") (nonrusting)
Hinges: 2 pair
Pan larger than 30cm x 36cm (11 13/16" x 14 3/16")
for legs to stand in
Paint for wooden and metal parts
Buttons or lacing material for cover
Make the wooden frame to fit the upper pan (see Figure 2).
This might be the
fg2x287.gif (600x600)
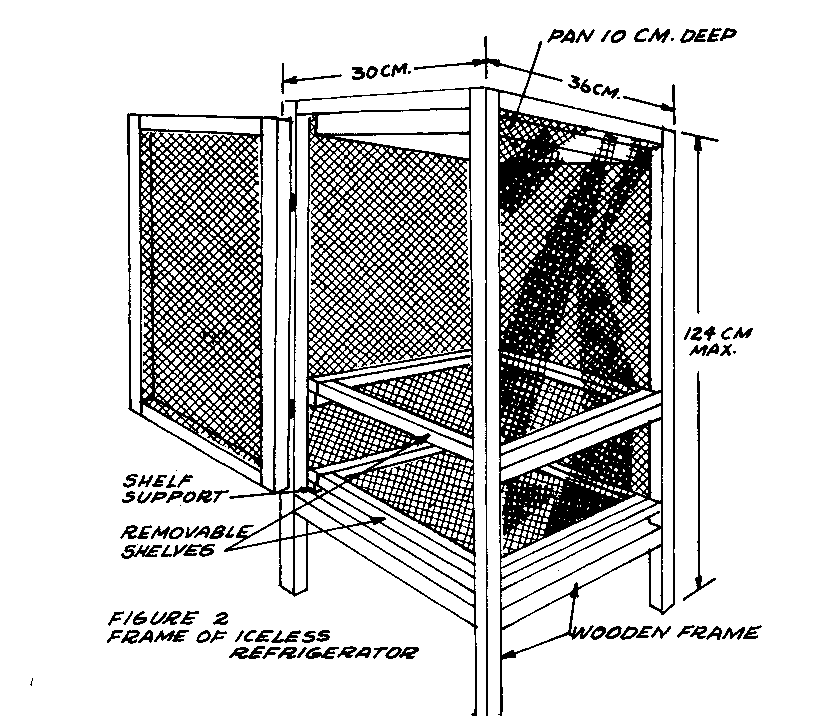
bottom of a discarded 20-liter (5-gallon) oil can. The lip
of the pan fits over the
top of the frame to keep the pan from falling into the
compartment. Hinge the
door carefully so that it swings easily, and make a simple
wooden or thong latch.
Paint or oil all the wooden parts. The upper and lower pans
should also be
painted to prevent rust. Cover the shelves (see Figure 3)
and frame with screening
fg3x287.gif (437x437)
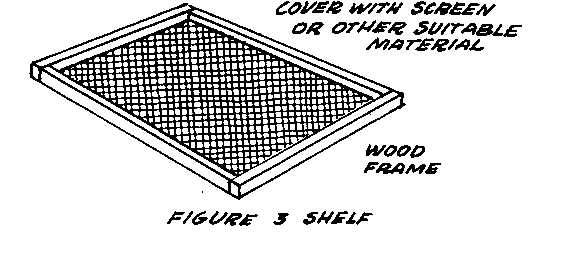
or hardware cloth and tack it in place.
The frame can be strengthened by putting the screen on
diagonally, although this
will take more material than applying it with the wires
parallel to the frame.
Make the shelves adjustable by
providing several shelf supports.
Flatten the pointed ends of the
nails slightly to keep the wood
from splitting when it is fastened.
Make two covers of canton flannel, jute burlap (not sisal or
henequin burlap), or
heavy-grade absorbent coarse cloth to fit the frame. Wash
and sun one cover
while using the other. On the front, fasten the cover to the
door instead of the
frame. Allow a wide hem to overlap the door closing. To form
wicks that will
carry water from the pans into the cover, the top and bottom
of the frame and
door covers should extend into the upper and lower pans. If
the cloth cover does
not stay moist, extra pieces of cloth can be placed at the
top of the frame to
serve as additional wicks.
ICELESS COOLER
A second type of cooler may be made from a basket with a
loose fitting cover. It
may be made of bamboo or other slender wood with open weave.
The size depends
upon the family's needs. In addition to the basket, you will
need a container to
set the basket in. This may be square or round, of
earthenware or metal. A clean
oil drum could be used. This container should be about 30cm
(12") high and wider
than the basket. Other materials include bricks or stones
and soft jute burlap.
To build the cooler (see Figure 4):
fg4x288.gif (600x600)

o Select a cool
place in the kitchen away from the stove for your cooler.
o Place the outer
container here.
o Arrange the bricks
or stones in the container so the basket will balance
evenly on them.
o Sew burlap around
the rim of the basket. Let it hang loose around the
bottom and extend
into the earthenware or metal container.
o Sew burlap loosely
over the cover of the basket.
Set the basket on the bricks. Place food in the basket.
Cover. Put water in the
bottom of the container. Wet the cover of the basket the
first time the basket is
used. Later do this just occasionally. The basket itself
should not be in the water.
The burlap cover should hang down into the water.
WINDOW BOX
In some countries window boxes are used to store foods
during the cool months
of the year. They must have good ventilation and tight
covers to keep out rain or
snow. An ordinary light wooden box may be used or you can
make one. <see figure 5>
fg5x289.gif (600x600)
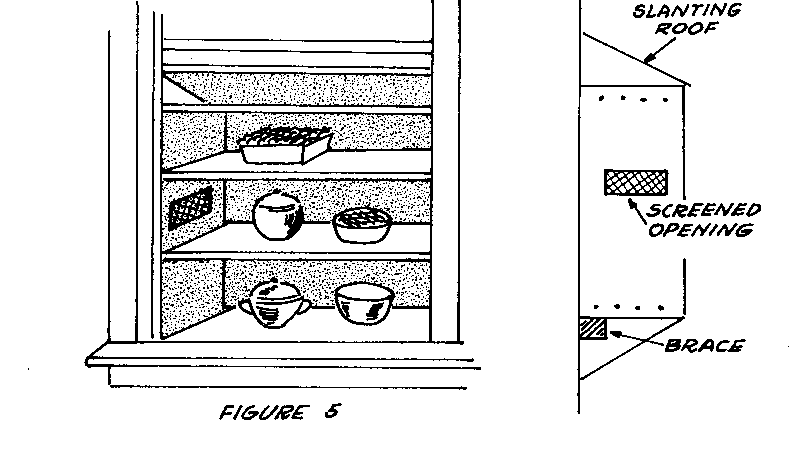
To install a window box
o Fit the box to the
outside of the window. The window is the door. Select
the window that is
in the shade longest during the day. Keep the window
closed when the
box is not actually in use. This will keep the box from
getting too warm
and the room from getting too cold.
o Put a shelf on the
window sill. Support the shelf with wooden braces.
o Set the box on the
shelf. Fasten the box to the window case with screws or
nails.
o Fit a sloping top
over the box to shed the rain.
o Make holes in the
end of the box so air can circulate. Screen the holes.
o Shelves may be
made of heavy screening, poultry wire, or wood.
o Rest the shelves
on cleats fastened to the sides of the box.
o Paint the box
inside and out. It will be easier to keep clean. Wash the inside
with soap and
water from time to time.
o Food placed in the
box should be in clean covered containers.
A similar food storage closet may also be built on the
outside of the house. You
can make it open into a room by a special door through the
wall.
OTHER WAYS TO KEEP FOOD COOL
A mechanical refrigerator is ideal for storing perishable
foods. However, refrigerators
are not available in all parts of the world and are often
very expensive to
buy and operate. Where a refrigerator is used, it needs special
care.
Clean and defrost it regularly. To do this, turn it off.
Allow the ice to melt.
Wash the inside of the refrigerator thoroughly, using warm
water and soap. Pay
special attention to the corners.
An ice chest can be made at home. Line a wooden packing case
with galvanized
iron. You will need to put insulation between the wooden box
and the iron to
keep out heat. Use sawdust, cork, or similar material. Be
sure to insulate the top
and bottom as well as the sides. Make a hole at the bottom
for water to drain
out as the ice melts. Keep the ice chest clean. Wash it with
soap and water
often.
To pack the chest, allow at least one fourth to one third of
the volume of the
chest for the ice. Block ice lasts longer than chopped or
crushed ice. Keep the
packed chest out of the sun and away from sources of heat.
Cool cooked foods to
room temperature before placing them in the chest.
A wooden keg lined with cement makes a good food cooler. You
may store leafy
vegetables such as spinach and lettuce here. The vegetables
can be kept in a
strong paper or plastic bag. Hang the bags on a hook screwed
into a cover of the
keg. Fill the bottom with water.
On some farms cold water pumped from deep wells may first be
used to cool
foods, by running it through a suitable storage box. Also, a
house or box may be
built over a spring or brook to keep foods cool.
Special wells or caves are sometimes built for cool storage
of foods. <see figure 6>
fg6x290.gif (600x600)
Storing Vegetables and Fruits
For Winter Use
In some countries the climate is too cold to grow foods the
year around. Farmers
and gardeners in many parts of the world have found good
ways to store some
vegetables and fruits.
Some of their methods may be ones you will want to study and
tell others about.
An agricultural adviser can help you decide which type of
storage is best for your
climate and the foods grown in your area. Storage methods
described here are
practical only in areas where outdoor winter temperatures average
-1[degrees]C (30[degrees]F) or
lower. They do not work when the climate is warm all year
long.
Some vegetables, like tomatoes, can be planted late in the
season so that they
can be picked just before frost. If picked when white or
turning red, tomatoes
will ripen in a warm room. To store them for longer periods,
they can be packed
in boxes of sawdust; when they are to be used, the boxes are
opened and the
tomatoes are put in a warm room to ripen.
Dry bean seeds can be kept for winter use by picking the
pods as soon as they
are mature and spreading them in a warm, dry place until
dry. The beans are then
shelled, stored in bags, and hung in a cool, dry, ventilated
place until needed.
Cellars are usually too damp for storing dry beans. Dry
beans of all kinds,
soybeans, and peas can be stored this way. Keep the beans as
dry as possible.
Root crops such as beets, carrots, celery, kohlrabi turnips,
winter radish, and
horseradish are not stored until late fall. When the soil is
dry, the roots are
pulled and the tops are removed. Cone-shaped pits make good
storage places for
root crops in areas where they can be kept from freezing.
Turnips may be left in
the garden until later than most crops but are hurt by
alternate thawing and
freezing. Parsnips may be left in the ground until needed as
freezing does not
hurt them, but put a few in storage for use when the ground
is frozen.
Sweet potatoes store best in a warm, moderately dry place. A
small supply can
be placed near a cooking stove of a warm chimney or some
other place where the
temperature will stay around 12[degrees]C to 15[degrees]C
(55[degrees]F to 60[degrees]F).
Late maturing pumpkin and squash can be kept in rows out of
doors until late
winter. They can also be kept on shelves in an area with a
temperature ranging
from 12[degrees]C to 15[degrees]C (55[degrees]F to
60[degrees]F).
Some helpful pointers on storing fruits and vegetables:
o Different
vegetables and fruits need different storage conditions and methods
o Anything showing
decay or injury should not be stored.
o Vegetables and
fruits will dry out unless the storage place is damp and the
temperature low
but not freezing.
o Ventilation not
only changes air and removes odors, it also helps maintain
desirable temperature
and humidity.
o Windows and
ventilators should be kept open when temperature is not
freezing.
o Walls and
ceilings should be insulated so moisture will not condense and drop
on stored foods.
The following sections show how to build some kinds of
storage facilities.
POST PLANK CELLAR
This type of storage cellar is low in cost, but does not
last long because the
wood will decay. (See Figure 1). If creosote or other
waterproofing material is
fg1x292.gif (600x600)
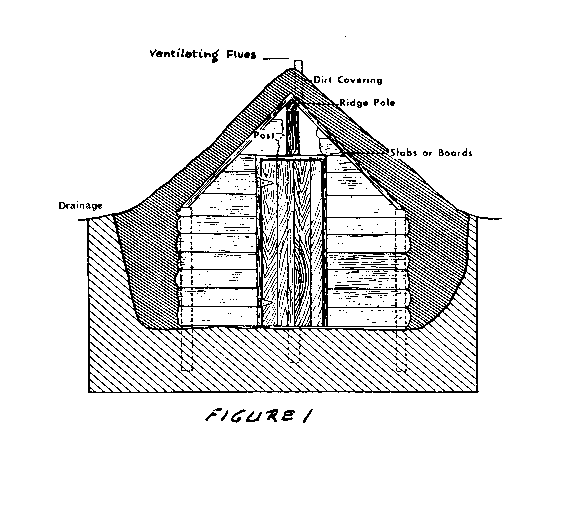
available, paint the wood with it to slow down decay.
o Dig a hole big
enough to hold the foods to be stored and 120cm (4') deep.
o Keep the soil
piled nearby to use to cover the roof and bank the sides.
o Set two rows of
posts of the
same height in
the bottom of
the pit near the side walls.
o Set a middle row
of posts
about 150cm (5')
higher than
the outside
posts. Put a ridge
pole on the
center row. Lay
planks on the
two outside
rows.
o Next place a
roof of planks.
o Close the ends
and cover the whole cellar except the door with soil. The
door may be made
of planks or other durable material. The thickness of the
cover depends
upon the climate.
o Be sure that
water drains away from the cellar. Extend a pipe from the
storage area up
through the dirt for ventilation.
CABBAGE PITS
A good way to store cabbage, collards, and other greens is
in a pit made of
stakes and poles covered with straw (see Figure 2).
fg2x293.gif (486x486)

o Dig a trench
long enough to
hold the number
of cabbages
to be stored.
o Pull the plants
by the roots
and set them
side by side in
the trench.
o Pack soil around
the roots.
o Build a frame
about 60cm (2') high around the bed. This may be of boards,
poles, or stakes
driven into the ground.
o Bank soil around
the frame.
o Place poles
across the top to hold a covering of straw, hay, leaves, or corn
fodder.
Cabbages can also be stored above ground in an area
protected by drains from
excess moisture (see Figure 3). Cabbage plants are pulled
out by the roots, placed
fg3x294.gif (200x600)
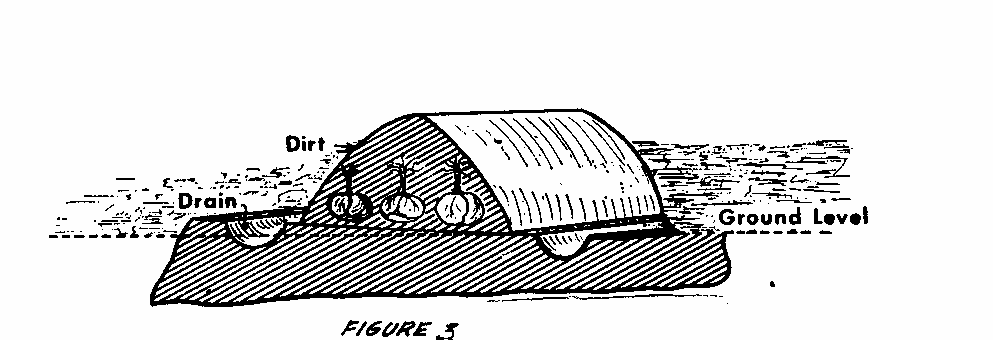
head down in the storage area and covered with soil. The
advantage of this
method of storage is that you can remove a few heads of
cabbage without
disturbing the rest of the pit.
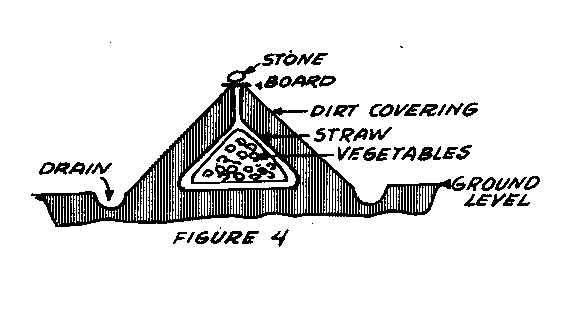
STORAGE CONES
o Build the cones
either on the surface of the ground, or in a hole 15cm to
20cm (8" to
10") deep in a well-drained location.
o Spread a layer
of clean straw, leaves, or similar material on the ground.
o Stack the food
to be stored on the litter in a cone-shaped pile.
o Cover the food
with more straw, leaves, etc.
o Cover the entire
pile with 7cm to 10cm (3" to 4") of soil.
o Firm the soil
with the back of a shovel to make it waterproof. More soil
may be needed in
very cold weather.
o Dig a shallow
drainage ditch around the cone to carry away water.
o Ventilation or
air circulation is necessary.
Small cones with 100 to 150
liters (a few bushels) of
vegetables will get enough air
if the straw between the
vegetables and soil extends
through the soil at the top
opening. To keep out rain,
cover the top with a board or
piece of sheet metal held with
a stone. <see figure 4>
fg4x294.gif (600x600)
Large cones - Place two or three rough boards or stakes up
through the center
of the pile of vegetables to form a flue. Cap the flue with
two boards nailed
together at right angles.
o Opening the cone
- Once the cone is opened it is best to remove all the
food at once. It
is better to make several small cones rather than one large
one, and place
small amounts of vegetables in each cone. When several kinds
of vegetables
are stored in the same cone, separate them with straw or
leaves.
o Cones should be
made in a different place every year to avoid decay from
spoiled food
left in an old cone.
Fish Preservation
Fish can be an important source of protein, and more and
more people are adding
fish to their diets. Whether fish are caught from the sea or
raised in a pond, a
problem many people face is that they have more fish on hand
at one time then
they can eat or sell fresh.
If the proper equipment and a reliable supply of energy are
available, fish can be
kept for long periods by canning or freezing. Without these
resources, salting
and/or smoking are good low-cost choices for preserving
fish.
Whichever method is chosen, quality and cleanliness are
especially important:
o The quality of the
fish to be preserved--the fish must be top quality, salting
and smoking will not
help poor quality, old, or rotting fish; and
o Cleanlines in all
operations--all water used must be unpolluted; all waste
must be removed
from working and drying areas; whatever comes in contact
with the fish,
including all the equipment, must be kept clean.
SALTING FISH
Salting, one of the oldest methods of preserving food, is an
art as well as a
science. The process of salting fish is influenced by
weather, size and species of
fish, and the quality of salt used. Therefore, experience is
needed to adapt the
process outlined here to your situation. Start by salting
small lots of different
varieties of the available fish. By salting small amounts of
fish at first, you will
learn how much time is required for each step. Salted fish,
if properly packed to
protect it from excessive moisture, will not spoil.
One word of caution: Start by salting non-fatty,
white-meated varieties of fish.
The salting of fatty fish brings up problems of rancidity,
rusting, and spoilage
that can be handled better after you have experience in
salting.
The process of salting fish has four operations:
o Preparing the fish
o Salting
o Washing and drying
to remove excess salt
o Air drying
IMPORTANT POINTS TO REMEMBER
o
Use only top quality fish
o
Work cleanly
o
Work fast
o
Keep the brine saturated--when in doubt, add
more salt.
o
Try to follow local custom in style and
length of cure
o
All water used must be unpolluted
Tools and Materials
A clean sharp knife
Salt: the amount varies with local conditions, but figure
about 1 part salt (by
weight) to 5 parts of raw, prepared fish. Use good quality
salt. Salt that is dirty,
discolored, or has a bitter taste is unsuitable for salting
fish.
Clean containers for washing fish
Clean, flat working surfaces; such as tables
Clean containers for removing waste
Waterproof vats: one or more, depending on the amount of
fish to be salted. The
dimensions are not too important; a good size is 183cm x
152cm and 91cm deep
(6' x 5' x 3'). But fish can be salted in a container as
small as a wide-mouthed
glass jar. Metals other than stainless steel should not be
used. Wooden boxes will
work because moisture will swell the wood and seal it
effectively.
Clean boards and weights (for pressing).
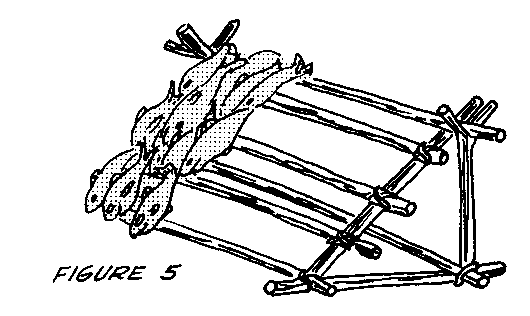
Clean slats or lines for hanging fish (see Figures 3 and 4).
fg3x2990.gif (437x437)
Portable thatch-roof shelters or small roofed sheds (see
Figure 5).
fg5x299.gif (437x437)
Preparing the Fish
Fish should be gutted and beheaded as soon as possible after
catching.
Remove the head by cutting it off on a slanted line
following the gills. Sharks
can be beheaded at the last line of gill slits. (Only the
"wings" of rays or skates
are usually considered edible.) Fish that weigh 250gm (1/2
pound) do not have to
be beheaded but they should generally be gutted. Local
custom will determine
whether or not they should be beheaded.
In gutting a fish, cut from the gill
cavity along the ventral fold to the
anal vent (see Figure 1). All the
fg1x297.gif (437x437)

guts must be removed. It is also
good commercial practice to remove
the black membrane located in the
visceral cavity (the hollow in the
body of the fish which contains the
guts) of many species.
The next step is to bleed the fish. All species of fish must
be thoroughly bled: if
the head has not been removed, cut the throat; remove the
gills and all blood
vessels. Blood clots can cause discoloration, as well as
bacterial infection that
would make the fish unfit for eating.
Cut the fish according to local
custom. As a rule of thumb: under
0.5kg (1 pound), the fish may be
left whole; from 0.5kg to 5kg (1 to
10 pounds) it should be split in
half from head to tail (see Figure 2);
fg2x297.gif (437x437)
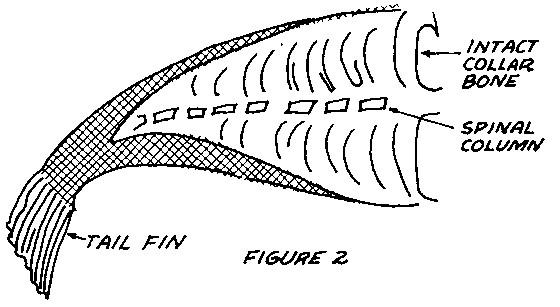
over 5kg (10 pounds), split the
fish in two again from head to tail.
The collarbone behind the gills
should be left intact when a fish is
split in half.
Salting
To salt fish, follow these steps carefully:
o Sprinkle a thin
layer of salt in a waterproof vat. Use just enough to cover
the bottom
completely.
o Place a layer of
fish, FLESH side up, with enough room for each fish to
avoid overlapping.
Try for a neat pattern, alternating head to tail and tail to
head.
o Cover the fish
with salt - a thin layer, but with no open spaces.
o Continue to layer
the fish flesh side up, up to two or three layers from the
top of the vat.
o Reverse the fish,
packing them SKIN side up to the top of the vat, alternating
with layers of
salt. The top layer must be salt.
o The salt will
extract moisture from the fish, forming a brine. Use boards and
weights to keep
all the fish under the salt.
o The brine must be
kept saturated (90 on a Salinometer, or when no more
salt can be
dissolved) at all times. As moisture is extracted, more salt must
be added to keep
the brine saturated. With too little salt the fish will spoil.
As moisture is extracted from the fish, the level of fish in
the vat will fall. More
fish can be added, skin side up, alternating a layer of fish
with a layer of salt,
the top layer always being salt. Continue to add salt to
keep the brine saturated.
The fish are "struck through," or thoroughly
salted, in 12 to 15 days in warm
weather. In cold weather, the fish should stay in the brine
for 21 days or more;
in the tropics, 15 days may be a good limit. The higher the
temperature, the
quicker the fish will be struck through. When properly
salted, the flesh of the
fish is translucent but the eyes are opaque and no longer
translucent. The flesh is
firm but yields to gentle pressure. It has a whitish salt
cover. An odor of fish
and brine should prevail. There should be no spoilage odors.
Washing and Drying to Remove Excess Salt
o When the fish are
struck through, remove them from the vat and wash in
unpolluted sea
water or fresh brine to remove excess salt.
o Then place the
fish on flat surfaces, using any arrangement of boards and
weights to press
them as flat as possible:
-
to remove excess moisture; and
-
to make the fish thinner, which will reduce
the length of the air-drying
process and
improve the appearance of the fish for marketing.
Air Drying
The final drying can be done either by sunlight and natural
air currents or by
artificial heat and air currents generated by fans. In most
areas, in the proper
season, drying can be done outdoors in the sun and fresh
air. Choose an open
area to get the most sunlight and wind. Avoid swampy areas,
locations near
human or animal waste, and, especially, fly-breeding areas.
When freshly salted fish is first brought out to dry, there
is danger of sunburn.
If fish is exposed at this stage to the direct rays of the
sun, it may harden on
the outside and turn yellow. This will keep the inside from
drying properly. To
avoid this, keep the fish under shade or semi-shade for the
first day.
After the first day, expose the fish to as much sunlight and
wind as possible. One
method is to lay the fish on triangular slats--so that the
fish rests on the least
possible amount of surface--fresh
side facing the sun (see Figure 3).
fg3x299.gif (437x437)

Another method is to hang the fish
by the tail (see Figure 4).
fg4x299.gif (486x486)
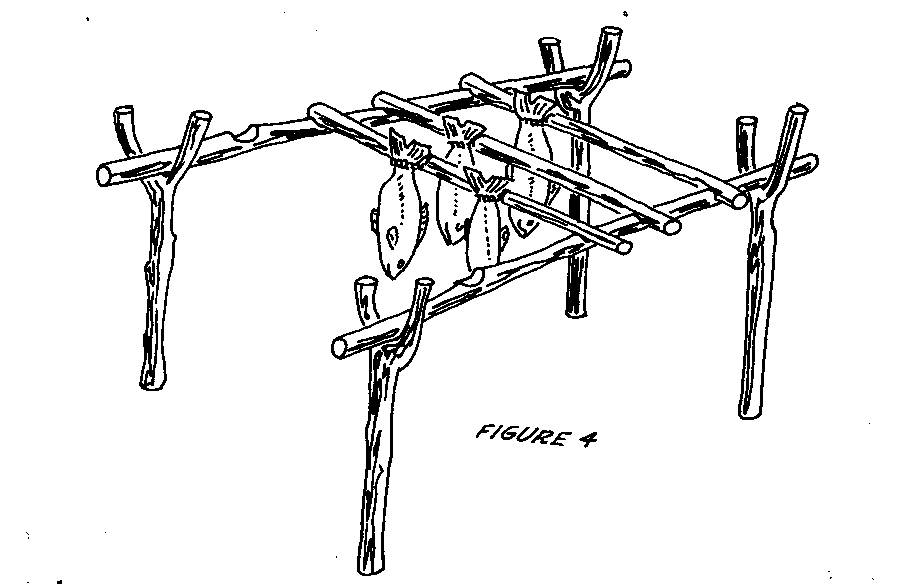
Protect the drying fish against dampness. The fish can be
sheltered by portable
thatch roofs (see Figure 5) or moved into small roofed sheds
built nearby for
fg5x299.gif (486x486)
protection from rainfall and
night-time dampness. The fish
should be free of discoloration,
mold, or other defects. Split fish
should not have ragged edges.
Generally, six warm days with
winds of more than 5km (3 miles)
per hour should dry the fish
enough to prevent spoiling in
storage or shipping, provided the
fish is properly packed to protect
it from excessive moisture.
Using Salted Fish
Salted fish is usually soaked overnight, with at least one
change of water, to
remove most of the salt before it is eaten. The longer it is
soaked, the more salt
is removed. Then it is used in the same way as fresh fish,
except that it is not
good for frying.
Source:
Daniel Casper, Product Manager, Seabrook Farms, Co.,
Seabrook, New Jersey
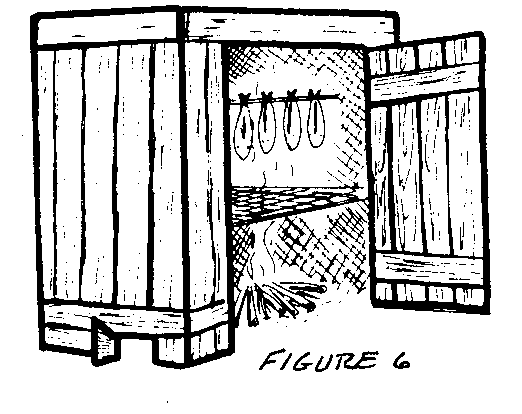
SMOKING FISH
Smoked fish does not last as long as salted fish, and must
be refrigerated, frozen,
or canned if it to be stored for any length of time. Smoked
fish are prepared in
a smokehouse, which is simply a shed or box over a fire that
is controlled so
that it produces smoke instead of flames. The fish are hung
inside the smokehouse
so that they are surrounded by smoke. It takes about six
hours to smoke fish for
eating or storage.
Prepare the fish as you would for salting. Bleed and gut the
fish and split them
from head to tail. Wash the fish in fresh, clean water. Place
in a salt water brine
for about one hour. Remove the fish from the brine and wash
again in clean fresh
water. Drain, and hang in a cool breezy place for about an
hour.
Build a fire in the smokehouse. When the fire is burning
properly--that is,
producing lots of smoke-place the fish on hooks and hang or
tie them in the top
of the smokehouse. Make sure the
fish are placed securely so they
will not fall. Watch the fire
carefully to make sure that it is
smoking the fish and not burning
them--and also to be sure that the
smokehouse itself doesn't catch on
fire.
After the fish are smoked for about
six hours they can be eaten
immediately, stored in jars (to be
canned), or frozen or refrigerated
until they are eaten.
Smoked fish do not last as long as salted fish, so do not
smoke all of the fish
unless it will be used soon after harvest. <see figure
6>
fg6x300.gif (437x437)
Source:
Chakroff, Marilyn. Freshwater Fish Pond Culture and
Management. Arlington,
Virginia: Volunteers in Technical Assistance, 1978.
Carruthers, Richard T. Understanding Fish Processing and
Preservation. Arlington,
Virginia: Volunteers in Technical Assistance, 1986.

