Instruction Example 5.2.: Bit Stand
To practise the manufacture of a device for storing bits at the
working place.
Material
A piece of hard or soft wood without branches, if possible.
Dimensions:
Thickness: 40 mm
Width: 150 mm
Length: 400
mm
The piece of wood is planed and sawn to size.
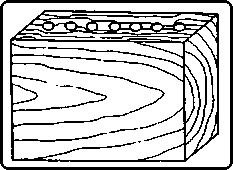
Figure
Tools, measuring and testing means
Bit brace, auger bits of various diameter, marking gauge,
folding rule or measuring tape, try square, awl
Auxiliary accessories
Carpenter's bench, scriber or pencil
Necessary previous knowledge
Measuring and scribing, units of measurement, properties of wood
Explanations to the working drawing
Front view and top view of the workpiece, scale 1 : 2.5
|
Sequence of operations |
Comments |
|
1. Prepare the working place. |
Check the boring tools. |
|
2. Clamp the workpiece. |
Make sure that it is in horizontal position. |
|
3. Scribe the centre line by means of the marking gauge. |
|
|
4. Determine and scribe the hole distances and hole diameters.
|
Hole diameter to be specified by the instructor or bit
shank/square tang to be measured at the real bit. |
|
5. Select the bit and chuck it in the bit brace. |
Use auger bits, if possible. |
|
6. Mount the hole depth setter. |
Hole depth depends on the bit to be stored. |
|
7. Bore holes of equal diameters. |
Vertical hole axis is important! |
|
8. Replace the bit. |
Smaller holes are to be bored for bits of smaller diameter.
|
|
9. Mount the hole depth setter. |
|
|
10. Bore the holes. |
Repeat replacement of bits and boring until all holes are
produced. |
|
11. Check the results. |
|