4. Taking off Dimensions at the Stairwell
Two different types of dimensions are taken off at the
stairwell: layout dimensions (plan view) or height dimensions. Wooden staircases
may also be built in between solid ceilings. In that case, the surface of the
bare ceiling is decisive instead of the surface of the stair-apron (see Fig.
28).
Taking off layout dimensions
The size of the existing or planned opening for the staircase is
transferred from the upper floor-ceiling by plumbing.
The plumb points are marked on the lower floor-ceiling and then
connected by means of a straightedge (straight, parallel, planed board of 20 -
30 mm thickness, 140 mm width and 2000 - 3000 mm length). A marking-out drawing
is drawn.
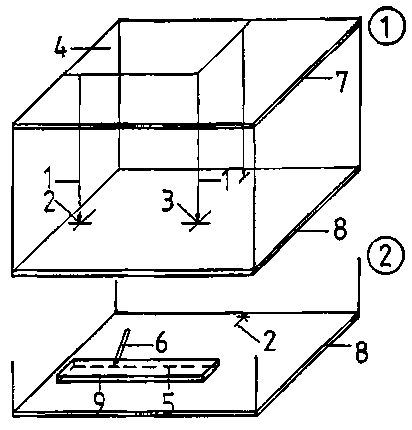
Figure 25 - (1)
Transferring of dimensions to the lower floor-ceiling (2) Connecting of marked
points with the straightedge - 1 plumb cord, 2 marked point, 3 plumb body, 4
opening in the upper floor-ceiling, 5 applied straightedge, 6 pencil, 7 upper
floor-ceiling, 8 lower floor-ceiling, 9 straightedge
The squareness of the stairwell is checked on the lower
floor-ceiling. A self-made builder's square, joined by means of the proportional
numbers 3:4:5 and nailed, is used for this purpose.
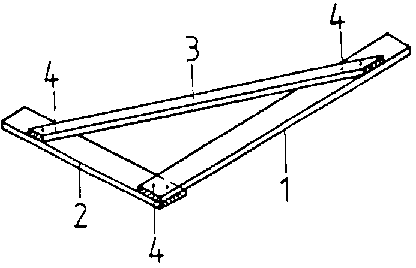
Figure 26 - A builder's square
- 1 longer, straight strip for true alignment, 2 shorter, straight strip for
true alignment, 3 strip for stiffening (bracing) the two straight
strips, 4 nail
All dimensions taken off are written into a hand-sketch.
Checking of squareness
The angle between the stair flight range and the range at the
stair head in the main landing or half-landing is checked. If the two ranges are
not square with each other, the right angle is prescribed.
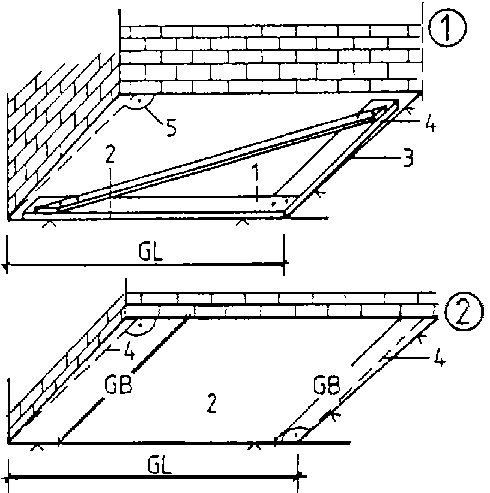
Figure 27 - (1)
Checking of squareness of the stairwell - 1 builder's square, 2
applying the square to the stair flight range, 3 border of the upper
floor-ceiling, 4 squareness with the stair flight range, 5 squareness of the
wall corner - (2) Determination of the size of the stairwell 2 stair
flight range, 4 right (square) angle with the stair flight range,
GB stairwell width, GL stairwell length
Prescribing of the right angle is based on the stair flight
range and the smallest size of the stairwell length is written into the
hand-sketch.
When the finished staircase is built in, the difference can be
made-up (padded with wood) at the stair apron.
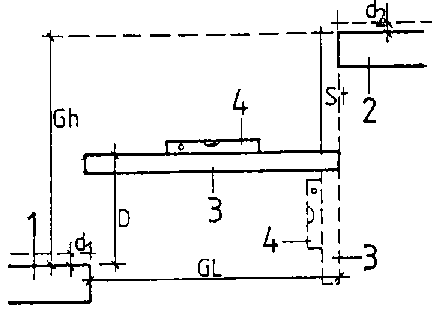
Taking off height dimensions at the stairwell
In this connection it is important to know whether the height
dimensions are to be taken off at stairwells with or without half-landing. The
height dimensions take priority for the calculation of the ratio of rise and
tread because the staircase to be manufactured is to be built in between the
landings with finished floor with a height of rise of s = 200 mm. This means
that the height dimensions in the stairwell are not in any case equal to the
dimensions for the stair flight height.

Figure 28 - Connection
between stairwell height and stair flight height - (1) with wood joist ceiling
(2) with solid ceiling - 1 upper stair-apron, 2 lower stair-apron, 3 upper
solid ceiling, 4 lower solid ceiling, 5 surface of finished floor, 6 surface of
upper stair-apron, 7 surface of lower stair-apron. 8 surface of upper bare
ceiling (solid ceiling), 9 surface of lower bare ceiling -
GH stairwell height, Lh stair flight height
The perpendicular height between the surfaces of the
stair-aprons or bare ceiling at the head and foot of the stairs to be built in
is measured. The stair flight height is then determined applying formula 11.
The stair flight height thus determined is used for the
calculation of the ratio of rise and tread.
Together with the height measurement, the length for the stair
flights to be built in is determined.
- The plumb cord is fixed to the straightedge.
- The straightedge is put on the top apron.
The end, which the plumb cord is fixed to, is supported by a
batten. The batten is held perpendicularly at the half-landing by a second
person.
- A water level is put onto the straightedge and levelled by
raising or lowering the batten at the half-landing.
- When the straightedge is exactly horizontal, the batten is
pressed to the half-landing and the height marking is scribed.
- When the pendulum movement of the hanging plumb has stopped,
the gauge size between the plumb cord and the front edge of the stair-apron is
measured. At the same time the front edge of the top landing is scribed to the
straightedge.
The two sizes, the gauge size and the size on the straightedge
between the plumb cord and the front edge of the top landing, are the length of
the stairwell.
- Measuring of the height of the stairwell between the two main
landings. (Use a batten!) The scribed sizes on the battens 8, 9, 10 in Figure 30
can be measured with a folding rule!
- Checking whether the height of the half-landing (height with
finished floor) will fit into the calculated ratio of rise and
tread.
If this is not the case, the half-landing must be removed and
built in again at the necessary height. If this is not done, the two stair
flights within one storey will have a different ratio of rise and tread!
The batten used for supporting the straightedge must be slotted
on top to prevent the straightedge from slipping off.
A hand-sketch is to be drawn on a sheet of paper which need not
be true to scale.
All dimensions taken off are to be written into such sketch. In
the plan view length and width of the stairwell and in the elevation the height
dimensions of the stairwell are to be shown.
On the basis of such sketch, the sizes for the stairs to be
built will be determined and the ratio of rise and tread calculated.
Why must the dimensions of the drawing be compared with the
dimensions of the stairwell?
____________________________________________________________________________________
____________________________________________________________________________________
____________________________________________________________________________________