
| Carpentry for Vocational Schools - A Teacher's handbook (GTZ, 252 p.) | ||||
| 3. CONCRETE | ||||
| (introduction...) | ||||
| 3.1. Composition of concrete | ||||
| 3.2. Proportions for mixing concrete | ||||
| 3.3. Reinforcing concrete | ||||
| 3.4. Finishing concrete | ||||
|
| |||||||||||||||||||||||||||||||||||
TOPIC: 3. CONCRETE
INTRODUCTION: This topic teaches students what concrete is made of; the right proportions of sand, gravel cement and water; how concrete is reinforced and how to finish a slab.
Concrete work is an important part of building a house, but this topic is quite broad and it might be difficult to teach the whole topic. Select those chapters where a real need exists according to the aim of the school.
OBJECTIVES:
3.1. Students must be able to name the raw materials in concrete and describe their characteristics.
3.2. Students should know the meaning of the "ratio" used in mixing concrete and the amount of each material needed to make one cubic metre of concrete. Students also should know the correct ratio for different purposes like foundations, walls or concrete blocks.
3.3. Students must know why concrete has to be reinforced, the, different reinforcement bars and meshes, its applications and the correct way reinforcement bars or mesh are laid.
3.4. Students should be able to describe the correct procedure for making a smooth finish of a concrete surface and the tools needed for this job.
METHODS:
3.1. First the objective is introduced in the classroom. We prepare samples of cement, sand and gravel to show the materials concrete consists of.
3.2. After explaining this chapter in the classroom, the samples of cement, sand and gravel are mixed in the right proportions with water. A small wooden form is prepared where the concrete is poured, consolidated and smoothed.
3.3. Prepare samples of different reinforcement bars and mesh and display them in the classroom where we explain their characteristics and uses. Demonstrate how reinforcement bars and mesh are jointed when necessary.
3.4. Again, prepare a small wooden form and after the explanation in the classroom, mix some concrete and pour into the wooden form where some reinforcement bars have been placed. Strike off the excess concrete and smooth the surface as described earlier in this chapter.
NOTE: The size of the wooden forms should not exceed 500 mm x 500 mm and 60 mm in height. When both concrete samples have been moved to dry for at least one week, take out the wooden forms and try to break both by supporting the concrete only on two outside edges and placing a heavy load in the middle. Students will see, that concrete without reinforcement will break easier.
At the end of this topic prepare a worksheet with questions for the students to reinforce this topic.
The concrete consists of Cement, Fine aggregate. Rough aggregate and Water. Concrete is used to make concrete slabs, wall foundation, septic tanks etc...
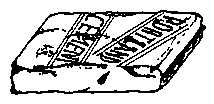
a) Cement: The most commonly used cement is Portland Cement. Cement itself is a grey powder which is made up of limestone, clay and marl. In the cement factory the raw material (limestone, clay, marl) are crushed. Afterwards these go through the raw mill for simultaneous grinding and drying of the raw material. If this process is done the raw material becomes raw meal and the raw meal is ready now for the rotary kiln, where the raw meal is fired. From the rotary kiln, the next step is the clinker cooler, to cool down the cement. At this step the raw material is already a cement and is packed in 50 kg paper sacks for sale.
Figure
b) Fine Aggregate: Fine aggregate or sand consists of small grain, small pebbles or particles of crushed stone that will pass through a 6.350 mm wire mesh screen. The sand should be clean, hard, sharp and well graded. Well graded aggregate means aggregate which is not uniform in size.
Figure
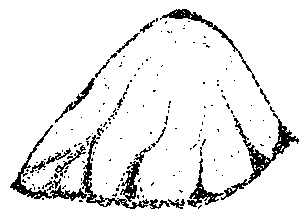
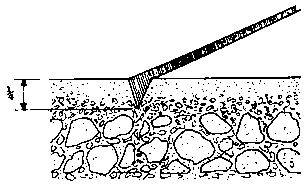
c) Coarse Aggregate; Coarse aggregate can be stone, crashed stone or gravel. Its depend on the project which coarse aggregate is suitable. Coarse aggregate should be clean, hard and free from harmful amounts of vegetable matter, loam or clay.

Figure
The ideal composition of coarse aggregate is as follow:
|
|
30% coarse = 25 - 32 mm in size |
|
|
30% medium = 16 - 25 mm in size |
|
|
20% fine = 8 - 16 mm in size |
|
|
20% very fine = 4 - 8 mm in size |
The largest particles should not be more than one quarter the thickness of the wall or slab.
Figure
Concrete mixes are designated by three numbers, in some cases there are only two numbers. The ratio describes the quantity relationship which is determined by the architect or engineer.
a) The ratio 1:2:4
- The ratio 1 : 2 : 4 is defined
:- 1 part cement
- 2
parts fine aggregate/sand
- 4 parts rough aggregate/stone or
gravel
- For one cubic
metre of 1 : 2 : 4 concrete uses the
following:- 8 Bags of
cement
- 0.5m/3 of fine aggregate/ sand
- 1.0m/3 of coarse
aggregate/gravel
- 200 litre of water
b) Different ratios
- 1:2:4 is used for foundations, footing, footpath, troughs, slab, wall, bottom of the septic tank, etc.
- 1:2:3 is used for the walls of a septic tank,
- 1:2:2 is used for the top of a septic tank,
- 1:4 is used for concrete blocks.
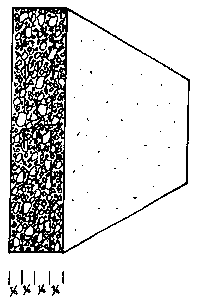
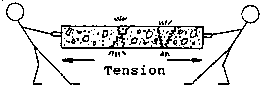
a) Forces: Concrete is very strong when it is subjected to compressive forces (being crushed). E.g.: low house stump of concrete, concrete footings etc..
Figure
Concrete is weak when it is subjected to tensile forces (being stretched). E.g. concrete lintels, concrete beams, concrete stairs etc...
Figure
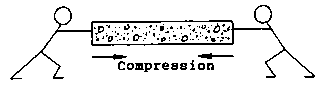
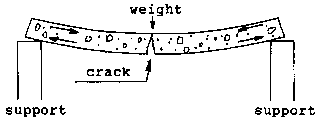
To illustrate the points made above we suspend a concrete beam between two points. The weight from above causes the beam to bend producing compressive stress along the top edge of the beam and tensile stress along the bottom edge causing the beam to crack.
Figure
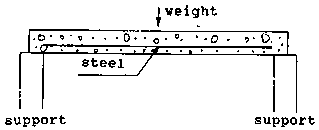
If we place a bar of steel, which has very high tensile strength, in the concrete near the bottom edge it would prevent the beam from stretching and cracking, this strengthening of concrete is called reinforcing.
Figure
b) Rules for laying reinforcing steel: It is important that reinforcing steel is placed correctly and where heavy loads are involved (e.g. bridges, concrete buildings etc.) the position and sizes must be calculated by an engineer and his drawings and specification must be strictly followed.
When you place reinforcing steel you must remember the following points:
- To make sure that the concrete sticks to the steel properly. The steel must be clean from rust, grease and dirt. If necessary use a wire brush to clean it
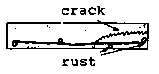
- Steel must be well covered with concrete on all sides to ensure moisture cannot reach it to cause rusting which in turn causes the concrete to crack up.
- When making a reinforced slab lift mesh off the ground with stones or special spacers. In formwork with reinforcing bars use small concrete blocks or special spacers to make sure the steel is the correct distance from the formwork.
- Wire used to tie the steel must not be galvanised. If it is, you must burn off the galvanised coating before use.
steel to close to bottom edge

steel to close to top edge

that is the right way
c) Codes: On as work drawing you find reinforcing fabric and bars referred to with a code. E.g. F62, C12, R10 etc.. As fabric and bars are not labelled you must know the meaning of the codes in order to recognize the various types of reinforcing steel found on a building site or in the store yard.
Reinforcing fabric (mesh):
- There are two types of reinforcing fabric which are made in sheets of 6m x 2.4m or in the case of thinner steel in rolls of 60m x 2.4m.
Square mesh:
Example - F62
"F" means fabric
"6"
means that wires are 6 mm dia.
"2" means the spaces are 2 decimetre - 200 mm
Example - F71
"F" means fabric
"7" means that wires are 7
mm dia.
"1" means the spaces are 100 mm
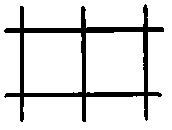
Square mesh
Rectangular mesh:
Example - F818
"F" means fabric
"8" means wire A is 8 mm dia.
"1" means the short side of rectangle is 1 decimetre (100 mm). The long side is normally twice the short side.
"8" means wire B is 8 mm dia.
Example - F1018
"F" means fabric
"10"
means wire A is 10 mm dia.
"1" means the short side of rectangle is 100
mm
"8" means wire B is 8 mm dia.
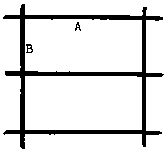
Rectangular mesh
Reinforcing bars:
- There are two types of reinforcing bars supplied in 6 m and 10 m length for plain bars and 5 m or 10 m length for deformed bars.
Plain, round bar:
Example - R10
"R" means round
"10" means 10 mm dia,

Plain, round bar
Deformed bar (contorted)
Example - C12
"C" means contorted
"12" means 12 mm dia.
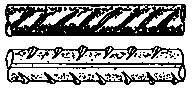
Deformed bar (contorted)
- Be aware that the code letter for deformed bars is not always a " C ".
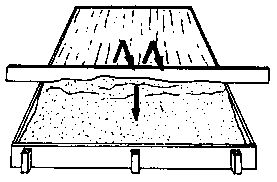
a) Striking off excess concrete:
After the formwork has been filled with fresh concrete just above the formwork the concrete is consolidated in order to get out all air pockets inclosed into the concrete.
The excess concrete is striked off with a specially prepared wooden board or magnesium rod across the concrete, starting on one side of the concrete. It normally requires two people to do it properly.
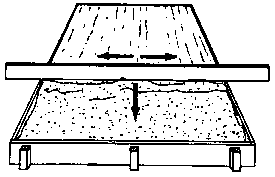
Figure
Consolidation and strike off are often combined into a single operation by lifting the board above the fresh concrete consolidate the mixture by bouncing the concrete using the bottom edge of the board.
Figure
Return the board to the starting point and strike off by moving forward with saw-like motions across the top of the form.
Keep the top-edge of the formwork and the edge of the strike-board clean and repeat the process forming a true surface.
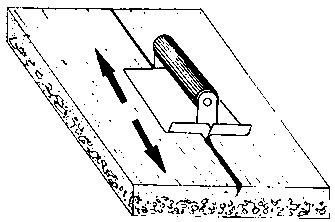
b) Hand floating concrete
The size and the dimension of the concrete slab will determine the procedure of hand floating concrete.
After striking off the excess concrete, there must not be water on the surface. If the concrete has been mixed too wet you have to wait for some time till the water has gone. If necessary speed up this process by spreading cement powder on the wet surface.
When surface has dried up, start floating on the farthest corner. To avoid stepping in the wet concrete, place timber boards on the places you have to stand on.
When concrete is too dry you may have to wet it with water in order to produce a smooth finish.
Floating is done by moving the float in short circular motions. Keep a trowel near by to fill in or to remove stones from the surface.
Figure
c) Control joints:
When having large areas of concrete slab, it is advised to divide the whole slab into smaller sections, because of the shrinkage of the concrete during the drying process.
The planned spacing of the control joint weakens the slab at these joints. In case the concrete cracks because of the shrinkage, it will crack on the weakened sections.
The joints do not extend to the full depth of the slab. They are usually cut one quarter of the depth of the slab and are made with a GROOVER.
Figure
Put a straight board across the concrete and push the groover alongside the board in the fresh concrete. Push the groover back and forth until a smooth groove has been formed into the concrete.
Figure
d) Edging Concrete:
Edging concrete is done when all water and sheen (glossy appearance) have left the surface. Rounding all the edges of the concrete prevents breaking off. This is necessary on steps or other parts where there is danger of breaking off corners.
Rounding off the edges is performed by using an EDGER.
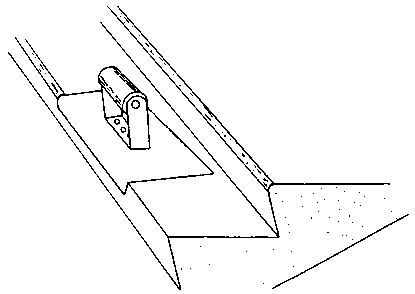
Figure
It should be run back and forth until the contour is shaped. This operation can be done easily if it is done easily when the concrete is firm but still moist.
 |
 |


