
| Carpentry for Vocational Schools - A Teacher's handbook (GTZ, 252 p.) | ||||
| 25. WATERTANKS | ||||
| (introduction...) | ||||
| 25.1. Sizes of watertanks | ||||
| 25.2. Watertank foundations | ||||
| 25.3. Ferrocement tanks | ||||
| 25.4. Maintenance and treatment of watertanks | ||||
|
| |||||||||||||||||||||||||||||||||||
TOPIC: 25. WATERTANKS
INTRODUCTION: This topic teaches students how to chose the right size of watertanks, how foundations for watertanks are made, how to make a ferrocement watertank and how to maintain and treat water-tanks.
OBJECTIVES:
25.1. To know the different sizes of water-tanks, to choose the proper size of the tank and the proper type of foundation for it.
25.2. To know how to make a correct foundation for a watertank on roofs, stumps or concrete.
25.3. To be able to describe the procedure for making a ferrocement watertank.
25.4. To know how to treat and maintain water-tanks properly.
METHOD: Making ferrocement tanks is difficult for the unexperienced.
To provide students with the necessary knowledge to make such tanks it is certainly not enough to have lessons in class only.
Therefore it is worthwhile to take the time to make a ferrocement tank as a school project.
NOTE: At the end of this lesson prepare at least two worksheets for students to complete as homework.
They are collected and corrected and assessed later.
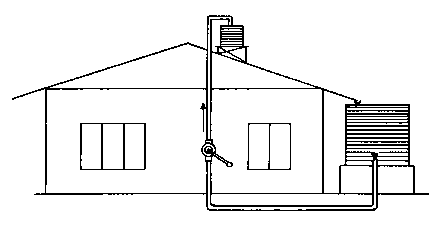
In rural areas, where watersupply systems are not possible, watertanks are installed to provide clean water insuring good health life and to store water in dry seasons.
Common watertanks are made of corrugated iron and available in sizes of 80 gallon (360 litres), 660 gallon (3000 litres) 1000 gallon (4500 litres) and 2000 gallon (9000 litres).
The size of the tank depends much on the size of the roof, the number of people using water and the space to put the tanks. If a very large roof is available, try to put as many tanks as possible to avoid a big loss of water. On small roofs, try to put large a tank, because it takes a long time to fill it up and you have to make sure the tank is filled in the wet season.
To achieve sufficient water pressure in the house, especially when installing a shower, an "overhead tank" has to be put on the roof of the house. Also in connection with a hot-water solar system, an overhead tank is needed. These tanks are usually 80 gallons and are connected by a pump to the ground tanks. There are electric pumps available, but because of non existing powersupply in rural areas, a manual hand pump is more appropriate.
Figure
Tanks must be placed on a very solid, even and levelled surface in order to prevent them from cracking caused by uneven foundations.
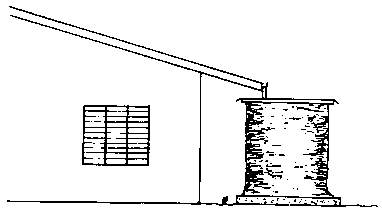
a) Foundations for overhead tanks:
- An iron or timber frame is made to fit exactly to the slope or the ridge of the house. The frame must be braced correctly. Joists are laid and covered across with roofing iron. Roofing iron has the advantage of keeping the bottom of the tank dry because the rainwater will run off in the valleys.
Make the roofing iron longer than the frame to keep the construction dry. The whole frame is secured by nailing or screwing down to a purlin.

Figure
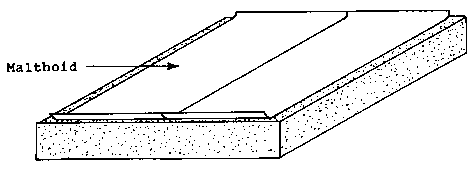
b) Concrete foundation: - Concrete foundations are required where the tank is near ground level and usually associated with a pump, because the outlet will be too low to give pressure to all tapes in the house.
The foundation is a simple concrete slab with an outside foundation going into the ground about 300 mm.
The surface must be completely leveled and smoothed. When dry, put a layer of "Malthoid" (Bitumen foil) to prevent the bottom of the tank from being in immediate contact with the concrete.
Figure
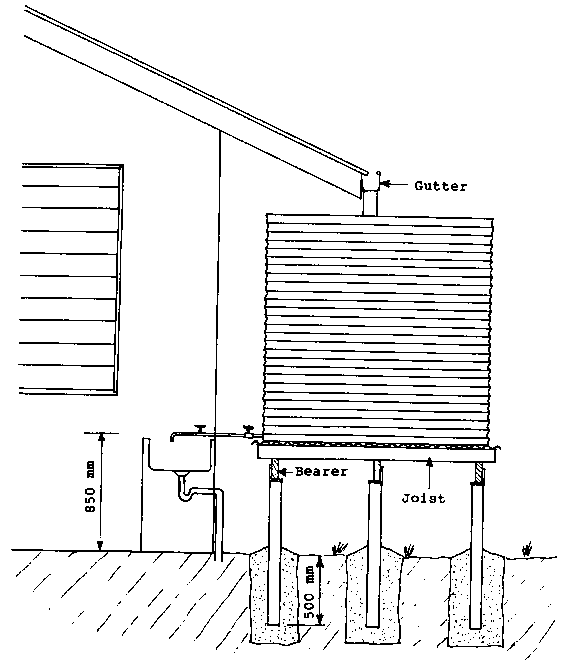
c) Stump foundations:
- When tanks need to be elevated in order to get sufficient water pressure in your kitchen or toilet, you can make it with a stump foundation. Steel, wooden or concrete stumps can be used.
- You have to be careful that you set the stumps at such a height, that there is later enough space left to fit the tank between the gutter and the top of the foundation.
- Stumps must be going at least 500 mm into solid ground and are surrounded firmly by concrete.
- Bearers must be 6"x2" (150 mm x 50 mm) and joists 4"x2" (100 mm x 50 mm) being placed upright ontop of the bearers with a spacing of about 150 mm. Roofing iron is nailed across. It must not be joined, to prevent water from entering to the joists and rotting them.
Figure
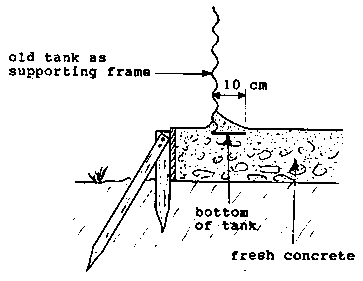
An old corrugated iron tank which has rusted through can be used as the supporting frame for the ferrocement tank.
a) Preparation:
- When making a new concrete slab foundation, take out the lid and cut the bottom of the tank approximately 10 cm away from the wall.
Set the tank in the fresh concrete and cover the 10 cm bottom iron with fresh concrete.
Figure
- When setting the tank on an old concrete slab foundation, take out the lid and clean off the inside of the tank with wire brush and wash out.
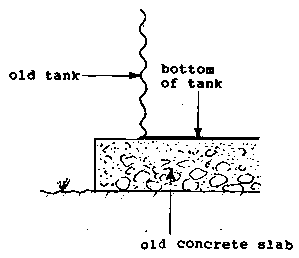
Figure
b) Putting the wire mesh:
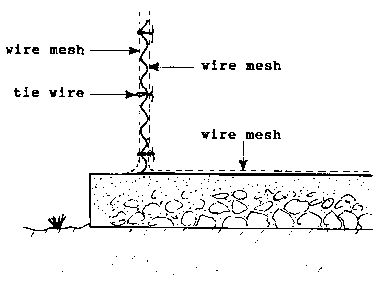
- Where the tank has a new foundation and the slab provides the bottom of the tank, a chicken wire mesh is laid inside and outside on the wall of the tank. For this punch holes all over the tank. The tie wire is passed through these holes to fasten the inner layer of chicken wire to the outside wire.
- Where the tank is placed on an old concrete slab , first lay of wire mesh on the bottom of the tank. Let the wire go up the wall about 15 cm and then lay the outside and inside wall and fasten them with the bottom layer.
Figure
c) Putting the cement mortar:
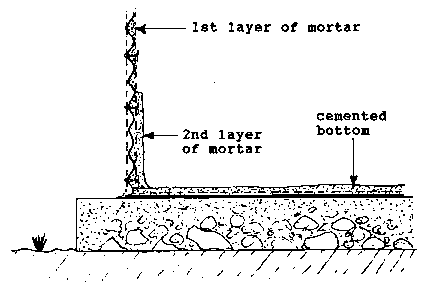
- The cement mortar must be made of fine sand and mixed with cement to a proportion of 2 parts sand to 1 part cement. The cement mortar should not be too wet.
- First, cement the bottom of the tank to a depth of about 50 mm. Check to see if the outlet to the tap is above this level. Let dry for 18 hours.
- The next step is to make a fairly dry mix and spread the mortar behind the wire mesh beginning at the bottom working up the wall.
Make sure all spaces between wall and wire mesh are filled properly.
- On reaching the top of the wall, start again from the bottom and cover the wire mesh with a second layer of cement mortar, working upwards in the same way.
- Use a steel or wooden float to smooth the mortar.
Figure
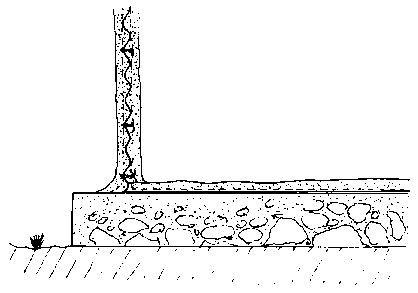
- When the inside is finished continue in the same way on the outside of the tank until the tank is covered and smoothed.
- After the mortar has dried for 24 hours, mix up cement and water in a bucket to form a paste-like cement wash. Use a brush to apply this cement wash on the inside and the outside of the tank in order to close all little holes still remaining in the wall and bottom of the ferrocement tank.
Figure
- The tank must be allowed to dry slowly. During this time keep it covered and every day water should be splashed over the tank. After two weeks, the tank can be half filled and two weeks later it can be filled to the top.
- Now the tank is strong enough to fit the lid. The lid can be made of a timber construction covered with flat iron provided with a hole to fit the strainer to catch the water from the gutter.
- Make sure all little spaces between lid and tank are closed with flywire to prevent mosquitoes from breeding inside the tank.
Figure
The most important thing to do is clean out the strainer of fallen leaves and other rubbish regularly. Before installing new corrugated watertanks, you can paint the inside with a special silver paint or bitumen based paint, suitable for watertanks, roofs and gutters. When buying paint ask for this paint only. Do not use any other paint because your health may be affected by the chemicals of any other paint.
Tanks should be cleaned inside from time to time. For this, disconnect the tank from the watersupply system and the gutter. Drain the water out and brush it thoroughly with a hard brush and wash out with a water hose.
Where rust spots occur, let the tank dry out completely and repaint it. Let the paint dry for at least one week to make sure the water is not spoiled by the paint.
Join the tank again to gutter and watersupply system.
 |
 |
