Back to Home
Page of CD3WD Project or Back to list of CD3WD Publications
 |  |  | Guide to the Development of On-site Sanitation (WHO, 1992, 245 p.) |  |  | Part II - Detailed design, construction, operation and maintenance | |  | Chapter 5 - Technical factors affecting excrete disposal | | | Chapter 6 - Operation and maintenance of on-site sanitation | | | Chapter 7 - Components and construction of latrines | | | Chapter 8 - Design examples |
|
Guide to the Development of On-site Sanitation (WHO, 1992, 245 p.)
Part II - Detailed design, construction, operation and maintenance
Chapter 5 - Technical factors affecting excrete disposal
Human wastes
Ground conditions
Insect and
vermin problems
Human wastes
Volume of fresh human wastes
The amount of faeces and urine excreted daily by individuals
varies considerably depending on water consumption, climate, diet and
occupation. The only way to obtain an accurate determination of the amount at a
particular location is direct measurement. Table 5.1 shows some reported average
quantities of faeces excreted by adults (grams per person per day).
Even in comparatively homogeneous groups there may be a wide
variation in the amounts of excrete produced. For example, Egbunwe (1980)
reported a range of 500-900 g of faeces per person per day in eastern Nigeria.
Generally, active adults eating a high-fibre diet and living in a rural area
produce more faeces than children or elderly people living in urban areas eating
a low-fibre diet. Both Shaw (1962) and Pradt (1971) suggested that the total
amount of excrete is about one litre per person per day.
The amount of urine is greatly dependent on temperature and
humidity, commonly ranging from 0.6 to 1.1 litres per person per day.
In the absence of local information the following figures are
suggested as reasonable averages:
- high-protein diet in a temperate climate: faeces
120 g, urine 1.21, per person per day.
- vegetarian diet in a tropical
climate: faeces 400 g, urine 1.01, per person per day.
Table 5.1. Quantity of wet faeces excreted by adults (in grams
per person per day)
|
Place |
Quantity |
Reference |
|
China (men) |
209 |
Scott (1952) |
|
India |
255 |
Macdonald (1952) |
|
India |
311 |
Tandon & Tandon (1975) |
|
Peru (rural Indians) |
325 |
Crofts (1975) |
|
Uganda (villagers) |
470 |
Burkitt et al. (1974) |
|
Malaysia (rural) |
477 |
Balasegaram & Burkitt (1976) |
|
Kenya |
520 |
Cranston & Burkitt (1975) |
Decomposition of faeces and urine
As soon as excrete are deposited they start to decompose,
eventually becoming a stable material with no unpleasant smell and containing
valuable plant nutrients. During decomposition the following processes take
place.
· Complex organic
compounds, such as proteins and urea, are broken down into simpler and more
stable forms.
· Gases such as ammonia,
methane, carbon dioxide and nitrogen are produced and released into the
atmosphere.
· Soluble material is produced
which may leach into the underlying or surrounding soil or be washed away by
flushing water or groundwater.
· Pathogens are destroyed
because they are unable to survive in the environment of the decomposing
material.
The decomposition is mainly carried out by bacteria although
fungi and other organisms may assist. The bacterial activity may be either
aerobic, i.e., taking place in the presence of air or free oxygen (for example,
following defecation and urination on to the ground), or anaerobic, i.e., in an
environment containing no air or free oxygen (for example, in a septic tank or
at the bottom of a pit). In some situations both aerobic and anaerobic
conditions may apply in turn. When all available oxygen has been used by aerobic
bacteria, facultative bacteria capable of either aerobic or anaerobic activity
take over, and finally anaerobic organisms commence activity.
Pathogens may be destroyed because the temperature and moisture
content of the decomposing material create hostile conditions. For example,
during composting of a mixture of faeces and vegetable waste under fully aerobic
conditions, the temperature may rise to 70°C, which is too hot for the
survival of intestinal organisms. Pathogens may also be attacked by predatory
bacteria and protozoa, or may lose a contest for limited nutrients.
Volumes of decomposed human wastes
As excrete become decomposed they are reduced in volume and mass
owing to:
- evaporation of moisture;
- production of gases which usually escape to the atmosphere;
- leaching of soluble substances;
- transport of insoluble material by the surrounding liquids;
- consolidation at the bottom of pits and tanks under the weight
of superimposed solids and liquids.
Little information is available regarding the rate at which the
reduction takes place although there are indications that temperature is an
important factor (Mare & Sinnatamby, 1986). Weibel et al. (1949) measured
the sludge accumulation rate in 205 septic tanks in the United States of
America, and obtained the results shown in Fig. 5. 1; other authors have
reported the accumulation rates listed in Table 5.2.
Fig. 5.1. Rate of accumulation of'
sludge and scum In 205 septic tanks in the United States of America (from Weibel
et al., 1949)
Table 5.2. Excreta accumulation
rates (litres per person per year)
The factors with the biggest effect on the sludge accumulation
rate are whether decomposition takes place above or below the water table and
the type of anal cleaning material used. Decomposition under water produces a
much greater reduction in volume than decomposition in air. This is due to
better consolidation, more rapid decomposition and removal of the finer material
in the water flow. Anal cleaning materials vary widely around the world, from
those requiring little or no storage space, such as water, to those having a
greater volume than the excrete, such as corn cobs, cement bags or stones.
Table 5.3. Suggested maximum sludge accumulation rates (litres
per person per year)
|
Sludge accumulation rate |
|
Wastes retained in water where degradable anal cleaning
materials are used |
40 |
|
Wastes retained in water where non-degradable anal cleaning
materials are used |
60 |
|
Waste retained in dry conditions where degradable anal cleaning
materials are used |
60 |
|
Wastes retained in dry conditions where non degradable anal
cleaning materials are used |
90 |
When designing a latrine it is strongly recommended that local
sludge accumulation rates should be measured. In the absence of local data, the
volumes given in Table 5.3 are suggested as a maximum. There is some evidence to
indicate that these figures are on the high side. However, if refuse is added to
excrete, the accumulation rate may be much greater.
Where excrete are stored for short periods only, such as in
double pit latrines or composting toilets, the reduction process may not be
complete before the sludge is removed. In such cases it will be necessary to use
higher sludge accumulation rates than indicated above. A 50% increase is
tentatively suggested.
Ground conditions
Ground conditions affect the selection and design of sanitation
systems, and the following five factors should be taken into consideration:
- bearing capacity of the soil;
- self-supporting
properties of the pits against collapse;
- depth of excavation possible;
-
infiltration rate;
- groundwater pollution risk.
Bearing capacity of the soil
All structures require foundations, and some soils are suitable
only for lightweight materials because of their poor load-carrying capacity -
marshy and peaty soils are obvious examples. In general, it is safe to assume
that if the ground is suitable for building a house it will be strong enough to
support the weight of a latrine superstructure made of similar materials,
providing the pit is appropriately lined.
Self-supporting properties of the pits
Many types of latrine require the excavation of a pit. Unless
there is specific evidence to the contrary (i.e., an existing unlined shallow
well that has not collapsed), it is recommended that all pits should be lined to
their full depth. Many soils may appear to be self-supporting when first
excavated, particularly cohesive soils, such as clays and silts, and naturally
bonded soils, such as laterites and soft rock. These self supporting properties
may well be lost over time owing to changes in the moisture content or
decomposition of the bonding agent through contact with air and/or moisture. It
is almost impossible to predict when these changes are likely to occur or even
if they will occur at all. It is therefore safer to line the pit. The lining
should permit liquid to percolate into the surrounding soil.
Depth of excavation
Loose ground, hard rock or groundwater near to the surface limit
the depth of excavation possible using simple hand tools. Large rocks may be
broken if a fire is lit around them and then cold water poured on the hot rock.
Excavation below the water table and in loose ground is possible by "caissoning"
(see Chapter 7), but it is expensive and not usually suitable for use by
householders building their own latrines.
Infiltration rate
The soil type affects the rate at which liquid infiltrates from
pits and drainage trenches. Clays that expand when wet may become impermeable.
Other soils such as silts and fine sands may be permeable to clean water but
become blocked when transmitting effluent containing suspended and dissolved
solids.
Opinions vary regarding the areas through which infiltration
takes place. For example, Lewis et al. (1980) recommended that only the base of
pits or drainage trenches should be considered and that lateral movement (the
sidewall influence) be ignored. Mara (1985b) and others have assumed that
infiltration takes place only through the side walls as the base rapidly becomes
blocked with sludge. Until more evidence is available, it is recommended that
the design of pits and trenches should be based on infiltration through the side
walls up to the maximum liquid level. For trenches, the area of both walls
should be used.
The rate of infiltration also depends on the level of the
groundwater table relative to the liquid in the pit or trench. In the
unsaturated zone, the flow of liquid is induced by gravity and cohesive and
adhesive forces set up in the soil. Seasonal variation may produce a change in
the amount of air and water in the soil pores and this will affect the flow
rate. Conditions at the end of the wet season should normally be used for design
purposes as this is usually the time when the groundwater level is at its
highest. In the saturated zone all pores are filled with water and drainage
depends on the size of the pores and the difference in level between the liquid
in the pit or trench and the surrounding groundwater.
Soil porosity also affects infiltration. Soils with large pores,
such as sand and gravel, and rocks such as some sandstones and those containing
fissures, drain easily. Silt and clay soils, however, have very small pores and
tend to retain water. Soils containing organic materials also tend to retain
water but the roots of plants and trees break up the soil, producing holes
through which liquids can drain quickly.
The rate of groundwater flow in unsaturated soils is a complex
function of the size, shape and distribution of the pores and fissures, the soil
chemistry and the presence of air. The speed of flow is normally less than 0.3 m
per day except in fissured rocks and coarse gravels, where the speed may be more
than 5.0 m per day, with increased likelihood of groundwater pollution.
Pore clogging
Soil pores eventually become clogged by effluent from pits or
drainage trenches. This may reduce or even stop infiltration through the soil.
Clogging may be caused by:
- blockage of pores by solids filtered from the
liquid;
- growth of microorganisms and their wastes;
- swelling of clay
minerals; and
- precipitation of insoluble salts.
When liquid first infiltrates into unsaturated soil, aerobic
bacteria decompose much of the organic matter filtered from the liquid, keeping
the pores clear for the passage of air as well as effluent. However, once
organic matter builds up so that air cannot pass through the pores, the rate of
decomposition (now by anaerobic bacteria) is slower, and heavy black deposits of
insoluble sulfides are built up.
Clogging of the pores can be minimized by ensuring that
infiltration occurs uniformly over the whole system. Poorly designed
infiltration systems (particularly trenches) often cause the liquid to converge
on a small section of the system. This produces localized high infiltration
rates and clogging in that area. Clogging can sometimes be reduced by a regime
of alternate "resting" and "dosing" of the soil. The infiltration area is
allowed to rest, i.e., to become fully drained of liquid for a period before
infiltration recommences. During the resting period, air reaches the soil
surface and the anaerobic bacteria causing the clogging die off, allowing the
surface to become unclogged.
Determining infiltration rates
It is rarely possible to measure accurately the rate of flow of
effluent from pits and drainage trenches, especially as the flow often decreases
as soil pores become clogged. Consequently various empirical rules are used.
Some recommendations are based on the rate of percolation of clean water from
trial holes dug on the site of a proposed pit or drainage field using various
design criteria to allow for differences in infiltration rates (US Department of
Health, Education, and Welfare, 1969; British Standards Institution, 1972). Laak
et al. (1974) found that, for a wide range of soils, the infiltration rates of
effluent were 130 litres per m² per day. A conservative rate of 10 litres
per m² per day was recommended for general application. On the other hand,
rates of up to 200 litres per m² per day are considered applicable in
practice in the United States of America (US Department of Health, Education,
and Welfare, 1969), and Aluko (1977) found that, in Nigeria, designs with a
maximum of 294 litres per m² per day have proved satisfactory. The
infiltration capacities given in Table 5.4 (US Environmental Protection Agency,
1980) are recommended as a basis for the sizing of pits and drainage trenches
where information about actual infiltration rates is not available. The
capacities given for coarse soils are restricted to prevent possible groundwater
pollution and therefore may be unnecessarily conservative in areas where this is
not a problem. Gravel is capable of much higher infiltration rates, which may be
a problem in areas where shallow groundwater is used for human consumption. This
pollution problem can be reduced by the provision of a sand envelope as
described on pp. 40-41.
Table 5.4. Recommended infiltration capacities a
|
Type of soil |
Infiltration capacity, settled sewage (I per m² per
day) |
|
Coarse or medium sand |
50 |
|
Fine sand, loamy sand |
33 |
|
Sandy loam, loam |
25 |
|
Porous silty clay and porous silty clay loam |
20 |
|
Compact silty loam, compact silty clay loam and non-expansive
clay |
10 |
|
Expansive clay |
<10 |
a Source: US Environmental Protection
Agency 1980
Groundwater pollution risk
This section summarizes the likely effects of on-site sanitation
systems on groundwater and the ways in which pollution can be minimized. Lewis
et al. (1980) have carried out detailed reviews of these aspects.
The effluent from pits and drainage trenches may contain
pathogens and chemical substances that could contaminate drinking-water
supplies. Because of their comparatively large size, protozoa and helminths are
rapidly removed by the straining action of the soil, but bacteria and viruses
are more persistent. The bacterial and viral pathogens that may be carried in
water are discussed in Chapter 2.
Of the chemical substances generally present in domestic wastes,
only nitrates present serious health dangers. Young babies bottle-fed with milk
made from water with a high nitrate concentration may develop "blue baby
disease", methaemoglobinaemia, which can be fatal if untreated. There is
conflicting evidence suggesting that low nitrate concentrations may contribute
to gastric cancer (Nitrate Coordination Group, 1986).
The usual means by which effluents affect drinking-water
supplies is through pollution of groundwater that feeds wells and boreholes. A
further danger is when effluent infiltrates the ground at shallow depth near to
water pipes in which there is intermittent flow or in which the pressure is at
times very low. Just as poor joints, cracks and holes in the pipe walls allow
water to leak out when the pipes are full, so effluent leaks into the pipes when
they are empty or under reduced pressure. Recommendations for allowable levels
of pollutants in drinking-water are given in Guidelines for drinking-water
quality (WHO, 1984).
Purification in unsaturated soil
Effluent passing through unsaturated soil (that is, soil above
the groundwater table) is purified by filtration and by biological and
adsorption processes. Filtration is most effective in the organic mat where the
soil pores are clogged. In sandy soils, Butler et al. (1954) found a dramatic
reduction in coliforms in the first 50 mm. The passage of pollutants from a new
pit or drainage trench reduces as the pores become clogged.
Viruses, because of their small size, are little affected by
filtration and their removal is almost entirely by adsorption on to the surface
of soil particles; this is greatest where the pH is low (Stumm & Morgan,
1981). Adsorption of both viruses and bacteria is greatest in soils with a high
clay content, and is favoured by a long residence time - that is, when flow
rates are slow. Because the flow is much slower in the unsaturated zone than
below the groundwater table, there is longer contact between soil and effluent
there, increasing opportunities for adsorption. Adsorbed microorganisms can be
dislodged, for example by flushes of effluent or following heavy rainfall, and
may then pass into lower strata of the soil.
Viruses, whether they have been removed or remain in effluent,
live longer at lower temperatures (Yeager & O'Brien, 1979). Both viruses and
bacteria live longer in moist conditions than in dry conditions, and therefore
in soils with a good water-holding capacity than in sandy soils. Bacteria live
longer in alkaline than in acid soils. They also survive well in soils
containing organic material, where there may be some regrowth.
Generally there is little risk of groundwater pollution where
there is at least 2 m of relatively fine soil between a pit or drainage trench
and the water table, providing the rate of application is not greater than 50
mm/day (equivalent to 50 litres per m² per day). This distance may have to
be increased in areas subject to intense rainfall, as the increased infiltration
rate produced by the percolating rainwater may carry pollution further.
Fissures in consolidated rock may allow rapid flow of effluent
to underlying groundwater with little removal of microorganisms. Holes in soil
caused by tree roots or burrowing animals can act in the same way as fissures.
Purification in groundwater
There is little information about survival of either viruses or
bacteria in groundwater, although it appears that low temperature favours long
survival times. Enteric bacteria may survive in cool groundwater for more than
three months (Kibbey et al., 1978). Field experiments indicate that the maximum
distance that viruses and bacteria travel in groundwater before being destroyed
is equal to the distance travelled by the groundwater in about ten days (Lewis
et al., 1980).
In fine-grained soils and pollution sources surrounded by a
mature organic mat, the distance travelled may be as little as 3 m, whereas a
new source in fast-flowing groundwater may cause pollution up to 25 m downstream
(Caldwell, 1937). The pollution extends from the source in the direction of
groundwater flow, with only limited vertical and horizontal dispersion. However,
this does not apply to pollution in fissured ground, where the pollution may
flow through the fissures for several hundred metres, often in an unpredictable
direction.
In most cases the commonly used figure of a minimum of 15 m
between a pollution source and a downstream water abstraction point will be
satisfactory. Where the abstraction point is not downstream of the pollution,
i.e., to the side or upstream, the distance can be reduced provided that the
groundwater is not abstracted at such a rate that its direction of flow is
turned towards the abstraction point (Fig. 5.2). This is particularly useful in
densely populated communities, where shallow groundwater is used as a water
supply.
If it is not possible to provide sufficient space between the
latrine and the water point, consideration should be given to extracting water
from a lower level in the aquifer (Fig. 5.3). The predominant flow of
groundwater (except fissured flow) is along the strata, with very little
vertical movement. Provided the extraction rate is not too great (handpump or
bucket extraction is acceptable), and the well is properly sealed where it
passes through the pollution zone, there should be little or no risk of
pollution.
Fig. 5.2. Zone of pollution from pit
latrine
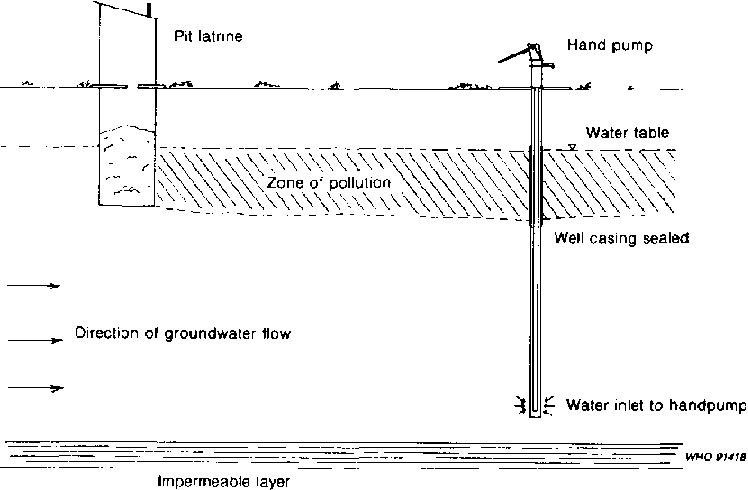
Fig. 5.3. Protecting a hand pump
from the pollution from a pit latrine
Significance of pollution
While faecal pollution of drinking-water should be avoided, the
dangers of groundwater pollution from on-site sanitation should not be
exaggerated. A depth of two metres of unsaturated sandy or loamy soil below a
pit or drainage trench is likely to provide an effective barrier to groundwater
pollution and there may be little lateral spread of pollution. Where the
groundwater is shallow, artificial barriers of sand around pits can control
pollution (Fig. 5.4).
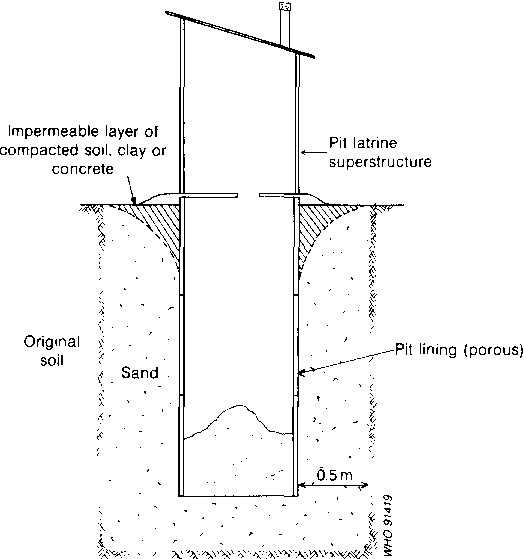
Fig. 5.4. Reducing the pollution from
a pit latrine with a barrier of sand
Unless water is extracted locally for domestic purposes,
pollution of groundwater from on-site sanitation does no harm and is to be
preferred to the considerable risks associated with defecation in the open.
Where on-site sanitation would result in pollution of wells used for
drinking-water, it is generally cheaper and easier to provide water from outside
than to build sewers or use vacuum tankers to remove excrete.
Insect and vermin problems
Insects
Many insects are attracted to excrete because they provide rich
organic material and water, both of which are essential for the insects'
development. The most important groups from a health point of view are
mosquitos, houseflies, blowflies and cockroaches.
Mosquitos
Some mosquitos, particular!)! Culex pipiens and some species of
Anopiteles, breed in polluted water, including that found in some pit latrines.
Unlike flies, mosquitos are not deterred by low light levels, so keeping excrete
in a dark place does not prevent them from breeding. Possible solutions are to
keep the pit fully sealed or to cover the surface of the liquid with a film that
prevents mosquito larvae from breathing. Oil and proprietary chemicals have been
used effectively but may contaminate the groundwater. An alternative is to use
small plastic balls that float on the surface producing a mechanical cover to
the liquid. Fortunately many latrines only have a free water surface for a short
period immediately after starting up or emptying. After that a layer of scum
forms on the water surface preventing further mosquito breeding.
Houseflies and blowflies
These are medium- to large-sized flies that are attracted to
human food as well as faeces and refuse. The three larval stages are found in
excrete or mixtures of excrete and decaying vegetable matter. Solid, moist and
fermenting material is most suitable for the breeding of houseflies, but the
larvae of the blowfly prefer more liquid faeces and may liquefy masses of faecal
material (Feachem et al., 1983). Open pit latrines are ideal breeding places.
Flies use both sight and smell to find food. This is an
important consideration when designing latrines since not only must excrete be
stored in a dark place but any ventilation holes must be screened.
Cockroaches
Cockroaches are attracted to latrines by the moisture and
organic matter; they are then likely to transmit disease by carrying pathogenic
organisms on their bodies. Provided that a site has a continuous food supply the
cockroaches tend to remain where they are. Accordingly latrines should be sited
as far as possible from where food is stored and prepared, to prevent migration
of cockroaches from one to the other.
Rats
Rats look upon excrete as a food source. If they come in contact
with excrete and then with food intended for human consumption there is a
possibility of their transmitting disease. In Nepal, there has been a problem
with rats burrowing into double-pit latrines through the holes left in the pit
walls. Not only does this create a possible transmission route for disease but
the rats deposit large volumes of soil in the pit which rapidly fill it. A full
lining of the top 0.5-1.0 m of any pit should prevent rats from
entering.
Chapter 6 - Operation and maintenance of on-site sanitation
Pit latrines
Simple pit latrines
Ventilated
pit latrines
Ventilated double-pit latrines
Pour-flush latrines
Offset
pour-flush latrines
Double-pit offset pour-flush latrines
Raised pit
latrines
Borehole latrines
Septic tanks
Aqua-privies
Disposal of
effluent from septic tanks and aqua-privies
Composting latrines
Multiple
latrines
Other latrines
Any review of on-site sanitation shows that there are a large
number of options to choose from. This is to be expected, since every project
has different characteristics, requiring a different solution. Many of the
alternatives are variations on, or combinations of, other designs and it is not
possible to describe them all. Those planning on-site sanitation should adopt
and combine the major options described in any way that will produce the most
appropriate solution.
This chapter describes how the different types of latrine
introduced in Chapter 4 work and discusses their relative merits. Details of
construction of individual parts is given in Chapter 7 and design examples in
Chapter 8.
Pit latrines
The principle of all types of pit latrine is that wastes such as
excrete, anal cleaning materials, sullage and refuse are deposited in a hole in
the ground. The liquids percolate into the surrounding soil and the organic
material decomposes producing:
- gases such as carbon dioxide and methane, which
are liberated to the atmosphere or disperse into the surrounding soil;
- liquids, which percolate into the surrounding soil;
- a decomposed and consolidated residue.
In one form or another, pit latrines are widely used in most
developing countries. The health benefits and convenience depend upon the
quality of the design, construction and maintenance. At worst, pit latrines that
are badly designed, constructed and maintained provide foci for the transmission
of disease and may be no better than indiscriminate defecation. At best, they
provide a standard of sanitation that is at least as good as other more
sophisticated methods.
Simplicity of operation and construction, low construction
costs, the fact that they can be built by householders with a minimum of
external assistance, and effectiveness in breaking the routes by which diseases
are spread, are among the advantages that make pit latrines the most practical
form of sanitation available to many people. This is especially true where there
is no reliable, continuous and ample piped water supply.
Unfortunately, past failures, especially of public facilities,
discourage some sanitation field workers from advocating their widespread use.
Objections to the use of pit latrines are that poorly designed and poorly
constructed latrines produce unpleasant smells, that they are associated with
the breeding of undesirable insects (particularly flies, mosquitos and
cockroaches), that they are liable to collapse, and that they may produce
chemical and biological contamination of groundwater. Pit latrines that are well
designed, sited and constructed, and are properly used need not have any of
these faults.
Design life
As a general rule, pits should be designed to last as long as
possible. Pits designed to last 25-30 years are not uncommon and a design life
of 15-20 years is perfectly reasonable. The longer a pit lasts, the lower will
be the average annual economic cost and the greater the social benefits from the
original input.
In some areas, ground conditions make it impractical to achieve
such a design life. If the maximum possible design life is less than ten years,
serious consideration should be given to using an alternating double-pit system.
In such systems the pits must have a minimum life of two years. In the past, a
minimum life of one year was considered sufficient for ensuring the death of
most pathogenic organisms, but it is now known that an appreciable number of
organisms can live longer (see Chapter 2). In any event the increased cost of
designing a pit to last two years as compared to one designed to last one year
is minimal because of decomposition and consolidation of the first year's sludge
(see Chapter 5).
Pit shape
The depth of the pit to some extent affects the plan shape. Deep
pits (deeper than about 1.5 m) are usually circular, whereas shallow pits are
commonly square or rectangular. As the pit gets deeper the load applied to the
pit lining by the ground increases. At shallow depths, normal pit linings
(concrete, brick masonry, etc.) are usually strong enough to support the soil
without a detailed design. Also square or rectangular linings are easier to
construct. At greater depths, the circular shape is structurally more stable and
able to carry additional loading.
Commonly, pits are 1.0-1.5 m wide or in diameter, since this is
a convenient size for a person to work inside during excavation. The cover slab
required is simple to design and construct, and cheap to build.
Emptying pits
The emptying of single pits containing fresh excrete presents
problems because of the active pathogens in the sludge. In rural areas, where
land availability is not a constraint, it is often advisable to dig another pit
for a new latrine. The original pit may then be left for several years
and when the second is filled it may be simplest to re-dig the
first pit rather than to excavate a new hole in hard ground. The sludge will not
cause any health problems and is beneficial as a fertilizer. However, in urban
areas, where it is not possible to excavate further holes and where the
investment in pit-lining and superstructure has been substantial, the pit must
be emptied.
From the public health point of view, manual removal should be
avoided. Where the groundwater level is so high that the pit is flooded or where
the pit is sealed and fitted with an effluent overflow, the wet sludge can be
removed by ordinary vacuum tankers. These tankers are the same as those used for
emptying septic tanks or road gullies (Fig. 6.1). Hand-powered diaphragm pumps
have so far proved to be very slow and laborious in emptying pits and have not
been widely adopted.
Where pits are mainly dry, the greater part of the contents will
have consolidated into solid material which conventional vacuum tankers cannot
lift. In addition to this difficulty Boesch & Schertenleib (1985) summarized
pit emptying problems as follows.
· The machinery may
be too large to get to the latrines. Conventional vacuum trucks are too big to
be driven into the centre of many ancient cities or urban/periurban unplanned or
squatter settlements where pedestrian routes predominate.
· Maintenance of vacuum tankers
is often poor. Their engines must be kept running all day, either to move the
truck or to operate the pump when stationary. This causes rapid wear and makes
them particularly susceptible to breakdown if preventive maintenance is
neglected.
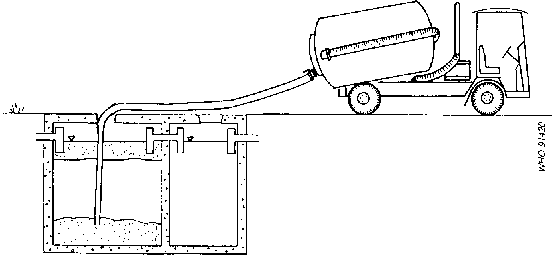
Fig. 6.1. Vacuum tanker desludging a
septic tank
· Management and
supervision of emptying services is often ineffective.
High-performance vacuum tankers able to deal with consolidated
pit latrine sludge have been developed (Carol!, 1985; Boesch & Schertenleib,
1985) and are able to exhaust sludge over a horizontal distance of 60 m, thereby
getting round problems of accessibility. However, considerable time is needed to
set up and then dismantle and wash out the suction pipes.
As an alternative, the pump and tank may be mounted on a small,
highly manoeuvrable site vehicle or on separate small vehicles in order to reach
a latrine with limited accessibility. The disadvantage of using a smaller tank
is that more journeys to the disposal point are required. Consequently, the
suction pump is unused during this waiting period unless several small tankers
are used with each pump. This can lead to a considerable increase in costs,
particularly where disposal points are distant from the latrines.
Larger-capacity transfer tankers may be employed to ensure best use of the
costly vacuum pump.
Another approach involves the use of a container which can be
manhandled close to an otherwise inaccessible latrine, even through the house
where necessary. Small-diameter, clean vacuum lines connect the container to the
distant tanker, providing the suction necessary to fill the container (Fig.
6.2). A fail-safe method of shutting off the sludge intake when the container is
full is required to prevent sludge being carried through the air-line into the
vacuum filter and engine. The containers have to be of such a size that they can
be manhandled safely when full but also that the least possible number of
container movements is required for each pit (Wilson, 1987).
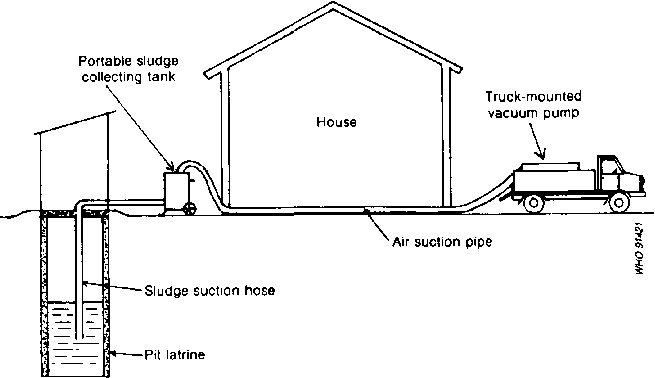
Fig. 6.2. Remote vacuum pump emptying
system
All these systems are relatively expensive and require efficient
mechanical maintenance to ensure reliability. The least sophisticated system
should be used wherever possible for the majority of pit emptyings.
Simple pit latrines
The simple pit latrine (Fig. 6.3) consists of a hole in the
ground (which may be wholly or partially lined) covered by a squatting slab or
seat where the user defecates. The defecation hole may be provided with a cover
or plug to prevent the entrance of flies or egress of odour while the pit is not
being used.
The cover slab is commonly surrounded by some form of
superstructure that provides shelter and privacy for the user. The
superstructure design is irrelevant to the operation of the latrine but crucial
to the acceptability of the latrine to the user. Superstructures range from a
simple shelter of sacks or sticks to a building of bricks or blocks costing more
than the rest of the latrine. The choice of superstructure will reflect the
income and customs of the user.
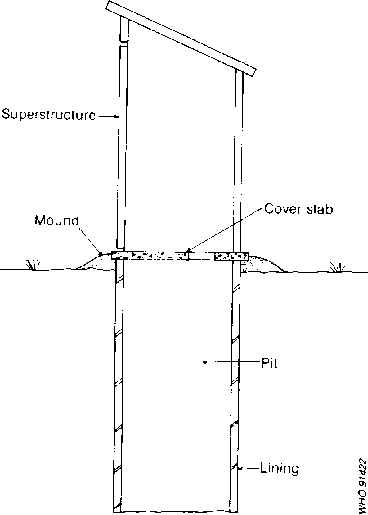
Fig. 6.3. Simple pit latrine
The cover slab should be raised at least 150 mm above the
surrounding ground to divert surface water away from the pit. Commonly, the
cover slab sits directly on the lining, but if the lining is made of very thin
material, such as an old oil drum, a concrete foundation beam may be necessary
to distribute the load of the slab to the lining and surrounding ground (Fig.
6.4).
The simple pit latrine is the cheapest form of sanitation
possible. Once constructed it requires very little attention other than keeping
the latrine area clean and ensuring that the hole cover is in place when the
latrine is not in use. Unfortunately the superstructure frequently becomes
infested with flies and mosquitos and full of pungent odours because users do
not replace the squat hole cover after use. Self-closing hole covers have been
tried but are often disliked because the cover rests against the user's back.
There may also be resistance to constructing new simple pit latrines because of
their resemblance to existing, badly constructed, pit latrines.
Ventilated pit latrines
These are also known as ventilated improved pit (VIP) latrines
(Fig. 6.5). The major nuisances that discourage the use of simple pit latrines -
smell and flies - are reduced or eliminated through the incorporation of a
vertical vent pipe with a flyscreen at the top (Morgan, 1977). Wind passing over
the top of the vent pipe causes a flow of air from the pit through the vent pipe
to the atmosphere and a downdraught from the superstructure through the squat
hole or seat into the pit. This continuous flow of air removes smells resulting
from the decomposing excrete in the pit and vents the gases to the atmosphere at
the top of the vent pipe rather than through the superstructure. The flow of air
is increased if the doorway of the superstructure faces the prevailing wind
(Mare, 1984). If a door is fitted it should be kept shut at all times (except
when entering or leaving) to keep the inside of the latrine reasonably dark, but
there should be a gap, normally above the door, for air to enter. The area of
this gap should be at least three times the cross-sectional area of the vent
pipe.
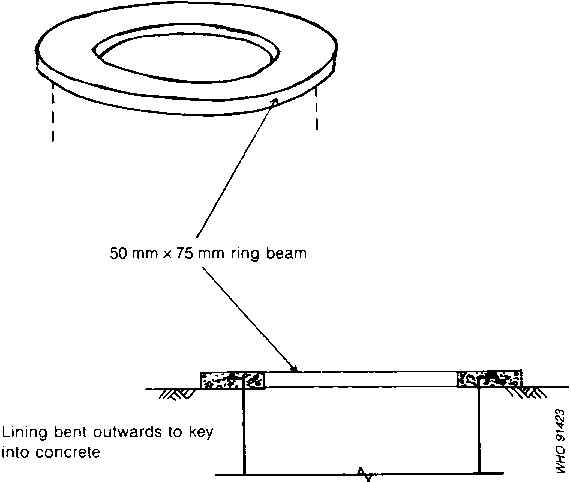
Fig.6.4. Ring beam on top of a thin
pit lining to support the coyer slab
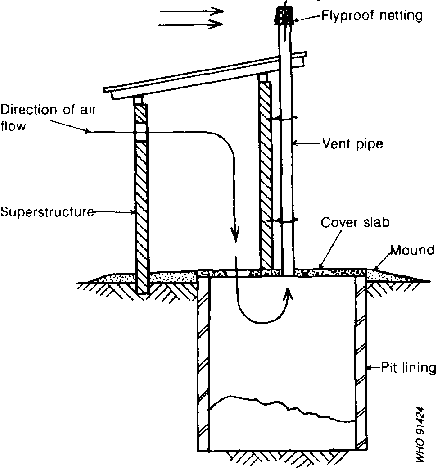
Fig. 6.5. Ventilated improved pit
(VIP) latrine
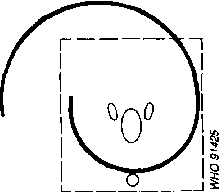
Fig. 6.6. Spiral construction for
the superstructure
The superstructure can be constructed in the form of a spiral
(Fig. 6.6). This excludes most of the light whether a door is fitted or not. The
defecation hole must be left open to allow the free passage of air. The vent
pipe should extend at least 50 cm above the latrine superstructure except where
the latter has a conical roof, in which case the pipe should extend as high as
the apex. Air turbulence caused by surrounding buildings or other obstructions
may cause reverse air flow, leading to foul odours and flies in the
superstructure. If mean wind speeds are about 2 m/s, as is fairly common in
rural areas, air speeds in the vent pipe are about 1 m/s (Ryan & Mara,
1983). Air flow may also occur at lower wind speeds because of solar radiation
heating the air in the vent pipe, causing the air to rise. The vent pipe should
then be placed on the equator side of the superstructure. It may be painted
black to increase solar absorption, if the material of the pipe is not itself
black.
In latrines relying on solar radiation for ventilation, foul
odours are sometimes experienced in the superstructure at certain times of the
day (usually early morning). This occurs where the outside air temperature is
colder than the air in the pit, which may prevent the air circulating. Very
little can be done to prevent this, other than sealing the defecation hole at
night.
In addition to removing odours from the pit, the screened vent
pipe significantly controls flies. In Zimbabwe, Morgan (1977) compared the
number of flies leaving the squat hole of a VIP latrine with the number leaving
a simple pit latrine. The results are shown in Table 6.1.
Flies are attracted to the pit by the odour coming from the vent
pipe but are unable to enter because of the screen. A few flies enter the pit
through the squat hole or seat, and lay eggs in the pit. New young flies attempt
to leave the pit by flying towards the light. If the latrine superstructure is
kept sufficiently dark, the major source of light is at the top of the vent
pipe, but the screen prevents the flies from escaping there and they eventually
fall back into the pit to die.
Well-constructed and maintained VIP latrines combat all the
problems associated with simple pit latrines, except mosquitos. However, they
are considerably more expensive than simple pits, since a ventilation pipe and
full superstructure are required. Because the defecating hole is directly over
the pit they accept any form of anal cleaning material without blocking. Routine
operation is limited to keeping the superstructure clean, ensuring that the door
(where fitted) is kept closed, occasionally checking that the fly-proof netting
on top of the vent pipe is not blocked or broken, and pouring water down the
vent pipe once a year to remove spiders' webs.
Table 6.1. Comparison of the numbers of files leaving the squat
holes of a simple pit latrine and a VIP latrine a
|
Period of trapping |
No. trapped in unvented privy |
No. trapped in vented privy |
|
8 October-5 November |
1723 |
5 |
|
5 November-3 December |
5742 |
20 |
|
3-24 December |
6488 |
121 |
a Source: Morgan, 1977.
Ventilated double-pit latrines
Although it is usually best to provide large deep pits, this may
not be possible where rock or groundwater lie within one or two metres of the
ground surface. A variation of the VIP latrine suitable for such situations has
two shallow pits side by side under a single superstructure (Fig. 6.7). The pits
are usually lined with bricks or blocks. Each pit may have its own squat hole or
seat. Alternatively, slabs may be movable, one with a hole for the pit in use
and a plain slab for the other pit. Whichever design is used, only one hole must
be available for defecation at any time. The latrine may be provided with two
ventilation pipes (one for each pit) but more usually only one is fitted, to the
pit in use. The hole for the ventilation pipe for the pit not in use is sealed.
As with single VIP latrines, the superstructure must be kept partially dark at
all times to discourage flies.
Fin. 6.7. Double-nit VIP latrine
Operation
One pit is used until it is filled to within about half a metre
of the top. The defecation hole over the full pit is then sealed and the one
over the empty pit opened. Where necessary, the ventilation pipe is moved from
the full to the empty pit, and the vent hole in the slab of the full pit sealed.
The second pit is then used until filled to within half a metre of the top. The
contents of the first pit can now be removed and the pit reused. The pits must
be large enough to allow each pit to be used for at least two years. This
ensures that when the pit contents are dug out most of the pathogenic organisms
have died.
Double-pit latrines can be considered as permanent
installations. The small effective capacity (0.72 m³ for a family of six,
using a sludge build-up rate of 60 litres per person per year, as suggested in
Chapter 5) enables pits to be relatively shallow, and therefore easier to empty
than deep pits. The pits should extend beyond the superstructure, either to the
sides or at the back, with removable slabs for emptying. These slabs should be
easy to lift, but should be sealed to prevent flies getting in or out. The
central wall between the two pits should be made with full mortar joints and may
be rendered with cement mortar on both sides.
As with the single-pit VIP latrine, the double-pit VIP latrine
has the advantages of reduced smell and fly nuisance. Also the contents of the
latrine dug out every two years or so are a valuable soil conditioner (see Annex
1). Double-pit VIP latrines are usually (but not always) more expensive than
single-pit VIP latrines, and require a greater operational input from the user,
particularly in changing over pits. Some societies have shown resistance to
handling the decomposed contents of the pit but this can often be overcome with
education and time. Allowing people to see (and handle) the contents of a pit as
it is emptied is the strongest persuader for those concerned.
All projects involving the construction of double-pit latrines
must allow for a prolonged support programme. Householders need to be reminded
to change pits at the right time and should be assisted in doing so. This
assistance will probably have to be available for at least the first two pit
changes to ensure that the complete cycle is covered.
Pour-flush latrines
The problems of flies, mosquitos and smell in simple pit
latrines may be overcome simply and cheaply by the installation of a pan with a
water seal in the defecating hole (Fig. 6.8). Chapter 7 gives details of the
design and fabrication of water seals. The pan is cleared by pouring (or,
better, throwing) a few litres of water into the pan after defecation. The
amount of water used varies between one and four litres depending mainly on the
pan and trap geometry. Pans requiring a small amount of water for flushing have
the added advantage of reducing the risk of groundwater pollution. The flushing
water does not have to be clean. If access to clean water is limited, laundry,
bathing or any other similar water may be used.
Pour-flush latrines are most appropriate for people who use
water for anal cleaning, and squat to defecate, but they have also proved
popular in countries where other cleaning materials are common. However, there
is a likelihood of blockage where solid materials such as hard paper or corncobs
are put in the pan. The placing of solid cleaning materials in a container for
separate disposal is not generally recommended unless careful attention can be
given to the handling of the waste and sterilizing of the container. Blockage
may also be caused by material used by menstruating women. This should be
disposed of separately, e.g., by burying or burning. Efforts to clear blockages
often result in damage to the water seal.
In most cases, because of the small quantity of water required
for flushing, pour-flush latrines are suitable where water has to be carried to
the latrine from a standpipe, well, or other water source. There is no
justification for the belief that the pit should be ventilated to prevent the
build up of gases. A vent pipe adds to the cost of the latrine and any gases
produced easily percolate into the surrounding soil.
Fig. 6.8. Pour-flush latrine
Fig. 6.9. Offset pour-flush latrine
Offset pour-flush latrines
An extension of the idea of the pour-flush pan with a water seal
is for the pit to be outside the latrine building (Fig. 6.9). The contents of
the pan are discharged through a short length of small-diameter pipe or covered
channel with a minimum gradient of 1 in 30. PVC, concrete or clay pipes, 100 mm
in diameter, are often used, but the diameter may be the same as the water seal
(usually 65-85 mm). Masonry or brickwork channels with smooth circular concrete
inverts have been adopted in some Asian countries. The channel is covered by
precast concrete slabs or by bricks laid transversely across the top (Fig.
6.10). Pipes or channels should project at least 100 mm into the pit.
Generally speaking, an offset pour-flush latrine requires a
larger volume of flushing water than a simple pour-flush latrine. The amount of
water required depends on the pan design, pipe slope and roughness. As little as
1.5 litres has been recorded as necessary for each flush, but usually
considerably more than this is required.
Offset pour-flush latrines are favoured by many because the
superstructure can be permanent. When the pit is full, another pit can be dug
alongside and the connecting pipe excavated and relaid to the new pit without
damaging the superstructure (Fig. 6.11).
Another benefit is that the toilet can be located inside the
house and the pit outside. If this layout is used, care must be taken to allow
for movement of the pipe where it passes through the house wall. This can be
achieved either by cutting a slot in the wall (Fig. 6.12) so that it does not
bear directly on the pipe, or by installing two short lengths of pipe (Fig.
6.13) joining in the centre of the wall. Both systems allow movement of the wall
without breaking the pipe. The distance of the pit from the house wall should be
not less than its depth, to prevent the load from the wall causing the pit to
collapse. If this is not possible, the pit may be located not less than one
metre from the wall, provided that the pit is fully lined and the unsupported
plan length parallel to the wall does not exceed one metre (Fig. 6.14).

Fig. 6.10. Brick-covered drain
Fig. 6.11. Moving the discharge pipe
of an offset pour-flush latrine to a new pit
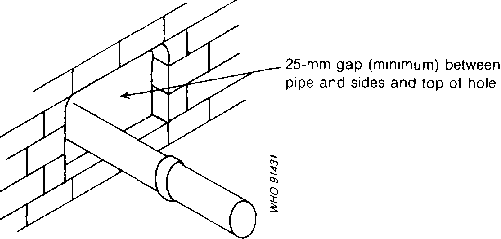
Fig. 6.12. Pipe laid through a hole
In an external wall
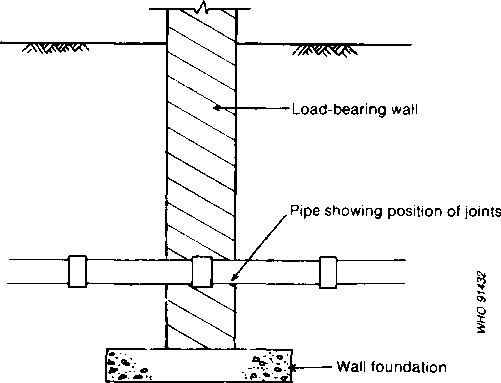
Fig. 6.13. Pipe fixed in place
through a wall
Double-pit offset pour-flush latrines
As with VIP latrines there are occasions when two shallow pits
are more appropriate than a single deep pit. Double pits with pour-flush pans
and water seals have been successfully used in India (Roy et al., 1984) and
elsewhere. The pit design is the same as in the double-pit VIP latrine but the
two toilets are replaced by a single waterseal pan connected to both pits by
pipes. An inspection chamber containing a Y junction is normally built between
the pits and the pan so that the excrete can be channeled into either pit (Fig.
6.15).
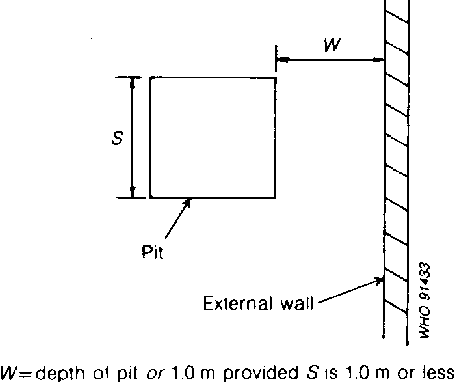
Fig. 6.14. Minimum distance between
a pit and the external wall of a house
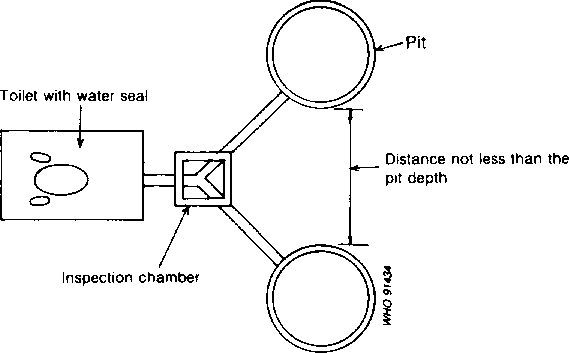
Fig. 6.15. Double-pit offset
pour-flush latrine
Before a new latrine is brought into service, the inspection
chamber is opened and one of the pipes leading to the pits is stopped off (a
brick, stone, mound of clay or block of wood is quite satisfactory). The cover
is then replaced and sealed to prevent gases escaping to the atmosphere. The
latrine can now be used like an offset pour-flush toilet except that slightly
more water may be required for flushing to prevent solids blocking the Y
junction. Since one of the outlets from the chamber is blocked, all the contents
of the toilet pan are directed into a single pit. When the first pit is full,
usually after a couple of years, the inspection chamber is opened and the
stopper blocking the outlet pipe removed and placed in the other outlet pipe.
The cover is again replaced and sealed. The pan contents now enter the second
pit.
In a further two years the contents of the first pit will have
decomposed and nearly all of the pathogenic organisms will have died. The lid of
the first pit is taken off and the contents of the pit removed and disposed of
or reused (see Annex 1). After replacing and sealing the lid, the first pit can
be used again if the stopper in the Y junction is returned to its original
position. In this way, the twin pits can be used indefinitely, each pit in turn
being used for two years, rested for two years, emptied and then used again.
The positioning and shape of the pits is determined to a large
extent by the space available. Some options are shown in Fig. 6.16. If possible,
the distance between the pits should be not less than the depth of a pit. This
is to reduce the possibility of liquid from the pit in use entering the pit not
in use. If the pits have to be built adjacent to each other, the dividing wall
should be non-porous. It can also be extended beyond the side-walls of the pit,
to prevent cross-contamination. Alternatively, the pit lining can be constructed
without holes for a distance of 300 mm either side of the dividing walls.
As with double-pit VIP latrines, double-pit pour-flush latrines
are most useful in areas where it is not possible to dig a deep pit or where
excrete are to be reused.
For proper operation it is most important that the construction,
particularly of the Y junction, is carried out properly, and the user is made
fully aware of how the latrine should be operated. Long-term support facilities
to remind and assist the user in changing and emptying pits will greatly improve
operational success.
Fig. 6.16. Some layout options for
double-pit offset pour-floch latrines
Raised pit latrines
Another way of dealing with the problem of difficult ground
conditions close to the surface is to construct raised pit latrines. The pit is
excavated as deep as possible, working at the end of the dry season in areas of
high groundwater. The lining is extended above ground level until the desired
pit volume is achieved.
If the pit extends more than 1.5 m below the ground there will
probably be sufficient leaching area below ground for a pit latrine having a
full depth of 3.5 m. In such cases, the lining above ground should be sealed by
plastering both sides (Fig. 6.17). The minimum below-ground depth depends on the
amount of water used in the pit and the permeability of the soil. Where
insufficient infiltration area can be obtained below ground level, the raised
portion of the pit can be surrounded by a mound of soil. The section of the
lining above ground (excluding the top 0.5 m) can be used for infiltration
provided the mound is made of permeable soil, well compacted with a stable side
slope, and is thick enough to prevent filtrate seeping out of the sides (Fig.
6.18). Earth mounds are not recommended on clay soils as the filtrate is likely
to seep out at the base of the mound rather than infiltrate the ground.
Fig. 6.17 Raised pit latrine
Raised pits can be used in combination with any other type of
pit latrine (VIP, pour-flush, double-pit). A common application is where the
groundwater level is close to the surface. A slight raising of the pit may
prevent splashing of the user or blockage of the pit inlet pipe by floating
scum.
Fig. 6.18. Mound latrine
Borehole
latrines
Borehole latrines have an augered hole instead of a dug pit and
may be sunk to a depth of 10 m or more, although a depth of 4-6 m is usual.
Augered holes, 300-500 mm in diameter, may be dug quickly by hand or machine in
areas where the soil is firm, stable and free from rocks or large stones. While
a small diameter is easier to bore, the life of the pit is very short. For
example a 300-mm hole 5 m deep will serve a family of five people for about two
years.
The small diameter of the hole increases the likelihood of
blockage, and the depth of the augered hole increases the danger of groundwater
contamination. Even if the hole does not become blocked, the sides of the hole
become soiled near the top, making fly infestation probable. However, borehole
latrines are convenient for emergency or short term use, because they can be
prepared rapidly in great numbers, and light portable slabs may be used.
The holes should be lined for at least the top half-metre or so
with an impervious material such as concrete or baked clay. Because of the small
diameter and short life, the full depth is not usually lined.
Septic tanks
Septic tanks are commonly used for wastewater treatment for
individual households in low-density residential areas, for institutions such as
schools and hospitals, and for small housing estates. The wastewater may be
waste from toilets only, or may also include sullage.
The septic tank, in conjunction with its effluent disposal
system, offers many of the advantages of conventional sewerage. However, septic
tank systems are more expensive than most other on-site sanitation systems and
are unlikely to be affordable by the poorer people in society. They also require
sufficient piped water to flush all the wastes through the drains to the tanks.
Treatment processes
Wastes from the toilet, and possibly kitchens and bathrooms,
pass through drains into a sealed, watertight tank, where they are partially
treated. After a period - usually 1-3 days - the partially treated liquid passes
out of the tank and is disposed of, often to the ground through soakpits or tile
drains in trenches (Fig. 6.19). Many of the problems with septic tank systems
arise because inadequate consideration is given to the disposal of the tank
effluent.

Fig. 6.19. Septic tank disposal
system
Settlement
A principal aim of septic tank design is to achieve
hydraulically quiescent conditions within the tank to assist the settlement by
gravity of heavy solid particles. The settled material forms a layer of sludge
on the bottom of the tank which must be removed periodically. The efficiency of
removal of solids by settlement can be high. Majumder et al. (1960) reported
removal of 80% of suspended solids in three tanks in West Bengal; similar
removal rates were reported in a single tank near Bombay (Phadke et al.,
undated). However, much depends upon the retention time, the inlet and outlet
arrangements, and the frequency of desludging. Large surges of flow entering the
tank may cause a temporarily high concentration of suspended solids in the
effluent owing to disturbance of the solids which have already settled out.
Flotation
Grease, oil, and other materials that are less dense than water
float up to the liquid surface, forming a layer of scum which can become quite
hard. The liquid moves through the tank sandwiched between the scum and sludge.
Sludge digestion and consolidation
Organic matter in the sludge and scum layers is broken down by
anaerobic bacteria with a considerable amount of organic matter being converted
into water and gases. Sludge at the bottom of the tank is consolidated owing to
the weight of liquid and solids above. Hence the volume of sludge is
considerably less than that of raw sewage solids entering the tank. Rising
bubbles of gas cause a certain amount of disturbance to the liquid flow. The
rate at which the digestion process proceeds increases with temperature, a
maximum rate being achieved at about 35 °C. The use of ordinary household
soap in normal amounts is unlikely to affect the digestion process (Truesdale
& Mann, 1968). The use of abnormally large amounts of disinfectant causes
bacteria to be killed off and thereby inhibits the digestion process.
Stabilization of liquids
The liquid in the septic tank undergoes biochemical changes, but
there are few data on the removal of pathogens. Both Majumder et al. (1960) and
Phadke et al. (undated) found that although 80-90% of hookworm and Ascaris eggs
were removed by the septic tanks studied, in absolute terms very large numbers
of viable eggs were contained in the effluent, with 90% of effluent samples
containing viable eggs.
Since the effluent from septic tanks is anaerobic and likely to
contain large numbers of pathogens which can be a potential source of infection,
it should not be used for crop irrigation nor should it be discharged to canals
or surface-water drains without the permission of the local health authority.
Design principles
The guiding principles in designing a septic tank are:
- to provide sufficient retention time for the
sewage in the tank to allow separation of solids and stabilization of liquid;
- to provide stable quiescent hydraulic conditions for efficient
settlement and flotation of solids;
- to ensure that the tank is large enough to store accumulated
sludge and scum;
- to ensure that no blockages are likely to occur and that there
is adequate ventilation of gases.
Factors affecting design
The design method outlined below provides sufficient volume for
both retention of liquid and storage of sludge and scum. The volume required for
liquid retention depends upon the number of users, the amount of wastewater
passed to the tank and whether sullage is accepted as well as waste from WCs.
The volume for sludge and scum
storage depends on the frequency with which the tank is
desludged, the method of anal cleaning of the users and the temperature.
Estimating me volume of a septic tank
Retention time
A sewage retention time of 24 hours is assumed to be sufficient.
This should correspond to the situation immediately before the tank is
desludged. After desludging the effective liquid retention time is greater
because liquid then occupies the regions previously full of sludge and scum.
Codes of practice vary in their recommendations from a retention
time of just less than 24 hours to about 72 hours. In theory, improved
settlement results from a longer retention time, although the maximum rate of
settlement is usually achieved within the first few hours. Settlement is impeded
by flow disturbances caused by the inlet and outlet arrangements. The problem is
likely to be greater in small tanks than large ones (whose hydraulic capacity is
better able to damp out disturbances) and it is reasonable to assume that in
large tanks correspondingly lower retention times can be used (Mare &
Sinnatamby, 1986). The Brazilian code of practice (Associacao Brasileira de
Normas Tecnicas, 1982) allows for reduced retention time in large tanks, such as
those serving institutions or small communities. In summary, if the wastewater
flowrate is Q m³ per day, it recommends that the retention time should be T
hours, as follows:
|
If Q is less than 6 |
T = 24 |
|
If Q is between 6 and 14 |
T = 33-1.5 Q |
|
If Q is greater than 14 |
T = 12 |
Liquid retention volume
If the septic tank accepts sullage as well as toilet waste, the
sewage flow from a house or institution usually represents a high proportion of
the water supplied. If the water supply per person is known, the sewage flow may
be taken as 90% of the water supply. If the water supply exceeds about 250
litres per person per day, the excess is likely to be used for watering gardens.
In most developing countries, the maximum sewage flow may be assumed to be
between 100 and 200 litres per person per day.
If only WCs are connected to the septic tank, the sewage flow is
estimated from an assumption about the number of times each user is likely to
flush the WC. For example, each person may flush a 10-litre cistern four times a
day.
The minimum capacity required for 24 hours' liquid retention is:
A = P x q litres
where
A = required volume for 24 hours' liquid
retention;
P = number of people served by the tank;
q = sewage flow per
person (litres per person per day).
Volume for sludge and scum storage
The volume required for the accumulation of sludge and scum
depends upon the factors discussed in Chapter 5. Pickford (1980) suggested the
formula:
B = P x N x F x S
where
B = the required sludge and scum storage capacity in
litres;
N = the number of years between dislodging (often 2-5 years;
more frequent dislodging may be assumed where there is a cheap and reliable
emptying service);
F = a factor which relates the sludge digestion rate to
temperature and the dislodging interval, as shown in Table 6.2;
S = the rate of sludge and scum accumulation which may be taken
as 25 litres per person per year for tanks receiving WC waste only, and 40
litres per person per year for tanks receiving WC waste and
sullage.
Table 6.2. Value of the sizing factor F in determining volume
for sludge and scum storage
|
Number of years |
Value of F |
|
between desludging |
Ambient temperature |
|
> 20 °C |
> 10°C |
< 10 °C |
|
throughout year |
throughout year |
during winter |
|
1 |
1.3 |
1.5 |
2.5 |
|
2 |
1.0 |
1.15 |
1.5 |
|
3 |
1.0 |
1.0 |
1.27 |
|
4 |
1.0 |
1.0 |
1.15 |
|
5 |
1.0 |
1.0 |
1.06 |
|
6 or more |
1.0 |
1.0 |
1.0 |
Total tank volume
The total capacity of the tank (C) is:
C = A + B litres
In practice, there are limitations on the minimum size of tank
that can be built; the guidelines described below are illustrated in the design
examples given in Chapter 8.
Shape and dimensions of septic tanks
Having determined the overall capacity of the septic tank it is
necessary to determine the depth, width and length. The aim is to achieve even
distribution of flow so that there are no dead areas and no "short circuiting"
(that is, incoming flow shooting through the tank in less than the design
retention time).
A tank may be divided into two or more compartments by baffle
walls. Most settlement and digestion may occur in the first compartment with
some suspended materials carried forward to the second. Surges of sewage
entering the tank reduce the efficiency of settlement but have less effect in
the second compartment. Laak (1980) reported a number of studies in which septic
tanks with more than one compartment performed more effectively than
single-compartment tanks. His survey also indicated that the first compartment
should be twice as long as the second. Any advantage of more than two
compartments has not been quantified.
The following guidelines can be used to determine the internal
dimensions of a rectangular tank.
1. The depth of liquid from the tank floor to the
outlet pipe invert should be not less than 1.2 m; a depth of at least 1.5 m is
preferable. In addition a clear space of at least 300 mm should be left between
the water level and the under-surface of the cover slab.
2. The width should be at least 600 mm as this is the minimum
space in which a person can work when building or cleaning the tank. Some codes
of practice recommend that the length should be 2 or 3 times the width.
3. For a tank of width W, the length of the first compartment
should be 2 W and the length of the second compartment should be W (Fig. 6.20).
In general, the depth should be not greater than the total length.
These guidelines give the minimum size of tank. There is no
disadvantage in making a tank bigger than the minimum capacity. It may be
cheaper to build larger tanks using whole blocks, rather than cutting blocks.
Examples of septic tank design are given in Chapter 8.
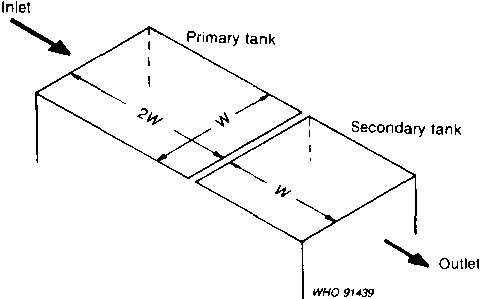
Fig. 6.20. Tank dimensions
Construction
The construction of a septic tank usually requires the
assistance and supervision of an engineer or at least an experienced
construction foreman. The design of the inlet and outlet is critical to the
performance of the tank. Careful checking of levels is particularly important
for large tanks that include complicated inlet, outlet and baffle board
arrangements.
For small household tanks, the floor is usually made of
unreinforced concrete thick enough to withstand uplift pressure when the tank is
empty. If the ground conditions are poor or the tank is large, the floor may
have to be reinforced. The walls are commonly built of bricks, blocks or stone
and should be rendered on the inside with cement mortar to make them watertight.
Large reinforced concrete tanks serving groups of houses or institutions must be
designed by a qualified engineer to ensure that they are structurally sound.
The tank cover or roof, which usually consists of one or more
concrete slabs, must be strong enough to withstand any load that will be
imposed.
Removable cover slabs should be provided over the inlet and
outlet. Circular covers, rather than rectangular ones, have the advantage that
they cannot fall into the tank when removed.
Septic tanks have been constructed from a variety of
prefabricated sections, including large-diameter pipes. Experience has shown
that the problems involved in fixing the inlet and outlet outweigh the
advantages of using pipes. A number of proprietary designs of tank are
manufactured from asbestos cement, glass-reinforced plastic and other materials
and are sold commercially.
Inlet
The sewage must enter the tank with the minimum possible
disturbance to the liquid and solids already in the tank. Surges and turbulence
reduce the efficiency of settlement and can cause large amounts of solid matter
to be carried out in the tank effluent. Suitable inlet arrangements are shown in
Fig. 6.21 and 6.24.
Surges are caused by flushing of the WC and emptying of sinks
and baths. Their effect can be minimized by using drainpipes of not less than
100 mm in diameter and ensuring that the gradient of the pipe approaching the
septic tank is flatter than about I in 66. Sizes and gradients of pipes between
the building and the septic tank may be specified in local building regulations.
Fig. 6.21. Septic tank Inlet pipe
Outlet
For septic tanks less than 1.2 m wide, a simple T-pipe
arrangement can be used for the outlet. A removable cover above the T-pipe
should be provided to permit clearance of any blockage. An alternative to the
T-pipe is a baffle plate made of galvanized sheet, ferrocement or asbestos
cement fitted round the outlet pipe (Fig. 6.22). A deflector may be provided
below the outlet to reduce the possibility of settled sludge being resuspended
and carried out of the tank. For tanks wider than 1.2 m, a full-width weir can
be used to draw off the flow evenly across the tank. A scumboard should be
fitted to prevent the scum washing over the weir (Fig. 6.23).

Fig. 6.22. Septic tank outlet baffle
plate
Fig. 6.23. Septic tank outlet using
full width weir
Dividing wall
If a tank is divided into two or more compartments, slots or a
short length of pipe should be provided above the sludge level and below the
scum level, as shown in Fig. 6.24. At least two should be installed to maintain
uniform flow distribution across the tank.
Ventilation of the tank
The anaerobic processes that occur in the tank produce gases
which must be allowed a means of escape. If the drainage system of the house or
other building has a ventilation pipe at the upper end, gases can escape from
the septic tank along the drains. If the drainage system is not ventilated, a
screened vent pipe should be provided from the septic tank itself.
The tank floor
Some codes of practice recommend that the floor of a septic tank
should slope downwards towards the inlet. There are two reasons: firstly, more
sludge accumulates near the inlet, so a greater depth is desirable; secondly,
the slope assists movement of sludge towards the inlet during desludging. For a
two-compartment tank, the second compartment should have a horizontal floor and
the first compartment may slope at a gradient of 1 in 4 towards the inlet. When
calculating the tank volume, it should be assumed that the floor is horizontal
at the higher level. The effect of sloping the floor provides extra volume. The
disadvantages of providing a sloping floor are that additional depth of
excavation is required, the construction is made more complicated, and the cost
of construction is increased.
Fig. 6.24. Septic tanks showing
options for connections between compartments
Operation and maintenance
Starting up the tank
The process of anaerobic digestion of the sewage solids entering
the tank can be slow in starting and it is a good idea to "seed" a new tank with
sludge from a tank that has been operating for some time. This ensures that the
necessary microorganisms are present in the tank to allow the digestion process
to take place in a short time (McCarty, 1964).
Maintenance
Routine inspection is necessary to check whether desludging is
needed, and to ensure that there are no blockages at the inlet or outlet. A tank
needs to be desludged when the sludge and scum occupy the volume specified in
the design. A simple rule is to desludge when solids occupy between one-half and
two-thirds of the total depth between the water level and the bottom of the
tank. One of the difficulties with septic tanks is that they continue to operate
even when the tank is almost full of solids. In this situation the inflow scours
a channel through the sludge and may pass through the tank in a matter of
minutes rather than remaining in the tank for the required retention time.
The most satisfactory method of sludge removal is by vacuum
tanker. The sludge is pumped out of the tank through a flexible hose connected
to a vacuum pump, which lifts the sludge into the tanker. If the bottom layers
of sludge have cemented together they can be jetted with a water hose (which may
be fitted to the tanker lorry) or broken up with a long-handled spade before
being pumped out.
If a vacuum tanker is not available, the sludge must be bailed
out manually using buckets. This is unpleasant work which exposes the operatives
to health hazards.
Care must be taken to ensure that sludge is not spilled around
the tank during emptying. Sludge removed from a septic tank includes fresh
excrete and presents a risk of transmission of diseases of faecal origin.
Careful disposal is therefore necessary.
When a septic tank is desludged it should not be fully washed
out or disinfected. A small amount of sludge should be left in the tank to
ensure continuing rapid digestion.
Aqua-privies
An aqua-privy is a latrine set above or adjacent to a septic
tank and is useful in situations in which there is a limited water supply (Fig.
6.25). Where the latrine is above the tank, a chute drop-pipe, 100 150 mm in
diameter, hangs below the squat hole or latrine seat so that excrete drops
directly into the tank below water level. The bottom of the pipe should be 75 mm
below the liquid level in the tank, providing a seal which prevents gases
escaping into the latrine superstructure and limits the access of flies and
mosquitos to the tank. Alternatively the toilet may be fitted with a pan with a
water seal. Where the latrine is adjacent to the tank, the pan with water seal
is connected by a short pipe. Effluent from the tank goes to a soakpit, drainage
trench or sewer. There is usually only a small flow of effluent and it is
therefore very concentrated.
Fig. 6.25. Aqua-privy
Fig. 6.26. Aqua-privy with pan
flushed by waste from a washing trough
In order to keep a seal at the bottom of the drop-pipe it is
essential that the water level in the tank is maintained. If the tank is
completely watertight, a bucketful of water every day, used to clean the
latrine, is sufficient to compensate for any losses due to evaporation. However,
it has been found in practice that many tanks leak. In some places sullage is
discharged into the tank (Fig. 6.26), but even this has not proved sufficient to
ensure that the water level is above the bottom of the drop pipe at all times.
In Calcutta, aqua-privies used by people who use water for anal cleaning have a
water seal incorporated in the drop-pipe below the pan (Pacey, 1978).
The design capacity of aqua-privy tanks may be calculated by the
same procedure as for septic tanks. Regular removal of sludge and scum is
essential, so a removable cover for desludging is required. A vent pipe is
usually provided.
Disposal of effluent from septic tanks and aqua-privies
A septic tank or aqua-privy is simply a combined retention tank
and digester; apart from losses through seepage and evaporation, the outflow
from the tank equals the inflow. The effluent is anaerobic and may contain a
large number of pathogenic organisms. Although the removal of suspended solids
can be high in percentage terms, the effluent is still concentrated in absolute
terms, and the need for safe disposal of septic tank effluents cannot be too
strongly stressed.
The effluent from large tanks dealing with sewage from groups of
houses or from institutions may be treated by conventional sewage treatment
processes such as percolating filters. Effluent from septic tanks and
aqua-privies serving individual houses is normally discharged to soakpits or
drainage trenches for infiltration into the ground. The infiltration capacities
of the soil given in Table 5.4 (page 37) may be used to determine the required
wall area of both soakpits and trenches.
Unfortunately it is not possible to predict the useful life of
such disposal systems, which depend on the efficiency of the septic tank and the
soil conditions. Pools of stagnant liquid often form when both toilet wastes and
sullage are discharged to a septic tank and then to a drainage field which is
too small or is clogged. This creates a potential health risk. Overloading of
the drainage field may be avoided by allowing only toilet wastes to go to the
septic tank. Sullage can be dealt with separately with fewer health risks than a
mixture of partly treated toilet waste and sullage. Kalbermatten et al. (1980)
proposed the use of a three-compartment septic tank, where sullage is introduced
into the final compartment. It is suggested that the effluent infiltration rates
may be double those for two-compartment tanks.
Soakpits
Pits used to dispose of effluent from septic tanks are commonly
2-5 m deep with a diameter of 1.0-2.5 m. The capacity should be not less than
that of the septic tank.
Depending on the nature of the soil and the local cost of stone
and other building material, soakpits may either be lined or filled with stones
or broken bricks. Linings are generally made of bricks, blocks or masonry with
honeycomb construction or open joints (Fig. 6.27), as for the linings of pit
latrines which are described in Chapter 7. The infiltration capacity of the soil
may be increased by filling any space behind the lining with sand or gravel
(Cairncross & Feachem, 1983). Hard material such as broken rock or broken
kiln-dried bricks not less than 50 mm in diameter may be used to fill an unlined
pit (Fig. 6.28).
Whether the main part of the pit is lined or filled, the top 500
mm should have a ring of blocks, bricks or masonry with full mortar joints to
provide a firm support for the cover. The ring may be corbelled to reduce the
size of the cover. Covers are usually made of reinforced concrete and may be
buried by 200-300 mm of soil to keep out insects.
The area required for infiltration should be calculated from the
data given in Chapter 5, as illustrated in Example 8.6 in Chapter 8. Increasing
the diameter of the pit results in a disproportionate increase in the volume of
excavation and in the cost of the cover slab compared with the increase of wall
area. Therefore, if the required infiltration area is large, it may be more
economical to provide drainage trenches.
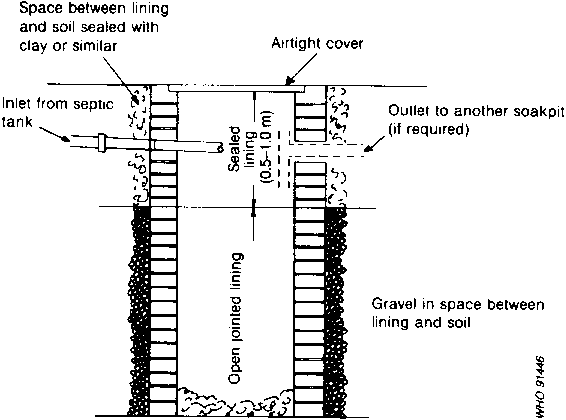
Fig. 6.27. Lined soakpit
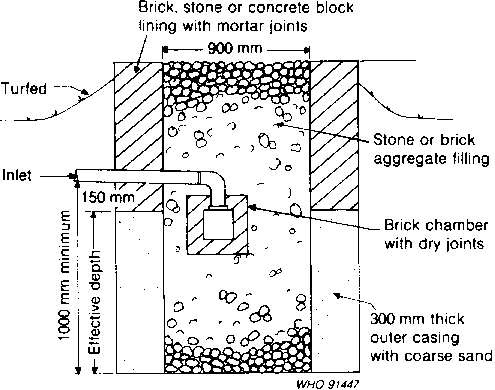
Fig. 6.28. Unlined aoakpit
Drainage trenches
The disposal of the large quantity of effluent from septic tanks
is often effected in trenches which disperse the flow over a large area,
reducing the risk of overloading at one place. The trenches make up a drainage
field. The effluent is carried in pipes which are normally 100 mm in diameter
with a gap of about 10 mm between each pipe. Unglazed stoneware pipes (tile
drains) are often used, either with plain ends or with spigot and socket joints.
The upper part of the gap between plain end pipes may be covered with strips of
tarred paper or plastic sheet to prevent entry of sand or silt. With spigot and
socket pipes, a small stone or cement fillet can be placed on each socket to
centre the adjoining spigot (Fig. 6.29).
Drainage trenches are usually dug with a width of 300- 500 mm
and a depth of 600 1000 mm below the top of the pipes. A common practice is to
lay the pipes at a gradient of 0.2-0.3% on a bed of gravel, the stones with a
diameter of 20 50 mm. Soil is returned to a depth of 300 500 mm above the
stones, with a barrier of straw or building paper to prevent soil washing down
(Fig. 6.30).
If more than one trench is needed it is recommended that the
drains be laid in series (Cotteral & Norris, 1969). Drains in series are
either full or empty, allowing the soil alongside empty drains to recover under
aerobic conditions (Fig. 6.31). If drains are laid in parallel, there is a
tendency for all trenches to contain some effluent. Trenches should be 2 m
apart, or twice the trench depth if this is greater than 1 m.
Fig. 6.29. Open pipe joint In a
drainage trench
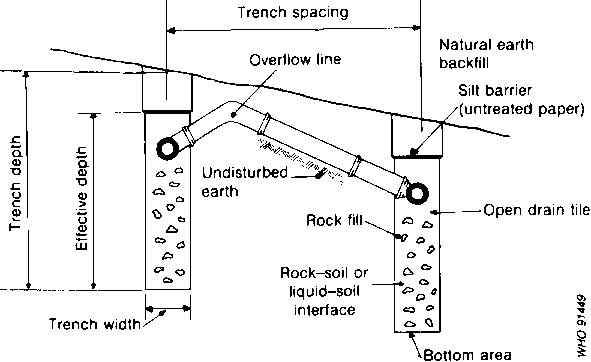
Fig. 6.30. Drainage trench
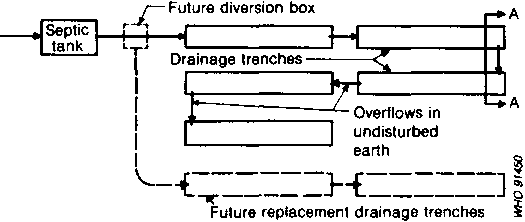
Fig. 6.31. Drainage trenches laid In
serles In a drainage field. A-A Indicates section shown In Fig. 6.30
The length of trench should be calculated by dividing the flow
of effluent by the infiltration rate, allowing for the area of both sides of the
trench, as illustrated by the examples given in Chapter 8.
Composting latrines
The value of composting excrete with dry organic matter is
discussed in Annex 1. Composting toilets are of two types: those such as
doublevault latrines, which use anaerobic bacteria, and continuous composting
latrines, which make use of aerobic bacteria.
Double-vault latrines
Each latrine consists of two chambers or vaults used alternately
(Fig. 6.32). Initially a layer of about 100 mm of absorbent organic material
such as dry earth is put in the bottom of one vault, which is then used for
defecation. After each use, the faeces are covered with wood ash or similar
material to deodorize the decomposing faeces and soak up excess moisture.
When the vault is three-quarters full, the contents are levelled
with a stick and the vault is completely filled with dry powdered earth. The
squat hole is then sealed. While the contents of the first vault are decomposing
anaerobically, the second vault is used. When the second tank is full, the first
one is emptied through a door near the bottom and the chamber is reused. The
contents may be used as a soil conditioner.
Each vault should be large enough to hold at least two years'
accumulation of wastes so that most pathogenic organisms die off before the
compost is removed. Recommended vault sizes range from 1.1 m³ (Winblad
& Kalama, 1985) to 2.23 m³ (Wagner & Lanoix, 1958).
Normally the superstructure is built over both vaults, with a
squat hole over each vault. A cover sealed with lime mortar or clay should be
fitted in the squat hole above the chamber not in use. A flyproof lid should be
placed on the other hole when it is not being used for defecation. Flyproof vent
pipes may be provided to avoid odour nuisance in the latrine, although covering
the faeces with ash is reported to be sufficient to eliminate bad smells.
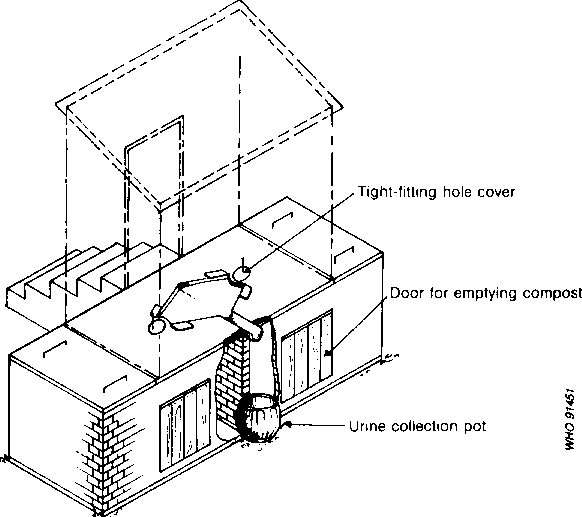
Fig. 6.32. Double-vault latrine
Control of the moisture content is vital for proper operation of
the latrine. Consequently composting latrines are not appropriate where water is
used for anal cleaning. It is usual to collect urine separately, dilute it with
3-6 parts of water and use it as a fertilizer (although this may cause a health
hazard). Some latrines are constructed with soakpits below the vaults so that
excess moisture can drain into the ground (Fig. 6.33). This allows for the
disposal of urine into the vaults but with consequent loss of a valuable
fertilizer and possible pollution of the groundwater. Wood ash, straw, sawdust,
grass cuttings, vegetable wastes and other organic material must be put into
vaults to control moisture content and improve the quality of the final compost.
Besides providing a reusable resource, the double-vault latrine
has the added advantage that it can be built anywhere. Since the vault contents
are kept dry, there is no pollution of the surrounding ground, even if the vault
is buried. In rocky areas or where the water table is high the vaults may be
built above ground. Walls and base should be watertight.
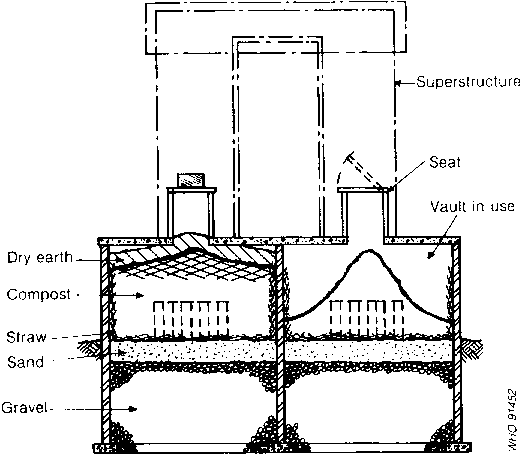
Fig. 6.33. Double-vault latrine with
soakpits
Double-vault composting latrines have been successfully used in
Viet Nam (McMichael, 1976) and Guatemala (Buren et al., 1984). When tried
elsewhere they have usually been unsatisfactory. Most of the disadvantages
revolve round the problem of controlling the moisture content. Proper operation
of the latrine is difficult to understand and considerable effort may be
required to educate local people in its use. The contents are often allowed to
become too wet, making the vault difficult to empty and malodorous.
Continuous composting toilets
These consist of watertight sloping chambers about 3 m in
length. Excreta fall into the chamber from a toilet. Dry organic kitchen and
garden waste is tipped in through a separate opening (Fig. 6.34).
Inverted U- shaped ducts and a ventilation pipe encourage the
passage of air through the mass, preventing it from becoming anaerobic and
allowing excess moisture to evaporate. As new material enters at the top of the
chamber, older material gradually moves to the bottom and then slides into a
smaller compartment from which it is removed periodically.
Such toilets have proved satisfactory in holiday homes and other
isolated buildings in industrialized countries, where they are sometimes
installed in a cellar beneath the latrine and kitchen.
Attempts have been made in Botswana and the United Republic of
Tanzania to adapt the design to suit African materials and customs (Winblad
& Kalama, 1985) using tanks made with concrete or sand and cement blocks.
They were found to be inappropriate because of their high cost and sensitivity
to user operation. Retaining the proper carbon-nitrogen balance and moisture
content is crucial to proper operation. In practice, it has been found that
moisture content is the most difficult to control. Fly and odour problems are
also common, particularly soon after commissioning.
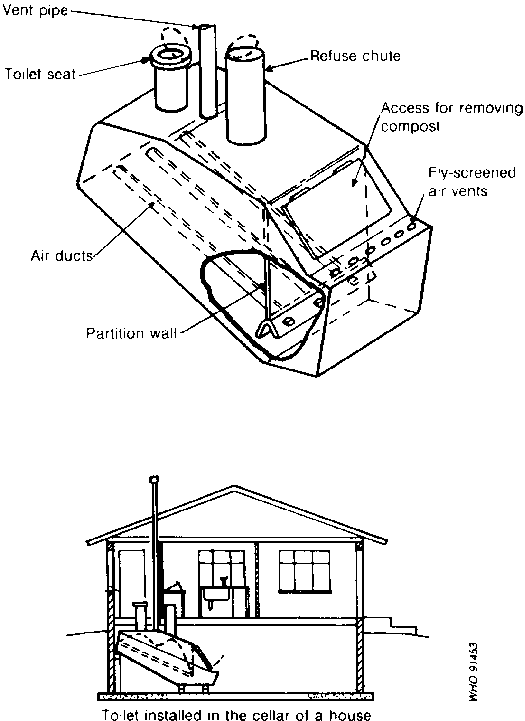
Fig. 6.34. Continuous composting
toilet
Multiple latrines
In some cultures there is a preference for separate latrines for
men and women or adults and children. There is also a need for multiple latrines
at places where large numbers of people meet, such as schools, restaurants,
offices, etc.
Latrines fitted with a water seal may be connected to a common
pit by drains (Fig. 6.35). VIP latrines may also be constructed over a common
pit but the number of toilet holes using a single vent pipe should be limited to
two. A multiple double-pit VIP latrine has been developed where each cubicle has
two holes or seats (Fig. 6.36). These holes are used alternately in the same way
as double-pit VIPs. The holes are used in such a way that the two holes which
serve a pit are in use (or not in use) at the same time. The holes not being
used are sealed. The dividing walls in the pit must extend to the full height of
the pit.
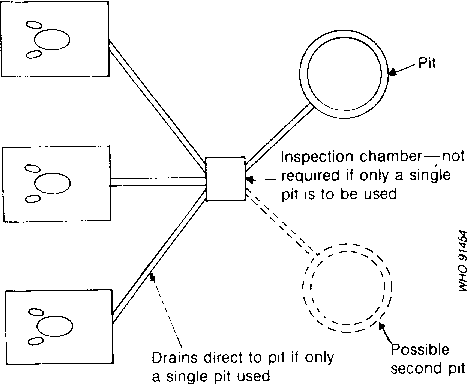
Fig. 6.35. Connecting a number of
pour-flush latrines to a common pit
Other latrines
Bucket latrines
The system in which excrete are removed from bucket latrines
(also called nightsoil latrines or earth closets) is one of the oldest forms of
organized sanitation. Bucket latrines are still found in many towns and cities
in Africa, Latin America and Asia, because their low capital cost makes them
attractive to underfunded local authorities.
In some rural and periurban areas, members of households take
nightsoil to manure heaps or apply it directly to fields as fertilizer. In towns
and cities, nightsoil is often collected by sweepers engaged by householders on
contract, or by the local authorities. Buckets are usually emptied into larger
containers near the latrine. In some places labourers carry these containers by
hand or on their heads; hand-carts, animal-drawn carts, bicycles and tricycles
are also used.
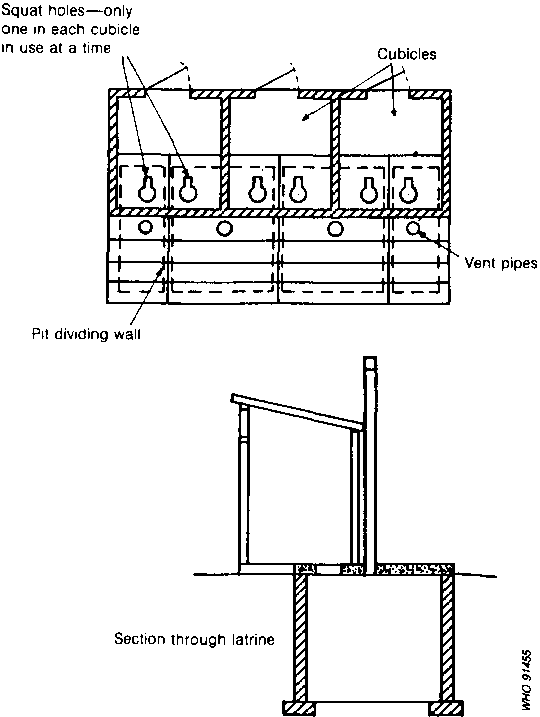
Fig. 6.36. Multiple double-pit VIP
latrine
For the reasons given in Chapter 4, nightsoil collection should
never be considered as an option for sanitation improvement programmes, and all
existing bucket latrines should be replaced as soon as possible.
The number of bucket latrines is declining rapidly. However, for
many years to come, some people will have to rely on bucket latrines as their
only form of sanitation. The following paragraphs give suggestions for
improvements to existing systems until they can be replaced by more acceptable
forms of sanitation.
Good operation
A container made of non-corrosive material is placed beneath a
squatting slab or seat in the bucket chamber, with rear doors which should be
kept shut except during removal and replacement of the bucket.
The bucket chamber should be cleaned whenever the bucket is
removed. The squat hole should be covered by a flyproof cover when not in use.
The cover of the seat should be hinged (Fig. 6.37) and the cover of the
squatting slab should have a long handle.
At regular intervals (preferably each night) the container
should be removed and replaced by a clean one. Full containers should be taken
to depots or transfer stations where they are emptied, washed and disinfected
with a phenol or cresol type of disinfectant. In some towns it is the practice
to provide two buckets painted in different colours for each latrine. Containers
should be kept covered with tight-fitting lids while in transit and the
operators should be provided with full protective clothing. Proper supervision
and management are essential. Defective buckets should be repaired or replaced
and transport vehicles should be kept in good order.
In some systems, urine is diverted away from the buckets to
reduce the volume to be dealt with. It is usually channelled to soakpits, but
may be collected separately and used directly as fertilizer. Water used for
washing latrines and bucket-chambers should pass to soakpits, and should not be
allowed to pollute the ground around the latrines.
Disposal methods
The practice of dumping nightsoil indiscriminately into streams
or on open land is objectionable and causes health hazards.

Fig. 6.37. Bucket latrine
Sewers
Bucket latrines are sometimes found in towns that are partially
provided with sewers, in which case it may be convenient to discharge the
nightsoil into a main sewer. Tipping points on sewers require careful design to
prevent contamination of surrounding areas and should be as near to the sewage
works as possible. Extra water may have to be added to prevent blockage of the
sewers.
Sewage treatment works
Nightsoil may be discharged into the sewage flow at the works
inlet, at sedimentation or aeration tanks, or directly to waste stabilization
ponds or sludge digestion tanks.
Trenching
Trenches about 1 m deep and I m wide may be filled with
nightsoil to within not less than 300 mm of the top. The trench is then
backfilled with excavated soil, which should be well compacted to prevent the
emergence of flies or the excrete being dug up by animals (Fig. 6.38). At the
end of each day any exposed excrete must be covered with at least 200 mm of
soil, well compacted. After backfilling, the trench should remain untouched for
at least two years, after which it can be reexcavated for reuse and the contents
used as fertilizer. The trenching site should be close to the collection area
but away from residential areas. It should have deep and porous soil, be well
above the water table, and not be subject to flooding.
Reuse
Nightsoil can be used as a fertilizer after all pathogens have
been destroyed. It may also be added to ponds for fish cultivation (see Annex
1).
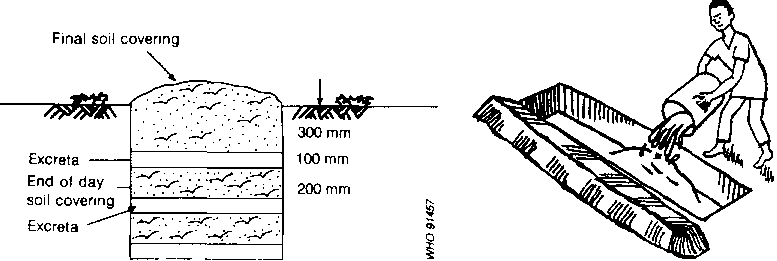
Fig. 6.38. Disposing of excrete from
bucket latrines by trenching
Vault latrines
Vault latrines are a way of overcoming the problem of frequent
emptying needed with bucket latrine systems. A watertight tank or vault below or
close to a latrine is used to collect faeces, urine and sometimes sullage. The
capacity of the vault is often sufficient for 2-3 weeks' accumulation of
excrete, after which time the vault is emptied. The system is satisfactory if
collection is reliable and hygienic, and the vaults are properly flyproofed,
vented and fitted with water-seal toilets.
In some places, the contents of vaults are bailed out by hand
and taken away in tanks mounted on carts. This is highly undesirable. Trials
with manually operated pumps to empty vault contents have not been very
successful because with a low pumping rate (about 400 litres per hour) complete
evacuation of the vault is a long and tedious operation. This method is
obviously also undesirable.
Motorized vacuum tankers can provide safe removal but must be
backed up by good institutional support for operation and maintenance. Most
vacuum tankers cannot lift vault contents if the proportion of solids exceeds
about 12%, but some have facilities for adding water to vaults before lifting
the contents.
Sufficient extra space to allow for irregularities in collection
time should be planned for in designing vault capacity. In communities where
finance, spare parts and good maintenance are available, the additional space
needed may be only 15-20%. However, where vehicle maintenance is poor, an
allowance of 50% may be advisable.
The performance of vaults has been mixed, mainly dependent on
the levels of finance and vehicle maintenance. Poorly constructed vaults are
common, leading to problems with odour and flies, ground pollution and
thickening of the vault contents. It is not recommended that new vault latrines
be constructed.
Cesspits
Cesspits, like vaults, are watertight tanks with sealed covers
(to keep out mosquitos). They differ from vaults in that they are usually
located outside the premises and collect sullage as well as the wastes from
water closets. The capacity may be sufficient for up to several months' use
(Fig. 6.39). The cost of providing a regular removal service for all the
wastewater from a house with a good supply of piped water can be very high,
making cesspits an expensive form of sanitation.
Chemical toilets
Modern chemical toilets are normally of the following types:
· a cylindrical
bucket fitted with a plastic seat and lid; the capacity is usually 20-30 litres;
after the bucket has been emptied and cleaned, about 50 mm depth of fluid is put
in;
Fig. 6.39. Cesspit
Fig. 6.40. Manually flushed chemical
toilet
· two tanks: the
flushing-liquid reservoir contains a mixture of fresh water and a deodorizing
chemical which is pumped manually to the rim of the pan; discharge is to the
waste-storage tank (Fig. 6.40);
· a single tank in which a
flushing pan is fitted; a manual or electrically operated pump recirculates oil,
drawing it from the base of the tank through a filter and discharging it around
the rim of the pan; the pan has a counter-balanced flap so that the contents
cannot be seen (Fig. 6.41).
Fig. 6.41. Recirculating oil toilet
The fluid is normally a chemical diluted with water which
renders excrete harmless and odourless. When containers are full, the contents
are tipped into pits or sewers, or pumped into storage tanks.
Chemical toilets are used in aircraft, long-distance coaches,
caravans, vacation homes and construction sites. The chemical is expensive.
Overhung latrines
An overhung latrine consists of a superstructure and floor built
over water (Fig. 6.42). A squat hole in the floor allows excrete to fall into
the water. A chute is sometimes provided from the floor to the water. Overhung
latrines should never be built in places where pit latrines can be provided.
However, they may be the only possible form of sanitation for people living on
land that is continuously or seasonally covered with water.
Wagner & Lanoix (1958) suggested that such latrines might be
acceptable provided the following conditions are met.
· The receiving
water is of sufficient salinity all year round to prevent human consumption.
· The latrine is installed over
water that is sufficiently deep to ensure that the bed is never exposed during
low tide or the dry season.
· Every effort is made to select
a site from where floating solids will be carried away from the village.
· The walkways, piers, squatting
openings, and superstructures are made structurally safe for adults and
children.
· The excrete are not deposited
in still water or into water that will be used for recreation.
Fig. 6.42. Overhung
latrine
Chapter 7 - Components and construction of latrines
Pits
Latrine floors
Slabs
Footrests and
squat holes
Seats for latrines
Water seals and pans
Vent
pipes
Superstructure
Many components of sanitation systems are common to different
types of latrines. In this chapter, the technical details of the following
components are considered:
- pits and pit linings;
- latrine floors, which
may be cast directly on the ground where the pit or vault is offset;
- slabs,
supported over direct or offset pits;
- footrests and squat holes;
-
seats;
- water seals, pans, pipes and junction chambers;
- vent
pipes;
- superstructures.
Pits
Excavation
Most pit latrines provide sanitation for a single household,
usually necessitating a pit about 1 m across and 3 m or more in depth (although
much larger pits are common in some areas), or two shallow pits of up to 1.5 m
in depth. The pit may be circular, square or rectangular in plan. Circular pits
are more stable because of the natural arching effect of the ground around the
hole, with no sharp corners to concentrate the stresses (Fig. 7. 1). However,
people often find that square or rectangular pits are easier to dig. The depth
of the pits often follows local traditions. It is usually advantageous to dig
the pit as deep as possible, but this depends on soil conditions, cost of lining
and the level of the groundwater.
Pit linings
The need for a pit lining depends upon the type of latrine under
construction and the condition of the soil. In septic tanks and aqua privies,
for example, which require watertight compartments, the pit is always lined.
However, in pit latrines it is only necessary to have a lining if the soil is
likely to collapse during the life span of the latrine. It is not easy to decide
in advance whether a soil will be self supporting. If other excavations in the
locality (such as shallow wells) have proved to be self-supporting over a number
of years, then it is probably safe to assume that a pit for a latrine can be dug
without support. Granular soils such as sands and gravels normally require
support. Cohesive soils, such as silts and clays, and soils with a high
proportion of iron oxides, such as laterites, are often self-supporting.
However, silts and clays may lose their self-supporting properties when wet,
particularly where there is a varying water table.
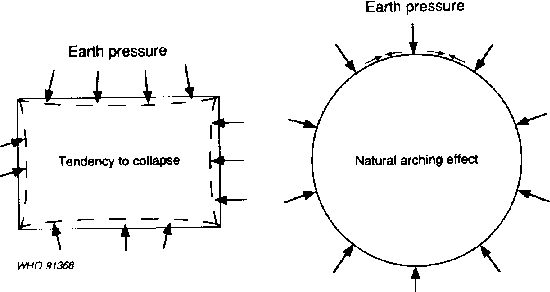
Fig. 7.1. Strength of pit shapes
If there is any doubt about the conditions it is better to
assume that the soil is not self-supporting. Increasingly it is recommended that
all pits should be lined, especially where the design life is over five years.
Failure of an unlined deep pit can be extremely hazardous for the person
excavating it. If the failure occurs some years later it can be expensive for
the owner and disturbing for the users. In all cases the top 300 500 mm should
be lined and sealed to support the slab (and where necessary the superstructure)
and to prevent contamination of the surface and entry of vermin.
The lining may be of any material that supports the soil and
that will last as long as the design life of the pit. Commonly, materials such
as fired bricks, concrete blocks, concrete, ferrocement and local stone are
used, but stabilized soil blocks, old oil drums (though with a limited life in
corrosive groundwater) and unglazed fired clay pipes have also been successful.
Quarried stone, where available cheaply, makes a satisfactory
lining. The more regular blocks should be used for the top 500 mm with mortar
joints. Less-regular stone can be used for the remainder of the lining without
mortar in the vertical joints. The builders or masons must be skilled and
experienced if the lining is to last a reasonable length of time. Where local
stone is used, its durability must be confirmed. Some stone will deteriorate
when exposed to air or water or to frequent changes between wet and dry
conditions.
The use of timber or bamboo is not generally recommended, since
they are subject to insect and fungal attack and often have a limited life. Some
hard woods can be satisfactory provided they are treated with tar, creosote or
other preservative to lengthen their life. Care must be taken to ensure that
none of the preservatives leach into the groundwater as even low levels of some
preservatives can be toxic (WHO, 1984). Woven cane and bamboo have been used for
the lower part of a lining with stronger materials used for the top 500 mm.
However, unless the pits are designed to have an extremely short life, cane and
bamboo should be avoided.
Construction
Shallow pits
In almost all cases, pits of up to 1.5 m in depth can be
excavated to their full depth and then lined from the bottom up. If the soil is
very loose, the sides of the excavation may have to be sloped to prevent
collapse. The space between the lining and the soil can then be backfilled,
preferably with a granular material such as sand or gravel. Granular materials
are used because they fill the space between the soil and the lining without
leaving large voids. They also act as a filter to prevent soil particles being
washed into the pit. Voids behind the lining produce locally increased loads on
the lining which may cause collapse.
It is usual to provide a foundation for the lining similar to
that provided for a domestic house. In most soils, a foundation width equal to
twice the wall thickness is usually sufficient (Fig. 7.2). In very soft ground
it may be necessary to construct wider foundations to prevent the weight of the
lining itself forcing it into the soil (Fig. 7.3). Where the superstructure load
is not directly applied to the lining, a widened foundation may not be required
since the load applied to the ground at the base of the lining is small and
considerable skin friction builds up between the sides of the lining and the
ground.
Soakpits or leaching pits require a porous lining to allow the
wastewater to escape into the ground. The method of achieving this depends upon
the lining material used. With bricks, blocks or local stone, a proportion of
the vertical joints are left unmortared. These unmortared joints may be confined
to specific courses (e.g., every third or fourth course) rather than being
spread throughout the lining. This enables the fully mortared courses to carry
the load exerted by the soil on the lining. Where the ground is relatively
strong, a more open, honeycomb technique is used, with only small dabs of mortar
joining the masonry. Alternatively, specially manufactured bricks with angled
ends to suit round pits and a central opening to allow for infiltration may be
used (D. J. T. Webb, personal communication).
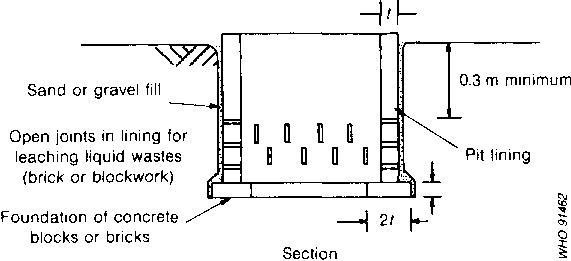
Fig. 7.2. Lining for a shallow pit in
firm ground
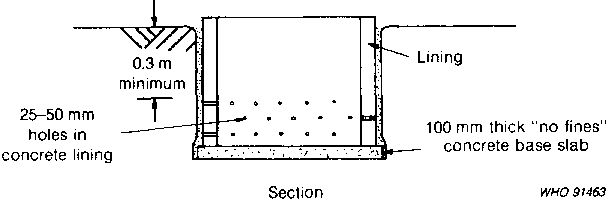
Fig. 7.3. Lining for a shallow pit in
soft ground
Concrete, ferrocement and fired clay ring linings are made
porous by creating holes of 25-50 mm in diameter through the lining.
Alternatively, the ring joints are held open by small stones or bricks.
Additionally, concrete linings may be made of "no fines" concrete, that is,
concrete without any fine aggregate (sand). A mix of one part of cement to four
parts of clean gravel (with stones of 6-18 mm in diameter) is suitable. Where
precast rings are used, the upper and lower 100 mm of the ring should be made of
conventional concrete for extra strength.
Deep pits
The method of excavating deep pits depends upon the stability of
the soil during the construction period. In soils that are self-supporting, the
pit may be dug to its full depth and the lining installed afterwards. If the
ground is not self-supporting, the lining must be constructed as the pit is dug.
Where a lining is not required for support during excavation,
the pit is dug to the full depth, making allowance for the thickness of the
lining to be installed subsequently. Accurate dimensions are maintained by using
a plumb bob to ensure verticality and a template, either circular or rectangular
to retain the horizontal dimensions. Ensuring correct dimensions minimizes the
costs of lining and backfilling. Sometimes the soil near the surface is
weathered and likely to collapse. In that case, the top metre of soil may be
supported with a temporary lining (Fig. 7.4). If the finished lining is to be of
precast concrete rings, then the top metre of soil will have to be excavated to
a larger diameter so that the rings can pass inside the temporary lining.
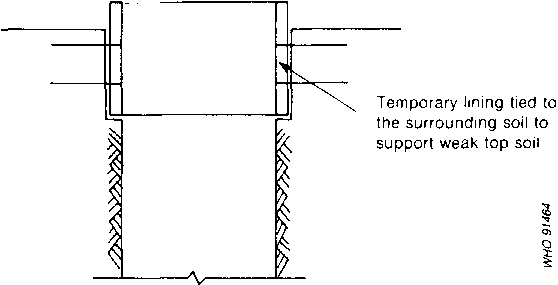
Fig. 7.4. Excavation for a pit to be
lined with precast concrete rings
When the hole has been excavated to the design depth, the bottom
is levelled and cleaned. In firm ground, a foundation can be constructed by
cutting a groove into the walls of the pit and building a ring beam. In
exceptionally soft ground, where the lining is likely to sink into the floor of
the pit, the ring beam foundation can be replaced by a floor slab of "no fines"
concrete, 75-100 mm in thickness, covering the whole base of the pit. This will
distribute the weight of the lining over a larger area of the pit base, thus
reducing the load per unit area and preventing upwards heave of the soil (see
Fig. 7.3).
Construction of linings
Precast rings
The use of precast concrete (Fig. 7.5) or fired clay rings for
the lining of pits has the advantage that the lining can be prepared before
excavation begins. This is particularly useful in weaker soils because it
reduces the time the soil remains unsupported. The rings to be placed at the
bottom of the hole may be porous, designed to allow the liquid wastes to seep
into the surrounding soils or they may be sealed to create a wet tank, designed
to increase the rate of sludge digestion. The ring nearest to the surface should
be fully sealed to prevent entry of surface water and rodents and also
contamination of the soil. As with shallow pits, any space between the back of
the rings and the soil should be filled with sand or gravel.
Brick, blockwork and stone lining
These are built in a similar way to precast concrete linings,
i.e., by building up from the foundations. With very deep pits it may be wise to
allow time for the cement mortar to gain strength before filling any space
behind the lining, to prevent the weight of the fill from deforming the lining.
Except for the top 300-500 mm, the joints are left open as described above to
ensure infiltration of liquid to the soil.
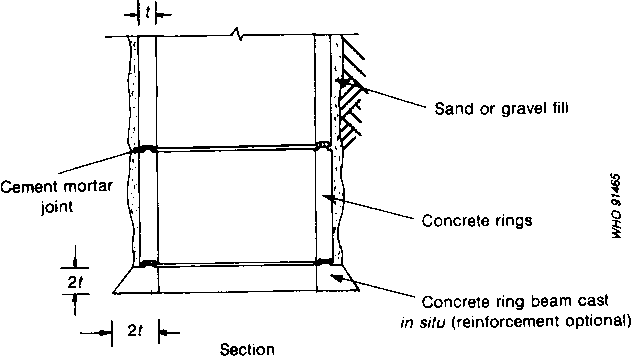
Fig. 7.5. Pit bottom lined with
precast concrete rings
In situ concrete lining
In this method the hole is lined with concrete cast in the hole
(Fig. 7.6). After excavation, shuttering is positioned to a convenient height
allowing for compaction, and the space between is filled with concrete. Normally
the concrete does not require steel reinforcement for structural strength.
However, a small amount of steel may reduce shrinkage cracking. The lining can
be made porous by leaving small holes in the concrete (short lengths of 25-SO mm
of pipe fitted between the shuttering and the soil will be satisfactory).
Alternatively "no fines" concrete can be used.

Fig. 7.6. Pit with concrete lining
in situ
Ferrocement lining
When mortar is plastered over layers of fine wire mesh (such as
chicken wire) the resulting material is called ferrocement. It is strong, light,
requires no shuttering and is easy to construct. It is now widely used for such
structures as water tanks and latrine slabs and can be adapted for use as a pit
lining.
In some countries the term ferrocement refers to any
cement-based material reinforced with steel. Specifically it now describes a
material consisting of several layers of small-diameter steel mesh (usually
hexagonal chicken wire, with wire of 0.7-1.3 mm in diameter and openings of 12
mm). The layers are tied together with fine wire at 150-mm intervals and then
plastered with a rich cement mortar (one volume of cement to two volumes of
sand) to give a finished thickness of about 25 mm.
After excavating the hole, as much loose material as possible is
removed from the pit walls. Cement mortar is applied directly to the walls of
the pit to give a layer approximately 12 mm thick. This layer is then covered
with two or three thicknesses of steel mesh, held in place with long staples
driven through the mortar into the soil. A second coat of mortar is then applied
and pushed firmly into the holes in the wire mesh. On completion, the mortar
covering the mesh should be at least 10 mm thick. Where a porous lining is
required, holes can be punched through the mortar while it is still weak.
Ferrocement rings may also be precast on the surface and used in
the same way as concrete rings.
Excavation in loose ground
Where the ground is very loose and liable to collapse if left
unsupported, or where the excavation enters the water table, the most common
method of construction is to prefabricate the lining on the surface, place it in
a starter excavation, dig out the soil below and allow the lining to sink as the
hole is dug. This method is called "caissoning" (Fig. 7.7).
A hole is excavated as deep as possible (experience of the local
ground conditions will determine the depth). A precast concrete ring fitted with
a cutting edge is then placed in the hole. Additional rings are placed on top
until ground level is reached. Excavation now begins inside the rings. As the
ground is dug away from under the cutting edge, the rings start to sink under
their own weight. Additional rings are then placed on top until the required
depth is reached.
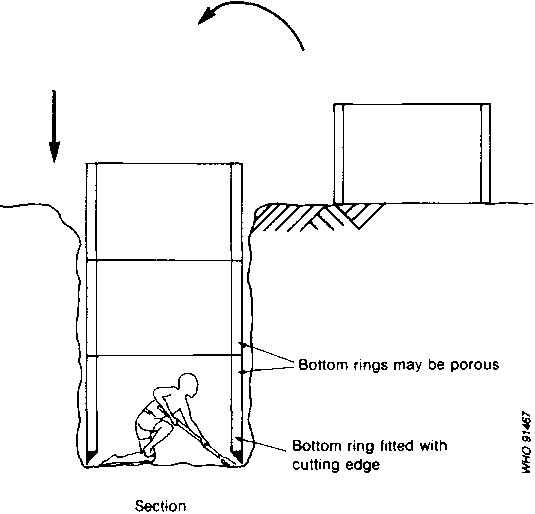
Fig. 7.7. "Caissoning" a pit
This method may also be used for linings of bricks or blocks.
However, the lining must be constructed sufficiently far above the ground to
ensure that the mortar has fully set before the lining enters the ground. The
honeycomb method of construction cannot normally be expected to have sufficient
strength to be sunk as a caisson.
Where caissoning is employed because of a high groundwater
table, excavation should take place towards the end of the dry season when the
water table is at its lowest. As the lower ring enters the water it is possible
to continue excavation for up to one metre by scooping material in a bucket or
with a specially shaped shovel.
Backfilling
Any space around the outside of the lining should be backfilled
with compacted earth taken from the pit or, where available, with sand and
gravel. If the ground is particularly weak, the top of the pit may be backfilled
with weak concrete or a soil-cement mixture to give additional strength.
Strengthening may be important if the top of the pit has become overly enlarged
during excavation.
Latrine floors
Floors of latrines, whether laid on the ground or supported over
a pit, should be smooth and impervious so that they may be cleaned easily and
have a satisfactory appearance to users. The upper surface should be at least
150 mm above the surrounding ground level (Fig. 7.8) to prevent rain and surface
water entering the latrine.
The floor surface should slope gently to facilitate cleaning and
to prevent surplus wash water from collecting in puddles. The slope is normally
from the outer edge of the floor towards the squat hole or pan at the centre, so
that the water used for cleaning flows into the pit and does not foul the area
surrounding the slab. A fall of about 20 mm between the edge and the centre of a
slab up to 1.5 m across is sufficient to prevent pools of liquid forming (Fig.
7.8). Where seats are used, the floor should slope away from the seat support so
that any wash water flows towards the latrine entrance.
If a precast slab is smaller than the inside floor area of the
superstructure, an impervious surface is normally provided to seal the area
between the slab and the inside wall of the building. Any area around the slab
which is left as bare earth could be fouled, thus becoming a possible site for
hookworm infestation. However, in order to minimize costs, the space around the
squatting area inside the superstructure should be limited. This reduces
building costs for the superstructure as well as flooring materials. But the
squat hole or pan should not be so close to the superstructure that users are
forced to lean against the wall when they are trying to defecate. A minimum
floor space of 80 cm in width and I m from front to back is normally acceptable
(Mare, 1985b).
Slabs
Requirements
A latrine slab serves two main purposes, as a support and as a
seal. It has to support the weight of the person using the latrine and,
possibly, the weight of the superstructure. It also seals the pit, with the
exception of the squat hole and, where required, the vent-pipe hole. This
facilitates control of flies and smells and reduces the likelihood of rodents
and surface water entering the pit. Where the slab has been made in sections
(for ease of placing and emptying) or has a removable cover, the joints should
be sealed with a weak mortar such as a lime or mud mortar.
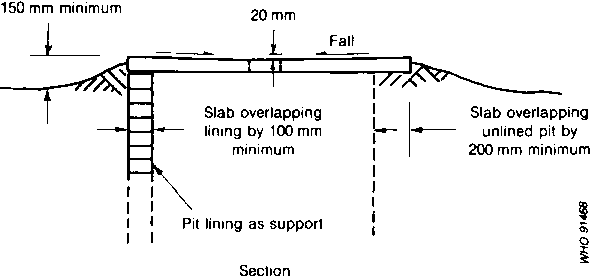
Fig. 7.8. Requirements of slabs
To support the weight of a person over a latrine pit the
suspended slab has to act structurally in the manner of a bridge. Where seats
are provided, the extra weight has to be allowed for when designing the slab.
Depending on the design of the slab, the materials may have to be able to resist
forces in tension as well as in compression (Fig. 7.9). The materials needed to
carry the tensile forces are often more expensive than those commonly used in
low-cost buildings. The slab is often the most expensive individual component
that has to be paid for by the user. It is therefore important to ensure that it
is carefully designed to serve its purpose with a minimum of costly material.
The slab normally rests on a foundation or on the top of the pit
lining (see Fig. 7.8). This ensures that the weight of the slab and the weight
of the person using it are spread evenly on the soil. Particular care must be
taken where the slab also has to carry part of the weight of the superstructure.
If the ground is weak, the foundation prevents subsidence or collapse of the
ground underneath the load. Any gaps between the slab and the pit lining should
be sealed with earth or a weak mortar to prevent ingress of water. This seal
also prevents small animals and insects getting into and out of the pit.
Where a pit is excavated to a larger diameter than planned,
precast slabs are occasionally supported on timber poles. This practice is not
advisable as the heavy load on the poles is likely to lead to early failure.
However, small slabs (approximately 500 mm square), designed to provide a
hygienic squat hole for existing latrines at minimum cost, will not overload a
timber support (Fig. 7.10).
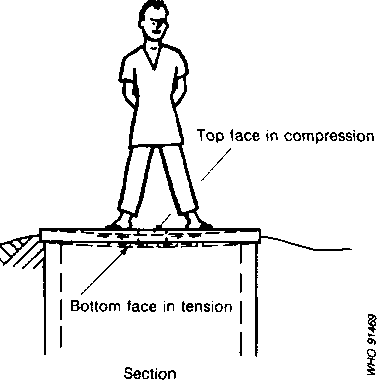
Fig. 7.9. Tension and compression
forces in a slab
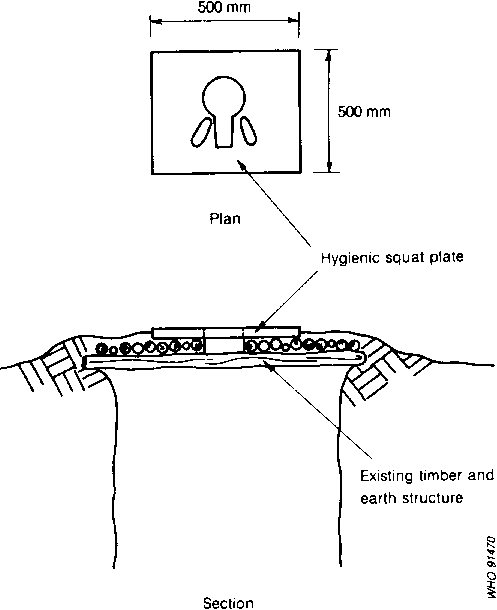
Fig. 7.10. Small slabs for upgrading
timber and earth structures
The latrine slab should feel secure and should not deflect
noticeably under the weight of a person using the latrine. It needs to be as
clean and attractive as possible so that people feel comfortable using the
latrine. There is then much less chance of the latrine being misused or fouled.
Offset pits used with pour-flush latrines require a cover slab
to prevent entry of flies and rodents and to ensure safety, particularly of
children. With the omission of a squat hole, the structural requirements are the
same as for a latrine slab.
Shapes of direct pit slabs
The shape and size of the pit are the first factors to be
considered when designing a supported slab. Latrine pits can be round, square or
rectangular and it is usual to find that a particular shape becomes the accepted
design for a particular area.
Borehole latrines have a small span and therefore require very
simple slabs. The shape will depend on the users' needs for a clean hygienic
area with correctly spaced footrests, rather than being controlled by the size
of the hole to be covered. Larger, hand-dug pits 1-1.5 m in width require a
shape designed to span and seal the pit. An exception to this is where the span
of the slab is reduced by corbelling the top of the lining (Fig. 7. 11). This
decreases the amount of material required in the slab and thus reduces the cost.
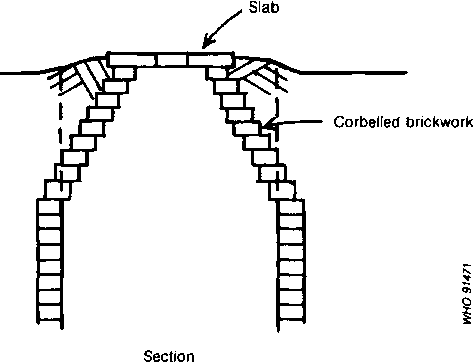
Fig. 7.11. Minimizing the span of the
slab
Slabs may be precast or constructed in situ, which means that
the slabs are built over the pit, exactly where they are to be used. In a large
agency-assisted programme, slabs are often manufactured at a convenient
construction site away from the latrines and then brought to the site and laid
across the pits. Where slabs are to be moved, weight and shape are both
significant factors.
The shape of the slab is also determined by the type of latrine.
Water-seal latrines, aqua-privies, ventilated pits and pits sealed with hole
covers all have different requirements. For example, the need for an extra hole
close to the edge of the slab for a vent pipe makes the unreinforced dome slab
unsuitable for ventilated latrines.
The slab normally overlaps the supporting pit lining or
foundation by at least 100 mm on all sides to ensure that the load is adequately
transferred. This overlap may have to be extended to 200 mm where the pit is
unlined and the slab is resting directly on the soil (see Fig. 7.8).
Cement-based slabs and components
In most countries, concrete or cement-based slabs provide the
most durable and economic method of covering latrine pits. There are many
different ways of using cement. Its ability to bind with other materials and
provide a clean watertight surface make it the obvious choice for the majority
of programmes.
Concrete is a mixture of cement, sand, gravel and water. When
set, it forms a hard dense material which is extremely strong in compression but
weak in tension. Cast as a simple flat slab across a pit, its own weight and the
weight of any person on it forces the concrete to deflect downwards in the
centre. As the load increases, small tension cracks form on the underside of the
beam. With heavy loads, these cracks may extend upwards through the concrete
until the slab breaks. To prevent this happening, steel bars or other
reinforcement may be placed in the concrete on the lower side of the slab to
carry the tension load and prevent the cracks spreading.
Unreinforced concrete
Small slabs, such as those required for borehole latrines or to
provide a hygienic platform for the squatting area of timber-supported slabs
(see Fig. 7.10), do not need any reinforcement. Where an unreinforced span of
greater than 0.5 m is required, the slab should be cast in the form of a "flat"
arch. The weight of the load is then directed through the arch to the supporting
area on the ground. The underside of the concrete remains in compression and no
reinforcement is required. Using this principle, a shallow circular dome or arch
can be constructed to cover a latrine pit. The dome is strong enough to support
itself and the people using it without any expensive steel reinforcement. A slab
using this principle has been developed by a team in Mozambique (Fig. 7.12) and
has proved to be economical and popular. The slabs are about 40 mm thick and
rise 100 mm in the centre to give the arch effect (International Development
Research Centre, 1983).
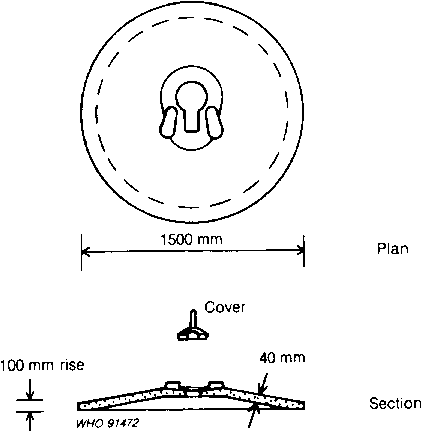
Fig. 7.12. Dimensions of domed slab
without reinforcement
Although such domed slabs fall away from the centre, a small
inward slope about 100 mm wide immediately around the squat hole is incorporated
to direct any waste into the pit. These slabs have been used most effectively in
areas with sandy soil which quickly absorbs any surplus wash water.
The concrete slab is given the shape of a dome by mounding up
earth to the required profile of the underside of the slab. The earth is
compacted and smoothed. It may then be covered with plastic sheeting or old
cement bags, or coated in old engine oil to break any bond between the earth and
the fresh concrete. A circular iron strip made from an oil drum is used as the
edge former or mould. The concrete around the centre hole is made slightly
thinner so that a slope towards the hole can be made. Each slab has to be
allowed to harden undisturbed for several days after casting.
To save space in the casting yard, up to five slabs may be cast
on top of each other, using a lower, previously cast slab as a former for the
next slab. Particular attention has to be given to the concrete mix of a thin
unreinforced slab. A maximum aggregate size of 10 mm and slightly more cement
than usual is required. The recommended mix is one part by volume of cement to
two parts of sand and one and a half parts of 6-10 mm aggregate.
An unreinforced slab may also be produced in a rectangular mould
with a flat upper surface and a dome on the underside (Fig. 7. 13). As an
unreinforced dome slab cannot accept a second hole close to one edge for a vent
pipe, flies, smells and cockroaches are prevented from leaving the pit by
providing a tight-fitting cover over the squat hole. This is cast directly in
the squat hole so that it fits exactly. A layer of cement bag paper may be used
to prevent the fresh concrete sticking to the old.

Fig. 7.13. Semi-domed slab
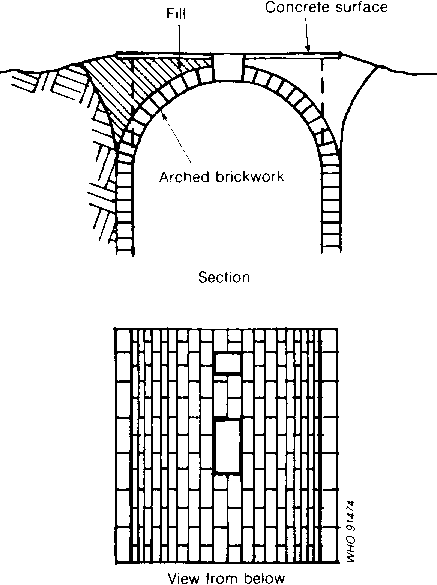
Fig. 7.14. Arched brickwork lining
and support
Bricks can be used to form an unreinforced arch across a
rectangular pit (Fig. 7. 14) using a rough framework of bamboo, reeds or forest
poles which is left in the pit. The space above the arch is levelled with river
sand and topped with a 20-mm cement-sand screed sloping towards the centre. This
technique requires very little cement and no steel. However, these structures
have to be built by skilled masons and there is no opportunity for precasting.
Emptying of the pit can only be carried out through the squat hole.
Reinforced concrete
Because of the weakness of concrete in tension it is often
reinforced with other materials. Most commonly it is strengthened by the
inclusion of steel bars. Details of the reinforcing steel required for common
sizes of slab are shown in Table 7.1. Mild steel bars, 6 mm in diameter spaced
at intervals of 150 mm, or 8 mm in diameter spaced at intervals of 250 mm in
each direction, are normally sufficient for 80-mm thick slabs of up to 1.5 m in
span. This span distance is measured at the point of minimum span, that is, the
shortest distance between two points which fully support the slab. Where used
correctly, reinforcement in a concrete slab will support at least six adults on
a 1.5-m span slab. For the small spans illustrated, extra steel is not required
for trimming around the pit opening.
Table 7.1. Spacing of steel reinforcement bars for concrete
slabs a
|
Slab |
Steel bar |
Spacing of steel bars (mm) for minimum slab span of:
|
|
thickness |
diameter |
|
|
|
|
|
|
(mm) |
(mm) |
1 m |
1.25 m |
1.5 m |
1.75 m |
2 m |
|
65 |
6 |
150 |
150 |
125 |
75 |
50 |
|
8 |
250 |
250 |
200 |
150 |
125 |
|
80 |
6 |
150 |
150 |
150 |
125 |
75 |
|
8 |
250 |
250 |
250 |
200 |
150 |
a The steel bars should be fixed on the
lower side of the slab, with 12-mm cover or thickness of concrete beneath each
bar. Steel to be laid at above spacings in both directions. Size and spacing of
steel calculated for grade 20 concrete and mild steel reinforcement, with
characteristic yield stress of 210 N/mm², or high-yield mesh, yield stress
485 N/mm².
The reinforcing steel is laid in both directions, that is, with
one layer of bars perpendicular to the second layer (Fig. 7.15). Where the slab
is rectangular, the bars parallel to the direction of the minimum span should be
beneath the bars in the direction of the longer span. For the bars specified, a
characteristic yield strength for the steel of 210 N/mm² is assumed. Care
is required to ensure that the steel is of the required quality.
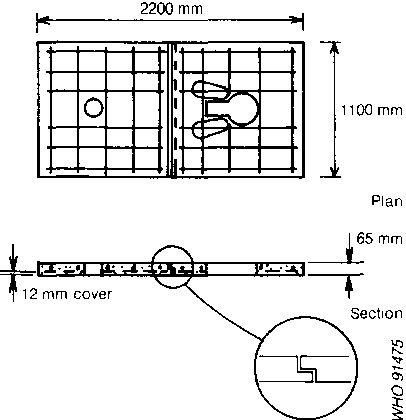
Fig. 7.15. Reinforced concrete
rectangular slab (for details of reinforcement see Table 7.1)
When individual bars are used, some may be omitted by mistake.
One way of avoiding this is to use steel mesh, which consists of smaller
diameter bars welded together. This can be cut to the required shape but there
is likely to be wastage of the off-cuts that have to be discarded. A mesh with
7-mm bars at 200-mm centres, with a cross-sectional steel area of 193 mm²/m
(yield stress 485 N/mm²) is normally sufficient.
Care must be taken when reinforcing concrete with steel to
ensure that the steel is completely surrounded by the concrete. There should be
at least 12 mm of concrete under the steel bars and at the ends of all bars.
This protects the steel from the corrosive effect of gases and moisture in the
pit. When concrete is placed in a mould or former it has to be compacted by
manual or mechanical vibration to remove any air bubbles and to ensure the
durability of the completed slab. Simple wooden or steel moulds can be reused
many times to give the required shape to the wet concrete if they are coated
with a suitable release agent. There are many proprietary agents, but used
engine oil painted on to the mould effectively prevents the concrete from
sticking. Alternatively, plastic sheeting or empty cement bags may be used to
prevent bonding. These materials may also be used between the ground and the
underside of the slab. The squat hole is formed using a shaped wooden mould with
a bevelled edge. A vent pipe opening may be created with an offcut of plastic
pipe which is removed a few hours after casting so that it can be reused many
times.
An alternative way of using steel for reinforcement is to
precast a ferrocement slab. The method of construction is described under
construction of linings, p. 89. A flat ferrocement slab is strong enough to
carry the imposed load but is too flexible for the users' comfort. In order to
ensure adequate stiffness, the ferrocement may be shaped as a dome or may be
cast with ribs on the soffit (Fig. 7.16). Four layers of mesh are normally
required for a slab with a I am span. It is necessary to ensure that the cement
mortar has been adequately pressed through all the layers of wire mesh and
compacted to a dense material if it is to have adequate strength.
Steel reinforcement is used in various ways in different
countries reflecting differences in price and availability. Because of the
relatively high cost of steel, many techniques have been investigated in the
search for cheaper alternatives. One approach is to reinforce concrete with
small unconnected fibres with a low modulus of elasticity. These are either
natural fibres, such as sisal, jute, coir, Manila hemp or kenaf, or man-made
fibres such as fibrillated polypropylene. The fibres are chopped and added to
the cement mix. Use of these low-modulus fibres does not reinforce the concrete
in the conventional sense of carrying the tensile load, but is particularly
beneficial in ensuring adequate curing of the concrete without the formation of
minute shrinkage cracks (Parry, 1985). The resultant "unreinforced" concrete
attains a much higher tensile strength than would otherwise be possible. Slabs
made from fibre-reinforced cement should normally be given the shape of an arch
or dome to minimize tensile forces in the soffit.
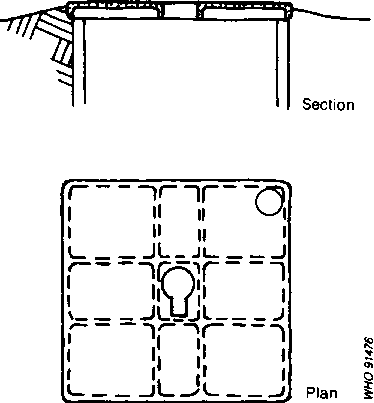
Fig. 7.16. Ferrocement slab
Slabs have also been reinforced with barbed wire, fencing wire,
scrap steel from cars and broken machinery, redundant universal beams and almost
anything that is available. Although a saving is made on reinforcement, these
methods usually lead to a much greater use of concrete in order to cover the
larger sections of steel and therefore are rarely economical.
Bamboo has a high strength-to-weight ratio and in certain parts
of the world is widely available. Because of the low cost, bamboo strips have
been used as an alternative to steel bars but it is important to ensure that the
bamboo strips in a slab are completely covered by the concrete so that water and
vapours cannot rot the bamboo. The strips should initially be treated with
preservative. One recommended method (UNCHS, undated) is for the bamboo to be
dipped in white lead and 10% varnish to inhibit water absorption from the
freshly placed concrete. Even where treated, there is some doubt as to the
longterm durability of bamboo as reinforcement.
Where cement is relatively expensive, a technique known as
reinforced brickwork can be utilized, in which part of the concrete is replaced
by whole or half bricks, leaving steel reinforced concrete ribs to support the
bricks (Fig. 7.17). The whole slab requires a cement skimming over the surface
to make it impervious to fouling by the users.
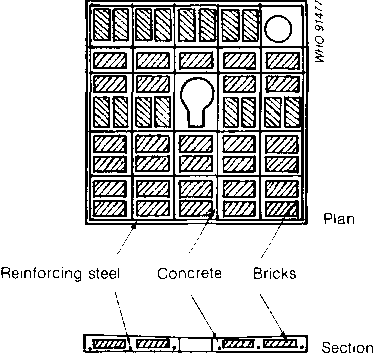
Fig. 7.17. Reinforced brickwork slab
Concrete mixes
Different concrete design mixes (that is, combinations of
cement, sand, aggregate and water) are suitable for use in various
circumstances. The concrete mix that is most often used is 1:2:4 (one unit by
volume of cement with two units by volume of sand and four units by volume of
aggregate). The sand should be clean and hard and may be sized by sieving
through ordinary mosquito netting. Coarse aggregate comprises graded stones 6-18
mm in size and should be free of fine dust. This mix results in a finished
volume of concrete which is approximately 70% of the total volume of the
individual dry materials.
The cement, sand and coarse aggregate have to be mixed with a
specific amount of water to give the optimum strength for the amount of cement
used. For concrete mixed and placed by hand, there should normally be a water:
cement ratio of 0.55 by weight, i.e., the weight of water is approximately half
the weight of cement. Cement weighs 1400 kg/m3 and water 1000 kg/m3; a 50-kg bag
of cement thus has a volume of 0.035 m³. A 1:2:4 concrete mix using one
50-kg bag of cement therefore requires 0.070 m³ of clean sand, 0.140
m³ of aggregate and 0.027 m³ of water, which results in 0.17 m³
of finished concrete.
The volume of water is applicable where the aggregate and sand
are "saturated, surface dry". In hot dry climates, the small pores in the
aggregate, as well as the surface, are likely to be "oven dry" rather than
saturated. To use the specified amount of water would then lead to an extremely
stiff, unworkable concrete. The aggregate should therefore be thoroughly wetted
with water before mixing begins. The correct wafer: cement ratio results in a
relatively stiff but workable material which produces a skim of water on the
surface of the concrete as it is worked flat with a trowel. When the mix has too
much water, the strength is reduced considerably. An increase of only 50°,
in the water content decreases the finished concrete strength by half, which is
the equivalent of wasting half the cement in the bag.
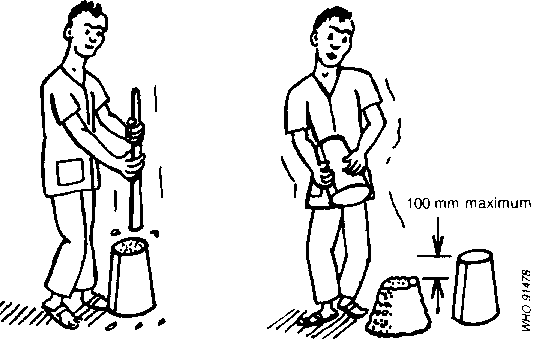
Fig. 7.18. Checking the water content
of concrete with a slump cone
To check that the calculated amount of water is correct, a trial
mix may be prepared and a slump test carried out. In this test, the concrete mix
is compacted into a slump cone (Fig. 7.18), which is similar to an upturned
bucket 300 mm high with the base removed. When the cone is removed, the concrete
will slump, i.e., reduce in height; the maximum slump, for concrete that is to
be reinforced, should be about 100 mm, and less for unreinforced concrete.
Caring for concrete
After it has been cast, concrete must be cured. It should be
covered with either wet sand, straw, cement bags, jute sacks, plastic or palm
leaves to keep the concrete moist and as cool as possible. The chemical reaction
which causes the cement particles to bind is dependent upon the amount of water
present. If the moisture has been sucked out from the surface of the concrete by
the heat of the sun, the chemical reaction cannot take place and the surface of
the slab will not be durable. In hot dry climates the concrete and its covering
need to be watered twice a day for seven days after casting. If the concrete is
not cured, it will have only 60% of its ultimate design strength; if cured for
three days, it will attain only 80%, but if kept damp for seven days will reach
almost 100% (Reynolds & Steedman, 1974).
A good guide for field workers is: "Make the concrete mixture as
dry as you can; and then keep the cast concrete as wet as you can."
The most effective way of checking the strength of a slab is to
test load it seven days after casting. As, normally, only one person at a time
will use the latrine, to test load the slab with five or six people gives an
adequate and convincing factor of safety. The slab should be supported at its
edges by four or five bricks placed on flat ground, and the people should stand
on the slab, avoiding areas directly over the bricks. Testing the strength of
precast slabs by throwing them off the back of the delivery truck at the site,
on the understanding that those that do not break are adequate, is not
recommended.
The final concrete surface should be clean, dense and free of
blemishes. The surface will absorb urine unless it is sealed effectively with,
for example, proprietary sealant, alkali-resistant gloss paint, bitumastic
paint, or two coats of a 25% solution of silicate of soda (Khanna, 1985).
A screed (a thin layer of cement mortar) is sometimes applied to
a flat slab after casting to create the desired slope towards the squat hole.
However, unless the screed is applied before the concrete has completely set
there is a danger of its flaking off in use. Wherever possible the required
slope should be cast in the original concrete, a dense surface being obtained by
trowelling with a steel float as the concrete begins to set. Alternatively the
slab may be cast upside down on plastic sheeting to ensure a good finish.
Footrests are normally cast separately, after the concrete of
the slab has hardened. The area where the rests will be cast is roughened when
the slab surface is being given its final trowelling. Formers for the footrests
can be made out of any available material such as tin or wood, but the
individual formers should be connected together and to fixed points on the edge
of the slab to ensure that the rests are always cast in the same position (Fig.
7.19).
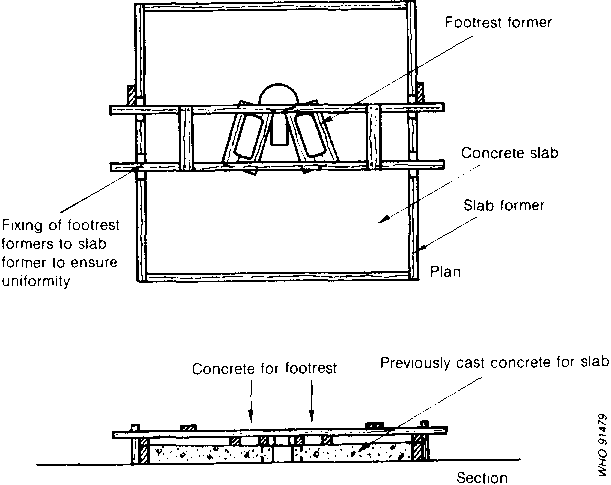
Fig. 7.19. Formwork for the casting
of footrests
Weights of concrete slabs
If cement-based slabs are to be moved, weight is an important
consideration. For example, a 65-mm-thick circular concrete slab, 1.5 m in
diameter, weighs approximately 275 kg, while an 80-mm thick slab weighs 340 kg.
A rectangular slab, 65 mm thick, designed to cover a pit of size 2.2 m x 1.1 m
would weigh 360 kg, unless made in sections (Fig. 7.20). Circular slabs are not
normally made in sections. When whole, a round slab can be moved by two or three
people, rolling it on its edge (Fig. 7.21). This is particularly useful in the
management of the construction yard and can sometimes even be used to transfer
the slab to the household site without a vehicle.
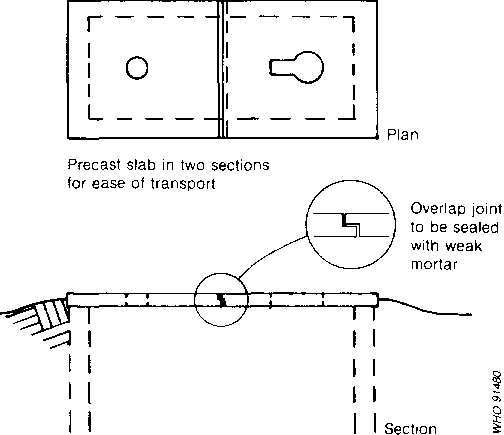
Fig. 7.20. Rectangular slab In two
sections
Fig. 7.21. Circular slab for ease of
transport
Concrete for other components
Concrete for floors of latrines that are not directly above the
pits is cast in situ. A slightly weaker concrete mix of 1:3:6 may be used but
the curing requirements remain as described above. The outlet pipe and pan
should be carefully laid to the desired level before the concrete is cast.
Cover slabs for offset pits and floors and cover slabs of septic
tanks are normally also made of concrete. Walls of septic tanks are usually
constructed from concrete blocks or cement-plastered fired bricks. The
requirements for good quality concrete are identical to those for components
discussed previously.
Other materials for slabs
Wood
The simplest slabs in rural areas are made from rough poles and
tree branches laid closely together over the pit. A timber slab is always liable
to deterioration because of fungal decay owing to the moist gases rising from
the pit and also because of the threat from termites and boring insects in
tropical climates. Durable timbers such as the heartwood of some tropical
hardwoods are normally too expensive for use in latrines but, where available,
may be expected to last satisfactorily for several years.
A thick layer of earth or mud is often spread over the poles or
branches to bind them together and create a smooth surface (Fig. 7.22). In many
places, people are skilled at making mud floors which are almost as hard as
cement and quite smooth. They need not be rough or unsanitary. There are various
methods of improving the mud with local materials, such as mixing the soil with
a liquor obtained by soaking animal dung overnight. In some areas the mud is
mixed with charcoal or other small aggregate, or with cow dung and then smeared
with ashes. Alternatively, the mud from ant-hills has been found to make a hard,
practically waterproof surface (Denyer, 1978). If the surface is not kept in
good condition, however, there is a danger of hookworm larvae penetrating the
feet of users.
The life of a rough timber slab can be extended by using a
mixture of soil and cement to plaster and protect the wood. Alternatively, a
thin cement mortar screed can be laid over the surface of the earth to protect
against hookworm and to improve hygiene. However, it is usually more
cost-effective to use the cement to provide a permanent concrete slab which can
be transferred to a new pit when the first is filled. Where more than half a bag
of cement is needed to stabilize the earth, a concrete slab is likely to be a
cheaper alternative.
In an area where timber is abundant, hewn or sawn logs
supporting a platform of wooden planks make a floor that is preferable to the
mud and pole version (Fig. 7.23). The surface can be kept clean, and signs of
imminent collapse are normally apparent to the adult user. The durability of
timbers may be improved by some form of treatment. The effectiveness of these
treatments depends upon the amount of preservative that the timber can be made
to absorb, which is a function of the permeability of the timber and the process
used. Suitable preservatives include ordinary tar, tar-oils such as creosote,
water-based preservatives such as copper/chrome/arsenic, and specialized organic
solvents (Tack, 1979). Each type of preservative has its own characteristics and
particular uses. Where treated timber is not available and the cost of using
preservatives on a small scale is high, other more durable alternatives may be
cheaper in the long run.
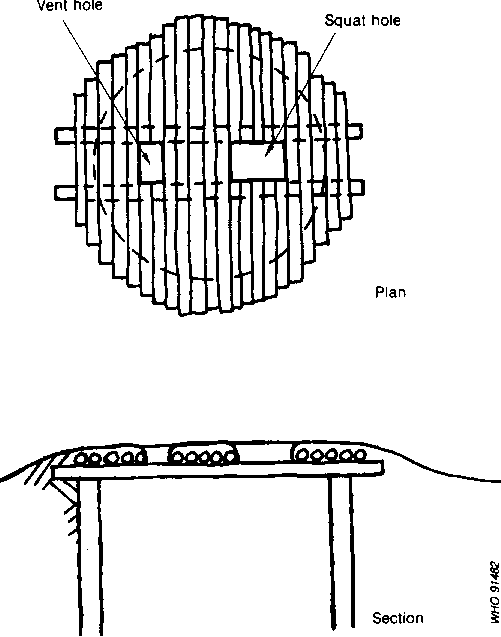
Fig. 7.22. Timber and earth slab
Simple timber slabs are often considered to be unsuitable for
sanitation projects, since people are less likely to use the latrine if they are
afraid that the slab may collapse under them. However, the danger of collapse is
usually less than the dangers associated with not having any appropriate system
of sanitation. If no other materials are available at reasonable cost, a rough
pole slab that has to be renewed every few years is to be preferred to no
latrine at all.
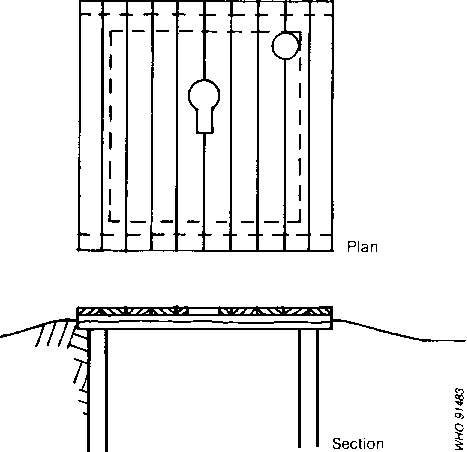
Fig. 7.23. Sawn timber slab
Scrap iron and steel
In urban areas where sanitation is most urgently required,
supplies of even the cheapest materials, such as rough poles, are usually
limited and relatively expensive. The simplest alternative used by householders
on an informal basis is to lay parts of discarded vehicles or any other scrap
materials across the pit opening to provide support, with flattened containers,
oil drums or galvanized iron roofing sheet to make a surface. Such materials do
not seal the pit but they enable the user to excrete into a relatively safe hole
rather than at the side of the street. However, where there are significant
dangers, especially for children, these methods cannot be recommended.
Miscellaneous materials
Slabs have been made in a variety of other materials.
Glass-reinforced plastics, polyvinyl chloride (PVC), ceramics and glass fibre
have all been used to meet particular needs and situations. Plastic floors tend
to flex under the weight of the user unless they are deeply ribbed. Some of
these materials can also be used to give a special surface finish to concrete
slabs.
Footrests and squat holes
Footrests are required to lift the users' feet off the slab in
case it is already fouled and also to position the users so that they are less
likely to dirty the slab or the edge of the squat hole. The positions and sizes
of footrests must be determined to suit the needs of the people in each area.
Fig. 7.24 indicates a typical layout. Different people in different societies
with different-sized bodies and varying flexibility of tendons may excrete
between their feet or behind their ankles. Their feet may be parallel or angled.
It is therefore advisable to check with young and old, and with male and female
in a community before assuming a particular layout. McClelland & Ward (1976)
reported that in one sample of 140 people, the distance from heel to anus in a
squatting adult varied from 0 to 0.25 m with a mean of 0.13 m for men and 0.10 m
for women.
Excreta enter a pit either by falling through a squat hole or by
passing through a water seal. Details of seals are given later. Squat holes have
to be large enough to limit fouling of the edges but not so large that children
are frightened of using the latrine. The hole can either be rectangular,
elliptical, pear-shaped or circular with a straight extension as in a keyhole
(Fig. 7.25). The maximum width should be 180 mm and the length at least 350 mm.
In a concrete slab, the edge of the former used to make the hole should be
angled to ease its withdrawal after casting.
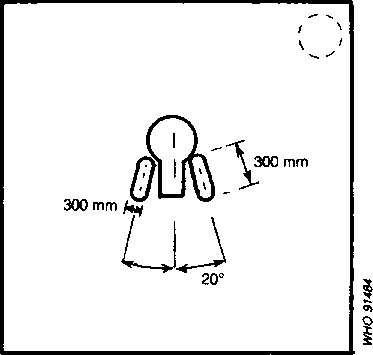
Fig. 7.24. Possible footrest
positions
Seats for latrines
In many parts of the world, people prefer to sit to defecate. To
make a latrine seat, a support or pedestal is built or mounted on top of the
slab. The seat level should be at a position that is comfortable for the
majority of the users (Fig. 7.26); this is normally about 350 mm above the top
of the slab.
The seat support can be made on site from brick, concrete, mud
block or timber and should be designed to minimize the load on the slab. A heavy
type of construction adds weight to the slab which then requires more expensive
reinforcement to carry the load. Commercially available or project-manufactured
pedestals made of ceramic, glass reinforced plastic (GRP), PVC or ferrocement
can also be used where people can afford them.
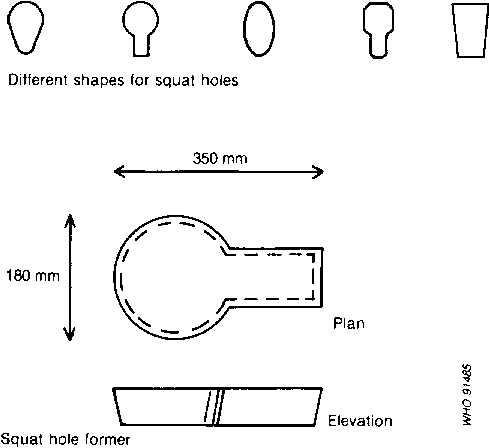
Fig. 7.25. Squat hole shapes and
former
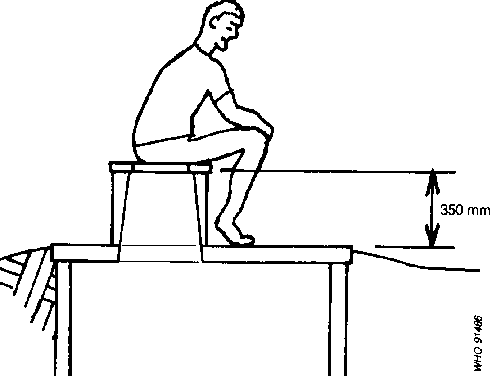
Fig. 7.26. Latrine seat
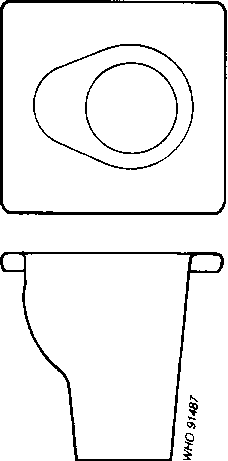
Fig. 7.27. Pedestal seat liner
The inside of the pedestal should be designed to prevent
constant fouling by excrete, which leads to increased odour and fly breeding.
One approach is to use a large-diameter opening of 250 mm or more, but this
might discourage use by children who are frightened by the large opening. An
alternative is to have a 1 80-mm diameter hole through the pedestal which is
lined with a smooth material such as cement mortar or an insert of glass fibre
(Fig. 7.27) or ceramic. A third alternative is a tapered hole, increasing from
an opening size of about 180 mm at seat level to 300 mm at the slab. If possible
the pedestal should overhang slightly so that the seat can be used with the feet
tucked under to mimic the squatting position.
Shapes of locally made pedestals vary from a rectangular box,
where the user sits on one side but can also sit across a corner with one foot
on either side, to a circular or oval design. It is important to obtain a good
seal between the pedestal and the slab.
A seat cover may be fitted to seal off an unventilated pit.
Where a vent pipe is fitted, an adequate flow of air to the pit can be obtained
by raising the seat cover slightly above the seat, as is the case with
conventional flush pedestals.
A special fitment with a small opening can be made to encourage
children to use the latrine. Alternatively the pedestal top can be enlarged to
accommodate a second seat with a smaller opening, possibly at a lower level, for
the use of children.
Water seals and pans
A pour-flush latrine utilizes a water seal to prevent odour and
insects entering the latrine from the pit. This water seal may be part of the
pan unit (Fig. 7.28) or may be connected immediately below the pan (Fig. 7. 29).
For on-site sanitation, flushing is normally carried out by the wash-down method
where the force of the flush water thrown into the pan is enough to drive the
excrete through the water seal.
The pan may be of the squatting type or of the pedestal variety
where the user can sit. The amount of water needed for flushing
Fig. 7.28. Combined pan and water
seal for direct pour-flush latrine depends on the design of the pan or pedestal,
the depth and volume of the water seal, and the minimum passage size through the
seal. For a water seal directly above the pit about 1 litre of water is normally
sufficient for flushing. Two litres may be required for an offset pit and a
minimum of 3 litres for an improved pedestal pan and offset pit.
Fig. 7.29. Pan and seal for offset
pour-flush latrine
The depth of the water seal is measured as the depth of water
that would have to be removed from a fully filled trap to allow the passage of
air (Fig. 7.28). The seal volume is the amount of water held within the trap
when the unit is not being used, and the minimum passage size is the opening
through which the water must flow and which may be of a smaller diameter than
the connecting pipe. The depth of the seal in a conventional WC is approximately
50 mm. However, the deeper the seal the more water is required for flushing. In
pour-flush latrines, the depth of the seal is normally reduced to the minimum
compatible with maintaining the seal in hot weather. The seal volume will be
reduced by evaporation, the water loss being proportional to the time between
consecutive flushings and the degree of exposure to direct sunlight and air
movement. A minimum seal depth of 20 mm is considered reasonable with an optimum
passage size of 70 mm (Mare, 1985b).
Water seals that can be removed during the dry season to
minimize water usage are not recommended. It is likely that the seal would not
be replaced at the beginning of the wet season and therefore the latrine would
not work effectively.
Types of water seal
Where the water seal services a direct pit, the pan and the seal
should be made as a single piece with a hemispherical bowl known as a
"gooseneck" trap. This is designed to discharge into the centre of the pit and
not against the pit lining where it might cause damage. These types of seal can
easily be damaged by users trying to clear blockages with a rod where the thin
cement of the seal is unsupported. As direct pits have become less popular
because of emptying difficulties, the use of the gooseneck trap has also
declined.
In many countries, the pan is made separately from the seal to
facilitate manufacture and to give the installer greater freedom as to where the
offset pit is located in relation to the pan. The normal system, which has an
inclined outlet, is known as a P-trap, while the system with a vertical outlet
is called an S-trap.
Water-seal materials
Pans and water seals may be produced by manufacturers or by
project staff to standard specifications in a variety of materials. Ceramics,
such as white vitreous china or other glazed earthenware, have traditionally
been used for pans and pedestals. However, such items may be expensive to
purchase and require careful attention to packing if they are to be transported
safely. They may also be heavy and require a strengthened slab for a direct pit.
Particularly because of the problems of transport and handling, the use of
plastics for pans and water seals is becoming more common. Glass-fibre pans and
high-density polyethylene (HDPE) water seals are light and easily transportable,
even by bicycle, and are often preferred by users, even when more expensive than
the cement-based systems described below.
The cheapest pans and seals are made from cement mortar (10-30
mm thick) close to the point of sale or delivery. They can be produced on a
large scale without factory facilities, and can be repaired easily when damaged.
Such units are likely to be rougher than manufactured pans and seals, and a
reaction between urine and the cement normally leads to some staining of the
surface and some odour from the trap. This can be minimized by the addition of
marble dust and chippings to the cement mortar. When dry, the surface can then
be rubbed down with carborundum stones to provide an attractive mosaic finish.
Colourings may also be added to the mortar to give a more attractive appearance.
An alternative method of production uses casting boards to cast
the pan and seal in two halves with a 1:2:2 concrete mix pressed around the
form. After 24 hours the two sections can be removed from the moulds and joined
together with neat cement, the inner surface also being smoothed off with neat
cement. One disadvantage of having the pan and water seal in one piece is that
the trap cannot be rotated in the direction of the offset pit.
The Thai model, which is now in use in about 3 million rural
homes, employs a two-part mould and is cast in a single step, including the
platform, without the need for grouting pieces together. The depth and angle of
the seal are uniform. Large numbers of moulds can be cast quickly, thus
facilitating production of pans and seals so that large numbers of households
can have pour-flush latrines in a very short period of time (J. T. Visscher,
personal communication).
Making the pan and trap separately enables very simple forms to
be used. These may be built up from clay and husk or plastered brick or concrete
which can be reused many times. A release agent is needed to break the bond
between the mould and the new concrete. Proprietary agents are available, though
used engine oil or even cow-dung wash have proved to be cheap and effective.
Pedestals designed for pour-flushing with small quantities of
water (about 3 litres) are normally made of ceramic to ensure a smooth finish.
Less efficient units may be made using cement-based methods with ferrocement,
fibre-reinforced cement and concrete with marble chippings.
Pipes and junction chambers
The water seal may be connected to the offset pit by
conventional pipework (see Fig. 6.9) or by a covered drain (see Fig. 6.10).
Where double pits are in use, a junction chamber or inspection chamber (see Fig.
6.15) is required whereby the flow can be directed into one pit or the other.
The pipe or channel should be not less than 75 mm wide and
should be as smooth and direct as possible. Any roughness or sharp bends will
tend to slow the passage of excrete, eventually leading to a build-up of
deposits and a blockage. The cheapest available non-pressure pipes will be
adequate, whether in fired clay, plastic or asbestos cement. The minimum slope
should be I in 30 for smooth pipes and I in 15 for rougher pipes or hand-shaped
channels. If the slope is too steep there is a danger of solids being deposited
in the pipe.
Special care must be taken where the pipe passes through the
superstructure wall (see Fig. 6.12 and 6.13). If possible, some degree of
flexibility is required at the pipe joints or in the channel so that
differential settlement of the latrine superstructure or the pit lining will not
cause damage. There is unlikely to be significant loading on the ground above
the connecting pipe, but where there is any possibility of vehicles crossing the
area between latrine and pit, conventional pipe bedding and protection should be
used.
The pipe or drain should extend some distance into the pit so
that the wastewater discharges directly towards the centre and does not dribble
down the pit walls, with a consequent build up of deposits.
Where a covered drain is used to connect a double-pit system, a
simple Y-junction can be constructed to divert the flow. The junction in a
pipework connection between pits and latrine requires a chamber which should be
of sufficient size to allow for ease of construction of the concrete benching.
It must also allow for the flow to be diverted from one pit to another with a
temporary blockage in one or other arm of the Y-junction. A minimum internal
dimension of 250 mm is recommended (Roy et al., 1984). The chamber cover slab
needs to be removable to allow for access to divert the flow, but also has to be
heavy enough and fixed in such a way that it is difficult for children to
remove.
Vent pipes
The vent pipe, i.e., the tube connecting the latrine pit to the
open air above the pit, serves two purposes: ( I ) to create a draught of air
from the superstructure, through the squat hole and out of the pit, passing up
the vent; (2) to act as a light source which will attract flies to the screen
trap which is attached to the top of the vent. Normally the vent pipe is
straight and rises vertically above the pit so that the daylight at the top can
be seen directly by any flies in the pit (Fig. 7.30). A straight pipe also
maximizes the air flow; bends in the vent absorb part of the energy in the air
movement.
With certain types of slab, or where existing slabs require
upgrading with a vent, there may be a need to bring the pipe out horizontally
underneath the slab before turning to the vertical. In this situation an
ancillary light source is required in the form of a glass or perspex window at
the bend (Fig. 7.31). Flies in the pit are first attracted to the light source
at the window. They cannot escape from the vent at that point so, following the
air flow upwards, they then go towards the light at the top of the vent.
Fig. 7.30. Straight vent pipe
Fig. 7.31. Angled vent pipe with
window
The draught through the vent is created primarily by the
movement of wind across the top of the pipe. This air movement creates a suction
effect, sucking air out of the pit and up the vent. To achieve satisfactory air
movement, the top of the vent should be at least 500 mm above the highest part
of the roof, except where the roof is conical, in which case the pipe should
reach at least the height of the roof apex. However, if the pipe can be extended
even higher, a stronger updraught will be created in the vent. Wind speed
increases even at slightly higher elevations above the ground, which creates a
stronger suction effect. Also, the higher the vent, the less likely it is to be
shielded by buildings or other obstructions which may cause air turbulence and
reduce or even reverse the updraught in the vent. Any large trees or overhanging
branches close to the vent may significantly affect air movement and thus reduce
the effectiveness of the ventilated latrine. Similarly, a rain cowl should not
be placed on top of the vent, as it will reduce the air flow; the amount of rain
entering the pit is not likely to be significant.
The vent should therefore be located in the best position to
catch any air movements across the upper end of the pipe. Vent pipes are
normally placed outside the superstructure, particularly where the building
materials available make it difficult to construct a watertight joint where the
pipe would pass through the roof. Free-standing pipes may be secured to the wall
of the superstructure using standard pipe fittings, strips of galvanized steel,
galvanized wire or other noncorrosive material. Where possible, the vent should
be located on the side of the building which faces the equator, that is the side
which receives most sunlight. The warming of the surface of the vent pipe,
raises the temperature of the air in the pipe, increasing the upward draught.
Painting the vent black aids this thermal effect. However, the air movement over
the top of the vent is the most significant factor in causing updraught and a
vent placed inside the building will still work effectively.
The updraught may also be increased by using a spiral design for
the superstructure, which funnels the air into the structure. If there are no
other ventilation holes, this produces a positive pressure inside the structure,
thus forcing air through the squat hole and the pit and up the vent. However,
where the winds are particularly variable and often blow from a direction away
from the superstructure opening, a negative pressure may be created which will
suck foul air out of the pit and into the building (Fig. 7.32).
Dimensions of the vent pipe
Vents may be square or round and can be constructed from a wide
variety of materials. Circular vent pipes should normally have an internal
diameter of at least 150 mm for smooth materials (PVC or asbestos cement) or 230
mm for rough surfaces (such as locally produced cement-rendered pipes), although
in exposed places with high wind speeds a smaller diameter may be sufficient. It
is normally advantageous to enlarge the top of the vent pipe by about 50 mm to
account for the head losses, that is, the reduction in energy and therefore in
updraught caused by the air passing through the fine mesh of the flyscreen (Fig.
7.33). There is a danger that cobwebs, dirt or insect matter may build up on the
screen, restricting air flow. Belling the top of the pipe can serve to balance
these restrictions.
Fig. 7.32. Layouts for
superstructures, vent pipes and pits
Fig. 7.33. Belled vent with fly
screen
Materials
Materials suitable for vent pipes include asbestos cement,
unplasticized PVC, bricks, blocks, hollowed-out bamboo, ant-hill soil, cement
rendered reeds or bamboo, and cement-rendered hessian (Ryan & Mara, 1983).
The choice of material will need to take into account durability, availability
of materials and skills, cost, and availability of funds. Ordinary PVC becomes
brittle when exposed to strong sunlight, so material with a special stabilizer
should be used if possible. Because galvanized steel corrodes in a humid
atmosphere, the use of thin sheets is not recommended for vent pipes except in
very dry climates.
Brick and block chimneys
Vent pipes may be made from bricks or blocks with cement mortar
joints in the form of a chimney that is at least 230 mm² internally. The
flyproof screen should be stretched over the top surface of the highest bricks.
If it is built into the course joint one brick down, a receptacle is created
which catches leaves and other debris. The chimney may be free-standing or built
into the corner of the superstructure. Morgan & Mara (1982) suggested that
thermal updraught in such chimneys continues well into the night because the
brickwork retains heat which is released slowly to the air over a period of
several hours.
Locally made vent pipes
Reeds, poles, thin bamboo or strips of 10 20 mm of large bamboo
can be tied together with wire or string to make a mat which forms a base for
cement mortar. The mat, about 2.5 x 1.0 m, is rolled round rings made of green
sticks to form a tube about 300 mm in diameter. Flyproof netting is fixed over
one end of the tube, which is then laid on the ground. The upper part of the
pipe is covered with a layer of cement mortar made with one part of cement to
three parts of sand. When the mortar has dried the tube is put in position with
the mortared part against the wall of the latrine. Then the outer part of the
pipe is plastered with cement mortar. Alternatively the pipe may be rotated on
the ground and completely plastered before erection.
A vent pipe can also be made with hessian. First, a
250-mmdiameter tube is formed of spot-welded steel mesh made of 4-mm bars at
100-mm centres (100 mm apart, centre to centre). Hessian or jute cloth is
stitched tightly round the outside of the tube and flyproof netting is stitched
over one end. Cement mortar, made of one part of cement to two parts of sand, is
then brushed over the tube in several layers until a total thickness of about 10
mm is formed. The vent pipe is then fixed in place. Alternatively, a pipe may be
made from ferrocement with three or four layers of mesh plastered with cement
mortar and without any hessian.
Fly screens
Fly screens should be made of material that will not be affected
by temperature, sunlight, or the corrosive gases that are vented from the pit.
Stainless steel or aluminium are considered to be best. Their comparatively high
cost may be justified by their long life, especially as the screen accounts for
a very small proportion of the total cost of the latrine. PVC-coated glass-fibre
netting is relatively cheap and has lasted for more than seven years in Zimbabwe
(Morgan & Mara, 1982). However, it tends to become brittle after about five
years and is likely to tear at the point where it passes over the edge of the
pipe. Ordinary plastic screens deteriorate quickly in sunlight. Painted mild
steel mesh, commonly sold as window screening against mosquitos, and galvanized
mild steel mesh last only a few months before corrosion by the pit gases renders
them ineffective. Gases and sunlight weaken the screens but the actual tearing
of the material is assumed to be caused by birds alighting or possibly by
lizards which frequent the top of rough-walled vent pipes or simply by the
tension within the flexing screen (P. R. Morgan, personal communication).
A mesh size of 1.2-1.5 mm is recommended. If the apertures are
larger small flies can pass through. If the apertures are smaller there is too
much resistance to the updraught of air. The screen should be firmly fixed to
the top of the pipe. Netting may be fitted over the top of brick and block
chimneys during building and on locally made vent pipes during fabrication.
Screens may be glued to PVC pipes with epoxy resin or tied on with a piece of
wire. Where there is a particular problem with mosquitos breeding in wet pits,
it may be necessary to install removable traps over the squat hole or pedestal
(Curtis & Hawkins, 1982).
Netting should be inspected regularly (at least once a year) to
ensure that it is still in place and that it remains in good condition. Part of
routine maintenance is to pour a bucketful of water through the screen and down
the pipe to wash away cobwebs and other material.
Superstructure
The building or superstructure of any latrine is required to
give privacy and protection to the user. From the health point of view the
superstructure is less important than the pit and slab. However, as most people
initially desire sanitation because of the convenience and privacy of having
their own facilities, it is important that the superstructure meets the users'
needs. Many sanitation projects leave the design and construction of the
superstructure to the user. Although there may be some benefit in having a
uniform design, it is advantageous to involve the owner or user in the
construction. A properly built superstructure should conform to certain
guidelines, the most important of which are outlined below.
Size
The size of the building should be such that people are
encouraged to use the facility properly, without its becoming an oversized
status symbol. If the floor area is much larger than the pit slab, people may be
tempted to defecate on the floor, particularly if the squat hole has been fouled
by previous users. The height should accommodate a person standing upright
without his or her feeling oppressed by the roof. However, if people are used to
stooping when going into buildings, a lower entrance may be acceptable or even
preferred. Where latrines are also being used as wash rooms or bath houses, a
larger area should be allowed for.
Shape
Where the superstructure is not attached to the dwelling, there
are two possible basic shapes (see Fig. 7.32): (1) a simple round or rectangular
box, with or without a privacy wall; (2) a spiral, which may be round or
rectangular. Although the spiral design uses more wall materials (while saving
on the possibly more expensive door and hinges), it has the advantage of keeping
the inside of the building partially dark and is therefore more suitable for
ventilated pit latrines.
If there is a door in a spiral design the functioning of the
latrine is not affected by its being left open. The design automatically
incorporates a privacy screen. However, if the pit has only a short life and the
superstructure will need to be moved to a new location when the pit is full,
then a simpler structure may be more suitable.
In some cultures there may be a prohibition on facing in a
particular direction when defecating. This must obviously be taken into account
when the latrine is being positioned.
Location
The latrine may be built as a free-standing unit within the
compound or may be attached to the house. If it is reached from inside the house
there is a greater likelihood that it will be properly maintained. It also has
the advantage that access can be controlled more easily by the householder.
However, greater care has to be taken of the pit lining because of its proximity
to the house foundations and the pit must be accessible from outside the house
for emptying. Offset pour-flush latrines have the advantage that the pit or pits
may be sited in any convenient space, even in the most cramped urban conditions.
The pits may even be under the footpath access to the latrine.
Ventilation
It is desirable to provide openings in the superstructure or
around the door to ensure adequate ventilation of the latrine. The inlet vents
are most effective when they face the prevailing wind and should preferably be
at a different height from the outlet vents to improve the efficiency of air
change (Fig. 7.34). A minimum requirement of about six complete air changes per
hour (10 m³/hour) has been recommended by Ryan & Mara (1983). An
opening of at least 0.15 m² should be adequate in most climates.
With a ventilated pit, the air movement is required to clear the
superstructure of stale air by passing into the pit for exhaust through the vent
pipe. Where there is a fairly constant prevailing wind, any openings should be
on one side of the structure only, facing the wind, so that there is no through
draught and to ensure maximum air movement through the pit (Fig. 7.35). However,
where the prevailing wind is variable, it may be necessary to have other
openings in the superstructure to prevent a suction effect when the wind blows
from a different direction. This can lead to foul air being sucked out of the
pit through the superstructure, to the discomfort of the users.
Fig. 7.34. Ventilation In a
pour-flush latrine
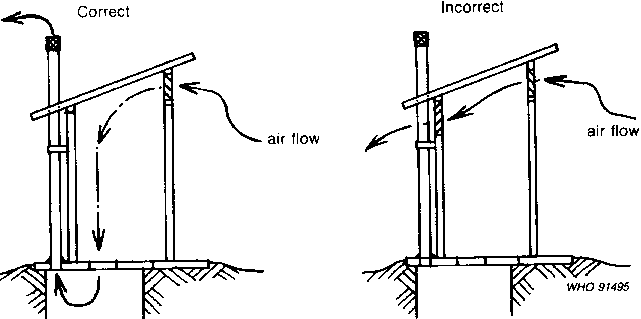
Fig. 7.35. Ventilation In a VIP
latrine
The superstructure must be strong enough to support a vent pipe
extending 500 mm above the roof line. Alternatively it may be found that a block
or brick vent adds rigidity to the superstructure.
Lighting
In general a latrine that is bright and light is more attractive
to its users. A ventilated pit requires a partially darkened superstructure so
that any flies in the pit are attracted by the daylight at the top of the vent
pipe rather than light from the inside of the latrine. However, the internal
walls of the superstructure may be whitewashed and some light allowed through
ventilation openings.
Where possible, the opening spiral or door of a ventilated pit
latrine should not face east or west as the low sun in the morning or evening
would light up the inside of the structure and encourage the movement of flies
out of the pit.
Access
Contrary to normal building practice, the door is usually
designed to open outwards to increase the usable space inside the building and
to avoid hitting any footrests. This may not be practicable in grass-roofed
structures with low eaves. In some cultures a privacy wall is required to screen
the door. If a spiral design is used, no door is required (though one may be
fitted if desired), which is an advantage where wood and other material for
making doors are expensive or in short supply.
Cleanliness
A superstructure that is left dirty and in a constant state of
disrepair will soon be unused as a latrine and abandoned. It is therefore
important that the building can be cleaned and maintained easily.
Materials
The design of the superstructure and the materials employed
normally depend upon the style and construction methods of other buildings in
the area. It is to be expected that people will build their latrine out of the
same materials as their dwelling - although perhaps to a slightly lower
standard. The temptation for projects to produce structures in a grand style
should be avoided. If the latrine buildings promoted by a project are of more
expensive construction than local housing (even if they are temporarily
subsidized) they cost more than people can ordinarily afford. This acts as a
disincentive for new households to construct sanitation systems when the initial
promotion is finished. Similarly, the introduction of new materials and methods
should normally be avoided in a latrine programme as this diverts attention from
the real purpose of the sanitation system. It is better to use local skills and
materials which local tradesmen understand how to use and, most importantly, how
to maintain.
Many different types of materials can be used and the most
common of these are described below.
Screens and fences
The superstructure does not necessarily have to be a roofed
building, although there are obvious advantages in providing protection from the
rain and sun. However, in some cultures people have become used to defecating in
the open and find it objectionable to have to go into a small building. Also,
where funds are limited the overall cost of the latrine is considerably reduced
by erecting a simple fence made out of the cheapest locally available "waste"
materials (such as grass, grain stalk, woven palm) to meet the need for privacy
(Fig. 7.36).
In periurban areas, agricultural byproducts may not be
available. Other waste products such as cardboard or beaten tin cans or sacking
suspended on poles can provide the required privacy at very little cost.
It should be noted that a ventilated pit design needs a roofed
and darkened superstructure.
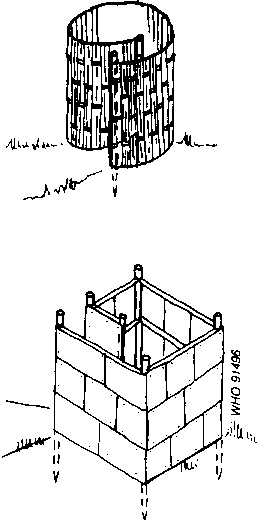
Fig. 7.36. Privacy screens made from
cheap locally available materials
Mud and wattle
In many parts of the world the housing consists of mud and
wattle, that is upright poles, with the bark removed, interwoven with small
branches, the whole being plastered with mud. Such a system can be readily
adapted to the needs of a small latrine, whether round or spiral, with a
thatched roof made from palm leaves or grass thatch. Mud and wattle may be
improved by nailing bamboo strips to straight upright poles and filling the gaps
with small stones before plastering with mud. A more regular, longer-lasting
structure is obtained. This can be roofed with thatch or with beaten tin or even
galvanized corrugated iron to provide a strong weatherproof structure (Fig.
7.37).
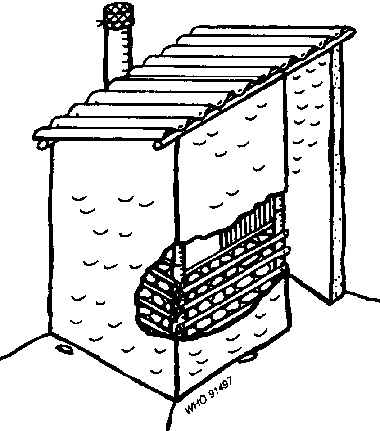
Fig. 7.37. Reinforced mud and wattle
superstructure
Bamboo
Shelters can be made from larger-diameter bamboo poles forming
the main frame with smaller bamboos nailed or strapped to them to form the
walls. Alternatively palm leaves or bamboo matting can be used to fill in the
walls of the bamboo frame.
Sawn timber
Increasingly, sawn timber is becoming an expensive and rare
commodity in low-income areas, but if off-cuts are available from a saw mill,
these can be used to clad a simple timber-framed structure.
Sun-dried bricks
Known as adobe, modagadol, kacha or by other local names, these
bricks are simply made from a mixture of well-puddled and tempered clay. Moulded
in simple wooden formers, they are allowed to dry slowly, out of direct
sunlight. They can be strengthened with the addition of natural fibres such as
fine grasses or coconut fibres. The superstructure is erected slowly using mud
mortar, and where necessary the walls can be strengthened with the addition of
fencing wire on alternate horizontal joints. Care must be taken to ensure that
the walls are not made too thick if the superstructure is built above a pit. A
great weight of walling can exert undue pressure on the foundations and sides of
the pit and may lead to collapse.
Machine-pressed blocks
This technique employs a portable steel press to compact
prepared soils in order to produce regular blocks. The blocks may be stabilized
with up to 8% of cement or lime depending upon the character of the soils used
and the degree of exposure of the finished wall. The blocks are laid in mud
mortar and can be plastered externally with mud mortar which requires attention
every couple of wet seasons. However, as is the case with the sun-dried bricks,
care has to be taken to ensure that walls are not made too thick and heavy.
Fired bricks
Where also used for housing, these make an excellent material
for latrine construction. To exert minimum pressure on the ground, a halfbrick
wall (112 mm thick) built in cement mortar is used with pillars at the corners.
If mud is used as the mortar to reduce costs then a onebrick wall (225 mm thick)
should be constructed.
Concrete blocks
Where a more expensive standard is acceptable, or if firewood
for brick firing is restricted concrete blocks can be made by hand on site or
purchased from a local manufacturer. The blocks are usually 150 mm thick but to
reduce materials 65-mm blocks can be made. However, greater skill is required in
the laying of these blocks and it is unlikely that a householder would be able
to build without skilled assistance.
Stone
Traditional building techniques with stones are sometimes used
for latrine construction. This is normally to be avoided over direct pits as the
thickness of the walls (often 450 mm or more) exerts a high load, requiring a
strong pit lining for support. Stone buildings are quite acceptable, however,
for offset pits.
Ferrocement
A strong cement mortar pressed into three or four layers of wire
mesh forms a strong, reasonably stiff membrane known as ferrocement. This
material has been used successfully for spiral superstructures but can only be
used where cement costs are low and the people are willing to accept a new
technology along with their new latrines.
Other materials
Plasticized materials, corrugated asbestos cement, galvanized
iron and aluminium sheets are also used.
Roofing
Materials such as thatch, palm leaves, clay tiles, fibre-cement
tiles, wood shingles, corrugated iron, corrugated aluminium, asbestos cement,
ferrocement and precast concrete can all be used for roofing the latrine
superstructure. An important point to note is that the roof must be adequately
tied into the wall structure and the walls must be strong enough to resist the
uplift of high winds. Some materials, for example, galvanized corrugated iron,
lead to greatly increased temperatures inside the latrine which may increase
odour and make the building less pleasant to use.
Doors
A door is not required for efficient functioning of most
latrines. However, for various reasons, users often wish to have a sawn timber
door. Where possible it is advisable to mount the door on self-closing hinges.
Doors can also be made from beaten tins or corrugated iron on a wooden frame,
bamboo strips or anything else that is available. Simple curtains may suffice
where timber is scarce. A door is not necessarily required for privacy of the
user. Where spiral designs have become common it is normal for people to knock
on the outside of the structure before entering to warn anybody using the
latrine of their approach.
Hinges do not have to be manufactured in steel; strips of old
car tyres or leather from old shoes can equally well be used.
Conclusion
In conclusion it may be emphasized that a superstructure is
usually required first for privacy and secondly as a shelter for the user from
the wind and rain. Brandberg (1985) asked the question, "Why should a latrine
look like a house?" to demonstrate that the poorest people need not be excluded
from the benefits of sanitation because they cannot afford the superstructure. A
simple screen for privacy can adequately serve as a first phase while funds are
found for a building. At a later stage materials in common use for house
construction in the area will be suitable for building the latrine
superstructure.
Chapter 8 - Design examples
Introduction
Pit latrine design
Septic tank
design
Aqua-privy design
Disposal of effluent from septic tanks and
aqua-privies
Composting toilets
Introduction
The design of a latrine is governed by both consumer
expectations and public health requirements. Although basic design factors
remain the same (pit volume, septic tank retention time, etc.), the factors that
govern the final cost of the latrine are controlled by local circumstances and
requirements.
It is not feasible to illustrate all the possible design
options. However, this chapter gives details of how to determine the basic
dimensions for the most common designs and gives examples to illustrate the
design procedure.
Pit latrine design
Pit size
When calculating the dimensions of a hole for a pit latrine,
three conditions must be satisfied.
1. The pit should have sufficient storage capacity
for all the sludge that will accumulate during its operational life or before
its planned emptying.
2. At the end of the pit's operational life there should still
be sufficient space left for the contents to be covered with a sufficient depth
of soil to prevent surface contamination with pathogenic organisms (soil seal
depth).
3. There should be sufficient wall area available at all times
to enable any liquid in the pit to infiltrate the surrounding soil.
Storage volume
The storage volume required to accommodate the sludge that
accumulates in the pit during its operational life can be calculated from:
V = N x P x R
where
V= the effective volume of the pit (m³)
N =
the effective life of the pit (years)
P = the average number of people who
use the pit each day
R = the estimated sludge accumulation rate for a single
person (m³ per year).
Once the effective volume of the pit has been calculated, the
plan area is decided. This should be based on local preference, ground
conditions and construction materials, and is generally circular or rectangular
in shape. Note that only the area inside the lining is utilized for sludge
accumulation, not the excavated area.
Having determined the plan shape and area, the depth of pit
required for sludge accumulation is calculated as follows:
Sludge depth = [total sludge volume (V)]/(plan area)
Soil seal depth
This is usually taken as 0.5 m. In the case of double pit
latrines it is the depth to the bottom of the inlet drain.
Infiltration area
In communities where people use water for anal cleaning or bathe
in the toilet, a considerable amount of water may enter the pit. If it is
assumed that the soil pores below the sludge surface are blocked, then
additional wall area must be allowed for infiltration of the liquids above the
sludge.
The infiltration area cannot include the soil seal depth since
the top 0.5 m of a pit has a fully sealed lining.
Assuming that all the liquid entering the pit lies on top of the
sludge, then the liquid depth will rise until the area of contact between liquid
and soil is large enough to permit infiltration of the daily intake of liquid.
Pit depth
The total depth of the pit is calculated as follows:
Pit depth = sludge depth + infiltration depth + soil
seal depth
· Example
8.1
A family of six intends to dig a pit latrine with an operational
life of 20 years. The family uses newspaper and corncobs for anal cleaning, and
sullage is disposed of separately.
· Sludge
volume
V = N x P x R
The values of N and P are given (20 years and 6 people) but the
sludge accumulation rate (R) is not. In the absence of local information the
rate given in Chapter 5 can be used. The accumulation rate cannot be determined
without some knowledge of the depth to the water table. Assuming this is greater
than the likely pit depth, an accumulation rate of 901/year is used (see Table
5.3).
Sludge volume = 6 x 20 x (90/1000) (1 m³ = 1000
1itres) = 10.8 m³
If it is found that the pit does enter the groundwater, then the
calculation should be done again using the appropriate sludge accumulation rate
(601/year, from Table 5.3).
· Plan
area
The pit will be rectangular, with internal dimensions of 1.2 m
by 2.0 m. Thus the depth required for sludge is:
(10.8/1.2x2.0) = 4.5
· Infiltration
area
Since solid objects are used for anal cleaning and sullage is
disposed of elsewhere, there will be very little liquid to infiltrate.
Accordingly the infiltration area can be ignored.
· Soil seal depth
Assumed to be 0.5 m. Therefore the designed pit depth is:
4.5 + 0.5 m = 5
m.
This is very deep and consideration could be given to increasing
the plan area or reducing the life of the pit.
· Example
8.2
A family of six intends to construct a pit latrine to last 20
years. The family uses water for anal cleaning and intends to use the toilet as
a bathing area. The ground is mainly a fine sand with a water table 3 m below
the surface:
· Sludge
volume
Using the figures given in Table 5.3, the sludge accumulation
rate will be 601/year above the water table and 40 1/year below. First assume
that the pit will be mainly above the water table. If it is found that it enters
into the groundwater by more than 1.0 m then the volume can be recalculated.
Volume (V) = N x P x R
= 6 x 20 x (60/1000)
=
7.2 m³
· Sludge
depth
If the pit is to be circular, with an inside diameter of 1.3 m,
the sludge depth will be:
Sludge volume/Plan area = (7.2 x 4)/(p x 1.3²)
= 5.42 m
A pit of these dimensions would mean that most of the sludge
would collect below the water table. Therefore the volume should be recalculated
using a sludge accumulation rate of 40 1/year.
V = 6 x 20 x 0.04 = 4.8 m³
Therefore the new sludge depth will be:
(4.8 x 4)/( p x 1.3²) = 3.62 m
· Infiltration
rate
The infiltration capacity of a fine sandy soil is about 33
1/m² per day (see Table 5.4). Assuming the volume of water entering the pit
each day is 200 I then the infiltration area required will be:
200/33 = 6.1 m²
Therefore liquid will build up in the pit until a contact area
of 6.1 m² is achieved.
Water depth = infiltration area pit circumference =
(6.1)/(p x 1.3) = 1.49 m
Assuming a soil seal depth of 0.5 m, the total depth required
for the pit is:
3.62 + 1.49 + 0.5 = 5.61 m
This is a slight underestimate of the required depth because
some of the sludge will accumulate above the groundwater level. Bearing in mind
the inaccuracy of the basic design data, however, it is not necessary to carry
out a more accurate calculation.
· Example
8.3
An offset pour-flush double-pit latrine is to be constructed for
a family of six who use water for anal cleaning. The groundwater table is within
0.5 m of the surface during the rainy season and the soil is a sandy silt.
· Sludge
volume
As for the previous examples:
V= N x P x P
In a large pit the value of R would be taken as 40 1/year (see
Table 5.3) but as this is a double pit, full consolidation of the sludge is
unlikely to have taken place within the time taken to fill the pit (generally 2
years). Therefore a higher sludge accumulation rate (such as 60 l/year) should
be used.
Sludge volume = 6 x 2 x (60/1000) = 0.72
m³
· Sludge
depth
If each pit is 1.2 m wide and 1.2 m long, the sludge depth will
be:
0.72/(1.2 x 1.2) = 0.5 m
· Infiltration
depth
An offset pour-flush toilet uses about 31 of water per flush.
Assuming
20 flushes per day the total liquid inflow will be:
3 x 20 = 60 litres
If 6 l of urine enter the pit each day, the total daily inflow
of liquid will be 661. The infiltration rate for sandy silt is about 25
l/m² per day (see Table 5.4); therefore the infiltration area required is:
66/25 = 2.6 m²
The perimeter length of each pit is 1.2 x 4 = 4.8 m, therefore
the liquid depth will be:
2.6/4.8 = 0.5 m
· Pit
depth
The pit depth is the sum of the component depths, i.e.:
|
depth to bottom of inlet pipe |
0.2 m |
|
liquid depth |
0.5 m |
|
sludge thickness |
0.5 m |
|
Total depth of each pit below ground level |
1.2 m |
Septic tank design
· Example
8.4
Design a septic tank suitable for a household with up to eight
occupants in a low-density housing area in which the houses have full plumbing,
all household wastes go to the septic tank and the nominal water supply is 200 l
per person per day. Water is used for anal cleaning and the ambient temperature
is not less than 25°C for most of the year.
· Stage
1
Volume of liquid entering the tank each day
A = P x q
where
A = volume of liquid to be stored in the septic
tank
P = number of people using the tank
q = sewage flow = 90% of the
daily water consumption per person (Q).
q = 0.9 x Q = 0.9 x 200 = 180 litres per
person per day.
Therefore A = 8 x 180 = 1440 litres
· Stage
2
The volume of sludge and scum is given by
B = P x N x F x S
where
B = volume of sludge and scum
P = number of
people using the tank
N = period between desludgings
F = sizing factor
(see Table 6.2)
S = sludge and scum accumulation rate (see Chapter
6)
Assume N is 3 years; from Table 6.2, F= 1.0; as all wastes go to
septic tank S = 401 per person per year.
Therefore:
B = 8 x 3 x 1.0 x 40 = 960 litres
· Stage
3
Total tank volume = A + B = 1440 + 960 = 2400 litres (2.4
m³)
· Stage
4
Assume liquid depth = 1.5 m
Assume tank width is
W m
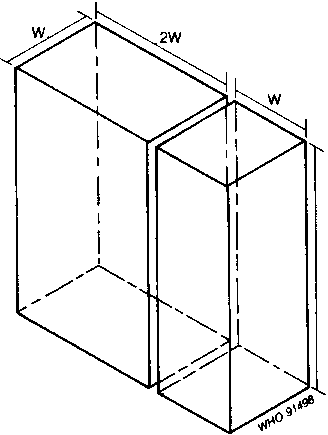
Fig. 8.1. Internal dimensions of the
septic tank designed in example 8.4
Assume two compartments, length of first = 2W
length of
second = W
This tank is illustrated in Fig. 8.1.
Volume of tank (V) = 1.5 x (2W + W) x W = 4.5
W²
Thus 4.5
W² = 2.4 m³
W = 0.73
Therefore:
width of tank = 0.73 m
length of first
compartment = 1.46 m
length of second compartment = 0.73 m
Depth of tank from floor to soffit of cover slab
= liquid depth + freeboard
= 1.5 + 0.3
= 1.8
m
Flotation
Since septic tanks have sealed walls and floor, the design must
be checked to make sure that the tank does not float out of the ground.
Flotation will occur if the total mass of the empty septic tank is less than the
mass of the water it displaces. This will only happen if the groundwater level
is higher than the bottom of the tank.
Calculate the mass of the walls, floor, roof and any baffle
walls (concrete: 2400 kg/m3; brickwork: 1500 kg/m3). Measure the volume of the
tank (outside dimensions) between the highest groundwater level and the bottom
of the tank. Multiply the volume by the density of water (1000 kg/m3). This
gives the mass of water displaced.
If the mass of water displaced is greater than the total mass of
the empty septic tank then the tank may float. This can be prevented by
increasing the mass of the structure (e.g., by increasing the thickness of the
floor or walls) or reducing the amount of the tank that is below the water
table.
Soil pressure
For large tanks, such as for a school or a number of houses, it
is necessary to check that the side walls of the tank are not likely to collapse
owing to the outside soil and water pressure. This is most likely when the tank
is empty. Such a calculation is beyond the scope of this book, and reference
should be made to a manual on reinforced concrete or masonry design.
· Example
8.5
Design a septic tank for a household having five occupants in a
medium density housing area in which the houses have full plumbing. Only WC
wastes go to the septic tank, and paper is used for anal cleaning. The ambient
temperature is more than 10°C throughout the year.
· Stage
1
Daily volume of liquid
A = P x q
If the WC has a 10-litre cistern and each person flushes it four
times a day, the sewage flow q = 4 x 10 = 40 litres per person per day and A = 5
x 40 = 200 litres.
· Stage
2
Volume for sludge and scum
B =P x N x F x S
Assume N is 3 years; from Table 6.2, F = 1.0; as only WC wastes
go to septic tank S = 25 litres per person per year.
So B = 5 x 3 x 1.0 x 25 = 375 litres
· Stage
3
Total tank volume V = A + B =200+375 = 5751(0.575
m³)
As this is less than the minimum recommended volume of 1.0
m³, the dimensions for the minimum volume should be calculated.
· Stage
4
Assume liquid depth = 1.5 m.
Assume tank width is
Wm.
Assume two compartments:
length of first = 2W
length of second =
W
Volume of tank = 1.5 x (2W + W) x W = 4.5 W²
If 4.5 W² = 1.0 m³, then W = 0.47
m
As this is less than the recommended minimum width of 0.6 m,
assume W = 0.6 m.
Length of first compartment (2W) = 1.2 m
Length
of second compartment (W) = 0.6 m
Depth of tank from floor to soffit of cover
slab
= 1.5 m (liquid depth) + 0.3 m (freeboard) = 1.8
m
The tank volume (excluding freeboard) is:
(1.2 + 0.6) x 0.6 x 1.5 = 1.62 m³
which is larger than the required volume calculated in stage 3.
This is no disadvantage; in practice the minimum retention time will be greater
than 24 hours or the tank will provide longer service than three years before
requiring desludging.
Aqua-privy design
Aqua-privies are basically small septic tanks. They have the
same purpose as septic tanks and work in the same way. It is recommended
therefore that they are designed in the same way as septic tanks. It is also
recommended that the minimum size of tank should be 1.0 m³. This is because
smaller tanks are more difficult to build and the turbulence produced by the
inflow will prevent proper settlement.
Disposal of effluent from septic tanks and aqua-privies
· Example
8.6
Determine the size of soakpit required in porous silty clay to
dispose of the effluent from the septic tank considered in Example 8.5.
From Example 8.5, the sewage flow is 200 litres per day.
From
Table 5.4, the infiltration rate for sewage is 201 per m² per
day.
Therefore, the wall area required is 200/20 = 10 m²
If the pit is 1.5 m in diameter, then the depth required from
the bottom of the pipe from the septic tank to the bottom of the pit is:
10/(p x 1.5) = 2.12 m
· Example
8.7
Determine the size of drainage field required in porous silty
clay to dispose of the effluent from the septic tank considered in Example 8.4.
From Example 8.4 the sewage flow is 1440 l per day. From Table
5.4, the infiltration rate for sewage is 20 l per m² per day.
So the wall area required is 1440/20 = 72 m²
If the effective depth of the trench (the depth from the bottom
of the pipe to the bottom of the trench) is 0.6 m, the length of trench required
is:
72/(0.6 x 2) = 60 m
This allows for infiltration on both sides of the trench.
If the plot is large enough, the drainage field should consist
of two trenches, each 30 m long, connected in series.
Composting toilets
Double-vault latrines
The design of a double-vault latrine is similar to that of a pit
latrine, i.e., the volume of each vault is calculated using the formula:
V= N x P x R
where
V= the effective volume of the vault (m³)
N
= the number of years the vault must last before becoming full
P = the
average number of users
R = the estimated sludge accumulation rate for a
single person (m³ per year).
The difficulty with vault design is that very little information
exists on the sludge accumulation rate in vaults where excrete are mixed with
ash and other organic material, and there has been little research into the
pathogen survival rate in such an environment.
Desludging period
Pit latrines are usually designed such that excrete are not
handled for two years. Since the inside of a composting toilet is similar to
that of a pit latrine, it is reasonable to assume that it should be designed
using similar parameters. However, some researchers disagree with this, saying
that the low moisture content of the compost produces very alkaline conditions
that destroy the pathogens in a much shorter time. Times as low as four months
have been suggested. In the absence of more accurate information, however, a
two-year retention time is recommended.
Sludge accumulation rates
The accumulation rate for the excrete component of the compost
can be determined in the same way as for a double-pit latrine. In the absence of
more accurate local information, figures 50% greater than those given in Table
5.3 are suggested.
Estimating the volume of ash and other organic material is more
difficult. Experience in Viet Nam indicates that approximately twice the volume
of faeces has to be added (Jayaseelan et al., 1987). Rybczynski (1981) suggested
five times the volume of faeces, and Kalbermattan et al. (1980) recommended
allowing 0.3 m³ per person per year for all wastes.
In the absence of information to the contrary, it is suggested
that the total sludge build-up rate is calculated as three times the estimated
faecal build-up rate.
· Example
8.8
Design a doub1e-vault composting toilet for a family of six who
use paper for anal cleaning.
The effective volume of each vault (V) must be:
2 x 6 x (0.06 x 1.5 x 3) = 3.24
m3
Vaults are usually sealed when they are three-quarters full,
therefore the actual volume of the vault must be:
4/3 x 3.24 = 4.32 m³
If the vault has a plan area of 1.3 x 1.3 m, the depth will be:
4.32/(1.3 x 1.3) = 2.56 m
Continuous composting toilets
Even fewer design data are available for continuous composting
toilets than for double-vault latrines. Past designs have been empirical and
little published information exists indicating the level of their success. It is
suggested that, until more data are available, the size of the primary tank in
the toilet should be based on the formulae and factors used for double-vault
latrines. The second tank should be 10-20% of the size of the first tank. The
floors of both tanks should slope at an angle of 30° to the horizontal. No
design data exist for calculating the size and number of aeration channels or
the diameter and height of the ventilation pipe.
· Example
8.9
Using the information given in Example 8.8, design an
appropriate continuous composting toilet.
From Example 8.8 the volume of the primary tank should be 4.32
m³.
The volume of the second tank will be:
4 3 x 0.1 5 = 0.65 m³
Assuming the first tank is 1.2 m wide and 2.2 m long then its
depth will be 1.65 m.
The length of the second tank will be:
0.65/(1.2 x 1.65) = 0.33 m
This is short and would make emptying very difficult; increase
the length to 0.5 m.
Since the vault floor must slope at an angle of 30°, the
depth of excavation at the outlet end will be greater than the depth at the
inlet.
Assuming the floor of the second tank is horizontal the internal
floor level will be at a depth of:
1.65 + 2.2 tan 30° = 2.9 m
Fig. 8.2 shows the final internal dimensions of the tank.
Fig. 8.2. Internal dimensions of the
continuous composting toilet designed in example
8.9


