Chapter Five Structure of the Compost Heap and Major Methods of Preparing Manure
A. Structure of compost manure
The construction of a compost heap is similar to that of any
other structure. A complete heap comprises layers of various materials and each
layer has special functions in the heap. Basically, a complete heap of compost
manure consists of the following parts:
1. Layer '0': grass/dry leaves
This layer has several functions.
(a) It helps in aeration of the heap.
(b) It prevents too much water from soaking the refuse as excess
water easily trickles downwards.
(c) It absorbs exhausted nutrients from the upper layers of the
decomposing heap. This layer should be 10 to 15 centimetres thick.
2. Layer 1: Refuse
This is the layer that is being made to decompose and it absorbs
plant nutrients from the overlying layers, preserving them instead of letting
them get exhausted in the soil. Usually, the width of this layer is 15
centimetres.
3. Layer 2: Dung
This layer consists of dung or any other type of livestock
fertilizer. The function of this layer is to produce nitrogen in the heap so as
to enable the micro-organisms function well in the decomposing of the refuse.
This layer also adds phosphate and other plant nutrients to the heap. It also
fixes bacteria and fungus in the heap. This layer should be 2 centimetres wide.
If the farmer does not have livestock dung, he may use other sources of
nitrogen, such as legumes, left-overs or artificial fertilizer such as sulphates
of ammonia.
4. Layer 3: Ashes
Ashes contain calcium and potassium, which are required by the
plant and help in the decomposition process by regulating the pH in the heap.
This layer is two centimetres wide.
5. Layer 4: Soil
This layer has the following roles:
(a) Prevents the ammonia produced in the lower
layers from escaping into the atmosphere.
(b) Prevents loss of temperature and humidity from the heap.
(c) Increases plant nutrients in the heap.
This layer is two centimetres wide.
NOTE: Water is sprinkled on top of the soil layer. This is
intended to increase the moisture in the lower layers, and especially the refuse
layer, so that the microorganisms can function well in decomposing it.
6. Inner cover
This is the cover on the heap. As explained earlier, the cover
has three roles:
(i) It helps preserve temperature and humidity in
the heap.
(ii) Regulates air circulation therein.
(iii) Helps condense the
water vapour in the heap, thus maintaining its moisture
level.
7. Outer cover
The role of this cover is to prevent too much rain water which
may cause:
· exhaustion of
plant nutrients in the heap.
· loss of humidity in the heap.
· saturation of the heap and
· blocking of air spaces in the
heap.
Without this cover, the result would be a poor quality
fertilizer.
B. Main steps in the preparation of
compost manure
Farmers intending to start the production of compost manure are
usually confronted by two main barriers:
(a) Inadequate water.
(b) Lack of dung or other farmland manure since they do not keep
livestock.
In an effort to deal with the above impediments, an explanation
of how to make compost manure under these conditions is offered below.
There are several ways in which compost manure may be made. Any
particular method to be adopted by the farmer will depend on several factors:
(a) The capability and ingenuity of the farmer in
making compost manure.
(b) Climatic conditions.
(c) The amount of refuse he possesses.
(d) The type of rubbish available.
In this
chapter, three major methods of preparing compost manure will be explained.
These are:
(i) On the earth's surface.
(ii) In compost
pits.
(iii) In special boxes.
C. Preparation of compost
manure on the earth's surface
This method is used by farmers residing in regions that have
adequate rains or where there are other sources of water. This availability of
water removes one of the impediments in the making of compost manure. When using
this method, it is important to achieve a heap that is 1.5 metres high, 3 metres
wide and 3 metres long.
(a) Compost preparation in areas with adequate water and
livestock dung
Requirements
(i) Grass/dry leaves.
(ii) Adequate refuse especially food remains, banana skins,
cassava, yams, Irish potatoes, sweet potatoes, coffee, weeds, rice husks,
millet, maize, bulrush millet, wheat, etc.
(iii) Dung and/or other types of manure from livestock.
(iv) Adequate water.
(v) Ashes.
(vi) Soil.
(vii) Inner cover, for example old sacks and mats.
(viii) Outer cover.
(ix) The following implements: matchet, sickle, fork and an
irrigation can.
Preparation
(i) Avail yourself of dry grass and leaves.
(ii) Prepare and mix refuse as explained in Chapter Four,
Sections 1 (c) and (d).
(iii) Demarcate the area for making compost manure. This area
should be 3 metres long and 3 metres wide. However, these measurements can be
slightly altered depending on the amount of refuse available. It is important to
remember that smaller heaps do not produce quality manure since they do not
decompose well. The same applies to larger heaps since the mixing of the
component parts is more difficult without special machines. Therefore, if the
farmer has a lot of refuse to decompose, it is advisable for him to have several
heaps of average sizes instead of one large one.

Fig. 6: Various implements used
in me preparation of compost manure
Caution
(i) Where possible, the site for
manure preparation should be near the livestock shed in order to get the dung
easily.
(ii) The site for manure preparation should be near a farm.
(iii) For hygienic reasons, the manure should not be prepared
near an occupied house.
(iv) It is also advisable that the above requirements be met
before the construction of the heap starts because the structure must be started
and completed within a day.
(v) If possible, the site should be under a shade so as to
prevent the fertilizer from drying due to direct sunshine. If no natural shade
is available, you will need to prepare some
shelter.
Steps to Follow
Step 1
Prepare three sites, the first one for the construction of the
heap and the second and third ones for the shuffling of the component parts.
Label them Site 1, Site 2 and Site 3 (see Figure 7 below).
Loosen the soil at Site 1, which is the place for building the heap. There are
three main advantages of doing this.
(a) Excess water is removed from the heap.
(b) The worms found in the soil get to the heap.
(c) Aeration of the heap is regulated.

Fig. 7: Construction and
shuffling sites of the heap
Step 2
Erect pegs at each comer of these sites. The height of the pegs
should be 1.8 metres. The pegs help in guiding the farmer during the preparation
and shuffling of the heaps so that he knows their demarcations. If the site is
likely to be flabby, the foundation of the heap should be made of leaves or
sticks as they help in regulating air circulation. However, if there is no such
likelihood, then there is no reason for using the leaves or sticks.
Step 3
Start layer '0' with dry grass or leaves. It should be 10 to 15
centimetres thick.
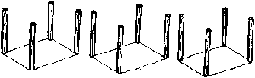
Fig. 8: Site for
the construction and shuffling of the compost heap
Step 4
The first layer will consist of the refuse prepared and shuffled
as explained in Chapter Four. It should be 15 centimetres thick.
Step 5
The second layer will consist of dung. It should be 2
centimetres thick.
Step 6
The third layer will consist of ashes. It should be 2
centimetres thick.
Step 7
The fourth layer will consist of soil. It should be 2
centimetres thick.
Step 8
Sprinkle water on the above layers. The amount should be only
enough to percolate to all layers; however, too much water will affect the
proper decomposition of the heap.
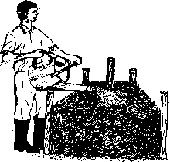
Fig. 9: A farmer sprinkling
water on a heap
Step 9
Repeat steps 4 to 8 (see Fig. 11 below). This repetition should
be undertaken until the heap attains a height of 1.5 metres; higher than that
will make the heap too heavy, resulting in three main problems.
(i) There will be too much heat which the
micro-organisms will not withstand.
(ii) Air circulation will be impeded.
(iii) The shuffling of the heap will be difficult, especially in
the absence of special equipment.
During the shuffling, erect a peg in the middle of the heap
ensuring that it sinks in adequately.

fig. 10: Erect a peg in the
middle of the heap
Step 10
Remove the pegs from the stalk. At times one peg could be left
intact to serve as a gauge of the temperature and the heap. The resultant
hole(s) aid in the circulation of air in the heap.
Step 11
Cover the heap with the inner cover.
Step 12
Place or construct a roof (outer cover), a raised platform or
shed above the heap and wait for maturation of the manure to take place before
applying it to the farm.
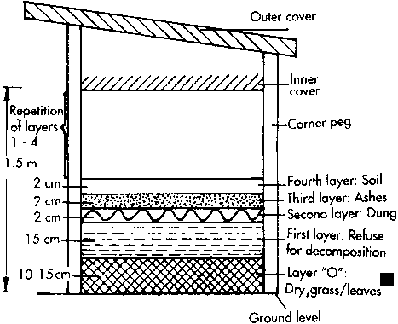
Fig. 11: A complete heap of
compost manure
Note
The farmer is advised to sprinkle water on the heap regularly.
If there is rain, it is important to remove the inner and outer covers
occasionally for the heaps to receive a moderate amount of rain. Care should be
taken to avoid soaking the heap with water all the time.
Step 13
Shuffle the heap (see Chapter Four). The first shuffling should
be done on Site 2 fourteen (14) days following the completion of the heap
structure. The second shuffling should be done 14 days thereafter and should be
done on Site 3. The 14-day period may be extended depending on the rate of
decomposition. During the shuffling, ensure that the layers that were at the
top, the sides and the base of the heap are put in the middle to enable them
decompose properly.
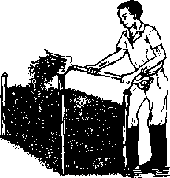
Fig. 12: A farmer
thoroughly mixing and shuffling the heap
Shuffling has the following advantages:
(a) It enables every part of the heap to get enough
air and moisture.
(b) Every part gets the micro-organisms required (as the
shuffling distributes these micro-organisms throughout the heap). In this way,
the decomposition process is accelerated.
(c) It enables uniform distribution of warmth in the heap,
resulting in uniform decomposition of the heap.
(d) It reduces chances of the formation of layers that might
otherwise be air- and water-tight to the point of blocking free penetration into
the heap.
If the above steps are carefully followed, the compost manure
should be ready for use after 10 to 12 weeks since the completion of the heap
structure. Incase the decomposition was satisfactory, the process of
constructing the heap has to start again. The farmer will then correct all the
mistakes that may have been made in the first instance. Competent farmers ensure
that they always have one or more extra stalks under decomposition. The number
applies also to the heaps undergoing maturation or those already mature and are
awaiting application on the farm.
(b) Compost preparation in areas without livestock but with
availability of water
Requirements
(i) Dry grass or leaves.
(ii) Enough refuse; for example food remnants, banana skins,
cassava, Irish potatoes, sweet potatoes, yams, sugar-cane peelings, weeds, etc.
(iii) Domestic ashes.
(iv) Enough water.
(v) Dry grass that can easily decompose.
(vi) An inner cover.
(vii) An outer cover.
Preparation
(i) There should be enough dry leaves or grass.
(ii) Prepare and shuffle the refuse as explained in Chapter
Four.
(iii) Prepare three sites whose measurements are as
explained above; one on which to construct the heap and the rest for the purpose
of shuffling. They should be labelled Sites 1, 2 and 3 as shown in Figure
8.
Step 1
Loosen the soil on Site 1.
Step 2
Erect pegs at the comers of Site 1. The pegs should be 1.8
metres high. Erect two or three other pegs at different places of Site 1. As
already explained, if the site is likely to be flabby, start the construction
with tree branches. If the site cannot be flabby, then there is no need to do
so.
Step 3
At Site 1, place layer '0' that is composed of grass or leaves.
The thickness should be 10 to 15 centimetres.
Step 4
Prepare the first layer. This layer consists of the refuse to be
decomposed. The thickness should be 30 centimetres.
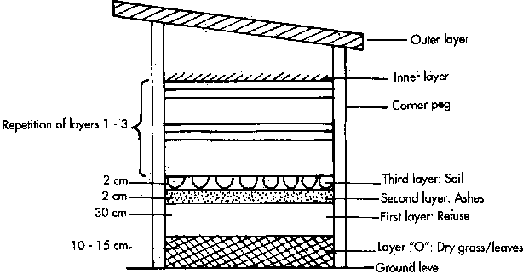
fig. 13: Heap of compost manure
showing me various layers
Step 5
The second layer consists of domestic ashes (or lime) and it
should be 2 centimetres thick.
Step 6
The third layer consists of soil and is 2 centimetres thick.
Step 7
Sprinkle adequate water on the fourth layer so that all layers
are adequately moist.
Step 8
Repeat steps 4 to 7 until the stack reaches a height of 1.5
metres.
Step 9
Remove the pegs that are in the middle of the heap.
Step 10
Place the inner cover over the heap.
Step 11
Place the outer cover over the heap.
Step 12
If decomposition progresses well, after a few days the height of
the heap reduces by 15 to 30 centimetres and the shuffling should be done on
Site 2 after 30 days. During this process, ensure that the refuse on top, at the
sides and the base of the heap is put in the middle. This facilitates uniform
decomposition.
Start preparing another stack at Site 1, which is now empty.
After another 30 days, transfer the decomposing refuse from Site 2 to Site 3 and
that one on Site 1 to Site 2. By the third month, the compost manure will be
ready. The compost manure (which is now humus) should be removed from Site 3 and
be either applied to the farm or stored for future use. The refuse in Site 2 may
be shuffled onto Site 3 and that on Site 1 onto Site 2. A new stack may be
prepared on Site 1, which is now empty. Following this process, after the first
four months, the farmer may have fresh compost manure on a monthly basis.
(c) Compost preparation without use of water in areas with
plenty of fresh coffee foliage and cattle
Requirements
(i) Plenty of easily decomposing plants.
(ii) Ashes.
(iii) Leguminous plants and products.
(iv) Plant remains; for example, fruit peelings, barks of coffee
trees, etc.
(v) Soil preparation: the farmer should ensure that there is an
adequate supply of plants that hold a lot of water. One preparation method is
that of growing these plants. The farmer should also have enough
legumes.
Prepare three sites 1, 2, and 3 for the construction and
shuffling of the compost heap. Each site should be 3 metres in length as well as
in width.
However, these measurements may be reduced depending on the
amount of available refuse and manure, as well as other needs. The steps to be
followed are as follows:
Step 1
Cut the plants into 10-centimetre bits and split them where
necessary. The split bits should be left for one week in the cattle sheds so
that they may mix up with dung and urine. The same applies to legumes. The
mixture should be removed from the cattle shed after one week.
Step 2
The construction of the heap should start on Site 1 by placing a
layer of grass or leaves. This layer should be labelled '0' and should be 10 to
15 centimetres thick.
Step 3
Arrange the mixture explained in step 1. This first layer should
be 40 centimetres thick.
Step 4
Arrange the second layer which consists of barks of fruits,
coffee berries, etc. The width of this layer depends on the amount of bark
available.
Step 5
Arrange the third layer which consists of ash. It should be 2
centimetres thick.
Step 6
Arrange the fourth layer which consists of soil. Its should be 2
centimetres thick.
Step 7
Press the layers down sufficiently by trampling upon them.
Step 8
Repeat steps 3 to 7 until the stack is 1.5 metres high.
Step 9
Place the inner cover on top of the heap.
Step 10
Construct the outer cover.
Step 11
Use Site 2 to shuffle the heap after 14 days. After 21 more
days, relocate the refuse heap on Site 2 onto Site 3.
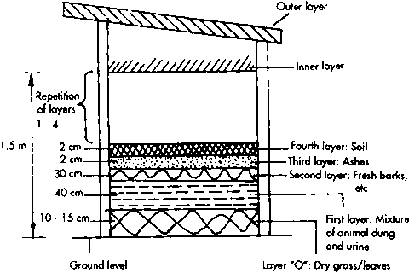
Fig. 14: Structure of the
compost heap
As explained earlier, this process is continued on rotational
basis. After 21 more days (which is the maturation stage) the compost manure
will be ready for application on the farm.
D. Preparation of compost manure in pits
The second main method of making compost manure is through the
use of compost pits. However, this is applicable only where there is lack of
water or rain. Generally, the three ways of making compost manure which were
explained earlier are used where there is plenty of water or rain; they are also
applicable in the making of compost manure in pits. This means that the
explanation offered above in respect to making compost manure is applicable to
preparing it in pits. Therefore, repetition is not necessary here, except to
emphasise that the site for making the pit should have the following
requirements:
(a) It should be flat.
(b) The water table should be low - there should be no
possibility of availability of underground water.
(c) There should be no possibility of water getting into the
pits.
(d) To limit the problem of inadequate air the pit should not
exceed a depth of one metre.
(e) The edges of the pit should have a slope so as
to facilitate good service to the pit, especially that one of shuffling the
contents. The pits are numbered 1, 2, and 3 similar to the sites explained
earlier. After filling the pits, cover them with the inner and outer
covers.
E. Preparation of compost manure in boxes
The third major method of making compost manure is through the
use of boxes. This is done by farmers who need small quantities of manure or
those with small quantities of refuse but who have the ability to buy or make
the boxes.
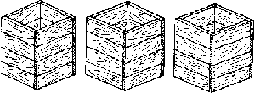
Fig. 15: Three boxes used for
the preparation of compost manure
The boxes are open on both ends, the top and the bottom. Each
box measures one square metre and may be made from bricks, timber, iron sheets,
etc. as long as they are able to preserve heat, facilitate circulation of air
and retain adequate moisture. Three boxes are required for a good shuffling of
the manure.
Requirements
(a) Adequate rubbish.
(b) Three boxes open both at the top
and bottom.
(c) Livestock manure, especially cowdung.
(d) Domestic
ash.
(e) Enough water.
Preparation
(a) Prepare and shuffle the rubbish to be decomposed as
explained in Chapter Four.
(b) Prepare the boxes.
(c) Prepare livestock
manure, domestic ashes and enough water.
Steps to Follow
Step 1
Loosen the soil at the site where the compost manure will be
prepared.
Step 2
If necessary, put in place a mechanism for letting in air from
the bottom as explained earlier. Leaves, timber, layers of bricks, etc. may be
used.
Step 3
Place or build the box on top as stated under Step 2.
Step 4
Build a heap inside the box as follows:
Layer '0'- Dry grass/leaves - 3 centimetres
Layer
1- Refuse -15 centimetres
Layer 2 - Dung - 2 centimetres
Layer 3 - Ashes -
2 centimetres
Layer 4 - Soil - 2 centimetres
Step
5
Sprinkle water on these layers.
Step 6
Apart from layer '0', repeat layers 1 to 4 until the box is
full.
Step 7
Place the inner cover on top of the box.
Step 8
Build a roof (outer cover) on top of the box to prevent an
improper decomposition of the refuse or spoilage.
Step 9
After 14 days, the heap in box 2 should be shuffled. The second
shuffling is to be done after 14 days when the refuse in box 2 is moved into box
3. If another shuffling is necessary, it will be done in another 14 days.
Following this, the refuse should be left alone to undergo decomposition and for
the fertilizer to mature.
Usually, compost manure is ready for use within 12 weeks
following the preparation of the heap in the box.
Note
In cases where the farmer is unable to prepare compost manure
due to unavailability of some essential items, the farmer should ensure that all
the refuse coming from plants and animals should be made to decompose and
returned to the soil. This means that the remains of crop plants after harvest
or preparation, food left-overs, rubbish swept from the house, or other refuse,
should not be discarded aimlessly.
It is very helpful when farmers see for themselves the good
quality of plants brought about by the application of compost manure on the
farm. We wish to encourage all farmers to be more modem by preparing and using
compost manure, thus contributing to soil conservation and the protection of the
environment.