Back to Home
Page of CD3WD Project or Back to list of CD3WD Publications
 |  |  | Irrigation Reference Manual (Peace Corps, 1994, 485 p.) |  |  | Chapter 1 - Introduction | |  | 1.1 The role and purpose of irrigation | | | 1.2 Introduction to the irrigation reference manual | | | 2.1 Watersheds | | | (introduction...) | | | 2.1.1 Watershed hydrology | | | 2.1.2 Hydrologic processes | | | 2.1.3 Assessing watershed conditions | | | 2.1.4 Soil and water conservation practices | | | 2.2 Water flow measurement | | | 2.2.1 Units of measurement | | | 2.2.2 Measuring devices in open channels | | | 2.2.3 Float method | | | 2.2.4 Weirs | | | 2.2.5 Siphon tubes | | | 2.2.6 Bucket and stopwatch method | | | 2.2.7 Orifices | | | 2.3 Surveying | | | (introduction...) | | | 2.3.1 Profiling | | | 2.3.2 Steps in making a topographic man | | | 2.3.3 Abney level surveying | | | 2.3.4 Simple levels for use in surveying contour lines | | | 2.3.5 Compass use | | | 2.4 Soil-Plant-Water relationships | | | (introduction...) | | | 2.4.1 Soil moisture storage and availability | | | 2.4.2 Estimating soil water characteristics on site | | | 2.4.3 Development of the soil water reservoir | | | 2.4.4 Soil water availability and crop use patterns | | | 2.4.5 Soil intake characteristics | | | 2.4.6 Soil chemistry and fertility | | | 2.5 Conducting initial environmental evaluations of irrigation projects | | | (introduction...) | | | 2.5.1 The role of environmental assessment | | | 2.5.2 Illustrative environmental review form for irrigation or water resource development projects | | | 3.1 Diversions | | | 3.1.1 Types | | | 3.1.2 Types of construction materials | | | 3.1.3 Construction and maintenance factors | | | 3.2.1 Hand mixing | | | 3.3.1 Spring box designs | | | 3.4.1 Location of the pond | | | 3.4.2 Availability of water | | | 3.4.3 Soils | | | 3.4.4 Topography | | | 3.4.5 Design end construction | | | 3.5 Pumps and water lifting devices | | | (introduction...) | | | 3.5.1 Types of pumps | | | 3.5.2 Pumps powered by humans and animals | | | 3.5.3 Animal-powered pumps | | | 3.5.4 Mechanically driven pumps | | | 3.5.5 Centrifugal pumps | | | 3.5.6 Propeller or axial flow pumps | | | 3.5.7 Mixed flow pumps | | | 3.5.8 Turbine pumps | | | 3.5.9 Sources of power | | | 3.5.10 Selection of pumps and power units | | | 3.5.11 Amount of water to be pumped | | | 3.5.12 The pumping lift or head | | | 3.5.13 Horsepower and efficiency | | | 3.5.14 Pump characteristic curves | | | 3.5.15 Power source and power Costs | | | 3.5.16 Pump location | | | 3.5.17 Pump installation | | | 3.5.18 Turbine and propeller pumps | | | 3.5.19 Intake structures | | | 3.5.20 Minimum water level | | | 3.5.21 Typical pump design | | | 3.5.22 Size of pumps | | | 3.5.23 Costs | | | 3.5.24 Evaluation of pumping plants | | | 3.5.25 Rower puma | | | 3.5.26 Hydraulic ram | | | 3.6 Wells | | | (introduction...) | | | 3.6.1. Methods of drilling: Percussion drilling | | | 3.6.2 Methods of drilling: Hand auger rig | | | 3.6.3 Other drilling equipment | | | 3.6.4 Hand dug wells |
|
Irrigation Reference Manual (Peace Corps, 1994, 485 p.)
Chapter 1 - Introduction
1.1 The role and purpose of irrigation
Irrigation is defined as the artificial application of water
onto cropland for the purpose of satisfying the water requirements necessary for
growing crops. Irrigation plays a key role in stabilizing food production in a
number of countries by either supplementing or replacing the need for natural
precipitation for the purpose of food production.
Irrigation is a key to the ability of many farmers, and even
nations, to feed themselves and provide an adequate standard of living.
Irrigation not only protects against drought but brings with it numerous other
benefits as well as occasional problems.
Irrigation has been credited with being a primary factor in the
rise and fall of civilizations. For example, in the region of Mesopotamia about
4,000 years ago, a thriving civilization depended on a highly developed
irrigation system. Waterlogging and salinization, as well as the erosion and
sedimentation resulting from irrigation, were instrumental in bringing about the
collapse of that empire. To this day, much of the land remains saline and has
not been recovered for crop production.
Currently, about one-fourth of the cultivated land in the world
is irrigated. In the United States, the 10% of cultivated land that is irrigated
provides some 25% of the value of agricultural production.
Irrigation can result in a number of benefits for the farmer and
his or her community. Irrigation stabilizes farm production by protecting
against drought and by increasing crop yields and quality when rainfall is
insufficient. It permits farmers to grow moisture-sensitive, high-value crops
and crops that will improve their diet. In some areas with proper climates,
irrigation allows farmers to raise two or three good crops in a year. It allows
them to plant on time, thus optimizing market conditions. In some areas,
irrigation systems are used for frost protection. There are numerous problems,
however that can be caused by poor design, construction, and management of
irrigation systems. Salinization and waterlogging are other results. Poor design
and management of systems often result in irrigation of only one-half or
one-third of the potential area. Thus, costs per unit area may be very high, and
the benefits of irrigation may extend to only a portion of the farmers who could
use the water.
Irrigation is only one of many inputs to a farmer's sustainable
agricultural system. Cultural practices, farmer resources, farmer preferences,
and other factors will affect the selection, design, construction, and operation
of an irrigation system. Therefore, it is very important that those who work in
irrigated agriculture understand clearly not only the benefits and consequences
of irrigation but also what it takes to maximize or optimize the benefits.
This manual was written in response to the need for providing
technical information to those who work with small-scale farmers in areas where
rainfall is deficient and where irrigation water is available or can be
developed from existing water
sources.
1.2 Introduction to the irrigation reference manual
The Irrigation Reference Manual is designed to complement and
support the materials covered in the Irrigation Training Manual. These reference
materials should provide sufficient background information to allow trainers,
trainees or Volunteers complete basic tasks in organizing and mobilizing
communities, assessing and developing water sources, and designing and managing
irrigation projects. The material is not intended to be all-inclusive but rather
to provide enough technical coverage to allow basic concepts to be understood
and basic construction or application procedures to be applied. The Irrigation
Reference Manual also includes an annotated bibliography to point trainers or
other users towards other references if more detailed descriptions of any topics
are needed.
The Manual has been designed to correlate information directly
with the format of the Irrigation Training Manual. All of the training section
headings are represented in this reference manual. Trainers or other users
should be able to immediately access technical descriptive or illustrative
materials that will support a specific training topic. In addition, the
Reference Manual concludes with an index to assist in locating materials
pertaining to any particular topic area.
The Reference Manual is organized to discuss the following:
Chapter 2 - Physical and Biological Resource Base
Trainers or other users are provided with sufficient background
to interpret basic hydrologic processes, measure the supply of water available
to support projects, survey an area of land, describe the relationship between
soils, water, and plant development, and prepare a simple assessment of
potential project environmental impacts. This information represents the
foundation on which any irrigation project will be designed, constructed, or
managed. A variety of techniques are included for each topic area and all of the
methodologies are appropriate to the typical working conditions experienced by
Peace Corps Volunteers.
Chapter 3 - Developing Water Sources
This material allows users of the manual to begin working with
simple construction practices necessary to capture, convey, store, and lift
water supplies. Basic principles in the use of concrete are described.
Illustrations and descriptions of pumping devices typically available to
Volunteers are also included.
Chapter 4 - Estimating Irrigation Requirements
This material provides representative formulas, charts, and case
examples that enable users to estimate the amount of water necessary to sustain
a crop. Information allowing the users to calculate water use for more than 25
different crops is included.
Chapter 5 - Farm Water Delivery Systems
Detailed discussions of the concepts and applications of
hydraulic principals are included in this chapter. Students typically benefit
from access to careful and thorough explanation of these concepts, and the text
has been developed to make these principals as practical as possible. The
chapter also includes sufficient conceptual and illustrative information to
allow trainers to communicate the factors involved in designing and implementing
irrigation systems using surface, sprinkler, or drip application methods.
Chapter 6 - Farm Water Management
The Manual provides a thorough description of the principals and
procedures followed in preparing a schedule of water use on farms and
methodologies that can be used to evaluate how effectively water and land is
being used by the farmer. The chapter concludes with a comprehensive set of
illustrations that communicate the techniques of irrigation scheduling in a
non-verbal manner.
Chapter 7 - Waterlogging and Salinity
Technical information is presented to enable trainers to
describe and demonstrate techniques for assessing the degree of waterlogging and
salinity problems that may be occurring and to apply chemical amendments or
cultural practices that can minimize or avoid such problems. The chapter also
includes a concise description of water quality as it affects irrigation
projects.
Appendix A - Math Skills and Tool Use
Common formulas, conversion charts, and algebraic and
trigonometric values are included to enable trainers or other users to easily
apply mathematical formulas. A list of tools commonly available to Peace Corps
Irrigation Volunteers is also included.
Appendix B - Community Organization and Development
A concise review of basic concepts important in working with
people-centered agricultural projects is presented. The discussion emphasizes
basic techniques that can assist a Volunteer's efforts to enter, interact, and
participate in community project efforts. The level of detail in this appendix
is limited because it is anticipated that Volunteers will be supplied with more
comprehensive community organization literature. In particular, it is
anticipated that trainers will attempt to provide each Volunteer with a copy of
Two Ears of Corn, an excellent reference book to guide any
community-based agricultural involvement.
Appendix C - Summary of International Irrigation Center (IIC)
Training Modules
The IIC has prepared a collection of 40 video modules that
present basic irrigation principals and practices. These modules were
specifically developed for conditions in Ecuador, but many have universal
applications. A description of the length, content, and applicability of each
module to Peace Corps training sessions is included for those trainers who may
have access to video equipment and the actual video cassettes.
Appendix D - Case Studies
Trainers can review these examples of different problems and
strategies used to develop small-scale irrigation systems worldwide to support
the material content in the technical training sessions. The case studies are
intended to be representative of typical conditions that may be experienced by a
Peace Corps Volunteer working with irrigation issues.
Appendix E - Annotated Bibliography
The Irrigation Reference Manual is intended to serve as a
primary source for basic information needed to design, implement, and manage
small or medium-scale irrigation projects. It is not, however, the only
reference that a practitioner would want to use. The extensive bibliography
includes a concise description of the specific values of each text that can be
consulted for further information by trainers or Volunteers.
Appendix F - Glossary of Terms
Concepts and principals can be most easily grasped when they are
presented in simple, concise descriptions. The glossary should assist trainers
in preparing descriptions that will enable trainees to comprehend terms quickly
and accurately. It is anticipated that the Irrigation Reference Manual will be
made available to Trainees, Volunteers, and other irrigation practitioners on an
as-needed basis. The material included in the Manual would be appropriate to
support a Peace Corps Volunteer's efforts in the field throughout his or her
term of service, and trainers may wish to request additional copies to
distribute to Trainees during the training. Alternatively, sections of the
Manual can be photocopied and distributed to support specific training sessions.
<<TOC2>> Chapter 2 - Physical and biological
resource base
|
Reference: |
Primary: |
(2), (9), (14), (18), (20-21), (27-28), (39), (44), (56-59)
|
|
Other: |
(16), (24) |
2.1 Watersheds
A watershed is the area representing all the land draining
moisture from the highest elevations, usually referred to as the headwaters, to
a specified outlet point. A single watershed can include all of the lands
draining into a main channel, often a river, including the tributary channels of
the entire river basin. For example, the Senegal River basin in West Africa with
its tributaries covers several hundred thousand hectares of land. A watershed
can also be subdivided to include only those lands draining a single tributary,
which may include only a few hundred hectares.
Watersheds are typically delineated using topographic maps. By
following the contour lines on the map, the dividing points between drainage
basins can be determined and the directions for flows identified (Figure 2.1).
Once the watershed is delineated, soil, water, and ecological resources within
the basin can be identified, and measures to protect these resources can be
developed.
Irrigation specialists are concerned with protecting and
developing the soil and water resources within watersheds and ensuring that
irrigation projects do not result in any disruptions to balanced ecological
processes. Specifically, it is important for an irrigation specialist to protect
the quantity and quality of water obtainable from a water source, avoid
conditions that promote flooding or extreme fluctuations in water availability,
and ensure that erosion does not result in a loss of agricultural land or
clogged canals and ponds.
Assessing and developing water resources requires an
understanding of the hydrologic processes influencing the movement and storage
of water within watersheds. Protecting the soil and water resource base requires
a knowledge of watershed conditions and implementation of conservation measures
that promote reliable water supplies of acceptable quality and minimal soil
loss.
2.1.1 Watershed hydrology
The hydrologic cycle (Figure 2.2) is easily understood: water
evaporates from the earth's oceans and other water bodies, is carried by air
currents, condenses due to temperature changes, falls to earth again as
precipitation, and finally flows back to water bodies to begin the cycle over
again.
Within this cycle there are several processes that affect the
timing and quantity of water moving through each phase. For example, as
precipitation falls some of it will be intercepted by vegetation before reaching
the ground. Some of this intercepted moisture will evaporate from plant surfaces
directly back to the atmosphere while the remainder will reach the ground
surface. Some water reaching the ground surface will evaporate, some will
penetrate the soil surface, and some may run off as surface flow. The
permeability of the soil surface will determine the rate and amount of water
that seeps into the ground. Water infiltrating into the ground provides
nutrients to plant roots to support their growth, recharges springs and
aquifers, and moves slowly downslope through the soil pore spaces to recharge
surface lakes and rivers.
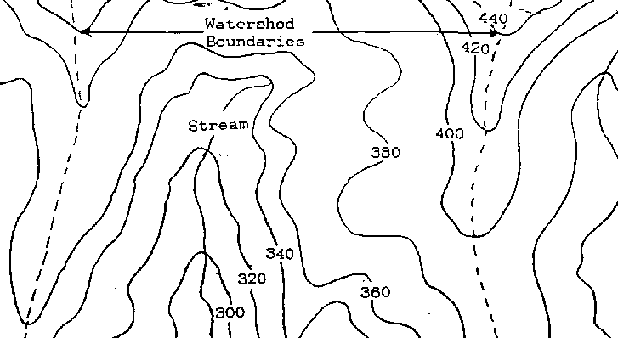
Figure 2.1 Watershed Boundaries
on Contour Map

Figure 2.2 The Hydrologic Cycle
(Ref. 21)
Human resource management practices often greatly influence the
hydrologic cycle processes. For example, the type of vegetation present will
influence the amount of precipitation intercepted and the rate at which water
can infiltrate into the ground. The area covered by vegetation also influences
the amount of soil moisture that is recycled to the atmosphere through
evaporation from exposed surfaces and plant transpiration. Land management
decisions often directly influence the type and amount of vegetative cover
present. Farming practices and other land use characteristics will influence
soil characteristics and thus the amount and quality of water infiltrating into
soils.
Water quality issues affect irrigation specialists primarily
from the perspective of salinity and sedimentation. The problems of high salt
content in water is discussed in detail in Chapter 7. Sedimentation is the
result of poor land management that causes excessive soil loss. Eroded soils can
clog canals and diversions, disrupt pipelines, fill in farm ponds or reservoirs,
contaminate wells, or result in a loss of arable lands. Being able to measure
hydrologic processes, and using this information to assess watershed conditions,
is necessary in order for Volunteers to effectively control water quality
concerns.
2.1.2 Hydrologic processes
There are standard methods used for quantifying and describing
hydrologic processes. Specifically, irrigation technicians should be familiar
with the concepts of precipitation, infiltration, surface runoff,
evapotranspiration, streamflow, and groundwater yields.
Precipitation is usually characterized in terms of
intensity, storm duration, and area covered. Rainfall intensity refers to how
much precipitation occurs within a given time period. It is typically expressed
in millimeters per hour (or inches per hour) and usually measured by seeing how
much rain fills a container of known volume in a specific period of time. The
length of time, or duration, of rain fall is expressed in minutes or
hours and is directly correlated with rainfall intensity. For example:
|
Depth in mm |
13.8 |
22.4 |
45 |
64 |
108 |
|
Duration (Min) |
5 |
10 |
30 |
60 |
360 |
|
Intensity, mm/hour |
166 |
134 |
90 |
64 |
18 |
Infiltration indicates how much water is absorbed into
the ground during a specified period and is typically expressed as a rate (e.g.
mm per hr or cm per hour). Infiltration capacity describes the maximum
amount of water that will infiltrate into a particular soil within a specific
time period. If the rainfall exceeds the infiltration capacity during the
specified period, then the excess water begins moving over the soil surface as
runoff. The infiltration capacity is determined by soil texture and
structure. Soil texture indicates the relative amounts of sand, silt, and
clay particles found within the soil. Soil structure indicates the way
these particles are bound together by organic materials and other adhesive
substances. Typical infiltration rates for different soil texture classes are as
follows:
|
Soil Texture Class |
Infiltration capacity cm/hour |
|
Loamy Sand |
2.5 - 5.0 |
|
Loam |
1.25 - 2.5 |
|
Silt Loam |
0.75 - 1.45 |
|
Clay loam |
0.25 - 0.5 |
Many soils that are initially dry will absorb large amounts of
water rapidly at first, but infiltration rates decline as the soil becomes
wetter. Infiltration rates can provide an important clue as to the capacity of
the soil to store moisture and the rate of runoff from a watershed.
Evapotranspiration, or ET, is the combination of
evaporation and transpiration. ET is generally estimated using simple formulas
described in Chapter 4. ET is typically expressed as a depth over a period of
time, such as mm or inches per month.
Surface Runoff describes the process of water movement
over the land surface that occurs when the precipitation rate exceeds the
ability of the soil to absorb the rainfall. Surface runoff is usually measured
as a depth or volume over time, such as mm or cm per hour or liters per second.
A hydrograph is a graphic depiction of the rate of runoff plotted over a
period of time for a particular watershed. Surface runoff supplies water to
lakes, ponds, wetlands, rivers, and streams. In extreme amounts, it can result
in flooding and severe erosion.
Volunteers should consult local hydrologists if they suspect
that flow rates might be large enough to damage irrigation structures. Stream
measurements conducted by governmental agencies such as ministries of water
resources, irrigation, or agriculture are important sources of streamflow
information.
Agriculture are important sources of streamflow information. For
small streams the information may not be available, and the Volunteer may have
to measure streamflows at various times of the year (see Section 2.2 of this
manual). Adjustments may need to be made to account for wet and dry years.
Aquifers or ground water reservoirs are soil, rock, or
mixed materials that are totally saturated with water (Figure 2.3). The surface
(top most area) of this saturated zone is called the water table. The
level of the water table may vary seasonally as recharge fluctuates and people
withdraw water through wells. Due to gravityground water flows from a location
where the water table is higher to where it is lower.
The permeability of aquifers vary according to the aquifer
material. Aquifer materials are typically a mix of consolidated and
unconsolidated (or fractured) rocks. Consolidated rocks are porous materials
held firmly together by compaction and cementation and are represented by
sandstones, limestones, and conglomerates. Unconsolidated materials include a
mix of boulders, gravel, sands, and clays.
Gravel aquifers are the most permeable and yield water easily
from wells. Gravel aquifers are often sources for high capacity wells.
Permeability usually relates to the coarseness of the aquifer material.
Unconfined or water table aquifers (Figure 2.3) have a
free water surface. Confined or Artesian aquifers (Figure 2.3) are
bounded by an impermeable or semi-impermeable layer that maintains the water in
the aquifer under pressure. Wells in artesian aquifers may flow freely without
the need for pumping.
One type of unconfined aquifer is known as a perched aquifer,
where an impermeable layer of limited size stops the percolation of water to
a deeper aquifer, thereby creating a small underground reservoir of limited
volume (Figure 2.3).
Surface springs or seeps occur in places where an impermeable
rock layer emerges at the ground surface. Ground water flows by gravity along
this impermeable layer and exits the ground at the spring site.
Aquifers function much like a surface reservoir, except in the
case of some artesian aquifers, pumps are required to extract the water from
below ground. Ground water quality may also be a concern in some locations. If
irrigation wells have been operating without causing problems to crop growth,
the water is probably of acceptable quality. In newly pumped areas, the water
should be sampled and evaluated before use in irrigation (See Chapter 7).

Figure 2.3 Types of Aquifers and
Location of Water
Source
2.1.3 Assessing watershed conditions
An assessment of watershed conditions should be an initial task
in the development of any project. Volunteers should be prepared to spend time
walking the watershed to observe and record information first-hand.
Technical aids useful in conducting an assessment of watershed
conditions include maps, aerial photographs, and data forms that can be used to
collect field information. Topographic maps at scales of 1:25,000 are valuable
for studying specific sites within watersheds or small watersheds of less than 2
km. Larger watersheds may require map scales of 1:100,000. Maps that have been
prepared to document characteristics of soils, vegetation, climate, geology,
hydrology, or social conditions should also be obtained.
Aerial photographs at scales of 1:10,000 to 1:15,000 should be
used wherever possible. If stereoscopic aerial photographs are available, it is
important that the overlap over the area depicted is not less than 50 percent
and not more than 55 percent along the flight line and 15 percent between flight
lines. This makes it possible to use the photographs to create three-dimensional
viewing of areas using a stereoscope.
Data forms should enable the collection of baseline technical
information quickly and with sufficient depth to make professional judgments.
Data forms should be prepared for information on soil characteristics, climate,
water sources, vegetation, social conditions, and land use practices.
Useful tools that will facilitate field work include:
· a shovel and soil auger for
investigating soil characteristics and bags to collect soil samples;
· an Abney level for measuring changes in
elevations;
· maps, photographs, and colored
grease pencils for marking photos;
· small,
clean jars for collecting water samples; and
· clipboards and data forms.
The inventory of watershed conditions should focus on evaluating
the following characteristics of the watershed:
A. Soils: list general types evident in the watershed;
note areas with high potential for erosion; link soil types with natural
vegetation; note soils with potential for crop productivity.
B. Topography: link steep slopes with erodible soils;
note slope lengths, particularly in areas of high erosion potential; describe
slope aspects.
C. Hydrology: identify all potential water supply
sources; note drainage patterns, floodplains, and areas of flood potential;
interpret the amount of change occurring in the shapes, depths, or directional
patterns of channels; identify factors that could affect water quality,
including presence of grazing animals, areas of heavy sediment loading, or heavy
agrochemical use; obtain streamflow data on a daily, monthly, or annual basis
depending on the needs of your inventory.
D. Vegetation: classify general vegetation types in
watershed and link with soils and climatic characteristics; estimate the amount
of ground that is protected or covered by the natural or planted vegetation in
each vegetation type.
E. Land Use Practices: map the ways all land is currently
being used within the watershed, including grazing areas, crop production lands,
harvested forests; identify areas prone to inappropriate land uses; also
identify environmentally sensitive or unique areas, such as wetlands, important
wildlife habitat, and archeological sites.
In evaluating watershed conditions the objective is to qualify
or quantify the sensitivity and resilience of the watershed. Watershed
sensitivity describes a watershed's ability to withstand stress and
manipulation. Watershed resilience describes the ability of a watershed
to recover from damage evident on land surfaces, in stream channels, or in water
bodies. All watersheds can withstand some level of impact before the quality of
the soils and water degrade to a level that no longer supports biological
diversity and human goals.
Watersheds that are in a declining condition typically
demonstrate the following cycle of symptoms:
· reduced ground cover or
increased density of drainage channels,
· increased peak flows of
streams and rivers,
· deepened or widened channels
resulting from the erosive power of increased peak flows,
· lowered water tables under
alluvial floodplains, resulting from deepened channels and more rapid runoff,
· changes in the amount and type
of streamside and floodplain vegetation, resulting from the lowered alluvial
water tables,
· further channel degradation,
and the development of many new side channels and gullies, resulting from
changes in streamside and floodplain vegetation, and
· increased runoff rates leading
to a decrease in available soil moisture, which further reduces ground cover and
results in another cycle of decline in watershed condition.
Any land use or management practice that tends to speed up the
delivery of precipitation to the stream channel(s) will tend to have a negative
influence on watershed
conditions.
2.1.4 Soil and water conservation practices
A primary objective in watershed management is to ensure
balanced soil and water systems. Protecting water quality and supply and
preventing erosion are the major focus of this objective.
Erosion is the removal of soil through naturally
occurring processes, including wind, falling raindrops, water flowing on the
surface of the ground, and the force of gravity. The impact of falling rain or
wind-borne soil particles can cause more soil particles to detach and move under
the force of gravity, moving water, or wind. Any factor that lessend the impact
of rain or strong winds reduce the amount of soil particles detached and eroded.
Removal of ground cover and changes to the natural drainage patterns are two
primary causes of accelerated erosion.
Vegetative cover intercepts much of the rainfall and reduces the
velocity and intensity of rain drops. Plant roots also create openings in the
soil and increase infiltration of rainwater into the soil. This reduces the
amount of water flowing on the surface that might otherwise accelerate the
downslope movement of detached soil particles. Undisturbed forests and pastures
frequently have infiltration rates that exceed rainfall rates, thus eliminating
or reducing the amount of erosion due to water.
Erosion is typically classified into four categories:
Sheet Erosion - A uniform depth of surface runoff moves
detached soil particles to tiny channels (rills) that have formed.
Rill Erosion - The surface of the ground is cut and
deepened enough to concentrate runoff and soil particle movement in a tiny
channel or rill. Rills are generally less than 1 foot or 30 cm deep.
Gully Erosion - Rills over 30 cm (one foot) deep are
usually referred to as gullies. As more and more flow concentrates in rills,
they deepen, speed up runoff, and lower the water table of alluvial lands. As
the number of channels increase, peak flows increase and productive lands are
lost.
Channel Erosion - As peak flows increase, their erosive
force cuts away the banks or beds of natural stream channels, changing drainage
patterns and frequently further accelerating flow rates and flooding.
Eroded soil particles are carried by flowing water or wind
currents until the flow no longer has sufficient energy to carry or move a given
particle. The particles are then deposited. In the case of water erosion,
sediment deposits can reduce water quality, destroy the spawning and rearing
areas for fish, reduce the life of.i.ponds or channels by filling and clogging,
and increase downstream flooding through loss of channel capacity.
There are two simple ways to determine if serious erosion is
occurring in a watershed:
1. Collect water samples at an outlet point in a drainage basin
and observe the amount of sediments in the water over time.
2. Build simple runoff plots at several points in the watershed.
Runoff plots can be built using large stakes or pins driven into the ground (at
least 25 cm long) with a large washer at ground level. Measure the distance
between the head of the stake and the top of the washer after drilling the pin
into the ground. Re-measure this distance on a monthly basis for a rough
estimate of monthly soil loss rates.
For example: over a one year period, the distance between the
top of the pin and the top of the washer has increased by 10 centimeters (0.1
meter). Therefore, for every hectare (100 meters  100 meters) on the slope you can estimate 100
  100
100  0.1 = 1000 cubic
meters of soil loss.
0.1 = 1000 cubic
meters of soil loss.
It is also possible simply to use visual observations of the
increasing exposure of tree roots or raised soil pedestals to indicate soil
loss.
Measures for erosion control are based on either reducing the
energy that detaches soil particles or increasing particle resistance to
movement. Where it is not possible to reduce erosive energy and/or increase
resistance to particle movement, it may be necessary to use methods that trap
eroded sediments before they leave the site or are delivered to channels.
Reducing erosive energy can be accomplished by:
· increasing infiltration,
primarily through increasing plant cover,
· reducing the length of slopes,
primarily through berms and dips,
· diverting runoff away from
disturbed areas using berms and drains,
· reducing slope gradient with
check dams and land shaping,
· increasing the surface
roughness of the ground to slow runoff, primarily through revegetation, mulches,
and planted buffer strips, and
· avoiding the creation of
unmanaged channels.
Increasing particle resistance to movement can be accomplished
by:
· increasing ground
cover,
· improving soil aggregate structure,
for example, by increasing soil organic matter,
· lining channels, and
· conveying runoff through pipes or other medium.
Eroded sediments can be trapped using check dams, brush cover on
hillsides, and earth or brush berms.
Techniques that can be applied to conserve or restore soils in a
watershed or within an irrigated field include the following:
a. Protecting native vegetation.
b. Re-establishing native vegetation.
c. Establishing perennial crops (pasture, fruit trees,
agroforestry systems), especially on steep slopes.
d. Practicing minimum tillage or mulching in crop cultivation
systems that emphasize annual crops.
e. Using a crop rotation sequence rather than continual
successive plantings of the same crop.
f. Planting strips of vegetation along the contour that serve to
anchor the soil in place with their roots and slow down the movement of water
downslope.
g. Constructing ditches along the contour at a 1 percent slope
to divert excess water into protected drainageways.
h. Constructing terraces to provide a level platform for planted
crops in combination with contour ditches, thus reducing slope gradient, slope
length, and runoff velocity. Terraces are flat earth ridges, perhaps 3 meters
(10 feet) wide at the base, usually constructed along a contour line. They must
have enough slope to drain water, but should be less than 2 percent slope to
minimize erosion. Next to tree cover, terraces probably offer the best measures
for conserving soil and water on steep slopes.
i. Diverting flows in gullies and constructing check dams to
trap sediments and encourage revegetation within the gully bed. Gully erosion
control is extremely difficult, and success is not common. Gullies are often
referred to as a kind of "cancer" on the landscape. When trying to use check
dams or brush to slow the velocity of flow and encourage infiltration in
gullies, it is important to work from the bottom (mouth) of the gully uphill
towards the head. Starting at the top of the gully and working downhill usually
results in undercutting of the check dams, as the force of water at the top is
frequently too strong.
j. Constructing brush "carpets" on steep slopes by using wooden
stakes to pin down leafy brush, thus slowing the velocity of the runoff and
encouraging it to infiltrate into the soil.
k. Building wire mesh boxes filled with stones (gabions) and
placing them in a stream channel in a manner that protects the banks and bed
from the erosive force of streamflows. Gabions are flexible, permeable, and
generally very inexpensive to make. They can be stacked against the sides of
gullies or streams to prevent bank erosion, or staggered up steep slopes to slow
runoff.
l. Protecting or replanting streamside vegetation to slow and
filter runoff reaching streams and strengthen the banks of channels.
m. Reducing or eliminating unmanaged fires that would otherwise
rapidly eliminate vegetative cover and increase nitrate and other contaminants
in runoff.
n. Reshaping natural drainageways or digging artificial
drainageways of a low, broad shape that drain excess water away from fields and
protecting these drainageways from erosion by lining with rocks, planting grass,
or placing drop structures or check dams periodically.
o. Selecting and planting crops in a pattern that provides
maximum ground cover, aerates the soil through deep rooting, and reduces the
force of runoff.
Cuttings and seedlings should be planted along with any
temporary erosion control structures to insure long-term erosion control when
the brushwood or stakes have decayed. Examples of these conservation measures
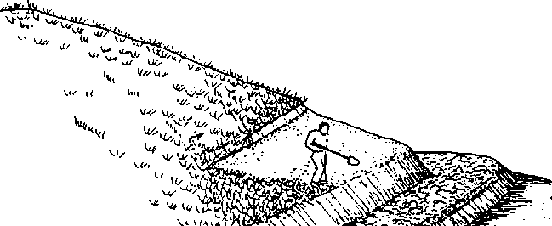
are illustrated in Figures 2.4 through 2.17 and Tables 2.1 and 2.2.

Figure 2.4 Plugging of Smaller
Gullies (Ref. 56)
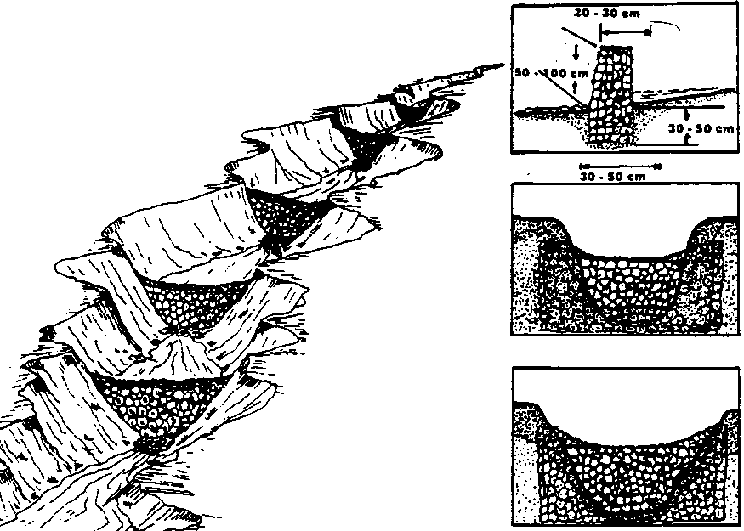
Figure 2.5 Construction of a Rock
Check Dam

Figure 2.6 Brushwood Check Dam
(Ref. 56)

Figure 2.7 Pole or Log Check
Dam

Figure 2.8 A Woven Wire Check
Due
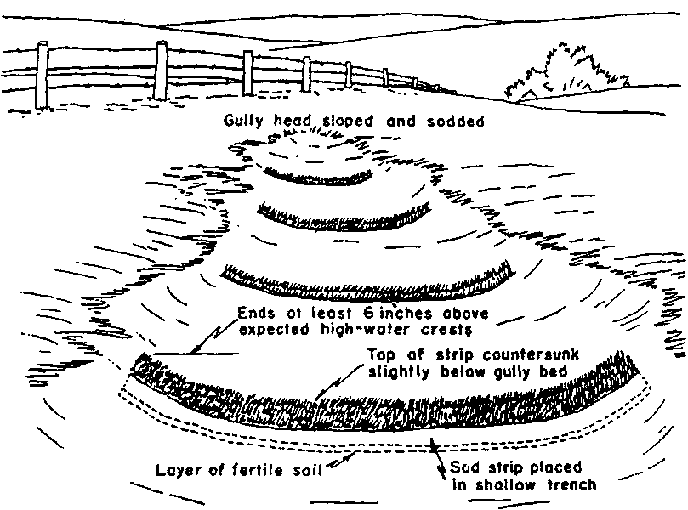
Figure 2.9 Sod Strip Checks on a
Small Gully

Figure 2.10 Water Drainageway
Protected Against Erosion by Rock Lining (Ref. 9)

Figure 2.11 Retention Well as a
Site for Diverting Runoff eater (Ref. 9)
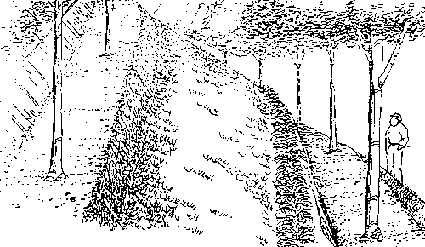
Figure 2.12 Discontinuous Narrow
Terrace (Orchard Terrace) (Ref. 9)

Figure 2.13 Discontinuous Narrow
Terrace (cross section) (Ref. 9)
- If initially constructed with an inverse slope of 15-20%, some
self-compaction occurs resulting in a slope of approximately 10X.

Figure 2.14 Contour Planting Beds
(Ref. 9)

Figure 2.15 Contour Infiltration
Ditch (Ref. 9)
Figure 2.16 Bench Terrace Construction Sequence "A" (Ref.
9)

1. The lower most terrace is formed
first and compacted thoroughly
2. me topsoil from the area of the
next higher terrace is removed and distributed evenly over the lower terrace

3. The second terrace is formed and
compacted, then covered with topsoil from the area of the third terrace.

4. Work progresses up slope, each
newly formed and compacted terrace is covered with topsoil taken from the slope
immediately above. Grass is planted along the risersof all terraces.
Figure 2.17 Bench Terrace Construction Sequence "B" (Ref.
9)

1. Terrace construction begins with
the uppermost terrace and with the 2 meter segment nearest the drainage side.
The topsoil is pulled over to one side of the section.

2. A well compacted section of the
terrace is formed.

3. The topsoil is then redistributed
over the same 2 meter terrace section.

4. Work progresses sideways a long
the uppermost terrace

5. Work progresses downslope. Work
begins at the drainage side of each terrace and progresses sideways

6. Grass is planted on terrace
risers.
Table 2.1 Bench Terrace Construction Guide (Ref. 9)
|
SLOPE (%) |
SOIL DEPTH* (Meters) |
TOTAL TERRACE WIDTH (Meters) |
PLATFORM WIDTH (Meters) |
|
.2 |
1.68 |
1.30 |
|
.3 |
2.5 |
1.94 |
|
20 |
.4 |
3.34 |
2.60 |
|
.5 |
4.26 |
3.30 |
|
.6 |
5.02 |
3.90 |
|
.2 |
1.16 |
.80 |
|
.3 |
1.72 |
1.20 |
|
30 |
.4 |
2.3 |
1.60 |
|
.5 |
2.98 |
2.10 |
|
.6 |
3.46 |
2.40 |
|
.2 |
.90 |
.56 |
|
.3 |
1.32 |
.82 |
|
40 |
.4 |
1.78 |
1.10 |
|
.5 |
2.25 |
1.40 |
|
.6 |
2.68 |
1.66 |
|
.2 |
.74 |
.40 |
|
.3 |
1.10 |
.60 |
|
50 |
.4 |
1.46 |
.80 |
|
.5 |
1.84 |
1.00 |
|
.6 |
2.20 |
1.20 |
* "Depth of A Horizon" in original changed to permit use in
eroded areas where horizons are often indistinct.
Table 2.2 Spacing of Contour Hillside Ditches (Ref. 9)
|
SLOPE (%) |
ANNUAL CROP |
PERSONAL CROP OR PASTURE |
|
Distance (m) |
Maximum Length (m) |
Distance (m) |
Maximum Length (m) |
|
2 |
42.0 |
90 |
|
|
|
4 |
25.0 |
120 |
|
|
|
6 |
19.3 |
160 |
|
|
|
8 |
16.6 |
200 |
|
|
|
10 |
14.9 |
260 |
40.2 |
140 |
|
12 |
13.8 |
280 |
33.5 |
140 |
|
14 |
13.0 |
300 |
28.9 |
140 |
|
16 |
11.4 |
340 |
25.3 |
160 |
|
18 |
10.2 |
380 |
25.0 |
180 |
|
20 |
9.2 |
420 |
24.0 |
200 |
|
22 |
8.4 |
470 |
23.2 |
200 |
|
24 |
7.7 |
500 |
21.4 |
210 |
|
26 |
7.2 |
500 |
19.8 |
220 |
|
28 |
6.6 |
500 |
19.5 |
220 |
|
30 |
6.3 |
500 |
18.9 |
220 |
|
32 |
|
|
18.7 |
220 |
|
34 |
|
|
18.6 |
230 |
|
36 |
|
|
17.7 |
230 |
|
38 |
|
|
16.9 |
230 |
|
40 |
|
|
16.2 |
230 |
2.2 Water flow measurement
2.2.1 Units of measurement
Generally, water measurement units may be divided into two
classes: those that express a certain volume and those that indicate a discharge
or volume per unit time.
The units depend on the system being used, either metric or
English. In the metric system, the more common units for volume are liters,
cubic meters, cm-ha, and m-ha. A cm-ha is the volume required to cover an area
of one hectare with a one-centimeter depth of water and is equivalent to 100
m3. In the English system, the common units are ac-in or ac-ft, which
correspond to depths of one inch and one foot, respectively, over an area of one
acre (43,560 ft2). All of these units are useful in expressing water
requirements, or water applied, in terms of depths, and their equivalents to
units of volume.
For discharge rates, or volume per unit time, common units in
the metric system are m3/see (cum/see) or liters/sec (lps) and, in
the English system, ft3/sec (cusec) or gallons per minute
(gpm).
2.2.2 Measuring devices in open channels
Nearly anything that partially restricts the flow in an open
channel can serve as a measuring device if it is calibrated. The majority of
these restrictions are not standard, however, and there are no formulas or
rabies available to determine their discharge. Even "standard" structures, if
not properly built, installed, and maintained may not operate as expected.
Standard devices include orifices, weirs, Parshall flumes, Cutthroat flumes, and
broad crested weirs. Submerged orifices may be used under limited head
conditions when trash and debris are not a problem. Weirs are useful and
economical where flows are not too large and sufficient head is available in the
canal. They are one of the oldest and most accurate devices when used under the
proper conditions.
The flow measurement device selected for installation will
depend on several factors, among which are:
1. The accuracy required. Most devices have an accuracy
of ±10% if they are properly installed and maintained. Many have better
than ±10% accuracy with careful fabrication, installation, and maintenance.
2. Ease of construction. A simple device that can be
manufactured locally with the required precision may give better measurements
than a more complicated one that is beyond the ability of local craftsmen to
construct.
3. Ease of use. Readings must be easily made and
accurately interpreted by the user.
4. Cost of the flow measurement device. Flow measurement
devices must be economical to encourage their purchase and use.
5. Topographic conditions and geometric shape of the channel
where the flow will be measured and the range of the canal discharges to be
measured. Some devices require large differences in head and are most
suitable for canals with significant slope while others will give satisfactory
measurements with small differences in head. Many devices have a limited range
of discharge for which they can be practically used.
Details of several common measuring devices such as orifices,
sharp crested weirs, broad crested weirs, Parshall flumes, and Cutthroat flumes,
as well as horizontal and vertical pipes, are provided in other publications.
The following is a presentation of various common and simple methods of flow
measurement.
Methods of Measuring Channel
Flow
2.2.3 Float method
(Ref. 57)
The rate of flow passing a point in a ditch or other open
channel can be determined by multiplying the cross sectional area of water by
the average velocity of the water. Normally, the cross sectional area can be
determined by direct measurement of the channel dimensions. The velocity can be
estimated by timing the passage of a small float through a measured length of
channel. The procedure for estimating rate of flow by the float method is as
follows:
1. Select a straight section of ditch with fairly uniform cross
sections. The length of the section will depend on the current, but 30 meters
usually will be adequate. A shorter length may be satisfactory for slow flowing
ditches.
2. Make several measurements of depth and width within the trial
section to arrive at the average cross sectional area. The area should be
expressed in terms of square meters.
3. Place a small float in the ditch about a meter upstream from
the upper end of the trial section. Determine the number of seconds it takes for
the float to travel from the upper end of the trial section to the lower end.
Make several trials to get the average time of travel. The best floats are small
rounded objects that float submerged. They are less apt to be affected by wind
or to be slowed by striking the side of the channel. Among small objects that
make good floats are a long necked bottle partly filled with water and capped, a
rounded block of wood, or an orange.
4. Determine the velocity (or speed) of the float in units of
meters per second by dividing the length of the section (in meters) by the time
(in seconds) required for the float to travel that distance.
5. Determine the average velocity of the stream. Since the
velocity of the float on the surface of the water will be greater than the
average velocity of the stream, the float velocity must by multiplied by a
correction coefficient to obtain a good estimate of the true average stream
velocity. The correction factor varies with the type of float used and with the
shape and uniformity of the channel. With floats that sink about 2 to 5 cm below
the water surface, a coefficient of about 0.80 should be used for most unlined
farm ditches. A coefficient of 0.85 is appropriate for smooth uniform unlined
ditches. With floats that extend two thirds or more of the water depth below the
surface, the coefficient should be about 0.85 for unlined ditches and 0.90 for
lined ditches.
6. Compute the rate of flow. The rate of flow is obtained by
multiplying the average cross sectional area (item 2) by the average stream
velocity (item 5). The accuracy of these estimates of flow rates is dependent
upon the preciseness with which average cross sectional areas and float
velocities have been determined and upon the selection of the proper correction
coefficient. The method is not accurate enough for conveyance loss measurements.
An example of this method of estimating flow rates is shown in Figure 2.18 using
Figure
2.19.
2.2.4 Weirs
In a weir (Figures 2.20 and 2.21), water is open to atmospheric
pressure on both upstream and downstream sides. Types of weirs are identified by
their shape. The most common are the:
· rectangular weir,
· trapezoidal weir, and
· triangular weir.
Sharp-Crested Contracted Rectangular Weirs
The standard contracted rectangular weir is built so that the
outlet sides and crest are away from the bottom and sides of the canal in which
it is set. The weir contracts the flow of the channel and causes it to fall over
a crest.
Extensive experiments on weirs have resulted in the following
guideline for accurate measurement of flow:
1. The upstream face of the bulkhead should be smooth and in a
vertical plane perpendicular to the axis of the channel.
2. The upstream face of the weir plate should be smooth,
straight, and flush with the upstream face of the bulkhead.
3. The entire crest should be a level, plane surface that forms
a sharp, 90 edge where it intersects the upstream face.
4. The upstream corners of the notch must be sharp.
5. The distance of the crest from the bottom of the approach
channel (weir pool) should not be less than twice the depth of water above the
crest and in no case less than 20 cm.
6. The distance from the sides of the weir to the sides of the
approach channel should be no less than twice the depth of water above the crest
and never less than 20 cm.
7. The overflow sheet (nappe) should touch only the upstream
edges of the crest and sides.
8. Air should circulate freely both under and on the sides of
the nappe.
9. The measurement of head on the weir should be taken at a
point upstream from the weir a distance of four times the maximum head on the
crest.
Figures 2.20 and 2.21 indicate typical weir installation. Figure
2.22 summarizes the formulas used for different weirs.
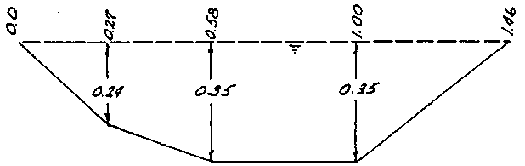
FIGURE 2.18. Estimating Flow Rates by Float Method (Ref.
57)
* Assume a straight section of unlined irrigation ditch 30
meters in length. Representative cross sections at stations 00+0, 12+0 and 28+0
(Figure 2.19).
Cross Section Data
Station 00+0
|
Distance from left water edge |
(m) |
0.00 |
0.45 |
1.00 |
1.50 |
|
Water depth |
(m) |
0.00 |
0.33 |
0.35 |
0.00 |

* (1.00-0.45 = 0.55 and 1.50-1.00 = 0.50)
Station 12+0
|
Distance from left water edge |
(m) |
0.00 |
0.40 |
1.16 |
1.58 |
|
Water depth |
(m) |
0.00 |
0.26 |
0.32 |
0.00 |

Station 28+0
|
Distance from left water edge |
(m) |
0.00 |
0.27 |
0.58 |
1.00 |
1.46 |
|
Water depth |
(m) |
0.00 |
0.24 |
0.35 |
0.35 |
0.00 |


Velocity Data
Time for float (wooden sphere) to travel 30 meters
|
Trial Number |
1 |
2 |
3 |
4 |
Average |
|
Time (seconds) |
95 |
91 |
90 |
88 |
91 |

Average stream velocity = 0.33  0.80 = 0.26 m/see
Flow Rate
Q = AV = 0.35 m2  0.26 m/see = 0.091 cubic m/sec
or 0.091 cum/see  1000 L/sec/cum/sec = 91 L/sec (lps)
Figure 2.19 Ditch Cross Sections for Example (Ref. 57)

Station 00 + 0

Station 12 + 0
Station 28 + 0

Figure 2.20 Rectangular Weir Used
as Measuring Device and Drop

Figure 2.21 Ninety Degree V-Notch
Weir (Ref.
41)
2.2.5 Siphon tubes
Siphon tubes (Figure 2.23), used to remove water from a head
ditch and distribute it over a field through furrows, corrugations, or borders,
are also used to measure the rate of flow into these distribution system.
These tubes, made of aluminum, plastic, or rubber, are usually
preformed to fit a half cross section of the head ditch. The normal diameter
range is from 2.5 to 15 cm (1 to 6 inches), although both smaller and larger
sizes are available. The smaller sizes are used with furrows and corrugations
and the larger sizes with borders. Various lengths are available.
Siphon tubes are portable. For this reason, a low number of
tubes is required to irrigate a given area resulting in low initial cost for
equipment. Flow into individual furrows or borders can be controlled effectively
by using the number of tubes that will divide the total head ditch flow into
individual streams of the desired size.
Figure 2.22 Summary of weir formulas
|
Measuring Device (all sharp crested) |
Front Views
H = cm, L = cm |
Formula
Q = Liters/Second |
|
Rectangular Weir (with contraction) |
* |
Q = 0.018(L - 0.2H)H3/2 |
|
90° Triangular Weir |
** |
Q = 0.014H5/2 |

Rectangular Weir (with contraction)*

90° Triangular Weir**

Weir Side View
Siphon tube use is limited to fields with little cross slope in
order to maintain a near-constant operating head on each tube. A disadvantage to
their use is that each tube needs to be primed individually. This priming is the
principal labor requirement when siphon tubes are used for surface irrigation.
The discharge of a siphon tube depends on: (1) the diameter of
the tube, (2) the length of the tube, (3) the roughness of the inside surface
and the number and degrees of bends in the tube, and (4) the head under which
the tube is operating. When the outlet end of the tube is submerged, the
operating head is the difference in elevation between the water surfaces
measured at the entrance and outlet ends of the tube. When the tube is flowing
free, the operating head is the difference in elevation between the water
surface at the entrance of the tube and the center of the outlet end (Figure
2.23).
Method of Measuring Pipe
Flow
2.2.6 Bucket and stopwatch method
This method for measuring flow is generally well adapted to
small flows. It is very simple to set-up and conduct, requires no special
equipment, and gives good results. The necessary equipment to perform this test
are a bucket of known volume (preferably 20 liters), a 1 m long PVC tube (the
diameter will depend on the flow rate), and an ordinary wrist watch with a
second hand.
To use this method, first dam the water source and insert the
PVC tube into the dam so that all the flow goes through the tube. The PVC tube
will have to be high enough above the base level of the dam so the bucket can be
placed under the tube. Measurements should not be taken until the flow in the
tube stabilizes. The procedure works best with two people: one person filling
the bucket and the other timing the event.
To measure the flow, record the time it takes to fill the
bucket. The procedure should be repeated at least twice. The flow is calculated
by:

2.2.7 Orifices
An orifice is an opening in a plate that has well-defined and
sharp edges. It may be round or rectangular. The water surface upstream must be
above the top of the opening, if orifice flow is to occur. The orifice is
mounted on a flat plate or is cut out from a flat metal plate. The flat plate or
wall on which the orifice is mounted is placed perpendicular to the direction of
flow across the channel. Knowing the size of the orifice and the head across the
orifice, the flow can be estimated. Figure 2.24 provides a definition of the
terms.
Figure 2.23 Siphon Tubes: Bead Measurement and Discharge

FREE FLOW - Outlet of Siphon is not
Submerged

SUBMERGED PLOW - Outlet of Siphon is
Submerged

Discharge
For a freely discharging orifice, the only head measurement
required is the water level height above the center of the orifice. For an
orifice that is submerged on both sides, the head across the orifice must be
measured. The equation and units are given in Figure 2.24. The conditions that
should be met for accurate flow measurements are:
1. The upstream edges of the orifice should be sharp and smooth.
2. The distance from the edges of the orifice to the sides of
the canal or stream bed should be greater than twice the least dimension of the
orifice.
3. The face of the orifice wall should be vertical.
4. In a rectangular orifice, the top and bottom edges of the
orifice should be level.
5. The cross-sectional area of the water in the canal should be
at least 8 times the cross-sectional area of the orifice.
An orifice plate for measuring flows in small streams can be
constructed easily by cutting either a rectangular or circular hole in a piece
of sheet metal. The orifice should be carefully cut to the proper dimensions,
and the edges should be sharp. The sheet metal plate can then be installed
across a stream as part of a check dam while the measurements are taken. A 2 1/2
cm circular orifice is useful for flow rates to 1/2 liters per second. A
circular orifice with a 5 cm diameter opening is useful for flows to 3 liters
per second with 30 cm of head. A 10 cm orifice is useful for flows to 9 liters
per second.

Figure 2.24 Definition Sketch and
Formulas for
Orifice
2.3 Surveying
Topographic surveying provides some of the basic information
required for the design, construction, and operation of an irrigation system.
Some of the most important aspects of surveying are:
1. Profiling. Measurement of the elevations of the ground
surface along a route (for example, where a pipeline will be installed) or where
a structure will be installed.
2. Area measurements.
3. Topographic mapping. Determination of ground surface
elevations in a field in order to construct a contour map is necessary for
determining land leveling requirements, placement of ditches or structures, etc.
Every Volunteer working with irrigation should have, at a
minimum, a hand level (at least 4  power) or an
Abney level; a surveying rod; a measuring tape (minimum of 30 meters); a
carpenter's level; and a scientific calculator (capable of computing roots and
powers). This will allow the Volunteer to determine elevation differences,
profiles, and area measurements. Some topographic mapping can be accomplished
with this equipment. For significant leveling work, however, an engineer's level
and/or transit is often required. This equipment is not often available to the
Volunteer. The theory and practice of land leveling is beyond the scope of this
manual. The Volunteer should consult appropriate references and obtain
assistance from an engineer or surveyor before undertaking significant land
leveling.
power) or an
Abney level; a surveying rod; a measuring tape (minimum of 30 meters); a
carpenter's level; and a scientific calculator (capable of computing roots and
powers). This will allow the Volunteer to determine elevation differences,
profiles, and area measurements. Some topographic mapping can be accomplished
with this equipment. For significant leveling work, however, an engineer's level
and/or transit is often required. This equipment is not often available to the
Volunteer. The theory and practice of land leveling is beyond the scope of this
manual. The Volunteer should consult appropriate references and obtain
assistance from an engineer or surveyor before undertaking significant land
leveling.
This section covers the basics of profiling and topographic
mapping. It also includes some appropriate techniques for laying out contour
lines and determining elevation
differences.
2.3.1 Profiling
(Ref. 21)
Accurate knowledge of the ground profile along a pipeline route
is often critical for proper pipeline design. Correct profiling depends on
correct use of simple equipment. "Eyeball" methods of profiling are sufficient
only in the simplest of situations. The following is a general description of
profiling methods.
Theory of Leveling
1. The line of sight of a properly used level is always at the
same elevation, regardless of the direction in which it is pointed.
2. If the elevation at any point on the ground is known, the
elevation of the level line of sight may be found by measuring up from the known
point. Because most work requires knowledge of relative elevations only, the
known point is often assumed to be 100 or 1000.
3. If the elevation of the level line of sight is known, the
elevation of any point on the ground may be found by measuring down from the
line of sight.
4. By successive use of the above concepts, the elevation of any
point may be found.
Equipment
1. Surveying level and tripod or hand level. Levels are
surveying instruments that have a telescope and means for orienting the
telescope's line of sight on a horizontal plane.
2. A stick marked with distance measurements (e.g. feet or
meters). This stick is called a "rod."
3. Distance measuring equipment, such as a measuring tape,
engineer's chain, or optical distance estimating equipment. Pacing is adequate
only for flat terrain or short distances.
4. A notebook, properly set up.
Theory of Profiling
1. Profiling involves measurement of elevations (leveling) along
a line, together with measurement of horizontal distances.
2. Distances must be measured on a straight line between points
for which elevations are taken.
Notekeeping
1. Notekeeping is one of the most critical portions of
surveying. Many surveying mistakes can often be traced back to poor notation. A
notebook should always be properly set up and time taken to make notes clear and
readable.
2. A site sketch should accompany the measurements. This will
help the notetaker remember important surface features of the area. The sketch
should show salient features such as houses, streams, hills, and trees along the
pipeline route. A North arrow should also be included.
Terminology
1. Sta = Station. This is the point on the profile line
at which an elevation was measured. These are normally numbered by hundreds of
feet. For example, a station 10 may be 1000 feet from the beginning of the
survey. Intermediate distances are indicated by pluses: Sta 10 + 50 would equal
1050 from the beginning.
2. Bm = Benchmark. This is a monument or point of known
description that includes elevation.
3. Tbm = Temporary Benchmark. This is an object that is
relatively permanent, such as large rocks or trees, where the elevation has been
determined.
4. Bs = Backsight. This is a rod reading at a point of
known elevation.
5. HI = Height of Instrument. This is the elevation of
the line of sight of the instrument.
6. Fs = Foresight. This is a rod reading at a point of
unknown elevation.
7. Elev = Elevation.
8. Dist = Distance between points.
9. Tp = Turning Point. This is a point used primarily to
serve as a reference elevation to move the instrument. Both a foresight and
backsight are taken on the point. The point may be on or off the profile line
but should be a solid point that is easy to relocate.
Profiling Procedure
1. Setup and level instrument.
2. Sight Benchmark (point of known elevation) for Backsight
reading.
3. Enter rod reading in Backsight (Bs column 2).
4. Add rod reading (column 2) to Benchmark (column 5) to get
Height of Instrument (HI column 3).
5. Sight point to be determined (Foresight) and enter reading in
Foresight (Fs column 4).
6. Subtract Foresight (column 4) from Height of Instrument
(column 3) to get elevation of Foresight (column 5).
Turning Point
1. Rodman maintains position at Foresight.
2. Move setup, and level the instrument at new location (Tp 1).
3. Sight rod at Backsight (last foresight station) and enter
reading in column 2.
4. Add rod reading (column 2) to elevation of backsight (column
5) to get Height of Instrument (column 3).
5. Proceed with Foresight (steps 5 and 6 above).
Example 1: An example survey is presented in Figure 2.25.
Notation for this survey is presented in Table 2.3
TABLE 2.3 Survey Notation (meters) for Figure 2.25 (Ref.
27)
|
1 |
2 |
3 |
4 |
5 |
6 |
|
+ |
|
(-) |
|
|
|
Sta |
Bs |
HI |
Fs |
Elev |
Notes |
|
Pt A |
2.5 |
102.5 |
|
100 |
Assumed elev. |
|
Pt B |
|
|
11.5 |
91 |
|
|
Tp 1 |
4.2 |
95.2 |
|
|
Pt B. |
|
Pt C |
|
|
12.3 |
82.9 |
|
The steps used in the example problem are different from those
used by professional surveyors. They have been simplified in an attempt to
reduce confusion and are more than adequate for the type of surveying that is
necessary in small-scale piped water systems. When using this method, always
remember the following simple calculations:
1. Known elevation + Backsight reading = Height of Instrument
2. Height of Instrument - Foresight = Next Elevation
Practical Hints for Surveying
1. Before starting, walk the course to be surveyed and mark the
line to be profiled. If the survey is conducted for a piped water system,
remember to keep in mind that pipe will have to be laid in trenches along the
course. Whenever possible, avoid obstacles that will make laying difficult.
2. Mark with a sturdy stake all turning points, foresights, and
backsights as work progresses so they will be visible if a recheck is necessary.
3. After you have finished your calculations, redo the survey if
unacceptable errors occur. It is much easier to correct a surveying mistake
before pipe has been laid in the ground.
4. It is desirable to recheck horizontal distances as well.
Approximate methods, such as pacing, will catch major errors with a minimum
effort.

Figure 2.25 Profiling: Example
(Ref. 21)
Plotting the Profile
Once the horizontal distances and elevations are surveyed in the
field, the data is brought back to the office and plotted on graph paper. This
completed profile can be used for sizing pipelines and locating storage tanks,
air valves, and washout points among other requirements. Normally, the vertical
scale is greater (numerically smaller) than the horizontal scale. For example,
the vertical scale may be ten times the horizontal: in the vertical scale, one
cm may equal 1 meter and in the horizontal, one cm may equal ten meters. Other
similar ratios may be used.
Example 2: Figures 2.26 and 2.27 show a ground sketch of
the area to be surveyed and the completed profile for the survey. The following
are measurements taken during this survey:
|
At |
0 + 00 |
100.0 + 0.2 = 100.2 |
(equals HI) |
|
At |
0 + 47 |
100.2 - 9.7 = 90.5 |
(equals next elevation) |
This is repeated for the next instrument setup:
|
At |
0 + 47 |
90.5 + 1.3 = 91.8 |
(equals HI) |
|
At |
1 + 03 |
91.8 - 9.9 = 81.9 |
(equals next elevation) |
Many different ground elevations may be found from a single
Height of Instrument sight, as shown by the following:
|
At |
1 + 03 |
81.9 + 4.2 = 86.1 |
(equals HI) |
|
At |
1 + 30 |
86.1 - 5.5 = 80.6 |
(equals ground elevation) |
|
At |
1 + 37 |
86.1 - 8.9 = 77.2 |
(equals ground elevation) |
|
At |
1 + 45 |
86.1 - 5.2 = 80.9 |
(equals ground elevation) |
|
At |
2 + 00 |
86.1 - 4.2 = 81.9 |
(equals ground elevation) |
2.3.2 Steps in making a topographic man
1. Clear field of all debris, ensure clear line of sight
to all points on the field.
2. Measure boundaries of the field and determine its area.
3. Collect and make a sufficient number of marker stakes.
4. Stake out a square grid over entire field. Use one side of
the field (straightest side, if possible) as a starting point and set stakes at
the recommended spacing of:
a. 10 m if broken or irregular land relief.
b. 20 m if flat
or uniform land relief.
The use of a 3-4-5 right triangle will assist in laying out the
grid evenly and at 90° degree angles.

Figure 2.26 Typical Profile (Ref.
21)
LOCATION:
SURVEYOR:
DATE:
|
STA |
+B. S. |
H. I. |
-F. S. |
ELEV. |
NOTES |
|
0+00 |
|
Assumed |
100.0 |
Spring |
|
0.2 |
100.2 |
|
|
|
|
0+47 |
|
|
9.7 |
90.5 |
TP #1 |
|
1.3 |
91.8 |
|
|
|
|
1+03 |
|
|
9.9 |
81.9 |
TP #2 |
|
4.2 |
86.1 |
|
|
|
|
+30 |
|
|
5.5 |
80.6 |
Stream West Edge |
|
+37 |
|
|
8.9 |
77.2 |
Stream |
|
+45 |
|
|
5.2 |
80.9 |
Stream East Edge |
|
2+00 |
|
|
4.2 |
81.9 |
TP #3 |
|
9.7 |
91.6 |
|
|
|
|
2+50 |
|
|
5.3 |
86.3 |
|
|
3+00 |
|
|
0.7 |
90.9 |
TP #4 |
|
6.1 |
97.0 |
|
|
|
|
+30 |
|
|
3.7 |
93.3 |
|
|
+72 |
|
|
2.5 |
94.5 |
Top of Hill |
|
4+00 |
|
|
7.8 |
89.2 |
TP #5 |
|
1.6 |
90.8 |
|
|
|
|
+50 |
|
|
6.1 |
84.7 |
|
|
5+00 |
|
|
9.6 |
81.2 |
E.O.L. |

Figure 2.27 Survey Sketch and
Notations (Ref. 21)
5. Establish a benchmark (permanent or semipermanent object) on
or near the field.
6. Take readings of elevational differences for each stake in
the grid with reference to the benchmark with some type of leveling device and
rod.
7. Take field notes for the entire field.
8. Sketch topographical map of field:
a. Sketch field to scale on graph paper.
b. Place grid on sketch.
c. From the field notes, fill in all of the elevational readings
for each point on the grid.
d. With a continuous smooth line, connect the points of the same
elevation reading and extrapolate points in between where need be; this is a
contour line.
e. Incrementally increase (or decrease) value of elevation
reading and repeat step (d) for each new elevation.
f. Complete topographic map for the range of elevation readings.
Make sure there is an incremental progression of elevation readings so that the
contour lines will have equal elevational differences between them. The contour
line increment will depend on the range of elevation readings, the detail
required, and the size of the area being mapped. For example, a 1 meter
increment between contour lines will provide more detail than a 10 meter
increment in one given
area.
2.3.3 Abney level surveying
(Adapted from Reference 27 with appropriate modifications. For
greater details on surveying, and adjustment of the level, the user should
consult Reference 27 or books on surveying. The Abney level should also be
periodically checked to insure that it is properly adjusted.)
Abney level surveying is especially useful for rapidly
determining elevation differences, particularly in hillside situations, where
great precision is not required.
The Abney level consists of a square tube (dimensions of about
16  1.5
1.5  1.5
cm) with an eyepiece at the observer's end, a horizontal cross-hair at the
objective end, a bubble level, a 45° mirror, and a moveable indexed arc.
1.5
cm) with an eyepiece at the observer's end, a horizontal cross-hair at the
objective end, a bubble level, a 45° mirror, and a moveable indexed arc.
Conducting a survey with the Abney requires two persons. An
Abney level, a 30 meter tape measure, and a field book are necessary; a compass
may be used if bearings are desired.
The survey is begun at some fixed reference point (such as the
water source or some prominent landmark along the route) and proceeds long the
route of proposed construction.
The surveying technique is simple: the surveyor sights through
the Abney at a target held by the other person, and the ground distance between
them is measured. This distance, and the vertical angle (angle measured by the
Abney) are recorded in the field book. It is important that the target that the
surveyor sights upon is the same height above the ground as the Abney, which is
the same as the surveyor's eye-level. If the assistant is not as tall as the
surveyor, then the assistant should carry a target stick cut exactly to the same
length as the surveyor's eye-level. A red cloth can be tied to the top of the
stick, or the assistant's hand can be placed over the end of it, to provide a
clear target. It is also useful for the surveyor to use a forked stick as a
stand to rest the Abney on, in order to obtain a steadier reading (in this case,
the target stick should be cut to the same length as this forked stick).
Figure 2.28 shows the basic arrangement and calculation used in
trigonometric leveling with the Abney: the surveyor and assistant are 28 meters
apart (ground distance), and the vertical angle is - 16° (the negative
angle indicates that the surveyor was sighting downhill). Use a calculator or
trigonometric table to determine the sine of the angle. In this case the sin of
16° is 0.2756 so 28  0.2756 is 7.7 meters
elevation difference.
0.2756 is 7.7 meters
elevation difference.
Field Methods
While conducting the survey, the surveyor and assistant must
also observe the terrain being walked. The surveyor must constantly keep in mind
that, at some later time, other people will actually have to dig a trenchline
along that route. Notes must be made about the type of terrain being traversed,
such as stretches of jungle, cultivated fields, footpaths, gullies, soil
conditions (e.g. gravel, soft dirt, bare rock). It is easy to survey across
terrain over which might be exceedingly difficult or impossible to lay a
pipeline!
The surveyor should make use of as many reference points as
possible so that if a section of the pipeline needs to be resurveyed at a later
time, a convenient starting point can be found. Reference points should be
permanent or semi-permanent. Suitable examples are prominent trees, rock
outcroppings, etc. If the surveyor carries flagging, spray paint, lime,
nailpolish or enamel paint, landmarks can be identified with a permanent label.
Figure 2.29 shows a good, precise format for recording accurate
and complete notes.
Figure 2.28 Trigonometric Surveying with an Abney Level (Ref.
27)
|
VERTICAL DISTANCE = GROUND DISTANCE  SIN q SIN q |
EXAMPLE ILLUSTRATED BELOW:
(= -16° (NEGATIVE SIGN INDICATES SIGHTING DOWNHILL)
SIN
(= 0·276 (FROM TRIGONOMETRIC TABLE)
GROUND DISTANCE = 28
METERS
VERTICAL DISTANCE = 28  0.276 = 7.73
METERS.
0.276 = 7.73
METERS.

Figure

ABNEY LEVEL

SURVEYING WITH AN ABNEY LEVEL

Figure 2.29 Example: Field Book
Notes (Ref. 27)
Closing the Survey
Closing the survey means tying the survey to two reference
points of known elevations, thus providing a check on the surveyed elevations.
Closing a survey can be done by repeating it entirely, beginning from the
original endpoint and ending at the original starting point, but not necessarily
along the same original route.
Leveling Rods
A leveling rod is used to measure the vertical distance from the
surface of the ground to the line of sight of a surveying level (Figure 2.28).
It can be constructed as a land measuring rod but the "0" m should just be the
end of the rod. The overall length should be about 3 m and the rod should be
marked in meters, decimeters, and centimeters.
Attach a moveable target to the rod. This might be a small board
held against the rod with something such as a short piece of rubber (from an old
inner tube) to hold it in place after the height is adjusted.
When the surveying instrument is sighted on the rod, the target
is moved up or down until it is centered on the line-of-sight. The vertical
distance is then
read.
2.3.4 Simple levels for use in surveying contour lines
(Ref. 9, with appropriate modifications)
In many areas, sophisticated surveying levels are not available
to farmers interested in designing soil conservation structures. Even where they
are available, it is often more practical for the farmer to build a cheap,
simple, effective level for use in surveying contour lines. Although less
accurate than more sophisticated levels, the A-Frame level (Figure 2.30), the
Line Level (Figure 2.31), and the Hose Level (Figure 2.32), when properly
constructed and used, are sufficiently accurate for the work on small hillside
farms.
A. How to build and use an a-frame level
1. Construction
The materials required are 3 straight boards or sticks, 3 nails
or screws, a thin string, and a plumb-bob -- a screw-capped glass bottle or
uniform-shaped rock. A small level is very convenient and is easier to use on
windy days.

Figure 2.30 A-Frame Level for
surveying Contour Lines (Ref. 9)

Figure 2.31 Simple Line Level for
surveying Contour Lines (Ref. 9)
Figure 2.32 Use of a Hose Level (Ref. 42)

No slope

Meter level

10% Slope

20% Slope
Important points to consider in building the A-frame level:
a. The symmetry of the level is important (two legs should be
the same length and crossbar should be positioned identically on the legs so
that it is parallel to the ground.)
b. The dimensions of the level are not important, but if
constructed in larger dimensions than the one in Figure 2.31, the level should
be assembled with screws so that it can be disassembled for transportation.
Measuring an exact distance (2 m) between the feet makes calibrating the 1%
slope position easier.
c. The plumb-bob must be attached so that it does not deflect
the string to either side. If a screwcap bottle is used, it should be hung by a
hole made exactly in the center of the cap. If a rock is used, it is important
that a very uniformly shaped rock be chosen.
2. Calibration
The level should be calibrated every day before use, as warping
of the wood can greatly change the results.
a. Calibration of 0%
1. The level should be positioned with
both feet on firm surfaces but with one end obviously higher than the
other.
2. The level is gently rocked, allowing
the string with the plumb-ob to gently strike the
crossbar.
3. When the plumb-bob stops swaying side
to side and the string strikes the crossbar at the same point repeatedly (5-10
times), mark this position in pencil on the crossbar.
4. Reverse the position of the level so
that the other foot is now at the higher point. Care must be taken to position
the feet of the level in exactly the same points as
before.
5. Repeat steps 2 and 3, obtaining a
second mark on the other side of the center of the
crossbar.
6. The 0% position of the level is
exactly in between the two marks obtained in this trial. This position can be
marked by measuring with a ruler or paper (half the distance between the 2
marks). Now when the feet of the level are even the string will strike the
crossbar at the 0% position. This position is used to survey contour lines for
barriers, terraces, or ditches be used for retention, rather than diversion, of
water.
7. Once calibrated, a small carpenter's
or line level can be fastened to the crossbar to facilitate use on windy
days.
b. Calibration of
1%
1. Position the level
so that the feet are on the same level and the string strikes the crossbar at
the 0% position. The feet should be on firm surfaces.
2. Raise one foot by the distance
required to position the level at a 1% slope. For example, if the distance
between the feet is 2 m (200 cm), then a 2 cm tall object (e.g. a 2 cm tall
stack of coins) should be placed under one foot. [2 cm (raised foot)/200 cm
(distance between feet) = 0.01; 0.01  100% =
1%.]
100% =
1%.]
3. Rock the level gently, now the string
strikes the 1% slope position. Mark this position on the
crossbar.
4. Since this type of contour line will
be used to construct structures to divert water, an arrow should be placed
pointing toward the lower foot to indicate the direction of water
flow.
5. As in previous calibration, if
desired, a small level can be fastened to the
crossbar.
3. Use of the A-frame level
The A-frame level is used to survey contour lines by placing
stakes at the position of the feet when the level gives the desired reading.
Stakes should all be placed on the same side of the level, all upslope or all
downslope, in order to avoid errors. When not being used, the level should be
stored in a dry, shady place.
B. How to Build and Use a Line Level
1. Construction
The materials required are 2 straight boards or sticks, a string
of desired length, and a line level (Figure 2.31).
2. Calibration
The level should be calibrated every day before using as bending
of the hooks on the line level or warping or chipping of the sticks can greatly
change the results.
a. Calibration of
0%
1. Slots are cut in each stick at the
same distance from one end.
2. The string is tied firmly to each stick so that it cannot
slip out of the slots.
3. Hook the line level on the string and
find a place on firm ground which gives a level
reading.
4. Reverse the direction of the line
level on the string while maintaining the position of the sticks. If the reading
changes, the hooks of the line level must be adjusted slightly by bending
them.
5. Repeat steps 3 and 4 until the line
level gives identical readings upon reversal.
b. Calibration of
1%
1. Repeat the steps as
in the calibration of 0%. However, this time the slots on the sticks should be
placed so that a 1% drop occurs over the distance of the string. (For example,
if the string measures 2 m then the slot on one stick should be 2 cm higher than
on the other.)
2. Remember that the stick that has the
slot located higher actually represents the lower ground surface when the
reading of the string is level. Remember to mark the sticks so that no confusion
as to the direction of water flow will arise when surveying contour
lines.
3. Use of
the Line Level
This type of level is easiest to use with at least three people,
two holding the sticks and the third reading the line level and placing stakes.
When not in use, the line level should be protected so that the glass vial and
hooks are not damaged.
C. How to Build and Use a Hose Level
(Ref. 42)
1. Construction:
A simple hose level (Figure 2.32), useful for laying out a grade
line, can be constructed using the following materials:
a. A transparent plastic hose, 16 m long and 1.5 to
2 cm in diameter.
b. Two thin rods or boards, or other thin, rigid material
about 2.6 m long.
c. Strips of wire, rubber, or string with which to tie the
hose.
d. Small cans of white and black paint.
e. Measuring
tape.
The level can be constructed as follows:
a. Mark the rods every 5 cm, starting 10 cm from one
end.
b. Tie the hose to the graduated rods so that it lies against
the rods from top to bottom.
c. Place the two rods side by side on the same level. Stretch
the hose downhill on a slope.
d. Fill the hose with water so that is rises to the
1 m mark on each end of the hose. Make sure that no air bubbles remain in the
hose. The simple level is complete!
2. Use:
This simple tool can be used to determine slope as follows:
1. Separate the rods by 10 m.
2. Note how much the water has changed in the hose.
If the water level at both rods are equal, then the two points are at the same
elevation. The slope between the two points is 0%.
If the water level lowers 5 cm from the 1 m mark on
the upper rod, it will rise 5 cm above the 1 m mark on the lower rod. (10 cm
total difference.)
With each 5 cm change against either of the rods,
there is a 1 percent change in slope, so that with a 5 cm change the slope is 1
percent, with a 10 cm change the slope is 2 percent, with a 50 cm change the
slope is 10 percent, and with a 1 m change the slope is 20%.
If the water in the downhill end goes over 2 m, the
slope is greater than 20% and should be measured as described
below.
3. Slopes between 20 and 40 percent can be measured
as follows:
a. Separate the rods by 5
m.
b. Note the change in water level on
either side. A 50 cm change indicates 20 percent (for each 5 cm change there is
2% more slope). If the water level changes 75 cm, the slope is 30%. If the water
level changes 100 cm, the slope is 40%.
The simple
level can be used to mark a level contour line in the field in the following
way:
1. Select a starting point and mark it with a stake.
2. Separate the rods by 10 m or some convenient
distance.
3. Move the leading rod up or down, until its water
level is the same as that in the rod at the initial point. Mark this
point.
4. Follow the same procedure from point 2 to point
3, point 3 to point 4, and so on.
We can also mark lines
with one, two, or three percent slope.
1. Choose a starting point.
2. Separate the rods by 10 m. The water level at each rod must
change:
5 cm for 1% slope
10 cm for 2%
slope
15 cm for 3% slope
If the water level indicated in the leading rod
rises, the slope is downhill. If the water level drops, the slope is
uphill.
3. Repeat the procedure for succeeding
points.
2.3.5 Compass use
In the field it may be necessary to measure the angle between
two different lines or points. This can be done by direct measurements with a
protractor if the lines can be drawn on a flat surface. Another more accurate
and easier method is the use of a simple compass. To do this, it is important
that the compass have peripheral degree graduations that are 360° to make a
full circle.
To measure a horizontal angle, the compass holder stands at a
fixed point, usually a corner of a field, and visually aligns the north reading
of the compass along the line of sight to another point (another corner in
field). Since the needle automatically points to negative north, the compass
holder notes the difference in degrees between the needle reading and the north
reading on the compass. This is known as the negative bearing of the object from
the fixed point. A second bearing is taken on a second object (another corner of
field) and the difference between the two bearing readings will give the angle
between the two points in relation to the fixed point.
The compass method can be used with a tape measure or long
string for surveying the area of an irregular plot of land. The area is first
walked over, and the points in the corners of the field are located and staked.
With a tape measure, the distances between the corners are measured and
recorded. At a corner of the field, the compass holder takes magnetic and
adjoining corners bearings and determines the angle. This is done at each corner
of the field.
With the aid of a protractor, the area is plotted to scale on a
sheet of graph paper. The square units of the graph paper are given an area that
will depend on the scale. The number of unit squares in the area of the field
are totalled and an area is determined for the field.
In using the compass, be sure that it is free from the effect of
magnetism due to iron objects carried by yourself or in nearby
surroundings.
2.4 Soil-Plant-Water relationships
Proper irrigation requires knowledge of soil water storage and
movement of water in the soil, as well as availability of this water to the
plant. Irrigation also requires knowledge of plant root development, crop water
use rates, and of the irrigation system itself. This section covers basic
definitions and relationships that must be understood by those who work with
irrigation management at the field
level.
2.4.1 Soil moisture storage and availability
Figure 2.33 indicates the availability of soil water. A soil is
at saturation or near saturation following a heavy irrigation or rainfall in
which most or all of the spaces between soil particles are filled by water. The
force of gravity is greater than the force with which soil particles hold water,
so between saturation and field capacity (see below), water is free to drain
through the soil by the force of gravity.
Field capacity (FC) is the amount of water that a soil
can hold against drainage by gravity.
Permanent wilting point (PWP) is the moisture content in
a soil at which plants permanently wilt and will not recover.
Available water (AW) is the water content that the soil
can hold between field capacity and wilting point.
Readily available water (RAW) is that portion of
available water that the crop can use without affecting its evapotranspiration
and growth. This portion is often indicated as a fraction of available water (p)
and is dependent primarily on the type of crop and evaporative demand. A p value
of 0.5 is commonly used. Shallow rooted crops such as most vegetables, however,
require high moisture levels for acceptable yields, so p is about 0.3. Deeper
rooted crops will generally tolerate higher depletions, so p = 0.6 to 0.7.
During critical stages of growth (for example, flowering in corn), less
depletion should be allowed than at other stages.
Soil moisture is typically measured as a percent of dry weight
of soil, or as a volume percentage. Expression as a volume percentage or depth
of water per unit depth of soil is most common and convenient in irrigation
management.
The most useful measurement gives available water-holding
capacity (AW) as a depth of water per unit depth of soil expressed as mm of
water per meter of soil depth (mm/m) or inches of water per foot of soil depth
(in/ft).
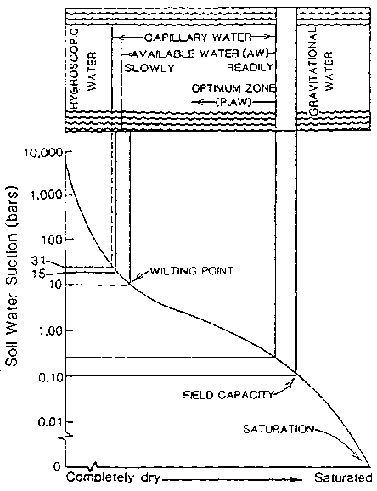
Figure 2.33 Soil Water and its
Availability
- Soil Moisture
The total available water (TAW) for a crop with root zone
depth (D) is the product of the available water-holding capacity (AW) per unit
of soil depth and the root depth in the same units, or:
TAW = D  AW
AW
The readily available water in the root zone (RAW) is:
RAW = p  TAW
TAW
p = percent of allowable depletion not resulting in
crop stress
Field Capacity
Although there are several lab methods for determining field
capacity, it may be faster and more practical to estimate as follows:
(1) select a recently irrigated plot with no plants
on it or make a small basin and fill with water;
(2) cover the saturated soil with canvas or plastic to prevent
evaporation; and
(3) take samples after the soil has drained to field
capacity. The time required is usually one day in coarse-textured soils, two
days in medium-textured soils, and three to four days in fine-textured soils.
Samples of the soil taken after the indicated time period will be approximately
at field capacity. Table 2.5 can then be used to understand the concept of field
capacity for different soil textures by the "feel" method.
Typical relationships, such as that
illustrated in Figure 2.34, which indicates field capacity as a function of
texture, are often sufficiently accurate for planning scheduling programs. For
more details on determination of soil moisture in quantifiable terms, see Ref.
44.
Permanent Wilting Point
Permanent wilting point can be established by determining the
moisture at which plants permanently wilt.
A simple criterion satisfactory for water management is that PWP
is 50% of FC for coarse to medium-textured soils and about 67% of FC for clays
and clay loams. Typical relationships, such as those illustrated in Figures 2.33
and 2.34 often provide sufficient accuracy in estimating wilting point for water
management purposes.

Figure 2.34 Typical Relationship
Between Soil Moisture Characteristics and Texture
Available Water
Available water-holding capacities for soils are a function of
soil texture, structure, organic matter, and salt content. For general
agricultural soils without salt, compaction, or other types of problems,
information such as that in Figure 2.34 or Table 2.4 on water-holding capacities
as a function of texture and soil water tension can be used for planning. The
factors that affect soil available water-holding capacity are:
1) Soil texture: as Table 2.4 shows, the
smaller the soil particles, the greater the surface area, and hence the greater
the area on which water can cling. This results in a higher available soil water
holding capacity. In the case of heavy clay soils, the soil water's availability
to plant roots is limited by the soil denseness, since the water is so tightly
held.
2) Soil structure is the arrangement of soil
particles into groups or aggregates. The spaces between these aggregates
provides places for soil drainage, soil aeration, and root growth. This is
especially important in heavy soils with small soil particles. Four common soil
structures are:
·
Crumb or Granular: Roundish aggregates that are porous and easily
worked.
· Blocky: Blocklike soil
aggregates that are relatively porous.
·
Columnar: Column-like soil aggregates that are relatively
porous.
· Platy: Platelike, flat soil
aggregates that can overlap and impair soil
permeability.
A soil with poor structure and drainage will tend to
trap water in the profile, increasing soil water-holding capacity, but also
creating problems with waterlogging and restricted root
development.
3) Hardpans are hardened or cemented layers
caused by physical or chemical processes and restrict soil drainage. This
results in a similar situation as poor structure.
4) Organic matter can increase a soil's
water-holding capacity, mainly by improving its physical condition.
5) A soil's salt content restricts a plant's
ability to take up water from the soil solution.
TABLE 2.4 Available
Water-holding Capacities for General Soil Types
|
Coarse sands - gravelly sands |
40 - 70 mm/m |
|
Fine sands - loamy sands |
70 - 100 mm/m |
|
Sandy loams |
120 - 160 mm/m |
|
Loams |
180 - 220 mm/m |
|
Silt loams |
230 - 270 mm/m |
|
Silty clay loams, silty clays, heavy clays |
160 - 200 mm/m |
2.4.2 Estimating soil water characteristics on site
Soil maps developed by local or national agencies often provide
sufficient information on soil water characteristics for developing irrigation
management programs. If such sources are not detailed enough (as is often the
case with very non-uniform soils), quick on-site evaluations can be conducted.
This usually involves estimating soil texture and correlating it with available
water through use of tables and/or experience.
Interviews with owners or managers of the farm will help to
identify areas of different soils. Often simple observations of differences in
crop development, superficial soil texture, and color of soil may help to define
such areas.
The soil texture and structure can be evaluated by the visual
and feel method using a soil probe or shovel and taking samples to typical
rooting depths in increments. Table 2.5 describes properties often associated
with specific textures. Figure 2.35 demonstrates an easy, visual method of
assessing soil texture. Figure 2.36 shows typical water extraction patterns.
In tropical areas with high rainfall and good drainage,
centuries of weathering have washed out much of the soils' mineral nutrients.
This changes the characteristics of the clay fraction of these soils. These
"tropical clays" are considerably less sticky and plastic than temperate clays
described in Table 2.5. Unfortunately, most of the soils' natural fertility is
also lost in this process. These soils are usually characterized by their
distinctive red or yellow color.
Figure 2.35 Demonstrating the Particulate Make-Up of Soils
(Ref. 9)

SANDY SOIL

LOAM SOIL

CLAY SOIL
Place soil in a bottle, add water, shake, and set on a stable
level surface, me heavier sand-sized particles will settle out first followed by
silt-sized and then clay-sized particles. This demonstration illustrates the
particulate nature of soils and can be used to help farmers understand what soil
texture means and how it can be important in affecting the drainage or
erodability of a soil. The bottles should be allowed to remain undisturbed for 2
full day in order for the finer, clay-sized particles to settle out.
TABLE 2.5 Textural Properties of Mineral Soils
|
Feel and Appearance of |
|
Soil Class |
Dry Soil |
Moist Soil |
|
Sand |
Loose, single grains that feel gritty. When squeezed, the soil
falls apart when pressure is released. |
Forms cast when squeezed that crumbles when touched. Doesn't
form a ribbon. |
|
Sandy loam |
Aggregates easily crushed; very faint velvety feeling initially;
continued rubbing gives gritty feeling. |
Forms cast requiring careful handling without breaking. Doesn't
form a ribbon. |
|
Loam |
Aggregates crushed under moderate pressure; firm clods. When
pulverized it feels velvety, becoming gritty with continued rubbing. Casts bear
careful handling. |
Cast can be handled quite freely without breaking. Very slight
tendency to ribbon. Rubbed surface is rough. |
|
Silt loam |
Aggregates firm, but may be crushed under moderate pressure.
Clods firm to hard. When pulverized, it feels smooth, flour-like. |
Cast freely handled without breaking. Slight tendency to ribbon.
Rubbed surface has a broken or rippled appearance. |
|
Clay loam* |
Very firm aggregates. Hard clods strongly resist crushing. When
pulverized, it feels gritty from the small aggregates left behind. |
Cast bears much handling without breaking. Forms ribbon feeling
slightly gritty when wet and rubbed. Plastic, sticky, and puddles easily. |
|
Clay* |
Hard aggregates and clods that strongly resist crushing. When
pulverized it feels gritlike due to harshness of numerous small aggregates that
persist. |
Casts bear considerable handling without breaking. Forms a
flexible ribbon and retains its plasticity when elongated. Satin feeling when
rubbed. Sticky when wet and easily puddled. |
* The properties described for the clayey soils refer to those
of the clayey soils found in the temperate regions.
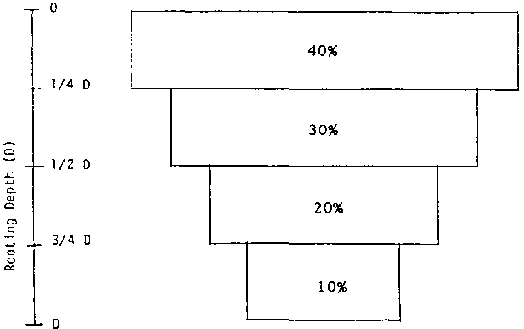
Figure 2.36 Typical Crop Water
Extraction
Patterns
2.4.3 Development of the soil water reservoir
The soil water reservoir available to the plant changes as the
root system develops. Root depth varies with crop and variety, stage of growth,
soil chemistry, structure, drainage and management. For example, excessive
irrigation or inadequate wetting of the root zone may limit root development.
The root system of a plant develops from seed depth at germination to a maximum
depth at full vegetative development, or until it encounters impermeable
barriers or other obstacles to root development. Typical rooting depths for
several crops divided into four groups are described in Table 2.6.
TABLE 2.6 Rooting Depths of Various Crops (Ref. 44)
|
Rooting Depth (m) |
Crops |
|
0.3 - 0.5 |
Cabbage, celery, lettuce, onion, pineapple, potatoes, sisal,
spinach, leafy vegetables |
|
0.5 - 1.0 |
Bananas, beans, beets, carrots, peas, clover, groundnuts,
peppers, soybeans, sugar beets |
|
1.0 - 1.5 |
Barley, citrus, cucumber, flax, small grains, maize, melons,
sunflower, sweet potato, wheat |
|
1.5 - 2.0 |
Alfalfa, cotton, deciduous orchard, grapes, sunflower, sorghum,
sugar cane |
For management purposes such as irrigation scheduling, the root
zone is often assumed to develop linearly from planting depth at time of
planting, or shortly after, to typical maximum root depth at full cover. In
monitoring the moisture on many field crops, the primary rooting system may be
assumed to be from one to two times the crop height, or to the depth where
hardpans or other obstacles are encountered. Moisture monitoring to the depth of
plant height is adequate for many crops other than alfalfa, tree crops, and some
other deep-rooted
crops.
2.4.4 Soil water availability and crop use patterns
Readily Available Water and Allowable Depletion
Table 2.7 groups several crops according to permissible soil
moisture depletion for maximum yield conditions. Table 2.8 indicates the
fraction allowable depletion of available moisture (p) as a function of crop
group and evaporative demand. The readily available water that can be extracted
from the root zone without limiting yield is obtained by multiplying p by the
total available water (TAW) to root zone depth.
Fungal and bacterial pathogens proliferate faster at higher
moisture levels. Crop quality, such as protein in wheat and color in cotton, may
improve with lower available water. Irrigation system flexibility or limited
water supplies may dictate allowable depletions. Osmotic potentials created by
salts in the soil create the same effects as soil moisture tensions. Salts may
inhibit water and nutrient uptake from the soil, therefore, and maintenance of
higher moisture levels than those indicated may be desirable in saline soils.
Tables 2.7 and 2.8 should serve only as guidelines when water supplies are
abundant and flexible.
TABLE 2.7 Crop Groups According to Soil Water Depletion (Ref.
11)
|
Group |
Crops |
|
1 |
Onion, pepper, potato |
|
2 |
Banana, cabbage, grape, pea, tomato |
|
3 |
Alfalfa, bean, citrus, groundnut, pineapple, wheat, sunflower,
watermelon |
|
4 |
Cotton, maize, olive, safflower, sorghum, soybean, sugarbeet,
sugarcane, tobacco |
Note:
Group 1 -- Most sensitive to water stress
Group 4 -- Least
sensitive to water stress
TABLE 2.8 Practical Depletion Values (Fraction) not Resulting
in Significant Water Stress
|
Crop Group |
Hot High Water Use |
Cool Low Water Use |
|
1 |
0.25 |
0.40 |
|
2 |
0.30 |
0.50 |
|
3 |
0.40 |
0.60 |
|
4 |
0.50 |
0.70 |
Moisture Extraction Patterns
Plants maintained at high moisture levels will take their water
from the root zone approximately in proportion to the concentration of roots. A
typical extraction pattern of water from the soil is indicated in Figure 2.36,
with 70% of the moisture extraction taking place from the upper half of the root
zone. Moisture-sensitive crops such as potatoes, maintained at high moisture
levels, may take 80% to 90% of their water from the upper half of the root zone.
As plants are subjected to stress, they will take more of their water from where
it is available in the lower reaches of the root
zone.
2.4.5 Soil intake characteristics
Soils that take up water rapidly will wet the root zone rapidly
after the onset of irrigation, and thus irrigations will usually be of short
duration. The rate at which soils take water is called the soil intake rate,
and the rate at which water goes into the soil is the infiltration rate.
The intake rate of a soil will affect such management and design factors as
irrigation durations, flow rates to be used, and dimensions of the system.
Factors Affecting Intake Rates
The most important factors influencing the infiltration rate of
water into the soil are:
1. Soil texture and structure. The coarser the texture
and the more highly structured, the higher the infiltration rates.
2. Soil surface conditions. Orientation of soil particles
and compaction: after water moves over a soil surface, soil particles are
rearranged and the soil surface tends to seal.
3. Soil moisture content and moisture gradients.
Generally, the drier the soil, the faster the infiltration rate.
4. Time since the start of irrigation. Infiltration rate
decreases with time until the basic intake rate is reached.
5. Salt content in the water and soil. Soils high in
soluble salts will typically exhibit higher intake rates than soils from which
salts have been leached.
6. High levels of sodium on the soil's exchange sites
will severely affect infiltration if structure collapses. See Chapter 7 for
details.
Infiltration rate, as used in border irrigation and sometimes in
furrow irrigation, has the units of velocity (l/t) and is the depth of water
entering the soil profile per unit time. It can also be thought of as the volume
of water absorbed by a unit area per unit time. The metric units commonly used
to express infiltration rate are mm/hr or mm/mint In furrow irrigation, where
infiltration rate is expressed as a depth per unit time, an equivalent depth is
usually implied since movement is horizontal as well as vertical. The depth is
obtained by dividing the volume rate of infiltration per unit of furrow length
by the product of unit length and furrow spacing. In furrow irrigation,
infiltration rate is commonly expressed as the volume absorbed by a unit length
of furrow in a unit time.
Most soils exhibit an initially high infiltration rate that
decreases with time and eventually reaches a constant or nearly constant rate
called the basic intake rate. Figure 2.37 demonstrates the typical
infiltration rate behavior with time, as well as cumulative infiltration with
time.
The basic intake rates for loamy sands and sands may be 2 to 3
cm per hour or greater. For sandy loams, it is typically 1 to 2 cm per hour. For
silt loams and clay loams, it is typically 0.5 to 1.0 cm/hr. For silty clays, it
may be 0.2 to 0.5 cm/hr or less. With poorly structured soils, these values may
decrease by 25% to 50%. With highly structured and loose soils, the values may
be 50% to 100% higher than those indicated.
Because infiltration can change so much during the season,
infiltration data should be used with caution, and sound judgment should be
exercised in interpreting it. To use such data requires knowledge of crops and
cropping history, irrigation methods and management, tillage, soil type and
structure, and time of season.
Infiltration Equations
In management of irrigations systems, several infiltration
equations and methods for establishing these have been used. One common method
for estimating infiltration rate uses ring infiltrometers. These are installed
by penetrating the soil surface by 15 to 20 cm. They are then covered with
plastic film, filled with water, and then the film is removed rapidly. A water
level reading is taken immediately on removal of the plastic because water
begins to infiltrate the soil at this time. The decline of the water surface is
measured as a function of time and these results are recorded and graphed (see
Figure 2.37).
To obtain an approximation of infiltration rate in a field
situation, small 1 m  1 m basins are
constructed with well compacted banks. A sheet of plastic is placed in the basin
and 15 to 20 cm of water introduced to the basin. The plastic sheet is removed
from the bottom, and the decline of the water surface is measured as a function
of time. Results can be graphed to provide an approximation of the time required
to infiltrate a certain depth of water. Base infiltration rates may require
additional water to be added to the
basin.
1 m basins are
constructed with well compacted banks. A sheet of plastic is placed in the basin
and 15 to 20 cm of water introduced to the basin. The plastic sheet is removed
from the bottom, and the decline of the water surface is measured as a function
of time. Results can be graphed to provide an approximation of the time required
to infiltrate a certain depth of water. Base infiltration rates may require
additional water to be added to the
basin.
2.4.6 Soil chemistry and fertility
Soil is made up of mineral particles derived from the weathering
of rocks and organic matter resulting from decomposing plants. Soil mineral
particles decrease in size from sand to silt to clay. Sand and silt usually
contribute very little to a soil's fertility but are important to a soil's pore
space and drainage.
Clay particles, on the other hand, are very small and have
tremendous surface area. The surfaces and edges of clay particles are negatively
charged. These negatively charged sites on the clay particles act like weak
magnets for positively charged ions or cations. Certain fractions of soil
organic matter also have negatively charged sites. This organic matter and clays
are termed the soil colloids by virtue of their charge and size. The sum
of all the negative charged sites on clay and organic matter in a soil is called
the Cation Exchange Capacity (CEC) and is expressed as meq/100 g.

Figure 2.37 Infiltration Curve
Many nutrients required by a plant are positively charged ions.
They are loosely held by these negatively charged sites and are not washed out
(leached) from the root zone when water travels through. For this reason, the
CEC is a good measure of soil fertility. Clay particles and organic matter also
have plant nutrients in their structure that are slowly released by soil
weathering and decomposition. This natural fertility and the CEC of the soil are
components of a soil's potential fertility. Negatively charged ions are not held
by soil colloids and can thus be readily leached out.
Organic matter has a very high CEC and can dramatically affect a
soil's ability to hold nutrients. Organic matter is thus very important to a
soil's productivity. This is especially important in severely weathered
"tropical clays,'" which rapidly lose most of their natural fertility and whose
clay particles have few negatively charged sites. Addition of organic matter to
these soils can be very beneficial.
Nitrogen is a very important plant nutrient involved in plant
growth, photosynthesis, and plant proteins. In the ammonium form, nitrogen is
positively charged and readily held on the negative exchange sites on soil. Soil
microbes, however, change ammonium into nitrate, and this occurs at a very rapid
rate in warm climates. The nitrate form of nitrogen is negatively charged and is
easily leached out of the root profile. Proper irrigation water management is
required to reduce the potential for leaching and ensure good nitrogen fertility
levels.
Other nutrients are more or less resistant to being leached out
of the soil, but it is a likely event when nutrient ions are negatively charged.
As more of these nutrients are leached out and minerals continue to weather, the
soil becomes more and more dominated by the hydrogen ion, resulting in acid
soil. High rainfall tropical areas will often have tropical clay soils, red or
yellow in color, exhibiting very acidic reactions (low pH).
Leaching of nutrients can also result in imbalances that can
severely affect plant growth. Chapter 7 discusses the effect of excess ions
(salts) in the soil solution. Soil chemistry is complicated, so a more complete
reference should be
consulted.
2.5 Conducting initial environmental evaluations of irrigation projects
Irrigation projects can result in a wide variety of impacts to
surrounding ecosystems, both positive and negative. On the positive side,
irrigation projects in Thailand have been credited with reducing the destruction
of tropical rainforests by enabling rural people to increase food productivity
on smaller parcels of land, thus eliminating the need for continuous clearing of
forests for agricultural development. Irrigated fields have improved habitat for
some species, particularly birds and small mammals. Some Asian farmers have
integrated fish production into their irrigated rice fields, thus creating
habitat while maximizing food productivity. In addition, the use of irrigation
has improved human welfare dramatically, providing foods and fibers to a large
percentage of the world's population that might otherwise have none.
Some irrigation projects, however, have contributed to
significant environmental degradation, primarily through poor project planning
and administration. Irrigation projects reshape the land surface and change the
way water moves, is stored, and is recycled in the hydrologic cycle. Poor
management of water applications in irrigation projects has frequently resulted
in high salt content of soil, in some cases rendering these lands useless for
further crop production. Poor drainage and poor scheduling of water applications
have resulted in waterlogged soils in some locations.
For more than 7,000 years, people have constructed diversion and
conveyance systems that enable water supplies to nurture crops on previously
unproductive or less productive lands. The consequence has been a proliferation
of crops, enabling regions to expand population levels, accumulate wealth, and
develop cultural and political power. Improper management of the soil and water
resources that support irrigated lands, however, can result in salinization of
the irrigated soils, silting of canals, and contamination of water supplies.
Several formerly powerful ancient cultures virtually disappeared, in part due to
poor administration and management of irrigation systems.
Even today, productivity on approximately 25 million hectares (7
percent) of the world's irrigated lands is seriously affected by these problems
(Ref. 3). Salinization of fertile croplands affects approximately 1.5 million
hectares per year. World Bank studies in Pakistan and Egypt indicate that
waterlogging and salinization have decreased the yields of major crops by 30
percent. Approximately 20 percent of the 40 million hectares irrigated in India
are also affected by these problems.
Construction of water storage reservoirs and irrigation channel
networks affect the amount of moisture in the soil, and the height of the ground
water table, and can influence water quality through increased sediments,
organic materials, and agrochemicals. Diversion of water for irrigation from the
huge Aral Sea in central Russia has largely eliminated local fisheries and
wildlife habitat, resulting in the loss of employment for people who fish,
creating health hazards, and threatening the very existence of this sea.
Poorly developed and managed water supply sources for irrigation
projects have resulted in a considerable loss of the world's wetland habitats
and have created new vector breeding environments, contributing to the spread of
serious infectious diseases, notably malaria, bilharzia, and yellow fever. In
the Sudan, incidents of bilharzia (schistosomiasis) increased more than 80
percent after the development of reservoirs and canals for irrigation
systems.
2.5.1 The role of environmental assessment
Many of these adverse impacts are difficult to predict
accurately or quantify. In some cases, the effects are the cumulative result of
several land alteration practices, with irrigation systems being only one of the
causative agents. Still, the fact that irrigation systems can result in or
contribute to environmental problems requires all irrigation workers to take
full account of potential environmental impacts before any project
activities are implemented.
In most countries, an environmental review is now required for
virtually all projects that will involve some construction or modification of
the environment. In most cases, the general public has insisted that projects
consider several alternatives for achieving the same goal, and implement only
the alternative that has been demonstrated to represent the least environmental
risk. All signs indicate that both professional and public concern over adverse
environmental impacts will continue to grow. The irrigation specialist will
increasingly be required to document not only the wider impacts of his or her
decisions but also the greatest balance that can be achieved between development
and conservation.
Volunteers who will be participating in projects that divert
water or otherwise alter water sources, construct canals, cultivate fields, or
result in any other potential changes to the social or natural environment
should be prepared to conduct a careful analysis of potential environmental
impacts. The most important output from this analysis should be a documentation
of potential impacts and the development of mitigative measures that will be
implemented as part of the project to guarantee that any potential environmental
problems will be avoided or minimized. Examples of mitigative measures include
such actions as ensuring that the vegetation along streams is protected or
restored; stocking Gambusia or other larvae-feeding fish in storage ponds
to minimize the incidents of mosquito-borne diseases; and building terraces and
drains in irrigated fields to minimize waterlogging and soil loss.
The process should begin with an initial environmental review
that uses field observations and professional judgment to determine if a
proposed project is likely to result in any significant environmental impacts.
The review is intended to rely on qualitative analyses and to be done fairly
rapidly. An illustrative form that can be used by Volunteers to complete an
initial environmental review is included in the next section of this chapter.
For most small projects that will not involve the construction of permanent
dams, extensive canal systems, or the irrigation of more than 10-15 hectares of
land, this initial environmental review should be sufficient to ensure that
careful environmental management will be built into all project components.
Larger projects that are likely to result in more extensive
environmental impacts can still be initially reviewed using this simple
environmental review form. If significant impacts are identified it may be
necessary to conduct a more thorough environmental assessment of the project. A
comprehensive environmental assessment (EA) will require much more time and
professional expertise than may be available to many Peace Corps Volunteers. If
a comprehensive EA is deemed necessary for a project, then the Volunteer will
most likely need to contact qualified government staff, private sector firms, or
international donors to assist with the effort. Volunteers should be aware of
the content of any comprehensive EA, which includes the following:
· A concise but
thorough description of the proposed actions that will occur, a statement of
project purpose, and a review of the roles and responsibilities of all agencies,
organizations, or individuals to be involved in the project.
· A detailed
description of the physical, biological, and social environment that will, or
could potentially, be affected by the proposed project actions. This description
should be quantified, wherever possible.
· A discussion of
the relationship of the proposed project actions to existing land use plans,
policies, and controls for the affected area.
· A detailed
description of alternative strategies that can be taken to achieve the stated
project purpose. This description should include the project plan (unamended)
and a "No Action" alternative, which essentially indicates how the stated
project purpose will be affected if the project is not implemented at
all.
· A detailed
description of predicted environmental impacts that should result from the
implementation of each alternative. Environmental impacts should include both
beneficial and negative consequences and secondary or indirect effects that may
occur. This description should include quantified predictions wherever
possible.
· Identification of
environmental impacts that cannot be avoided with any of the alternatives,
including the "No Action" alternative.
· Identification of
the preferred alternative and use of some kind of quantifiable process to show
why this alternative is the most preferable selection.
· A detailed
description of measures that can be incorporated into the preferred alternative
to ensure that any adverse environmental impacts will be minimized or avoided
and to guarantee that careful environmental management will be built into the
overall project
effort.
2.5.2 Illustrative environmental review form for irrigation or water resource development projects
The following illustrative form provides a scheme that can be
used by Volunteers or technicians to identify and rank probable environmental
impacts from proposed field work prior to the initiation of construction or
development activities. The form can also be used to help identify mitigative
measures that will eliminate these environmental impacts. Impacts are identified
as to whether they are of MINOR, MODERATE, OR SIGNIFICANT environmental concern.
Any MODERATE impact should identify measures that can improve the scheme. Any
SIGNIFICANT impacts should identify alternative activities that can replace the
initial proposed project.
PART I PROJECT CHARACTERIZATION
Project Description
_______________
_______________
1. Obtain topographic map(s) covering the area within or
including the proposed project development scheme.
2. Delineate the watersheds, natural drainage directions, and
approximate affected area within which the project will occur. Affected area
includes lands directly upstream and downstream from the proposed project, which
the project could alter by changing runoff or flood flows, vegetation cover, or
soil conditions.
3. Obtain land use, vegetation, soils, or flood maps for the
affected area if available.
4. Obtain information on the likelihood of occurrence of
important wildlife, fisheries, or habitat types, and the presence of threatened
or endangered species in the affected area.
5. Obtain information on the likelihood of occurrence of
important cultural resources in the affected area.
Note: Bring the topographic map to the field when doing the
field review.
PART II FIELD EVALUATION
Based on available information and field observations, evaluate
the predicted effect of the proposed project on the following resources. Include
proposed mitigation resources, if necessary.
|
N |
NO environmental impact or IMPROVED environmental conditions.
|
|
L |
MINOR negative environmental impact. |
|
M |
MODERATE negative environmental impact. |
|
S |
SIGNIFICANT negative environmental impact. |
|
U |
UNKNOWN environmental impact. |
I Water Resources
Use the topographic map to make a brief sketch of the proposed
development scheme. Identify significant local features, including rivers,
canals, ponds, lakes, forest lands, wetlands, other unique habitats, and
archeological sites. Show the apparent flow directions for floods and note any
obvious signs of flood depths or flood locations for a 10-year flood. Include a
map scale.
1. The project is located in a floodplain area.
(Yes) (No)
2. The project will increase/decrease/have no effect
on the duration of floods (circle one answer). If yes, the ranking of impact is
________.
3. The project will change the location of floods.
(Yes) (No) If yes, the ranking of impact is _______.
4. The project will change stream channel shapes, or
the amount or type of vegetation alongside streams. (Yes) (No)
Impact Ranking
|
MINOR |
MODERATE |
SIGNIFICANT |
|
Some change, but overall channel/vegetation remains the same.
|
Causes measurable change in shape or vegetation. |
Causes major change in channel shape or vegetation. |
5. Recommended measures to mitigate (reduce)
effects: _________.
6. Explain how recommended measures will mitigate moderate or
significant impacts.
7. What moderate or significant impacts cannot be mitigated and
why?
II Fish and Wildlife
1. Project will result in destruction or degradation
of habitat for fish or wildlife. (Yes) (No) If yes, the ranking of this impact
is ________.
2. Project will block fish or wildlife migratory
pathways. (Yes) (No) If yes, the ranking of the impact is ________.
Impact Ranking
|
MINOR |
MODERATE |
SIGNIFICANT |
|
Impacts localized and no impacts to migratory pathways or
habitat. |
May temporarily block pathways or eliminate habitat. |
Will block migratory pathways or will eliminate habitat. |
3. Endangered or threatened species are likely to
occur in the project area. (Yes) (No) If yes, list.
4. Proposed project will result in loss of
individual threatened or endangered species. (Yes) (No) If yes, which one(s) and
how?
5. Will any loss of habitat affect the survival of
species? Explain.
6. Recommended measures to mitigate effects: ________.
7. Explain how recommended measures will mitigate moderate or
significant impacts.
8. What moderate or significant impacts cannot be mitigated and
why?
III Vegetation
1. Vegetation types found in the area include
_______.
2. Project will result in cutting of trees, or loss
of vegetative cover. (Yes) (No) The ranking of the impact is
_______.
Impact Ranking
|
MINOR |
MODERATE |
SIGNIFICANT |
|
No loss of important plant communities or changes in runoff.
|
Some loss of important plants and change in runoff patterns.
|
More than 50 percent of plant cover lost and runoff patterns
vary greatly. |
3. Recommended measures to mitigate effects:
________.
4. Explain how recommended measures will mitigate moderate or
significant impacts.
5. What moderate or significant impacts cannot be mitigated and
why?
IV Soils
1. Changes in soil moisture:
(a) waterlogging ________.
(b)
drought ________.
2. Project will cause soil loss from farm fields.
(Yes) (No) If yes, ranking is ______.
3. Project will result in adverse changes to soil
physical or chemical conditions. (Yes) (No) If yes, ranking is
________.
Impact Ranking
|
MINOR |
MODERATE |
SIGNIFICANT |
|
Soil loss less than 5 tons/ha/year, and no salt or chemical
concentration. |
Soil loss greater than 5 tons/ha/year, and some salt or chemical
concentration. |
Soil loss greater 10 tons/ha/year, and high salt or chemical
concentration. |
4. Recommended measures to mitigate effects:
________.
5. Explain how recommended measures will mitigate moderate or
significant impacts.
6. What moderate or significant impacts cannot be mitigated and
why?
V Cultural Resources
1. Proposed project will result in the loss of
archeological, historical or cultural resources. (Yes) (No) If yes, identify
resources and rank the impact.
Impact Ranking
|
MINOR |
MODERATE |
SIGNIFICANT |
|
Project will make cultural resource less accessible. |
Project will result in loss or damage to less important
resources. |
Project will result in the loss or damage of important
resources. |
2. Recommended measures to mitigate effects:
________.
3. Explain how recommended measures will mitigate moderate or
significant impacts.
4. What moderate or significant impacts cannot be mitigated and
why?
VI Summary of Moderate and Significant Impacts and
Recommended Mitigative Measures ________.
<<TOC2>> Chapter 3 - Developing water
sources
|
Reference: |
Primary: |
(5), (15), (20), (28), (39), (54), (58) |
|
Other: |
(13), (28), (59) |
3.1 Diversions
3.1.1 Types
Diversion structures are used to separate all or part of the
flow in a stream to a location where it will be used or stored. Diversion
structures may be either temporary or permanent. If high flows make a permanent
structure very expensive, then temporary structures that can be easily and
economically reconstructed might be installed.
In streams or springs that have constant flow year-round, or
stream beds that are very wide, a permanent diversion can be used to channel
water, generally at an angle, towards the bank. The diversion may be constructed
across only a part of the stream's bed.
In streams with narrow beds and small flow rates, the diversion
may span the stream and pond up the
water.
3.1.2 Types of construction materials
Depending on the availability and cost of materials, and the
size and purpose of the structure, the following materials are commonly used:
· soil,
· boulders and rocks,
· logs,
· sand
bags,
· gabions,
· masonry, and
·
concrete.
3.1.3 Construction and maintenance factors
1. Many diversions are only temporary structures, so
they should be built with the understanding that they will be destroyed by flood
water during hard rainfall.
2. Diversions can be constructed so that part of the
structure is permanent and the other part temporary. In areas where there is a
large variation in stream flow during a relatively short period of time, this
system of diversion reduces the amount of labor required to reconstruct the
structure after each rainfall.
3. Design of any permanent structure should take
into consideration the amount of sediment that will settle upstream and reduce
water storage volume. Sediment traps can be constructed upstream of the
diversion to reduce some of the sediment. Maintenance will have to be performed
after each rainfall to clean the sediment traps. In watersheds with steep
slopes, special precautions should be taken for the probable movement of large
rocks in the stream bed during high flow.
4. If the diversion structure will be used as a
check dam to allow for water storage, the site of the diversion should have a
natural basin upstream to maximize water storage volume and decrease the
necessary height of the diversion or dam.
5. Gabions are baskets made of heavy duty galvanized
wire mesh that are filled with rocks and wired shut. The gabion provides an
easily constructed unit that is large enough and heavy enough to remain stable
in moving water. Gabions can be made to any convenient size ranging from 2-4 m
long by 1 m wide by 0.5-1 m deep. The wire mesh is usually 2-3 mm in diameter.
Evenly graded stones are used so that the gabions are well packed with few empty
spaces, and the largest stone should not be more than two-thirds of the minimum
gabion dimension.
6. Diversions constructed of materials that allow
excess amounts of seepage may require some type of impervious core or barrier to
reduce losses. These barriers are generally installed during the construction of
the structure. A common core, if available, is clay. Other barriers include
heavy grade plastic sheets, used fertilizer/animal feed sacks, and
sod.
7. Diversion structures require upstream and
downstream side slopes to assure their stability. The ratio generally depends on
the construction material, but, for small structures, values of 2:1 upstream and
1.5:1 downstream are acceptable.
8. A spillway, overflow structure, or other bypass
structure is necessary to allow water from the stream to pass over the diversion
structure and flow back into the natural watercourse without washing out or
damaging the structure. Water needs to be channeled through a bypass so that it
does not flow over the top of the entire length of the diversion, which could
cause erosion problems. Additionally, the energy of the water falling from the
outlet to the stream bed must be dissipated. Rocks or other durable materials
can be placed at the base of the downstream side of the bypass structure for
protection.
9. If the diversion provides water to a pipeline, a
trash removal system may be required to prevent blockage of the pipe. Sometimes
a simple screen over the inlet may suffice. If sediment is a problem, an
offstream sedimentation pond may be required.
<<TOC3>> 3.2
Concrete
Concrete is widely used for irrigation systems. It has several
desirable properties that make it a versatile and popular building material.
Freshly mixed concrete can be formed into practically any shape.
Rules for making good concrete are simple:
· Use proper
ingredients (cement, sand, and gravel).
·
Proportion the ingredients correctly.
·
Measure the ingredients accurately by volume.
· Mix the ingredients thoroughly.
Table 3.1 provides an initial estimate of the ratios of
ingredients to be used to make common small-scale concrete structures:
TABLE 3.1 Concrete Ratios by Volume
|
Coarse Aggregate, |
Cement |
Sand |
Coarse |
Water |
|
Maximum Size, mm (in) |
|
|
Aggregate |
|
|
10 (3/8) |
1 |
2 1/2 |
1 1/2 |
1/2 |
|
13 (1/2) |
1 |
2 1/2 |
2 |
1/2 |
|
19 (3/4) |
1 |
2 1/2 |
2 1/2 |
1/2 |
|
25 (1) |
1 |
2 1/2 |
2 3/4 |
1/2 |
|
38 (1 1/2) |
1 |
2 1/2 |
3 |
1/2 |
3.2.1 Hand mixing
Mixing should be carried out on a clean, hard surface or in a
mortar box. Concrete should not be mixed on the ground. Commonly, the correct
proportion of ingredients is measured by shovelfuls. A small bucket is also a
good measuring device. The ingredients are first thoroughly mixed together dry
until the mix is of a uniform color and consistency. Clean water is added slowly
and in small quantities; with each addition of water, the mix is turned over a
few times with a shovel. Water is added until the concrete is at the desired
consistency. Concrete should not be any runnier than is necessary to work with
because it loses strength if it is too watery.
Wet concrete is poured; it should not be dumped from any height
since separation may occur. Before it sets, the concrete must be settled and
compacted (rodded) to eliminate air pockets and make sure that there is good
contact with the foundation materials. Excessive trowelling causes segregation
of the aggregates and should be avoided. Forms are removed after the concrete
has hardened (a few days). It should be kept wet for at least 3 days, preferably
7, to assure adequate curing time.
<<TOC3>> 3.3 Designing structures for springs and
seeps
Protective structures for springs and seeps assure a clean water
supply to irrigation systems. The protective structure increases the volume of
water that can be diverted from the spring and protects the site from
contamination by runoff or animals.
Developing a spring or seep requires some understanding of
ground water flow (see Chapter 2) and preparation of a thorough construction
plan. The construction plan should include (a) a map of the area identifying the
location of the spring, the locations of water use, distances from source to use
outlet points, and surveyed changes in elevations; (b) a complete list of all
labor, materials, and tools needed; and (c) a spring box design with diagrams of
the top, side, and front views, and the dimensions of a cover. Spring box
structures can be costly in terms of the amount of time and finances invested,
so careful planning is
essential.
3.3.1 Spring box designs
There are several possible designs for springs boxes, but, in
general, their basic features are similar. Two basic design choices are a box
with one pervious side for collection of water from a hillside and a box with a
pervious bottom for collection of spring water flowing from a single opening on
level ground. To determine which design to use, dig out around the area until an
impervious layer is reached, locate the source of the spring flow, and design to
fit the situation. Figures 3.1 through 3.10 and Table 3.2 provide sample
drawings and work sheets.
General Construction Steps
The following steps are appropriate for either design choice:
1. Locate the spring site and mark out the area with
measuring tape, cord, and wooden stakes or pointed sticks.
2. Clean out the area around the spring to ensure a
good flow. If the spring flows from a hillside, dig into the hill far enough to
determine the origin of the flow. Where water is flowing from more than one
opening, dig back far enough to ensure that all the water flows into the
collecting area. If the flow cannot be channeled to the collection area because
openings are too diffuse, drains will have to be installed. Flow from several
sources may be diverted to one opening by digging farther back into the hill.
Always try to dig down deep enough to reach an impervious layer. An impervious
layer makes a good foundation for the spring box, and provides a better surface
for a seal against underflow.
3. Pile loose stones and gravel against the spring
before putting in the spring box. The stones serve as a foundation for the
spring box and help support the ground near the spring opening to prevent dirt
from washing in.
4. Approximately 8 meters above the spring site dig
a trench for diverting surface runoff. Use large stones, if available, to line
the diversion trench and prevent erosion.
5. Mark off an area about 9 meters by 9 meters for a
fence. Place the fence posts 2 meters apart and string the fence.
Concrete Construction Steps
In order to have a strong structure, concrete must cure at least
7 days. Strength increases with curing time. Be sure that all tools and
materials needed to build the forms and mix the concrete are at the site.
1. Build wooden forms. Once the dimensions of the
box have been drawn, cut wood to the appropriate sizes and set up the forms on a
level surface. The outside dimensions of the forms should be 0.1 meter larger
than the inside dimensions. An open bottom or back should be planned, depending
on the spring source location. The size of the opening in the form depends on
the area that must be covered to collect the maximum water. When building forms
for a box with a bottom, be sure to set the inside forms 0.1 meter above the
bottom for the floor. This is done by nailing the inside form to the outside
form so that it hangs 0.1 meter above the floor. Make holes in the forms for the
outflow and overflow pipes. Place small pieces of pipe in them so that correctly
sized holes are left in the box as the concrete sets. Build a form for the box
cover. Build all forms at the site.
2. Set the forms in place. Forms must be well
secured and braced before pouring the concrete. The braces can be tied together
with wire. Use a stick to tighten the wire and force the forms together. If the
forms are set and concrete is poured at the permanent site, water must be
diverted from the area to allow the concrete to cure. If diversion is not
possible, pour the concrete near the permanent site, and plan to have 6-8 people
available to help move the box later after the concrete has cured.
Clay/Cement Mixture
- Mix equal parts dry cement and dry powdered cement
- Add
water till plastic (not too wet)
- Slap down mixture around spring onto nerd
surface to start (It will not erode in flowing water)
- Build up walls
capturing spring and add tubes as level is reached
- Add large rocks in water
flow leaving a good water path
- Cover large rocks with progressively liar
rocks and than gravel
- Finish off with a layer of sand or dirt

Figure 3.1 Spring Box Design

Figure 3.2 Spring Box with Open
Sides (Ref. 39)

Figure 3.3 Spring Box with Open
Bottom (Ref. 39)

Figure 3.4 Forms for Spring Box
with Open Side (Ref. 39)

Figure 3.5 Forms for spring Box
with Open Bottom (Ref. 39)

Figure 3.6 Excavating Spring Site
(Ref. 39)

Figure 3.7 Placement of Rebar in
Concrete Slab (Ref. 39)

Figure 3.8 Forms for spring Box
Cover (Ref. 39)

Figure 3.9 Brick Spring Box (Ref.
39)
Figure 3.10 Calculating Quantities Needed for Concrete (Ref.
39)
(CaIculations for a box 1m  1m
1.0m with open bottom)
1m
1.0m with open bottom)
Total volume of box = length (1)  width (w)
  height (h)
Thickness of walls = 0.10m (t)
1. Volume of top = 1 1.2 m  w 1.2 m
  t
0.10 m = 0.144 m3
t
0.10 m = 0.144 m3
2. Volume of bottom = 1 0 m
 w 0 m
w 0 m  t 0 m = 0 m2
3. Volume of two sides = 1 1 m
 w 1 m
w 1 m  t 0.10 m
  2 = 0.20
m3
2 = 0.20
m3
4. Volume of two ends - 1 1 m  w 1 m
w 1 m  t
0.10 m
t
0.10 m  2 = 0.20
m3
2 = 0.20
m3
5. Total volume = sum of steps 1, 2, 3, 4, 5 = 0.54
m3
6. Unmixed volume of materials = total volume  1.5; 0.54 m3
  1.5 = 0.81 m3
7. Volume of each
material (cement, sand, gravel, 1:2:3):
cement: 0.167  volume from Line
6 0.81 = 0.13 m3 cement.
volume from Line
6 0.81 = 0.13 m3 cement.
sand: 0.33  volume from Line 6 0.81 = 0.26
m3 sand.
volume from Line 6 0.81 = 0.26
m3 sand.
gravel: 0.50  volume
from Line 6 0.81 = 0.4 m3 gravel.
volume
from Line 6 0.81 = 0.4 m3 gravel.
8. 
volume of cement 0.13 m3/.033 m3/bag =
4 bags.
9. Volume of water = 28 liters  4 bags of cement - 112 liters.
(NOTE:
1) Do not determine volume for an open side or bottom.
2) The
top slab has a 0.1m overhang on each side.
3) The same calculations will be
used to determine the quantity of materials for construction of a seepage
wall.
4) To save cement a 1:2:4 mixture can be used.)
Table 3.2 Sample Materials List (Ref. 39)
|
Item |
Description |
Quantity |
Estimated Cost |
|
Labor |
Foreman Laborers |
______ |
______ |
|
Supplies |
Portland cement |
______ |
______ |
|
Clean sand and gravel, if available or locally available sand
and gravel. |
______ |
______ |
|
Water (enough to make a stiff mixture) |
______ |
______ |
|
Wire mesh or rein forcing rods |
______ |
______ |
|
Galvanized steel or plastic pipe (for outlets, overflow, and
collectors) |
______ |
______ |
|
Screening (for pipes) |
______ |
______ |
|
Boards and plywood (for building forms) |
______ |
______ |
|
Old motor oil or other lubricant (for oiling forms) |
______ |
______ |
|
Baling wire |
______ |
______ |
|
Nails |
______ |
______ |
|
Tools |
Shovels and picks (or other digging tools) |
______ |
______ |
|
Measuring tape or rods |
______ |
______ |
|
Hammer |
______ |
______ |
|
Saw |
______ |
______ |
|
Buckets |
______ |
______ |
|
Carpenter a square or equivalent (to make square edge) |
______ |
______ |
|
Mixing bin (for mixing concrete) |
______ |
______ |
|
Crowbar |
______ |
______ |
|
Pliers |
______ |
______ |
|
Pipe wrench |
______ |
______ |
|
Wheelbarrow |
______ |
______ |
|
Adjustable wrench |
______ |
______ |
|
Screwdriver |
______ |
______ |
|
Trowel |
______ |
______ |
|
Total Estimated Cost |
________ |
3. Oil the forms. This prevents the concrete from
sticking.
4. Prepare the reinforcing rods (rebar) in a grid
pattern for placement in the forms for the spring box cover. Make sure there is
0.15 meters between the parallel bars and that the rods are securely tied
together with wire. Then position the reinforcing rods in the form. Four bars
tied together to form a square should be placed in the forms.
5. Mix the concrete in a proportion of 1 part
cement, 2 parts sand, and 3 parts gravel. Add just enough water to form a thick
paste. More gravel can be used to conserve cement.
6. Pour the concrete into the forms. Tamp the
concrete to avoid pockets or voids. Smooth all surfaces. Make the middle of the
cover a little higher than the sides to encourage drainage away from the spring
box.
7. Cover the concrete with canvas, burlap, empty
cement bags, plastic, straw or some other protective material to prevent it from
losing moisture. The covering should be kept wet so water from the concrete is
not absorbed. If concrete days, it no longer hardens, its strength is lost, and
it begins to crack. Keep the cover on for as long as the concrete is
curing.
8. Let the concrete structures set for at least 7
days, wetting the concrete daily. After 7 days, the forms can be removed and the
box installed.
Installing a Spring Box
The spring box must be properly installed to ensure that it fits
on a solid, impervious base, and that a seal with the ground is created to
prevent water seeping under the structure.
1. Place the spring box in position to capture the
maximum flow. Place gravel around the box or in the basin so that water flows
through it before entering the box.
2. Seal the area where the spring box makes contact
with the ground. Use concrete or puddled clay to form a seal.
3. Be sure that the area where the spring flows from
the ground is well lined with gravel, and then backfill the dug out area with
gravel. The gravel fill should reach as high as the inlet opening in the spring
box so that the water flowing into the structure passes through gravel. For
spring boxes on level ground, gravel backfill is unnecessary.
4. Place the pipes in the box. Use concrete to seal
around the pipes and prevent leaks. Place screening over the pipe openings and
secure with wire.
5. Disinfect the inside of the box with a chlorine
solution. Before the spring box is closed, wash its walls with a light solution
of chlorine.
6. Place the cover on the
box.
<<TOC3>> 3.4 Ponds for irrigation water
storage
Ponds or small reservoirs can be extremely important water
storage structures for the irrigated farm. Some reasons for constructing water
storage ponds are to:
· collect water from
small spring flows so that it can be used efficiently when needed in large flow
rates;
· provide overnight
storage of canal water that is available at night;
· store water for times of
critical need; and
· regulate flow.
Water for ponds can come from irrigation supply canals, natural
streams, springs, wells, or even rainfall runoff. In selecting a site for a
pond, one should consider the location of the water supply, the availability of
water, the soils, and the topography of the site. One should not normally
construct ponds and small reservoirs in streams, ponds, gullies, or places where
severe storms could create high flows that would wash away the dam. Small,
off-stream ponds and reservoirs generally will not have to handle intense storm
runoff.
3.4.1 Location of the pond
The pond should be located on or above the highest part of the
farm to avoid the need for pumping. Water can flow freely from the pond. The
pond should be located downslope from the water supply, unless water must be
pumped to a higher elevation. Preferably water will flow freely from the source
to the pond. A topographic survey will indicate the correct elevations to
optimize flow from the water source to the
pond.
3.4.2 Availability of water
Generally, one liter per second will allow the farmer to
irrigate one hectare of land. If water from a spring or other source will be
stored and emptied at a given interval from the pond, the pond must be able to
hold the maximum amount of water that the farmer needs to hold. For example, if
a spring supplies 1/2 liter per second, and the farmer plans to store water for
12 hours, he must be able to store:
Volume = Q  T =.0005
m3/sec
T =.0005
m3/sec  3600 sec/hr
  12 hrs = 21.6
m3
12 hrs = 21.6
m3
3.4.3 Soils
Ponds should be as impermeable as possible to prevent leakage.
The soils should contain a layer of material that is impervious and thick enough
to prevent excessive seepage. Clays and silty clays are excellent for this
purpose; sandy clays are usually satisfactory. Coarse-textured sands and
sand-gravel mixtures are highly pervious and, therefore, usually unsuitable. The
absence of a layer of impervious material over part of the ponded area does not
necessarily mean that you must abandon the proposed site. However, the pond will
have to be sealed in other ways.
You can generally determine if the soil has sufficient amounts
of clay by wetting it, feeling it in your hand, and squeezing it between your
fingers. If the soil can be molded, and if it can be ribboned out between the
thumb and forefinger, the clay content is usually
adequate.
3.4.4 Topography
Generally, reservoirs 2 to 3 meters in height can be constructed
by any small-scale farmer if the design and construction are proper. Topography
may determine the type of pond that can be built. Sloping topography will allow
the farmer to fill and drain ponds using gravity. The topography may determine
whether the farmer will be able to build an above-ground or below-ground
reservoir or pond.
Some ponds are made by constructing a dam across a creek bed or
gully to intercept water that would otherwise be lost after rainfall or to
intercept water coming from a small creek or spring. This is possible only for
very small watersheds that do not develop high flows during severe storms. One
must be careful, however, to provide spillways and bypasses for excess water.
Offstream ponds connected to a stream diversion structure provide protection
against failures due to
flooding.
3.4.5 Design end construction
A pond consists of 4 components - the walls (dikes or levees),
the floor, the inlet works, and the outlet works. The walls should be
impermeable (or nearly) and capable of withstanding the pressure exerted outward
by the pond. The floor must be as nearly impermeable as possible. The inlet
works must be able to receive the expected amount of water. The outlet works
should have the ability to regulate flow from the pond and also provide for the
overflow of excess water.
Figure 3.11 provides some ideas for outlet works. Inlets often
consist of a simple pipe of sufficient diameter to carry the maximum expected
inflow. The Rivaldi valve (a flexible irrigation hose that can be submerged to
allow water to flow from the pond) provides a convenient means of regulating the
outflow, as does the siphon tube(s).

Figure 3.11 Outlet Works for Small
Irrigation Pond
The walls and floor are best made of a mixture of sand and clay.
If the soil is of a sandy or sandy loam texture, clay or other lining materials
must be used. If clay is hard to come by, a 15 cm layer of sand/clay mixture (at
least 20% clay) may be laid on the bottom of the pond and used as a core in the
side walls (see Figure 3.12.) In all cases, the soils should be well compacted
to ensure that leakage is held to a minimum.
Waterproof linings made of plastic, vinyl, or butyl rubber may
be used. These can be expensive, however, and, if not properly installed, can
quickly develop leaks. All of these linings should be laid over a smooth bed and
have an earth cover of not less than 15 cm (at least 8 cm of material not
coarser than sand). Keep livestock out of the pond to prevent puncturing the
lining. Linings should be overlapped 15 cm at the seams. All vegetation and
roots of woody vegetation should be cleared to prevent the plants from breaking
through the lining. Polyethylene plastic should be laid out with 10% slack.
The side slopes of the inside of the pond should be no steeper
than 3 to 1 on the inside (water side) of the bank and 2 to 1 on the outside
banks. Top width for ponds up to 3 meters in height should be a minimum of 2
meters to assure stability.
The freeboard, or distance between the maximum expected high
water and the top of the berm (a berm is the wall of a pond), for small
ponds of less than 3 meters in height and 1 acre (0.4 hectares) in size can be
60 cm.
The spillway should not allow water to come closer than 30 cm
from the berm during periods of overflow.
If water has a significant amount of silt in it, a desilting
pond may be necessary for removal of sediment before the water enters the
storage pond.

Figure 3.12 Lining and Compaction
of Irrigation Pond (Ref.
7)
3.5 Pumps and water lifting devices
Human and animal-powered water-lifting devices have been in use
for thousands of years. These water-lifting devices have been used to provide
water for irrigation as well as for drinking and other uses. More recently,
machine-powered pumps have become the primary means of lifting water from wells
and surface water sources.
The use of hand-dug wells as a source of water for irrigation
also dates back several thousands of years. Hand-dug wells are still an
important means of securing a reliable source of water in many developing
countries. Hand-dug wells, however, are generally limited to areas where the
water tables are within 20 meters of the ground surface. Modern well drilling
technologies now permit wells to be drilled to several hundred, and even
thousands, of feet in depth.
The design, construction, and use of deep wells requiring the
application of modern technology is beyond the scope of this manual. Some basic
concepts about shallow and deep wells, however are presented to allow the
Volunteer to gain a basic understanding of types of wells and their
characteristics. Hand-drilled wells and driven (sand point) wells are low-cost
and appropriate technologies for many applications where water tables are
shallow. These methods are presented in some detail. Other wells drilling
methods that require the use of costly commercial drilling techniques and higher
technologies are described very superficially. The Volunteer should consider
these technologies where appropriate and can read a number of references for
greater understanding (See Ref. 13). Design and construction of these wells
should be left to the experienced engineer and/or commercial water well
contractor.
The selection, design, construction, and maintenance of pumps to
provide water from deep wells should be done with the assistance of experienced
engineers and well installers. Basic concepts required for the selection,
installation, and operation of some pumps and water lifters that can take water
from streams, ponds, or shallow wells, are presented in this section. (Extensive
information on the use of human and animal-powered water lifters is included in
Refs. 28, 58, and
59.)
3.5.1 Types of pumps
The type or kind of pumping system selected depends upon many
factors, including (1) the total dynamic head (TDH) or pumping lift; (2) the
required discharge (Q); (3) the source of available energy; and (4) the
operating conditions.
The use of mechanical power and modern pumps makes possible the
lifting of large quantities of water to considerable heights.
The supply of oil and electricity have made modern pumping
economically feasible. Worldwide energy shortages have recently caused concerns
in countries where fuel oil must be imported. Man and animal pumps are still
used in some areas where irrigation is primarily associated with subsistence
agriculture. Several types of hand and animal powered pumps are illustrated in
Figures 3.13 through
3.25.
3.5.2 Pumps powered by humans and animals
The simplest form of a manual lifting device is the water bucket
or scoop used to lift water from shallow wells, reservoirs, or canals. The use
of a bucket, rope, and roller or pulley increases the possible lift and allows
the lifter to use his weight to assist in pulling down. Animals have also been
used in some countries.
Labor costs of human powered irrigation are high unless there is
no alternative demand for the labor supply. Where crop failure may result in
serious malnutrition, the use of human and animal pumps for irrigation may be
necessary.
3.5.3 Animal-powered pumps
Animal power has long been used for water lifting. Animals in
good condition can develop about 0.10 HP per 100 kg of body weight. A 1,000 kg
horse produces approximately one horsepower. Many different systems are used.
When animals are used for lifting water, the cost of owning and
feeding them must be included in the cost of pumping water. A major problem in
the use of manual and animal lifting devices for irrigation is the small amount
of water that can be pumped. Irrigated areas are generally limited to
garden-size plots of less than one-fourth hectare and very shallow
lifts.
3.5.4 Mechanically driven pumps
Pumps powered by mechanical means other than man or animal can
be classified as positive displacement pumps or variable displacement pumps.
Positive displacement pumps (piston pumps, diaphragm pumps, gear pumps, screw
pumps) are seldom employed for irrigation and will not be discussed in this
manual.
Variable displacement pumps include the centrifugal, mixed flow,
turbine, propeller and jet pumps, and the hydraulic ram. The first four of these
are commonly used for irrigation.

Figure 3.13 Archimedean Screw
(Ref. 28)

Figure 3.14 Hand (Piston) Pumps
(Ref. 28)

Figure 3.15 Swing Baskets (Ref.
28)
Wicker swing basket of average capacity 8 litres.
Swing basket made from metal sheets

Figure 3.16 eater Scoop (Ref.
28)

Figure 3.17 Suspended Scoops
(Ref. 28)

Figure 3.18 Noria: (Ref. 58) (a)
With Fixed Buckets, Driven by Currents

Figure 3.18 Noria: (Ref. 58) (b)
With Larger Paddles
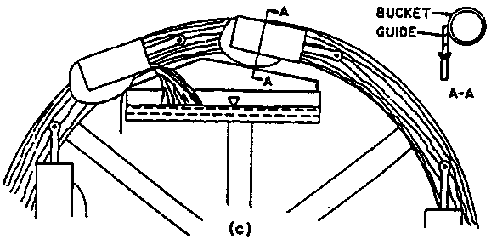
Figure 3.18 Noria: (Ref. 58) (c)
With Moveable Buckets

Figure 3.19 Modified Persian
Wheel or Zawafa (Ref. 58) (a)
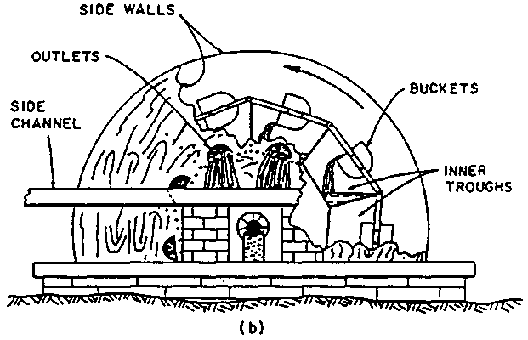
Figure 3.19 Modified Persian
Wheel or Zawafa (Ref. 58) (b)
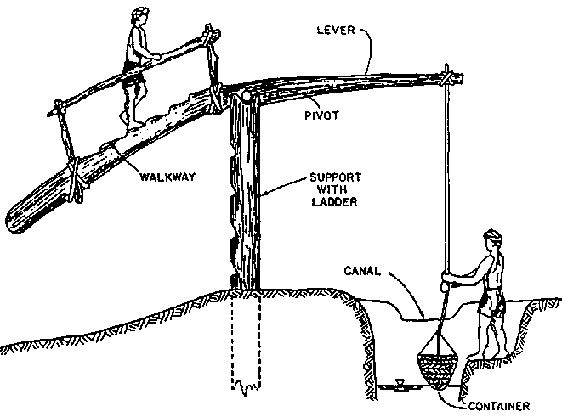
Figure 3.20 Picottah, Using Man as
Moveable Counterweight

Figure 3.21 Picottah style Doon
with Flap Valve (Ref. 58)

Figure 3.22 Gutters: (Ref. 58)
(a) Single with Handle

Figure 3.22 Gutters: (Ref. 58)
(b) "See-Saw"

Figure 3.22 Gutters: (Ref. 58)
(c) Modified to Increase Capacity

Figure 3.23 Modifications of the
Doon (Ref. 58) (a)
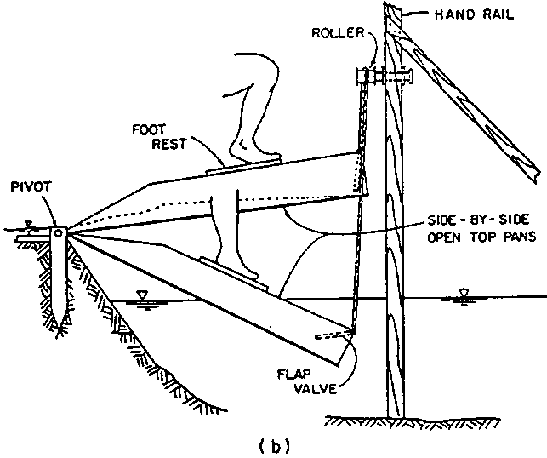
Figure 3.23 Modifications of the
Doon (Ref. 58) (b)

Figure 3.24 Self- Emptying Not
with Inclined Tow Path (Ref. 58)

Figure 3.25 Rower Pump (Ref.
28)
Each type of pump has advantages for a given set of conditions,
such as suction lift, total lift, discharge, efficiency of operation, and cost.
Pumping systems (combinations of pump motor and accessories) need to be designed
or selected for the range of conditions expected under normal
operation.
3.5.5 Centrifugal pumps
In centrifugal pumps, water enters the center of the impeller
(Figure 3.26), is picked up by the vanes, and accelerated to a high velocity by
rotation of the impeller. The water is forced to discharge into the casing,
where much of the velocity energy is converted to pressure. When water is forced
away from the center, or the "eye" of the impeller, a vacuum is created and
atmospheric pressure pushes more water in.
Centrifugal pumps are available in a wide range of sizes and
flow rates and can be used for both low and high head or pressure applications.
Centrifugal pumps are recommended for pumping from rivers, lakes, canals, and
wells. Usually, but not always, the pump is located above the water source.
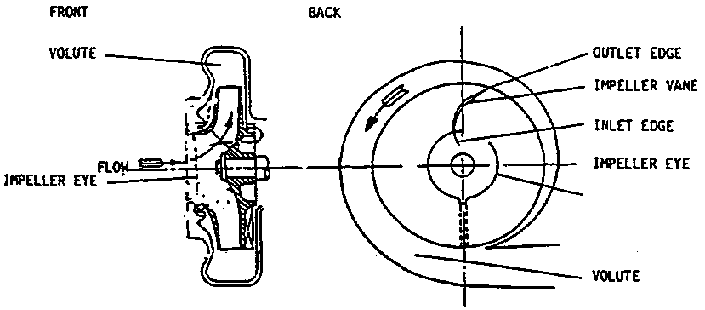
Figure 3.26 Components of a
Centrifugal Pump (Ref.
20)
3.5.6 Propeller or axial flow pumps
Propeller pumps are usually selected for pumping large volumes
of water against relatively low (lifts) heads. Capacities range from 40 to 6,000
L/s (liters per second). Total dynamic head (TDH), which is pump lift plus
friction losses, is usually from 1 to 2 meters but not more than 10 meters under
certain design conditions. As the term "axial flow'' implies, the impellers lift
the water and push it forward perpendicular to the plane of rotation, or
parallel to the
axis.
3.5.7 Mixed flow pumps
Mixed flow pumps both lift the water and accelerate it. Mixed
flow pumps are used for intermediate lifts over a wide range of flow rates. Most
mixed flow pumps are installed where head requirements do not exceed 15 m,
although they are available for heads ranging from 6 to 25 m. Capacities vary
from 40 to 6,000
L/s.
3.5.8 Turbine pumps
Turbine pumps are centrifugal pumps used in shallow to deep well
applications. A turbine pump is designed so that it can be easily multistaged,
developing several times the pressure obtained from a single stage pump. Deep
well turbines are usually multistage types - that is, the turbines (impellers)
or "bowls" are placed directly above each other. Each turbine picks up the flow
and boosts, or increases, the pressure, thus making it possible to lift the
water to higher elevations. Turbine pumps can be designed for discharges of less
than one liter per second to more than 600 L/s. Deep well turbines are either
installed with a motor at the surface, utilizing a long drive shaft, or with a
submersible electric motor installed below the various stages of impellers. The
submersible motor is often selected if the well has a crooked bore, if the drive
shaft would be excessively long, if there is danger of flooding at the surface,
and where economy and initial cost are favorable. A summary of pump types is
given in Table 3.3.
TABLE 3.3 A Summary of the Type of Pump Needed to Meet
various Pumping Conditions (Ref. 20)
|
Condition |
Pump Type |
|
A. Low to high lift, suction not exceeding 4 to 4.5 m, and low
to moderate capacity. |
Centrifugal (end suction) |
|
B. Low lift and large capacity. |
Propeller or axial flow |
|
C. Low to moderate lifts and moderate to high capacities. |
Mixed flow |
|
D. Deep well with high lift over wide range of capacities
(usually low to moderate). |
Deep well turbine(semi-enclosed or enclosed multiple-stage
impellers) |
Centrifugal pumps in end section and deep well turbine
configurations are illustrated in Figure
3.27
3.5.9 Sources of power
The kind of power used to pump or lift water depends to a large
extent upon cost, availability, and the amount of water to be pumped. Countries
that do not have, and cannot afford, an adequate supply of mechanical energy may
use man and animal power. (Both of these require energy in the form of food or
fodder.) Wind and solar power have been used to pump small amounts of water.
These sources of power will probably increase significantly in use as technology
improves.
Table 3.4 is a comparison of various energy sources. Note that a
liter of fuel provides about the equivalent energy of three to five person days
of work. A person's output is about 0.08 to 0.10 horsepower (HP) and, when
pumping water, the overall efficiency is about 60 percent; therefore, the usable
horsepower a person can develop is about 0.05. If water is pumped to a height of
4 meters, three people, working continuously during the growing season in 8-hour
shifts each, could pump 1 liter per second, which is taken as the normal maximum
irrigation requirement for general crops other than rice for one hectare in many
parts of the world.
Where large amounts of water are to be pumped to higher
elevations, mechanical pumps are necessary. Gasoline engines are suitable for
small commercial developments. Diesel engines, however, are used for most
commercial pumping operations where electricity is not available. Diesel engines
are usually more economical than other internal combustion engines and have a
longer life. Gasoline engines, including tractors, are more expensive to operate
than diesel. They are lighter in weight, however, can be more easily moved, and
are adaptable to many conditions where not more than 15 to 20 HP is required.
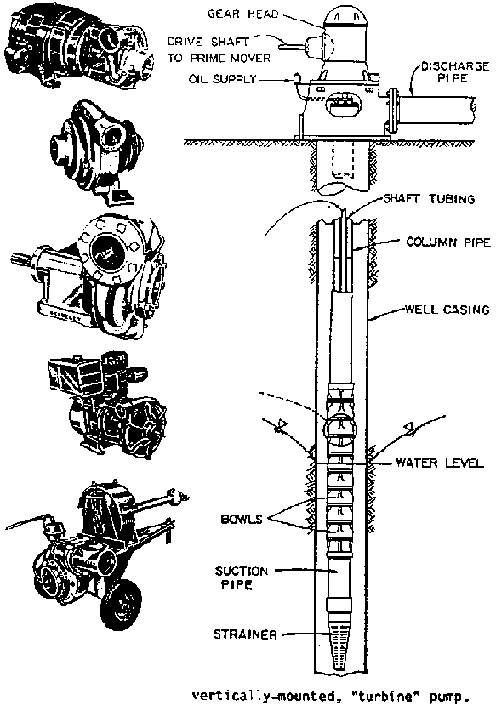
Figure 3.27 Pump Types and
Configuration.
TABLE 3.4 Comparative Costs to Pump 1,000 Cubic Meters of
Water to a Height of 2 Meters (Ref. 20)
|
Energy |
Energy |
|
Energy or Fuel |
Time |
Costs |
|
Source |
HP |
KWH |
Energy Units |
Required |
Required |
(U.S. $) |
|
Human |
0.09a |
0.32b |
person-dayc |
16.90 person-days |
8 hrs |
$84.50g |
|
Animal |
0.10e |
1.79f |
per day/100 kg weight |
3.04 animal-days |
8 hrs |
$91.20g |
|
Diesel |
9.12h |
6.82 |
liters |
3.12 liters |
1 hr |
$ 0.82i |
|
Gasoline |
9.12h |
6.82 |
liters |
4.07 liters |
1 hr |
$ 1.36j |
|
Propane |
9.12h |
6.82 |
liters |
5.16 liters |
1 hr |
$ 1.08k |
|
Electric |
9.17h |
6.82 |
KWH |
6.82 KWH |
1 hr |
$ 0.61l |
a In this table, a person is assumed to produce 0.09
HP.
b 0.09 HP  0.746 KW/HP
 8 hr/day
  60%
eff. = 0.32 KWH
60%
eff. = 0.32 KWH
c 8 hours
d Labor costs of
$5.00/person per day
e Assumes 0.10 HP per 100 kg of animal
weight
f 500 kg animal  0.10
HP/100 kg
0.10
HP/100 kg  0.746 KW/HP
  8 hrs/day
  60% pump;
efficiency = 1.79 KWH
60% pump;
efficiency = 1.79 KWH
g $30.00 per animal/day
h Pump
efficiency 80%
i Diesel fuel at $0.26/liter
j
Gasoline at $0.33/liter
k Propane at $0.21/liter
l
Electricity at $0.09/KWH
The electric motor can be a fraction of horsepower or of many
thousands of horsepower. Smaller sizes are usually single phase, while above 3
HP horsepower, motors are normally 3-phase. The initial cost is usually lower
than for other motors. Costs of operation and maintenance are low, and they have
a long and useful life. Electricity has often been considered the ideal source
of energy, and electric motors are suitable for all sizes of installation, from
very small to very large. There is much variability in cost and dependability of
electrical energy, however, and availability, dependability, and uniformity of
the electric power need to be considered. Voltage fluctuations can damage a
motor. Power outages during critical periods can result in serious loss of crop
production.
Wind has historically been an important source of power,
particularly for domestic and livestock water. Wind velocities are not
significant in many interior valleys. Conditions are more favorable on hill tops
along coastal plains and on islands. Generally, the velocity increases with
elevation above a base that breaks the wind. Costs of constructing windmills
increase exponentially with the height of the tower. Windmills can pump water
for garden-size plots if sufficient wind is available.
Water provides the lifting power for some irrigation projects
and small enterprises. The noria (Fig. 3.18) or water wheel is a cheap and
economical means of lifting water up to 3 or 4 meters (10 or 12 feet) above the
water surface of a river or small stream. A large metal wheel welded onto a
wheel from an old automobile, operating on its original bearings, is inexpensive
and effective. In some developing areas, the use of pumping projects organized
as small cooperatives has largely eliminated the use of both human and animal
power.
3.5.10 Selection of pumps and power units
The selection of pump and power units depends upon several
factors, including:
· amount of water to
be pumped;
· the operating
efficiencies (this includes the efficiencies of individual components such as
impellers, gearheads);
· the pumping head
(lift and/or pressure requirements);
· horsepower requirements;
· available energy (e.g.
electricity, gasoline, diesel);
· cost and returns on
investment; and
· the size of farm, type of
irrigation, and the available labor supply.
Pumps are usually designed for a specific set of operating
conditions. A significant departure from these conditions decreases efficiency;
therefore, the pump must be operated at or near the design values.
In designing a pumping system, it is best to plan activities so
that the pump operating conditions will be as constant as possible and that
changes in water requirements will be compensated by increasing or decreasing
the hours of pump
operation.
3.5.11 Amount of water to be pumped
The amount of water to be pumped depends upon crop water
requirements, the area to be irrigated, and the irrigation efficiency. The size
of the pumping plant needed depends upon the amount of water required and the
time that will be devoted to pumping.
The most economical use of investment capital is to select a
pump for continuous operation. In irrigated agriculture, however, pumps are
usually designed and operated continuously only during peak crop water
requirements. During other growing stages, the pump is operated at intervals to
meet crop water use. Some irrigators prefer to irrigate only during daytime
hours. In the design of a system, the decision should be made so as to economize
both labor and pumping plant costs.
A first approximation of the size of the pumping plant needed
can be made by assuming that, for maximum crop growth, the plants will require
an application equivalent to one liter per second per hectare (1 L/sec/ha), or
6.4 gpm/acre (gallons per minute/acre) of continuous pumping. This assumes that
rainfall is negligible. Another rough estimate is that crop water requirements
during the growing season are seldom less than 3 mm per day (0.12 inches per
day) and usually will not exceed 8 mm per day (0.32 inches per day) during
maximum use.
The amount of water a pump must deliver can be calculated from
the continuity equation:
Qt = 28ad (metric)
where
Q = required pump discharge in liters/second
t =
time in hours
a = area in hectares
d = desired irrigation depth in
centimeters
and, in the English system, approximately by
Qt = ad (English)
where
Q = cubic feet/second (cfs)
t = time in
hours
a = acres
d = inches
Note that in the metric system a pump discharge of 1 liter per
second will cover one hectare to a depth of 8.64 mm in 24 hours, or 0.36 mm per
hour. In the English system, 1 cfs will cover 1 acre to a depth of 1 inch each
hour.
3.5.12 The pumping lift or head
The total pumping lift or amount of pressure that a pump must
develop to force the water through pipes, sprinklers, etc., and to the desired
elevation is referred to as "head" or total dynamic head (TDH). The
relationship, if water were standing-in a vertical pipe, is
|
Head |
|
Pressure |
|
English system |
100 feet |
= |
43.3 psi |
|
Metric system |
100 meters |
= |
10 kg/cm2 |
Figure 3.28 shows a typical pump installation for a centrifugal
pump drawing water from a canal or pond and discharging through a sprinkler
system.
The total dynamic head (TDH) is a measure of the energy per unit
weight added to the pumped water by the pump, and is the sum of the changes in
pressure, elevation, and velocity heads between the pumping water level in the
well and the point of discharge, along with any friction losses between the two
points.

Figure 3.28 Diagram of a
Centrifugal Pump Installation Showing Head and Lift Concepts
Total dynamic head must be determined as accurately as possible
in order to design a pump. The TDH in Figure 3.28 can be determined as follows:
TDH = hp + hz + hv + hf
where:
hp = pressure head. This is usually the pressure
required at the discharge point, eg., to force water out through
sprinklers.
hz = elevation head. This is the difference in
elevation between the pumping water level and the point of discharge or the
point at which hp is measured. The pumping levels should be determined while the
pump is running and after the pumping levels have stabilized. In pumping from a
reservoir or stream, the pumping water level may stabilize immediately. In
pumping from a deep well, the pumping level may not stabilize for several hours.
In measuring pumping water levels in deep wells, electric sounders, air lines,
or other methods may need to be used.
hv = velocity head. This can be visualized as the
vertical distance water would flow out of the end of the pipe as a result of its
velocity. It is given by the equation:

g is the acceleration of gravity (32.2
ft/sec2 in English system, 9.8 m/sec2 in metric
system).
Because of friction losses, possible water hammer
and other structural damages may occur, and the velocity in most irrigation
pipes should be kept below 2 m/see (7 ft/sec). Therefore, the velocity head is
minimal. It is usually negligible when estimating TDH and thus is not even
accounted for.
hf = friction head. This is the pressure or head
that the pump must produce to overcome friction, i.e., the loss that occurs as
water "rubs" against pipe walls and fittings.
Example: Determine the required TDH for a centrifugal
pump as shown in Figure 3.28. Q = 411 m3/hr (1811 gpm); v = 2 m/see (6 ft/sec).
|
Metric |
English |
|
Elevation at discharge |
933.00 m |
3061.00 ft |
|
Elevation at pump |
922.00 m |
3024.00 ft |
|
Elevation at water surface |
919.00 m |
3015.00 ft |
|
Pressure head (32 psi) |
22.50 m |
73.90 ft |
|
Friction head |
|
|
|
(18 in. Suction, elbows, etc., 20 ft.) 0.01 m |
0.03 ft |
|
|
(16 in. Diameter, 1,000 ft) 1.16 m |
3.80 ft |
|
|
Velocity head (v = 2 m/see, or 6 ft/sec) |
|
|
|

|
0.20 m |
0.56 ft |
|
hz = discharge head + static suction |
|
|
|
lift = (3061 - 3024) + (3024 - 3015) = |
14.00 m |
46.00 ft |
|
TDH = hz + hp + hf + hv |
|
|
|
Metric = 14 + 22.5 + 1.17 + 0.2 |
7.90 m |
|
|
English = 46 + 73.9 + 3.83 + 0.56 |
|
24.30 ft |
3.5.13 Horsepower and efficiency
The power output (energy per unit time) of a pump is the energy
that the pump provides to the water in the form of discharge and head. This
quantity is called water horsepower (WHP). With discharge, Q. in gpm, and TDH in
feet, the equation is:

If Q is in L/sec, and TDH is in meters, m, the equation is:

The power needed at the output shaft of the power unit to run
the pump is called brake horsepower (BHP) and is determined by the WHP and the
pump efficiency (Ep). For Ep expressed as a decimal fraction, the equation is:

The efficiency given in the manufacturer's pump characteristic
curves is the laboratory efficiency. It is determined for a new pump under
closely controlled conditions. Minimum length of column and pump shaft is used,
and impellers are adjusted for ideal clearance. Ep in a field installation is
usually several percentage points lower than the efficiency in the
manufacturer's pump curves. A value of 70%, or Ep = 0.7, should generally be the
minimum acceptable for new pumps that are directly coupled to an electric motor,
even though theoretical values could be near 80% (Ep = 0.8).
A right angle gearhead will usually have an efficiency (Kg) of
about 95%. If the power from either an electric or internal combustion engine is
transmitted to the pump through a gearhead, the efficiency of the transmission
device must be accounted for in determining the horsepower requirements as
follows:

Example: For the previous example, Q = 411 m /fur, or 114
L/sec (1811 gpm), and TDH = 37.9 m (124.3 ft). If a pump with Ep = 0.70 will be
powered by either a diesel gasoline engine or electric motor through a gearhead
with Eg = 0.95, what size of engine or motor will be needed?
WHP = (114  37.9)/76 (metric) = 57, or
WHP = (1811 gpm  124 ft)/3960 (English) = 57

3.5.14 Pump characteristic curves
The amount of energy (head) a pump will add to a given discharge
of water, the pump required, and the efficiency are all measured by laboratory
testing. The results are displayed on a diagram known as a "pump characteristic
curve." An example of a typical characteristic curve is shown in Figure 3.29 for
a centrifugal pump. A pump that operates near the flattest portion of the
efficiency curve should be selected so that a small change in conditions will
not significantly change the pump efficiency.
The total head (TDH) that a pump will develop is plotted on the
graph versus the pump discharge. Often more than one curve is shown. Each curve
is for a different sized impeller or rotation speed. The efficiencies at which
the pumps will operate under various conditions, together with the required
brake horsepower curves, are superimposed over the other curves. In Figure 3.28,
the total dynamic head for which the pumps would be designed would be the head
required to lift the water from its source through the pipe and sprinklers or
into the ditch as shown. In the example, it was 37.9 meters (124.3 ft) at 114
L/sec (1811 gpm).
After the required discharge (Q) and TDH are determined, a
search is made through a manufacturer's pump curves to find the pump with a high
operating efficiency that meets these conditions. In Figure 3.29, a pump with
13.75 inch impellers, operating at 1750 RPM, with an efficiency of 80%, meets
the requirements of the previous example.
The calculated BHP at a pump efficiency of 80%
is:

The operating efficiency of a pump in the field is generally
lower than that given in the catalogs. Thus, a 75 HP direct couple (no gearhead)
motor would probably operate quite satisfactorily, unless bearing, shaft, and
other mechanical losses were
high.
3.5.15 Power source and power Costs
To estimate precisely the cost per hour of pumping, one would
need to measure the energy consumption of an engine or electric motor under
normal operation. One would then need to multiply this consumption by the cost
per unit of energy consumption. For new pumping plants that are properly
designed, one can estimate what the cost per hour of pumping will be if one
knows the required BHP and the cost per gallon or liter of fuel, propane, or
diesel. For electric units, one needs to know the cost per kilowatt hour (KWH).
The basic equations are:
Diesel. Gasoline. Propane (see Table 3.5)

Example: With gasoline at $0.30/liter, and with 100 BHP
required, what will the per hour costs be?

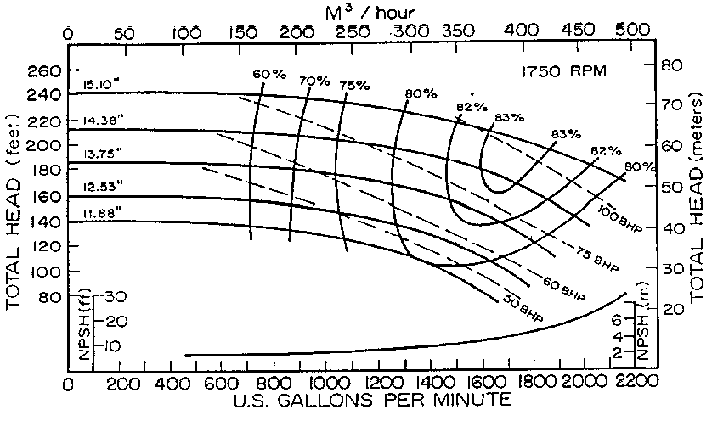
Figure 3.29 Pump Curve
Electric (Assume electric motors are about 85% efficient)
$/fur = BHP required  0.85
0.85  cost per
KWH
cost per
KWH
Example: With electric power rates at $0.07/KWH, and 100
BHP required, what will the per hour costs be?
$/fur = 100x.85  $0.07 = $5.95
TABLE 3.5. Performance Standards for Engines (Adapted from
University of Nebraska Tractor Tests) (Ref. 20)
|
Energy |
Brake Horsepower Developed |
|
Source |
BHP-Hr/$ U.S. Gal. of Fuel |
BHP-Hr/Liter of Fuel |
|
Diesel |
14.75 |
3.90 |
|
Gasoline |
11.30 |
2.98 |
|
Propane |
8.92 |
2.36 |
3.5.16 Pump location
The physical location of the pump in relation to the water level
in the sump (well, reservoir, pond) from which water is being pumped is
critical. If the pump is too high, cavitation may occur. The liquid is pulled
apart as it goes through the impeller, causing vapor pockets that collapse after
they have passed the impeller. This process, called cavitation, can destroy a
pump or cause it to deteriorate rapidly. The pump may operate very
inefficiently. If the pump is too high above the water surface, it may also lose
its prime.
The height or distance that a pump can be located above a water
surface varies with elevation above sea level, properties of the water, friction
loss in the suction pipe, and the net positive suction head requirements of the
pump.
Net positive suction head (NPSH) is the head that causes water
to flow through the suction pipe into the pump. NPSH required is the
suction head (pressure) required at the inlet of the impeller to ensure that the
liquid will not boil or form vapor pockets that result in cavitation. NPSH
required is a function of the pump design and is supplied by the manufacturer
(e.g., Figure 3.29). It varies between different makes of pumps and the capacity
and speed of any one pump.
NPSH available represents the pressure head available to
force the liquid into the pump impeller and is a function of the system in which
the pump operates. It determines how high a pump can be located above a water
surface and can be calculated for any installation. To operate successfully, any
pump installation must have an available NPSH equal to or greater than the
required NPSH at the desired pump condition. Thus:

To calculate how high above or below the pumping water level the
impellers may be located, consider the following:
PL = atmospheric pressure - NPSH required - friction
losses in suction - vapor pressure.
If PL is positive, the pump may be set
above the pumping water level a distance PL.
If PL is negative, the pump must be set a distance PL below the
pumping water level.
Example - for the pump with impellers from Fig. 3.29:
|
Discharge |
408.6 m3/hr (1800 gpm) |
|
Friction loss in suction pipe |
1.16 m (3.8 ft) |
|
Elevation of pump |
930 m above sea level (3061 ft) |
|
NPSH required |
4.86 m (16 ft.) |
|
Water temperature |
15.6°C (60°F) |
|
Vapor pressure of water at 60°F: |
0.17 m (0.57 ft) (Appendix A) |
|
Atmospheric pressure at 3000 ft: |
9.26 m (30.4 ft) (Appendix A) |
|
NPSH available = 9.26 m - (suction lift + 1.16 m + 0.17
m) = 3.06 |
Solution: PL = 9.26 m - 4.86 m - 1.15 m - 0.17 m = 3.08 m
This is also shown graphically in Figure 3.30. Thus, the static
suction lift (height of pump above the pumping water level) cannot be greater
than 3.08 m. In practice, stormy conditions can reduce atmospheric pressure by
more than 10% at times. Therefore, to assure good pump operation and prevent
cavitation, the pump may need to be placed as much as 0.6 m to 0.9 m (2 to 3
feet) lower than the NPSH would indicate at normal atmospheric conditions. For
this reason, the static suction lift should be 2.1 m to 2.4 m (7 to 8 feet).

Figure 3.30 Graphical Solution of
NPSH (Ref.
20)
3.5.17 Pump installation
Figures 3.31 and 3.32 show a top and side view of a recommended
pump installation when pumping from a sump. Figure 3.33 shows a recommended
installation when pumping from a well.
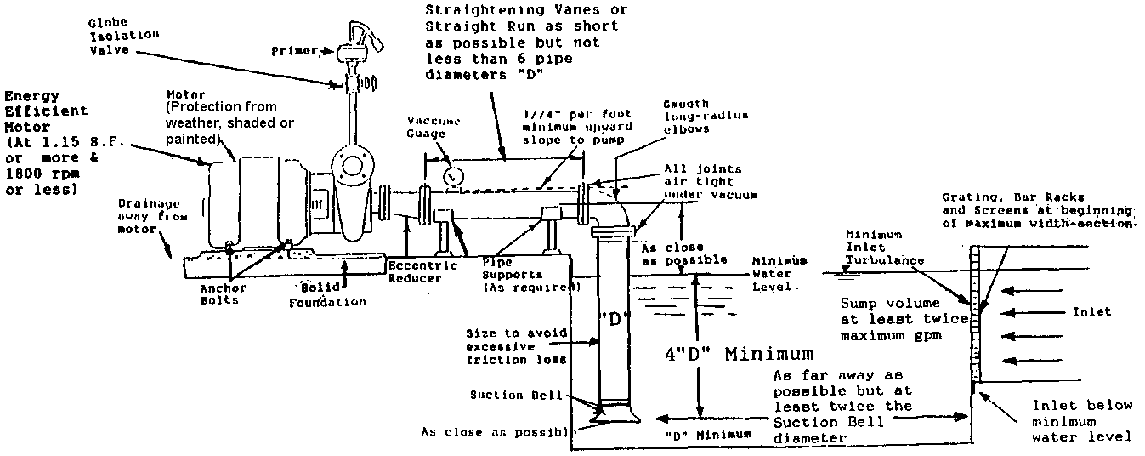
Figure 3.31 Recommended Pump
Installation - Side View (Ref. 54)

Figure 3.32 Recommended Pump
Installation - Top View (Ref. 54)

Figure 3.33 Recommended Pump
Installation (Turbine) (Ref. 54)
Suction Pine Design
When pumping water from a sump, the proper design of the suction
pipe is essential to good pump performance. If a centrifugal pump is designed
with a suction pipe that is too long, with too many bends, or too small a
diameter, cavitation and poor pump performance may result, much the same as if
the pump is located too high above the water surface.
Another critical factor in the suction pipe design is the
potential for entrapped air. Improper design can result in "high spots" in the
suction piping that trap air and either decrease capacity or periodically permit
large air bubbles to enter the pump. The pump may lose its prime, not operate at
expected efficiency, or give somewhat erratic discharge and pressure increases.
Remember that the suction line is generally under negative pressure, and air
release valves cannot be used to remove air.
Improper approach just upstream of the pump entrance may cause
flow to enter the pump with spiral velocities or non-uniform flow profiles. The
pump will not perform efficiently at the design flow if the water is spiralling.
The guidelines for suction pipe design are formulated with these
potential problems in mind. The closer the designer can follow the guidelines,
the more trouble-free his or her pumping system will be.
The following recommendations apply to suction pipe design:
1. Keep velocity as low as possible. This is
accomplished with larger diameter suction pipe.
2. Avoid bends in the suction pipe but, if bends are necessary,
use long radius bends.
3. Keep suction pipe horizontal or continually
sloping upward towards the pump. Avoid high spots in the line.
4. If suction pipe is to be reduced in diameter as
it enters the pump, use a reducer of a length at least twice the diameter of the
small pipe.
5. If the reducer is in a horizontal portion of the
pipe, an eccentric reducer, placed with the flat side up, should be used. If a
conventional reducer is used, the pipe must be inclined sufficiently to prevent
air entrapment.
6. Make sure the joints in the suction pipe are well
sealed, otherwise difficulty in pumping will be experienced and air will
continually be sucked into the system.
7. Ideally, a straight pipe eight diameters in
length just upstream from the pump suction inlet should be used to provide
uniform, non-spiralling flow.
8. Suction pipe should be of equal or greater
diameter than the pump suction connection.
9. Do not use screens on suction pipe inlet, as they
may clog and reduce flow and pressure at impeller inlet. Screens should be
placed at some distance from the suction pipe.
10. Use a streamlined suction bell at the inlet of
the suction pipe if possible. If not possible, use an inlet that minimizes
friction loss.
In summary, keep suction pipe velocities low, minimize bends and
friction losses, avoid high spots, and direct the flow into the suction side of
the pump with a uniform, non-spiralling
flow.
3.5.18 Turbine and propeller pumps
In general, turbine and propeller pumps are used in situations
where no suction piping is required. They are usually placed in a pumping pit
with the pumps submerged, so no suction pipe is necessary. As a result, they are
generally supplied with a suction bell attached to the bottom of the pump. No
suction pipe design is required.
If these types of pumps are to be installed in a situation that
would require suction pipe, the same guidelines for design as were advised for
centrifugal pumps would be
used.
3.5.19 Intake structures
Geometry and Positioning
Intake structures, pumps, or pits should be designed to supply
an evenly distributed flow of water to the suction bell to prevent vortices that
introduce air into the pump, reducing capacity and efficiency. Water should not
flow past one pump to reach another pump. The suction bell(s) should be as close
as possible to the back wall and not less than the suction bell diameter above
the bottom of the sump. False back walls should be installed when the location
of driving equipment prevents normal positioning. Centering pumps in the sump
leaves large vortex areas behind the pumps. Figure 3.34 shows a top view of a
recommended sump design when pumping from a canal, stream, or lake.

Figure 3.34 Recommended Sump
Design for Installation of one or More Pumps (Ref. 54)
Inlet
The sump inlet should be designed with gradually increasing
tapered sections, as shown in Figure 3.34. Abrupt changes in size from inlet to
sump can cause turbulent, cascading water and a vortex effect, which can cause
uneven operation of the pump, air entering the pump, or a vacuum effect, all of
which can cause excessive wear on the pump.
The sump inlet should be below the minimum water level and as
far away from the pump suction as the sump geometry will permit. No sharp drops
or waterfalls should be permitted. The flow should not hit directly on the pump
suction, or enter the sump in such a way as to cause rotation of water in the
sump.
Protective Screens
Protective screens should be provided whenever there is any
possibility of debris entering the pump (or pipe and sprinklers). Screens must
be cleaned frequently to allow water to pass through to the pump easily.
Sump Volume
The usable sump volume in cubic meters should equal or exceed
twice the volume pumped in one minute. This ensures adequate size to dissipate
inflow
turbulence.
3.5.20 Minimum water level
Minimum water level should be adequate to satisfy the particular
pump design requirements to prevent cavitation, but suction submergence ought
never be less than four times the diameter of the suction pipe (not the bell).
Some examples of pumping plant installations for pumping from
streams, ponds, or shallow wells are provided in Figures 3.35 and
3.36.
3.5.21 Typical pump design
As stated before, a pump should be designed for the maximum crop
water requirements and possible operational changes, such as a declining water
table. Decreasing efficiency should be anticipated and provided for.
Listed below are typical designs:
1. Centrifugal pump - conditions:
a. Pumping from a river or reservoir into a canal at
a higher elevation.
b. Area to be irrigated 2 hectares (4.9 acres).
c. Elevation 912 meters (3000 feet).
d. Irrigation efficiency = 67%, including conveyance
losses.
e. Maximum monthly crop ET in July of 206 mm with no
rainfall, or an average of 6.65 mm/day average continuous flow:
Irg = Irn/Ea  Ec = 6.65/.67 = 9.9 mm = 1 cm
from QT =
28 a d: Q = 28  2
2  1/24= 2.31 L/s (37 gpm)
f. Vertical distance from pump to canal (discharge head) = 62
meters (204 feet).
g. Vertical distance from water level to pump inlet = 3 meters
(10 feet).
h. Friction loss = 2 meters (6 feet).
Figure 3.35 Designs of Centrifugal Pump Installations
PUMPING FROM A STREAM OR POND
Irrigation can be accomplished by pumping from ponds and
streams if the lift is not too great. A small horizontal centrifugal pump set
not higher than 10 feet above the water and powered by a gasoline engine is the
equipment ordinarily used. Pumps of this type are made in sizes which will
deliver from 30 to 1,000 gallons or more per minute.
PUMPING FROM SHALLOW IRRIGATION WELLS
Along river bottoms where the ground-water level is
permanently within 10 feet or /055 from the surface, small irrigation
wells may be successfully used for the irrigation of farm land.
Casings for such wells are ordinarily made from sheet metal slotted to permit
water to enter. In some instances old range boilers with the ends cut out are
welded together and slotted with a welding torch Small centrifugal pumps set at
the ground surface are quite satisfactory
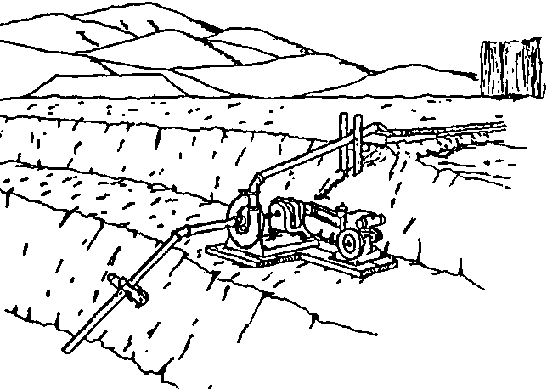
PUMPING SYSTEM FROM STREAM OR POND

DIAGRAMMATIC SECTION SHALLOW WELL
PUMP

DIAGRAMMATIC SECTION OF PUMP SYSTEM
FROM STREAM OR POND

Figure 3.36 Pump and Driver
Mounted on Pontoon in Water Supply (Ref.
58)
3.5.22 Size of pumps


If the pump is powered by an electric motor, a 3 BHP direct
coupled motor would probably be selected.
If an internal combustion engine (diesel or gasoline) were used,
a gearhead would probably be used to transmit the power and the operating
conditions could be obtained by throttle adjustment.
In this case, the motor will also have to overcome losses at the
gearhead.
The Peace Corps Volunteers working with irrigation need not be
experts on pumps. They must know, however, the fundamentals of design,
installation, and maintenance. This will enable them to provide the basic
specifications to the supplier and supervise the installation. A pump supplier
can provide the correct pump and accessories if provided with information on the
flow, head required, the power source to be used, and the configuration for
installation. The technicians (irrigation specialist) should in all cases demand
that the pump curves and maintenance instructions come with the pump. Often, the
pumps in stock are not the correct ones, and the Volunteer should not settle for
pumps that are extremely oversized or undersized or which do not operate with
good
efficiencies.
3.5.23 Costs
In considering the economics of any pumping system, all costs
and benefits should be included. Initial or capital investment costs are
important because they are usually high, and the purchaser is often required to
finance this capital investment by obtaining a loan. The best measure of the
economics of a system is to compare the annual costs with the annual returns.
Annual costs should include:
· interest,
depreciation, insurance, and taxes,
· repairs
and maintenance,
· operating costs
(energy),
· irrigation labor costs,
and
· production and fixed
costs.
The expected life of various components used in pump irrigation
is included in Appendix B. In irrigation by pumping, the annual energy and
maintenance costs may be significantly higher than the amortized capital costs.
Therefore, it is extremely important that good estimates of these costs be made
before a pumping plant is
purchased.
3.5.24 Evaluation of pumping plants
Proper design of pumping plants is only the first step to
successful operation. Equipment that is expected to last 10 to 20 years requires
good maintenance. Inadequate maintenance causes shorter life of equipment,
operational delays, and increases in the overall operating costs.
Pumping plant evaluations may be conducted to determine the
following:
· discharge of
pump,
· discharge and pressure at normal
operating conditions and under varying conditions,
· pump adjustment for optimum efficiencies,
· well characteristics,
· whether the pumping plant is operating as designed
(quality control),
· whether the pump and
power unit are properly matched, and
·
problems within components of the pumping plant or its management.
When the pump is new, and periodically after that, it should be
checked. As a minimum, a pressure gauge should be installed at the outlet side
of the pump to determine whether it is generating the desired pressure or head.
If the pump has an open discharge into a canal or pond, the pressure will be
zero and the flow rate will be the best indicator of whether the pump provides
an adequate or close to the design flow rate. When possible, measurements of
both discharge and head will provide a good indication of how the pump is
performing.
3.5.25 Rower puma
The Rower pump (Figure 3.25) is a reciprocating-action piston
pump whose PVC cylinder is inclined at an angle of 30° to the horizontal. A
unique feature of this pump is that it is fitted with a surge chamber at the
pump suction. This absorbs the impact of the accelerating and decelerating
column of water within the tube-well pipe and so provides a steadier upward flow
of water. This in turn enables the operator to make easier and quicker strokes.
A person can pump 50% more water in a given time using a pump with a surge
chamber fitted. The addition of the surge chamber enables children (who would
otherwise be too small to operate a conventional hand pump) to pump water quite
easily. The pump is being used to irrigate small plots in Bangladesh and other
countries.
3.5.26 Hydraulic ram
The hydraulic ram is a pumping device for lifting water to
heights of over 100 m. It works solely on the power of falling water carried in
a drive pipe. It is completely automatic and has an exceptional record of
trouble-free operation. It can be constructed from commercial pipe fittings and
adapts well to low input rural use. The disadvantage in the use of the hydraulic
ram, in irrigation in particular, is the low water yields that it produces.
Figure 3.37 shows the simple assembly of a hydraulic ram and the necessary
building materials.

Figure 3. 37 Hydraulic Ram (Ref.
55)
3.6 Wells
A well is a structure that consists of an open hole that
penetrates into the water bearing strata below the surface of the ground. The
walls of the well are kept open by a liner or casing, which is typically made of
plastic, metal, or rock. Holes in this casing (the so-called screened portion)
permit water to enter the well from which it is extracted. Wells may be dug by
hand, drilled mechanically with hand or machine tools, or the casing may be
driven into the ground, creating the hole as it penetrates. The hydraulics,
hydrogeology, and methods of well drilling are generally too complex and
extensive to be treated in this manual. The irrigation specialist who must know
more about wells should review References 5, 13, and 15. In this manual, some
basic concepts of well drilling are discussed. Details are presented on the
construction of only driven wells and hand drilled wells. These wells are low
cost and, in areas where water tables are within 30 feet (10 meters) of the
surface, will generally provide sufficient water for irrigating garden-sized
farm
plots.
3.6.1. Methods of drilling: Percussion drilling
In percussion drilling, a heavy bit is repeatedly lifted and
dropped, progressively boring through the earth. In rotary drilling, the
drilling results from the continuous scraping of the bit under constant
pressure. The hole is cleaned out as the drilling progresses, either with a
drilling fluid (mud), with high velocity air or, in auger drilling, by the
mechanical lifting of the auger.
Cable tool drilling is one of the most common methods of
percussion drilling. It is usually done by commercial well drillers with
motorized equipment. In some countries, however, manual means of raising and
lowering the bit have been developed.
In cable tool drilling, a chisel faced bit is repeatedly raised
and dropped. The bit breaks and pulverizes the materials. A slurry of water and
cuttings, which is formed by the drilling action, is periodically removed by a
bailer. Water is continually added to the borehole as needed. With manual
methods, the 40 to 80 kg drill is lifted and dropped through a tripod and pulley
arrangement operated by four to six people.
Wells may often be constructed by communities or individuals,
without the need for commercial drillers. The three types of wells commonly
encountered, which can be constructed relatively inexpensively, are the driven
wells, hand augered wells, and hand dug wells. The description of driven and
hand auger techniques that follows is extracted from "Appropriate Well-Drilling
Technologies" by the National Water Well Association (Ref. 15). Sketches of
other types of drilling equipment useful in drilling small capacity irrigation
wells are included in Figures 3.38 through 3.44.
EQUIPMENT AND METHOD - Driven Wells
Whenever the water table lies at shallow depths (23 feet or 7
meters), a well screen equipped with a drive point may be driven through the
overlying soil and into the water-bearing formation. This method employs a drive
hammer. Three basic types of drive hammers are in common use: (1) the hand
driver, consisting of a sliding weight and an attached pipe that fits over the
riser pipe (Figure 3.38), (2) an internal driving bar, which strikes directly
upon the driving point (Figure 3.38), or (3) a sliding weight and drive stem or
guide that attaches to the uppermost riser pipe coupling (Figure 3.39).
The basic equipment required for a driving rig ranges from a
4-foot (1.2 meter) section of oversized pipe (used as a sliding hand driver) to
more elaborate systems requiring a tripod, pulley, rope, and driving bar or
drive stem and sliding hammer. The driving rig will also require two or three
pipe wrenches and a shallow well hand pump to develop and remove soil debris
from the well screen.
Geological Applications
Driven wells are generally one of the most efficient methods of
drilling whenever the water table is within 23 feet (7 meters) of the surface
and the soil consists principally of sand with minor quantities of silt and
clay. Under ideal soil conditions, a small diameter well point may be driven to
a depth of 25 feet (7.6 meters) in 15 minutes. In heavy soils such as stiff
clay, or soils that contain numerous boulders, drilling with an auger or
percussion bit is faster than driving with a well point.
Hand-driven well points of 1 1/4 to 2 inches (3 to 5
centimeters) in diameter can be driven up to 25 feet (7.6 meters). If heavy,
100-300 lb. (45 to 135 kg) drive hammer assemblies are used, 4-inch (10
centimeters) well points and casings can be driven to depths of 33 to 49 feet
(10 to 15 meters).

Figure 3.38 Methods for Driving
Well Points (Ref. 15) (a) Hand Driver

Figure 3.38 Methods for Driving
Well Points (Ref. 15) (b) Internal Rod Driver
These assemblies provide an effective means for driving both
well screens and casings.
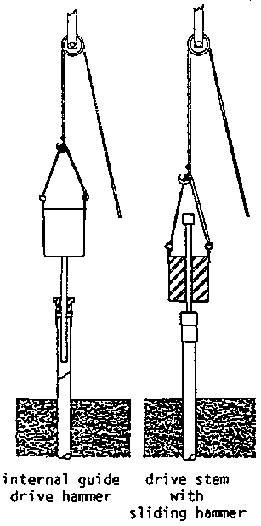
Figure 3.39 Heavy Duty Sliding
Hammer and Drive Stem Assemblies (Ref. 15) (a) Internal guide driver hammer
& Drive stem with sliding hammer

Figure 3.39 Heavy Duty Sliding
Hammer and Drive Stem Assemblies (Ref. 15) (b) Cross-section of sliding hammer
and drive stem
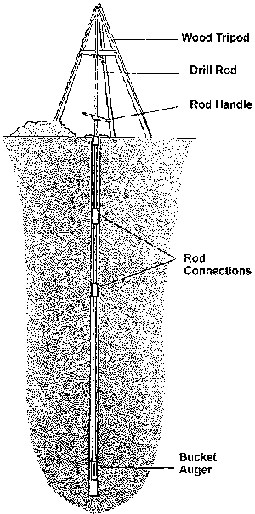
Figure 3.40 Hand Auger Drilling
(Ref. 15)

Figure 3.41 Typical Hand Augers
and Equipment (Ref. 15) (a) Sand Augers for Non-Cohesive Soils

Figure 3.41 Typical Hand Augers
and Equipment (Ref. 15) Helical Auger

Figure 3.41 Typical Hand Augers
and Equipment (Ref. 15) (b) Cohesive Soil Augers

Figure 3.41 Typical Hand Augers
and Equipment (Ref. 15) Bucket Auger

Figure 3.41 Typical Hand Augers
and Equipment (Ref. 15) Typical Drill Rod Connection

Figure 3.41 Typical Hand Augers
and Equipment (Ref. 15) Hard-Wood Rod Handle

Figure 3.42 Rod or auger Fork
Locally Fabricated From 1/4" (6 mm) Steel Plato (Ret. 15)
- When placed around a drill rod or auger, the fork acts as a
support for the drilling tools. In this manner, rods and augers may be added or
removed from the drill string with little danger of dropping sections down the
bore hole.

Figure 3.43 Manual Jetting
Equipment (Ref. 15)

Figure 3.44 Hydra-Drill (Ref.
15)
- One person may operate this equipment to depths of 50 feet (15
m). Greater depths may be attained when the engine and drill rod are suspended
from a tripod.
Labor Requirements
Given the proper soil and water table conditions, small diameter
driven wells may be completed by one to two unskilled persons. Large diameter
driven wells require a heavy-duty drive hammer and a tripod assembly. The crew
necessary for operation of this equipment consists of six people for manual
methods, and two or three for a motorized cathead system.
Fabrication Skills
All well point driving equipment can be constructed easily from
locally available scrap pipe or steel bars and standard pipe fittings. The
fabrication of simple drive hammers requires basic metal working and blacksmith
abilities. Construction of heavy-duty drive hammers, which weigh in excess of 50
lbs. (22.5 kg), will require the aid of an electric arc welder or basic metal
casting techniques.
Cost of Equipment
Excluding the initial cost of a well screen, drive point, and
riser pipe, a locally constructed hand drive system that requires no tripod will
be relatively inexpensive. Heavy-duty systems may cost more for the fabrication
of both drive hammer and drive stem, depending on the type of tripod used. If a
driving rig incorporates a motorized cathead, the system price could increase
again. A hub-driven cathead would cost considerably less but would require a
support
vehicle.
3.6.2 Methods of drilling: Hand auger rig
EQUIPMENT AND METHOD - Hand auger Rig
The hand auger method of drilling is one of the oldest and most
basic forms of low-cost labor intensive well drilling. In hand augering, the
drilling action is applied by manually rotating a cutting blade or auger (Figure
3.40). AS drilling progresses, the auger fills with soil and must be
periodically lifted to the surface and emptied. Drilling by this method is
fairly rapid for the first 20 feet (6 m). Thereafter, the number of drill rod
sections that must be coupled and uncoupled each time the auger is brought to
the surface adds considerably to the drilling time.
The basic components of a hand auger rig are:
· support
tripod,
· drill rod, fork, and auger
handle,
· auger,
· rope and pulley,
·
sand bailer,
· temporary casing to case hole
through caving soil, and
· drill bit to break
up hard soil and boulders.
Most light duty hand auger drilling systems utilize an
inexpensive wood or pipe tripod.
Drill rods are constructed from locally available 3/4 inch (2
centimeters) galvanized or black iron pipe. All connections between drill rods
and augers are of box and pin-type construction (Figure 3.41). Joining pins for
the connections are made from either toggle bolts or standard nut and bolt
assemblies. Both pin systems have proven to be highly reliable.
To avoid dropping a disconnected section of drill rod down the
borehole, a rod fork or auger fork is slid under a coupling to support and
retain lower sections of the drill stem (Figure 3.42). This rod fork may be
constructed from a 1/4 inch (6 millimeter) steel plate, or from a notched
hardwood board. In either case, the notch must be wide enough to slide around
the drill rod, but narrow enough to retain a coupling.
An auger handle is constructed by clamping two hardwood handle
sections around the drill rod (Figure 3.41). As the borehole advances, the bolts
are loosened, and the handle is relocated to a more convenient height.
Auger construction falls into two main categories, those for use
in cohesive soils and those for non-cohesive soils. The cohesive soil augers
(Figure 3.41) are designed for use in soils that adhere or stick together. These
soils commonly contain a mixture of sand, silt, and clay. Augers designed for
use in non-cohesive soils (Figure 3.41) are best suited to loose sand and gravel
formations.
Each type of auger can be produced locally using discarded
sections of casing, pipe, sheet metal, or perhaps the tubular section of an
automobile drive shaft. Local soil types determine the type of construction
used. In general, the best performance in soft cohesive soils can be obtained
with an open blade or helical auger. Hard clay soils may be excavated with the
bucket auger. In non-cohesive soil, the tapered tube auger is most effective
(Figure 3.41).
In addition to a tripod, rope and pulley are also primary
components of the drilling equipment. On a hand auger rig, a rope and pulley are
often used to handle the drill rods when a long pull of 20 or more feet (6
meters) is necessary to raise the auger. This long pull saves time and
eliminates the need for disconnecting numerous drill rods.
A rope and pulley are also necessary to handle other drilling
equipment such as well casings, wet bailers, and percussion bits. These
accessories provide a useful means for continuing
the well when water saturated or hard-pan formations are
encountered.
The most frequently used wet bailer on a hand auger rig is the
flap valve bailer, also used in bail-down drilling.
A percussion drill bit is also commonly used in conjunction with
hand auger equipment. Its ability to break up and loosen hard soil and boulders
that cannot be excavated with a hand auger permits drilling under a wide variety
of conditions.
Geological Applications
Hand augered wells are particularly well adapted to alluvial
deposits consisting primarily of silt, clay, sand, and limited quantities of
gravel. Maximum depths for hand augered wells range up to 122 meters (400 feet);
however, normal hand augering, is best suited to maximum depths ranging from 15
to 25 meters (49 to 80 feet). Hand auger wells of these depths were used for an
extensive hydrological survey of specific community well sites in Tanzania.
Other significant hand auger well projects include wells in the following
locations: Western Pakistan, Vietnam, Sri Lanka, India, Togo and the Ivory Coast
Region of Africa, and in Ecuador.
Labor Requirements
The operation of a hand auger rig requires a minimum crew of
four to five people. One member of the crew must be trained in basic well
drilling, as well as development techniques. The remainder of the crew may be
unskilled local labor. Under ideal conditions, inexperienced crews have drilled
to depths of 49 feet (15 meters) in a single morning. However, greater drilling
depths will require a considerably longer period due to the time and effort
spent in removing and emptying the auger.
Fabrication Skills
All hand auger tools and equipment are easily produced using
locally available sheet metal and
pipe.
3.6.3 Other drilling equipment
Other types of equipment used in drilling operations are shown
in Figures 3.45. and 3.46.
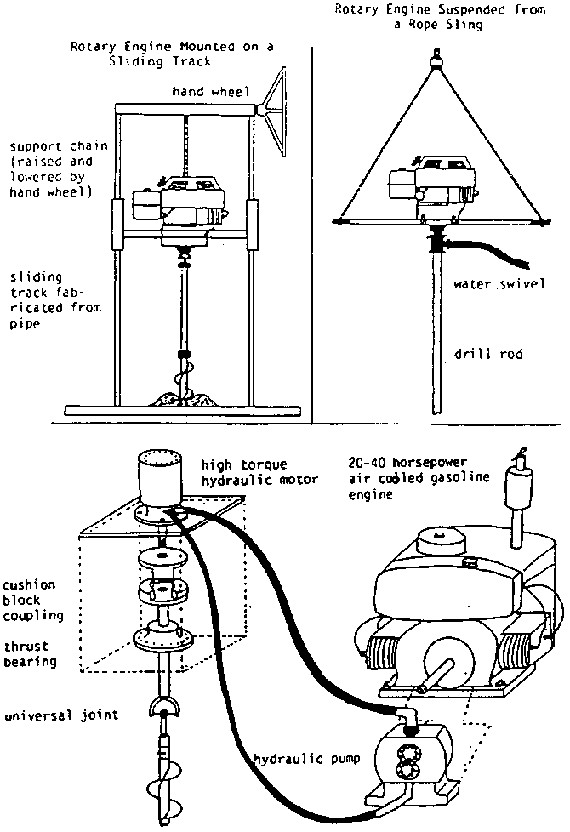
Figure 3.45 Drilling Equipment
(Ref. 15)

Figure 3.46 Hydraulic Rotary Rig
Mounted on a 1-Ton Pickup Truck (Ref.
15)
3.6.4 Hand dug wells
Hand dug wells have been used through the centuries as a source
of water for domestic and irrigation uses. Figure 3.47 shows a schematic of one
such well. Most hand dug wells are less than 20 meters in depth, even though
some wells have been constructed deeper than 60 meters.
The use of hand dug wells is limited to areas with fairly
shallow water tables (generally 20 meters or less), in contrast to some wells
that can be drilled to several meters. The construction of hand dug wells is a
very slow process, especially in rock formations that require blasting for the
penetration process. These wells are generally limited to small flow rates, as
the wells generally do not penetrate deep below the water table. Fluctuations in
water tables will usually cause significant variations in the yield of the well.
Constructing a hand dug well is a labor-intensive process
requiring a minimum of five workers for wells deeper than 5 meters. In loose
soil, the excavation speed may be 1/3 to 1 meter per day, while in rock
formations it may be even slower. Hand dug wells should be dug during the dry
season, when the water table is lowest.
Details on the construction of hand dug wells are presented in
ICE Manual M-9, entitled "Wells Construction." This manual should be considered
indispensable for Volunteers who are contemplating well construction for the
development of water supplies.

Figure 3.47 Hand Dug
Well
