Back to Home
Page of CD3WD Project or Back to list of CD3WD Publications
 |  |  | Manual Working of Material/Metal - Course: Manual working of metal. Methodical course-guide for instructors (Institut f³r Berufliche Entwicklung, 120 p.) |  |  | Chipping | |  | 1. Objectives and contents of practical vocational training in the working technique of “Chipping” | | | 2. Organizational preparations | | | 3. Recommendations for practical vocational training in the working technique of “Chipping” | | | 4. Application of the working technique of “Chipping” | | | 5. Captions and legends of the “Chipping” transparencies series |
|
Manual Working of Material/Metal - Course: Manual working of metal. Methodical course-guide for instructors (Institut f³r Berufliche Entwicklung, 120 p.)
Chipping
1. Objectives and contents of practical vocational training in the working technique of “Chipping”
By concluding their training, the trainees shall have a good
command of the working technique of “Chipping”. Therefore, the
following objectives have to be achieved:
Objectives
- Knowledge of purpose and application of chipping.
- Proper command of the various working techniques of chipping
and capability of separating or, resp., cutting workpieces.
- Capability of selecting the appropriate tools and accessories
and of using them appropriately.
- Capability of making decisions on quality
independently.
The following contents have to be imparted to the trainees:
Contents
- Purpose of chipping
- Tools, accessories and
means of protection for chipping
- Action and working techniques of
chipping
2. Organizational preparations
In order to guarantee a trouble-free development of the
instructions, exercises and practical work it is necessary to prepare this
training properly. The following steps have to be taken:
2.1. Preparations for instructions on labour safety
Prior to the exercises the trainees have to be given a brief
instruction on the proper use of tools and equipment. This comprises also hints
for accident-free work.
The following points should be emphasized:
- Use proper hammers and chisels only!
- Chisel heads must be free from burrs!
- Protect your hands from accidents by providing the chisel with
an impact guard (cover)!
- Wear safety goggles to protect your eyes from injuries!
- Enclose your workplace in the direction of impacts by means of
protective gratings or protective screens.
Familiarity with these hints has to be confirmed by the trainees
signatures in a control book.
2.2. Provision of teaching aids
- For demonstration purposes during the instructions
a vice should be installed at the place of instruction.
- The “Trainees' Handbook of Lessons - Chipping” is to
be handed out to the trainees in sufficient numbers.
- When using the transparencies series of “Chipping”,
check whether they are complete (transparencies nos. 10.1 - 10.5.) and whether
the overhead projector is in working order. (Check the operating conditions at
the place of instruction and make sure of the proper mains supply!)
- Surveys etc. which have to be written on the blackboard must
be completed prior to the instruction.
- All the tools and accessories for chipping mentioned in
section 3 should be kept ready for illustration purposes.
2.3. Provision of working tools and materials
- Sufficient copies of the “Instruction
Examples for Practical Vocational Training - Chipping” must be handed out
to the trainees to provide them with the theoretical foundations for the
exercises to be carried out.
- The initial materials required for the exercises must be
prepared and laid out in sufficient numbers on the basis of materials mentioned
in the “Instruction Examples ...”.
- Each trainee is to be provided with a workbench at which a
vice, the required steel supports and good lighting are available.
- The instructor has to check whether the workbenches of the
trainees are fully equipped with tools and accessories necessary for the planned
exercises.
Recommended basic equipment:
- steel rule, protractor, depth gauge, vernier
caliper
- steel scriber, prick-punch, double-point punch
- hammer, hand
hacksaw
- flat chisel, cape chisel, half-round grooving chisel, mortise
chisel
- bastard and smooth files - 300 mm (flat)
- C-clamps
Bench- or column-type drilling machines and the required
clamping tools (machine vice, holding clamps, C-clamps) must be provided for the
necessary preliminary work (drilling) in some of the exercises.
Based on the regulations on labour safety, the instructor has to
check that the drilling machines are in good working order prior to the
exercises.
2.4. Time schedule
Time planning is recommended for the following training stages
- introduction to the working techniques in the form
of instructions
- necessary demonstrations
- job-related instructions to
prepare the exercises
- carrying out the exercises
- recapitulations and
tests.
The necessary time share depends on the respective training
conditions. The biggest time share must be allocated to the
exercises.
3. Recommendations for practical vocational training in the working technique of “Chipping”
The following paragraphs comprise proposals on conducting
trainee instructions, demonstrations of working techniques, exercises and tests
. Two course variants are recommended:
Variant no. 1
This variant should be chosen for trainees with generally good
achievements and receptiveness.
1.1. Introductory instruction for the whole subject,
with demonstrations based on the “Trainees' Handbook of Lessons”.
1.2. Exercises in chiselling based on the “Instruction
Examples 10.1. - 10.5.” with subsequent evaluation.
1.3. Final test of theory knowledge based on the “Examples
for recapitulation and tests”.
Variant no. 2
This variant should be chosen for trainees with little previous
knowledge or poor achievements.
2.1. Introductory instruction with demonstrations
based on the “Trainees' Handbook of Lessons”
2.2. Exercises in cutting-off chipping based on the
“Instruction examples nos. 10.1. - 10.3.” with subsequent evaluation.
2.3. Additional instruction in the working technique of chipping
chiselling.
2.4. Exercises in cutting-off and chipping chiselling based on
the “Instruction examples 10.4. and 10.5.” with subsequent evaluation.
2.5. Final test on theory knowledge based on the “Example
for recapitulation and tests”
Practical skills should be checked immediately after handing
over the finished workpieces. Theory knowledge can be checked constantly,
however, it is recommended to have a final test written (item 1.3. to 2.5.)
after the exercises.
3.1. Introductory instruction
If possible, this instruction should be conducted in a
classroom. Make sure that the trainees put down necessary and supplementary
notes or answers to questions in their “Trainees' Handbook of
Lessons”.
The instruction can be given based on the main points contained
in the “Trainees' Handbook of Lessons”.
Purpose of chipping;
The trainees have to learn that cutting-off and chipping by
chiselling are energy and time-consuming activities. The instructor has to give
examples of such cases where it will not be possible to employ machining
techniques and where, therefore, chipping is required.
Based on the transparencies nos. 10.1. and 10.2. the instructor
can describe the positions and actions of chisels.

Figure 10.1
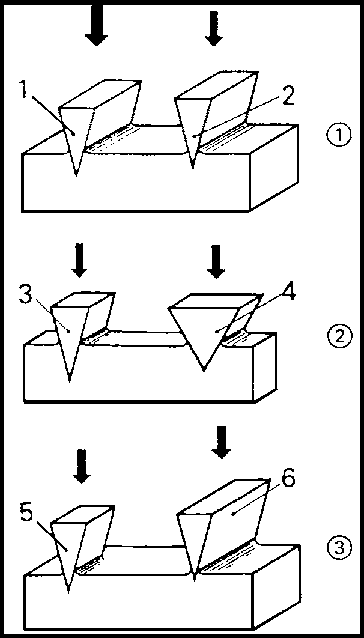
Figure 10.2
Tools, accessories and protective means for chipping:
The following original tools should be shown and the instructor
has to explain when to use them:
- flat chisel (chipping chisel)
- round
chisel
- cape chisel
- shear chisel
- grooving chisel
- mortise
chisel
- punching tool
If it is not possible to show all the chisels as original tools,
transparency no. 10.3. can be used as a teaching aid. The respective
illustrations are also contained in the “Trainees' Handbook of
Lessons”.
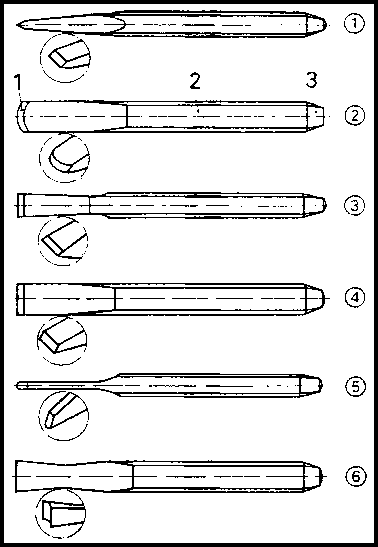
Figure 10.3
When explaining the kinds of chisels the instructor has to
mention how chisels are ground.
This includes a description of the relation between the wedge
angle of the tool edge and the material properties:
|
material property |
wedge angle |
|
soft (aluminium) |
30° - 50° |
|
medium-hard (steel) |
60° |
|
hard (tool steel) |
60° - 70° |
Other tools and accessories to be mentioned are:
- locksmith's hammer
- supports (steel plates and
blocks, anvil)
- vice.
The instructor has to stress that surface plates must never be
used as a support, because the chisel edge would destroy the surfaces of the
plates. The following means of protection should be mentioned:
- protective gratings and screens
- safety
goggles and impact protection
Action and working techniques of chipping:
This subject can be clearly explained by using transparencies
nos. 10.1. and 10.2. as teaching aids. The instructor has to deal in detail with
handling the chisel when chipping and cutting-off. This instruction can be
supported by the hints contained in the “Trainees' Handbook of
Lessons” and the respective illustrations, as well as by using
transparencies nos. 10.4. and 10.5. as teaching aids.

Figure 10.4

Figure 10.5
If possible, the instructor has to give a demonstration of
chipping and cutting-off chiselling on small-size steel parts. When speaking
about cutting-off chiselling of curved contours the instructor has to refer to
the preparation of this work by scribing a bore line. He has also to refer to
the necessary formulae, and a calculation should be done using the available
widths of a double-point punch.
|
D = y - 0.2 mm |
|
x = D/2 + 0.5 mm |
D = diameter of drill
y = width of double-point
punch
x = distance of bore line from scribed line
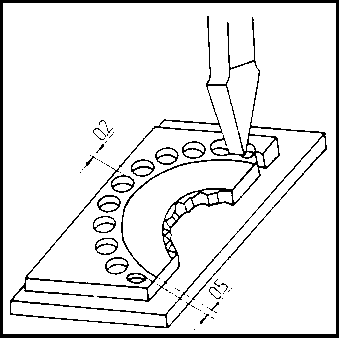
Drilling and chiselling out of curved
contours
3.2. Exercises
If it has not been possible to include demonstrations in the
instructions, this should be done right now prior to the exercises.
Subsequently, the trainees can begin with their first exercises
based on the “Instruction examples for practical vocational t
raining”.
However, it is necessary to prepare every individual exercise by
a brief “job-related instruction” in the course of which the trainees
are shown a finished workpiece in order to demonstrate the objectives and
purpose of the exercise.
|
The instructor must have made such a workpiece himself in order
to be familiar with all the problems which might arise from producing such a
workpiece. |
Thus, the main points of evaluating the achievements can be
clearly defined, and the instructor can inform about difficult areas in the
exercise. During these instructions the sequences of operations and the working
drawings should be placed on the desks so that the trainees can put down
additional notes therein. All the trainees can perform these exercises
simultaneously, provided that the necessary tools etc. are available. In this
case the trainees can carry out all the individual exercises by themselves. Each
trainee should be given as much time as required.
If there are not enough tools available, the instructor has to
form groups of trainees. It is recommended to divide these groups on the basis
of applying the various kinds of chisels:
group no. 1 - working with flat chisels
only
group no. 2 - working with flat, cape and grooving chisels.
If there are still trainees who cannot take part in these
exercises, they should perform additional exercises to consolidate working
techniques acquired earlier.
3.3. Examples for recapitulation and tests
This section comprises questions which are to consolidate and
test the previously acquired knowledge and skills. Each question is provided
with the respective answer. Questions which are also contained in the
“Trainees' Handbook of Lessons” are marked with the letter
“A”.
1. What is the purpose of chipping?
(Cutting-off or chipping
of material.)
2. When do we employ the chipping technique?
“A”
(If it is not possible to employ mechanical techniques or if these are too
costly.)
3. What is the material chisels are made of?
“A”
(Unalloyed tool steel with hardened cutting edge.)
4. What are the criteria for selecting chisels?
“A”
(The criteria are: kind of work and hardness of material of the workpiece.)
5. What kinds of chisels do we know?
(flat, round, cape,
shear, grooving, mortise and punching chisels (tools).)
6. What is the purpose of using flat chisels?
“A”
(Flat chisels are the most common tools for cutting-off and chipping chiselling)
7. What is the purpose of using cape chisels?
“A”
(They are used for cutting out horizontal grooves and for cutting-off the webs
in bore lines.)
8. What is the recommended wedge angle of cutting edges for
working on medium-hard steel?
“A” (60°)
9. Which additional tools and accessories do we need for
chipping?
“A” (Hand hammer, supports, vice.)
10. What is the basic principle for selecting the
hammer?
“A” (The hammer must have double the weight of the chisel.)
11. Which property must supports have?
“A” (They
must not be hardened so that they can absorb the impact of blows.)
12. Why must surface plates never be used as
supports?
“A” (The penetrating chisel edge would leave notches and
uneven spots on the plates so that they could no longer be used for their proper
purpose.)
13. What do you have to take into account when chiselling a
workpiece in a vice?
(You must hammer against the fixed jaw of the vice and
use a firm counter-support.)
14. Which protective means are used to prevent
accidents?
(Protective gratings or screens, goggles and impact protection.)
15. What is the task of protective screens and safety
goggles?
“A” (To protect people from being hit by flying chips and
fragments of workpieces.)
16. What is the action of chiselling?
(The impact of the
hammer on the chisel head is transferred to the cutting edge, which can perform
its chipping work now.)
17. What is the position of the chisel in a chipping
operation?
“A” (The chisel inclination towards the surface of the
workpiece is about 30°.)
18. How are metal sheets chiselled which are clamped in a
vice?
(The chisel must be in an inclined position - with an angle of
inclination of 45°.)
19. What is the position of the chisel in a cutting-off
operation?
“A” (Perpendicular to the surface of the workpiece.)
20. How can we chisel off curved contours from thicker
workpiece?
“A” (Scribing and punching of a bore line with a
double-point punch; drilling; chiselling off the webs with mortise
chisel.)
4. Application of the working technique of “Chipping”
Based on the variants mentioned in section 3, the exercises can
be designed as a single subject-oriented instruction or in several stages.
Based on the “Instruction examples for practical vocational
training - Chipping” the trainees can carry out 5 exercises with an
increasing degree of difficulty.
These “Instruction examples ...” also comprise a list
of materials (initial material, hand tools, measuring and testing tools,
accessories) as well as a sequence of operations associated with the exercise.
Also contained is an illustrative working drawing. Thus, the trainees avail of
all the necessary information in order to begin their exercise-related work.
If the course of the exercise reveals that the quality of the
workplaces does not meet the requirements, the trainees must carry out
comprehensive preliminary exercises.
In this case they should use any waste parts. After having
practised the skill sufficiently, the envisaged workpiece can be manufactured.
The following hint for organising the work should be taken into
account :
|
The trainee has to carry out all the necessary work by himself -
from cutting the initial material up to the completion of the workpiece. |
This is the only way to guarantee a just evaluation of the
achievements.
If the proposed instruction examples cannot be used for the
exercises, it will be possible to select other workpieces. In this case the
instructor has to make sure that the trainees can practise all the working
techniques mentioned earlier.
4.1. Instruction examples
What follows is a brief description of the individual
instruction examples in order to give a survey of those workpieces on which the
knowledge previously acquired can be practised.
Instruction example 10.1.
Training workpieces for cutting-off chiselling

Figure
The technique of cutting-off chiselling will be practised at
various cross-sections of steel.
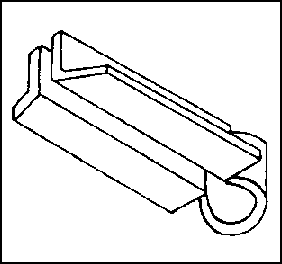
Instruction example 10.2.
Case for safety goggles

Figure
Cutting-off and shearing chiselling practises are employed to
form a metal sheet in such a way that it can be bent to form a case. This case
for safety goggles must be properly dimensioned. It can be fixed close to the
drilling or grinding machines.
Instruction example 10.3.
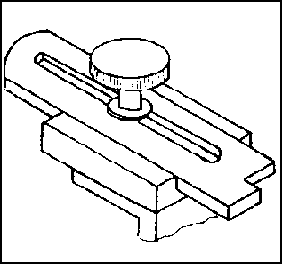
Dog vice for sheet metal
Figure
The trainee has to produce a bore line on angle steel and to
chisel off sections and cut-outs. This workpiece can be used for clamping metal
sheets in a workshop vice.
Instruction example 10.4.
Drilling support

Figure
The trainees practise the chipping chiselling of surfaces and
grooves on cast iron. They employ cape and grooving chisels.
After its completion this workpiece can be used as an accessory
for drilling machines.
Instruction example 10.5.
Marking gauge
Figure
Several flat steel components serve to practise cutting-off and
chipping chiselling by producing break-throughs and by working on surfaces.
After its completion this device can be used as an accessory for marking-out
operations.
4.2. Criteria for practical training
It is recommended to determine some crucial points of evaluation
and supervision. The following criteria can serve as a guideline.
Cutting-off chiselling
- Is the chisel position precisely perpendicular?
- Does the trainee drill the corner points in thin metal sheets
and continue by chiselling on a hardened support?
- Does the trainee notch thicker sections from all sides in
order to break them?
- Does the trainee prepare long dividing lines by producing a
guide notch?
- Does the trainee prepare curved contours, which are to be
chiselled off, by providing a bore line?
Chipping Chiselling
- Is the chisel position properly inclined?
- Does the trainee chisel off thin layers at narrow surfaces
with the chisel in an angular position?
- Does the trainee chisel off thicker layers in several
stages?
5. Captions and legends of the “Chipping” transparencies series
|
Transparency no. 10.1. |
Position of chisel in chipping and cutting-off operations
|
|
|
(1) chipping chiselling |
|
|
(2) cutting-off chiselling |
|
Transparency no. 10.2. |
Principle of wedge penetration (chisel edge) into the
material |
|
|
(1) equal wedge angles - unequal action of force |
|
|
|
1 action of higher force |
|
|
|
2 action of lower force (smaller depth of penetration) |
|
|
(2) different wedge angles - equal action of force |
|
|
|
3 smaller wedge angle |
|
|
|
4 bigger wedge angle (smaller depth of penetration) |
|
|
(3) different edge lengths - equal action of force and equal
wedge angle |
|
|
|
5 smaller length of edge |
|
|
|
6 bigger length of edge (smaller depth of penetration) |
|
Transparency no. 10.3. |
Kinds of chisels |
|
|
(1) flat chisel (chipping chisel) |
|
|
(2) round chisel |
|
|
(3) cape chisel |
|
|
(4) shear chisel |
|
|
(5) grooving chisel |
|
|
(6) mortise chisel |
|
Transparency no. 10.4. |
Chiselling-off of thin metal sheets |
|
|
(1) Scribing and drilling |
|
|
|
1 scribed line |
|
|
|
2 bore line |
|
|
(2) Chiselling out of “webs” with a mortise chisel
|
|
Transparency no. 10.5. |
Shearing-off of metal sheets |
|
|
(1) shearing-off of longer metal sheets by shearing chisel and
dog vice for sheet metal (angle steel with clamp) |
|
|
|
1 dog vice for sheet metal |
|
|
|
2 shearing chisel |
|
|
(2) shearing process in a vice |
|
|
|
3 vice jaws |
|
|
|
4 chisel |
|
|
|
angle of inclination of about 45° |
 |
 |
