Back to Home
Page of CD3WD Project or Back to list of CD3WD Publications
 |  |  | Manual Working of Material/Metal - Course: Manual working of metal. Methodical course-guide for instructors (Institut für Berufliche Entwicklung, 218 p.) |  |  | Filing | |  | 1. Objectives and contents of practical vocational training in the working technique of “Filing” | | | 2. Organizational preparations | | | (introduction...) | | | 2.1. Preparations for instructions on labour safety | | | 2.2. Provision of teaching aids | | | 2.3. Provision of working tools and materials | | | 2.4. Time schedule | | | 3. Recommendations for practical training in the working technique of “Filing” | | | (introduction...) | | | 3.1. Introductory instruction | | | 3.2. Exercises | | | 3.3. Examples for recapitulation and tests | | | 4. Application of the working technique of “Filing” | | | (introduction...) | | | 4.1. Instruction examples | | | 4.2. Criteria for practical training | | | 5. Captions and legends of the “Filing” transparencies series |
|
Manual Working of Material/Metal - Course: Manual working of metal. Methodical course-guide for instructors (Institut für Berufliche Entwicklung, 218 p.)
Filing
1. Objectives and contents of practical vocational training in the working technique of “Filing”
By concluding their training the trainees shall have a good
command of the working technique of “Filing”. Therefore, the following
objectives are to be achieved:
Objectives
- Knowledge of purpose and application of the filing
technique.
- Proper handling of files and capability of filing all surfaces,
edges and break-throughs to size,
- Capability of selecting and properly
using the appropriate tools and accessories.
- Capability of making decisions
on quality independently.
The following contents have to be imparted to the trainees:
Contents
- Purpose of filing
- Tools and accessories
-
Effects and handling of
files.
2. Organizational preparations
In order to guarantee a trouble-free development of the
instructions, exercises and practical work it is necessary to prepare this
training appropriately.
The following steps have to be
taken:
2.1. Preparations for instructions on labour safety
Prior to the exercises, a brief instruction on the proper use of
tools and equipment has to be given. This comprises also hints for accident-free
work.
The main emphasis is to be laid on:
- Files with crack-free file handles must be used
only.
- New file handles are to be drilled and enlarged in relation to
the tang of the file and then fixed by light blows with the hammer.
- Files are to be protected from dropping and must not be laid
one above the other.
- Hardened components must not be filed - danger of
slipping!
Familiarity with these hints has to be confirmed by the
trainees’ signatures in a control
book.
2.2. Provision of teaching aids
- For demonstration purposes during the instructions, a vice has
to be firmly installed at the place,
- The “Trainees’ Handbook of Lessons - Filing” is
to be handed out to the trainees in sufficient numbers.
- When using the transparencies series of “Filing”,
check whether they are complete (transparencies nos. 5.1. - 5.5.) and whether
the overhead projector is functioning. (Check the operating conditions at the
place of use and make sure of the proper mains supply!)
- Surveys etc. which are to be written on the blackboard have to
be completed prior to the instruction.
- All the tools and accessories mentioned in section 3 (for
filing purposes) should be kept ready for illustration
purposes.
2.3. Provision of working tools and materials
- The “Instruction Examples for Practical Vocational
Training -Filing” must be handed out to the trainees in sufficient copies
to provide them with the theoretical foundations for the exercises to be carried
out.
- The initial materials necessary for the exercises have to be
prepared and laid out in sufficient numbers according to the materials mentioned
in the “Instruction Examples...”
- Each trainee is to be provided with a workbench at which a
vice is firmly installed (check the proper height of this vice!)
- The trainees’ workbenches have to be fully equipped with
tools and accessories according to the envisaged exercises.
Recommended basic equipment:
- steel rule,
vernier caliper, bevelled edge square, protractor
- steel scriber, prick
punch, dividers
- hand hacksaw, locksmith’s hammer
- bastard and
smooth files 200 - 300 mm (flat, three-square, round)
- warding file (flat)
- In order to carry out the necessary preliminary work
(drilling), bench-type or column-type drilling machines with necessary clamping
devices (machine vices, holding clamps, C-clamps) are necesary.
- Before the exercises are carried out, the drilling machines
must be checked in order to find out whether their functionality complies with
the requirements of labour
safety,
2.4. Time schedule
Time planning is recommended for the following training stages:
- introduction to the working technique in the form
of instructions
- necessary demonstrations
- job-related instructions to
prepare the exercises
- carrying-out the exercises
- recapitulations and
tests.
The necessary time-share depends on the respective training
conditions. Most of the time is to be allocated to the
exercises.
3. Recommendations for practical training in the working technique of “Filing”
The following paragraphs comprise proposals on conducting
trainee instruction, the demonstration of working techniques as well as the
exercises and tests.
The following sequence of stages is recommended:
- Introductory instruction with demonstrations from
the “Trainees Handbook of Lessons”
- Exercises in
“Filing” based on the “Instruction examples 5.1. to
5.6.”
- Final test of theory knowledge based on the contents of
“Examples for Recapitulations and Tests”
Practical skills should be evaluated immediately after having
received the trainees’ test workpieces. Knowledge of theory should be
constantly checked, however, it is recommended that a final test paper should be
written after concluding the
exercises.
3.1. Introductory instruction
If possible, this instruction should be conducted in a
classroom.
Make sure, that the trainees put down necessary and
supplementary notes or answers to questions in their “Trainees’
Handbook of Lessons”.
Instruction can be carried out on the basis of the main points
contained in the “Trainees’ Handbook of Lessons”. The two
major subjects of “Purpose of Filing” and “Tools and Accessories
for Filing” should be taught in such a way that all the teaching aids
available are employed.
Purpose of filing
This subject can be explained to the trainees by employing
workpieces which had been worked with files. The trainees will learn that these
workpieces reveal all the signs of a single-piece production.
The trainees will learn - and this is to be emphasised - that
the finishing of surfaces or shapes is one of the major applications of the
filing technique and that they must have a good command of this skill.
Tools and accessories
Introducing the subject of files should be begun with a flat
file. The design of this tool can be illustrated by referring to the
original tool and to the illustrations contained in transparency no. 5.1.

Figure 5.1
This is also the time to demonstrate the kinds of fixing file
handles to the file blade. This will be followed by introducing the other types
of files contained in the list of the “Trainees’ Handbook of
Lessons”:
- flat file
- square file
- triangular file
(three-square file)
- round file
- half-round file
- crossing file -
barrette file
- knife-edge file.
The demonstration of original tools can be supported by showing
the illustrations contained in the transparencies nos. 5.2. and 5.3.

Figure 5.2
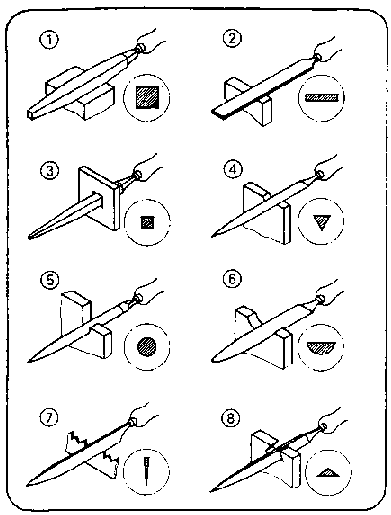
Figure 5.3
The trainees have not only to know the types of files but also
how to use them. In this context the instructor has to mention that the use of
files depends on their sizes and kinds of cut (single-cut,
double-cut, rasp-cut).
The following survey (written on the blackboard) can be employed
to finalise the instruction:
|
Designation Cut |
no. |
File surface |
Use of file |
Fineness of file |
|
rough-cut file
(roughing file)
bastard file |
0
1 |
rough (stroke of file tangible and visible) |
for oversize of 0.5 mm and mor |
very coarse |
|
second-cut file
(coarse finishing file) |
2 |
fine (file stroke no longer tangible but still visible) |
for oversize of less than 0.1 mm |

|
|
smooth-cut
(finishing file) |
3 |
|
|
|
|
dead-smooth
file (fine finishing file) |
4 |
very fine (file stroke neither tangible nor visible) |
for fits and best surface finish |
|
|
super-smooth
file (superfine finishing file) |
5 |
|
|
very fine |
The introduction of accessories should be linked with remarks on
their respective application:
- vice
- vee clamps
- angle clamps
-
protective jaws
- clamping jaws for round material
- clamping jaws for
bolts and thread clamps
- saw sharpening vice
- hand vice and pin
vice
- sheet metal dog vice
This is also the appropriate moment to mention that such
accessories can be easily produced by everybody. The subsequent working
techniques contained in this course will give some ideas of how to manufacture
these accessories during practical exercises.
Action of filing, postures of trainees and guidance of files
Transparency no. 5.1. as well as the illustrations contained in the
“Trainees’ Handbook of Lessons” can be employed to
describe the action of filing. The different actions of milled and chiselled
files should be explained. It is to be mentioned that the use of chalk on
surfaces will support the job of fine finishing.
The instructor must demonstrate the correct posture and guidance
of the file when instructing the group. This can be demonstrated very
effectively, if a vice is available in the classroom. If this is not the case,
the sequence of motions has to be demonstrated quite clearly.
The instructor has to emphasise that the file must be moved by
the motion of the arms only and that it must work in pushing direction only.
After these demonstrations each trainee should demonstrate the
filing movement and posture. The instructor should see to it that all the
trainees take part in evaluating the performance of their fellow-trainees.
Handling of files
If there is a vice available in the classroom, the following
major subjects should be imparted to the trainees within the framework of the
introductory instruction. The main method involved in these instructions should
be that of demonstrating the practical use of these files. If such a
demonstration cannot be given in the classroom, the instruction is to be
continued in the workhsop.
The instructor has to show how differently large, medium-size
and small files have to be handled. Special emphasis is to be laid on the
corect handling of file blades by the guiding hand. Subsequently, the kinds of
stroke (oblique stroke, cross stroke, longitudinal stroke) have to be
demonstrated when filing flat surfaces. The trainees have to see that
these kinds of stroke, when applied step by step, will improve the degree of
evenness and surface finish.
Transparency no. 5.4, should be employed as an additional
teaching aid. Subsequently, testing of faces by means of bevelled steel
straight-edge and bevelled edge square should be demonstrated. There should be
separate demonstrations of filing curved surfaces on small- and
large-size external radii materials, stressing the different way of handling the
file.
This fact is also illustrated by transparency no, 5.5.
and illustrations in the “Trainees’ Handbook of Lessons”. The
instructor has to show how internal round surfaces have to be filed with
different files depending on the size of the internal radii (round file,
half-round file, crossing file). This should be followed by instructions in
checking these radii with radius gauges and fillet gauges.

Figure 5.4
Pre-finished workpieces (sawn or drilled) must be prepared to
demonstrate the working technique of filing cuts and breakthroughs.
Depending on the shape of the cut or break-through, the instructor has to select
the appropriate form of the file. A separate section of instruction serves to
demonstrate the filing of chamfers on large-size and small-size
workpieces (employing a saw sharpening vice) as well as on round materials
(bolts). The different ways of handling the files have to be underlined. This is
also supported by the illustrations contained in the “Trainees’
Handbook of Lessons”. The instructions should be concluded by the
trainees’ answers to questions asked in the “Trainees’
Handbook of Lessons”.

Figure
5.5
3.2. Exercises
If it has not been possible to include the individual
demonstrations in the instructions, this should be done right now prior to the
exercises. Subsequently, it will be possible to commence with the first exercise
contained in the “Instruction Examples for Practical Vocational
Training”. However, it is necessary to prepare every individual
exercise by a “job-related instruction” during which the
trainees are shown a finished workpiece in order to demonstrate the objectives
and purpose of the exercise.
|
The instructor must have made such a workpiece himself in order
to be familiar with all the problems which might arise in producing such a
workpiece. |
Thus, the instructor can mention the criteria for evaluation as
well as the problems involved in manufacturing such a workpiece. During these
instructions the sequences of operation and the working drawings
of the “Instruction Examples” should be placed on the desks so that
the trainees can make notes therein. All the trainees can carry out these
exercises simultaneously, if the material prerequisites are given (availability
of a sufficient number of tools etc.). This being the case, any individual
exercise should be carried out individually with each trainee being allowed to
take the time he needs.
If this is not the case, the trainees have to be grouped in
teams depending on the subject of work and number of the available working
tools.
Trainees who cannot begin with filing should do other jobs in
the workshop:
- selection and preparation of initial
materials,
- checking and minor repair work on working tools under the
supervision of the instructor,
- exercises which consolidate skills in the
working techniques acquired in the
past.
3.3. Examples for recapitulation and tests
This section comprises questions which are to consolidate and
test the acquired skills and knowledge. Each question is provided with the
respective answers. Questions which are also contained in the
“Trainees’ Handkook of Lessons” are marked with the letter
“A”.
1. What is the purpose of filing?
(To change flat or curved
surfaces or edges of pre-worked components in terms of dimensions, forms and
surface finish),
2. When is it useful to employ files?
“A” (In case
of single-piece production, for repair work, and sometimes for assembly work).
3. Which of the file forms is the mainly used
form?
“A” (Flat file).
4. Which type of cut is used for filing general steel grades and
cast iron?
“A” (Double-cut file).
5. What is the order of files form coarse to fine surface
finish?
(Roughing file - bastard file - coarse finishing file -finishing file
- fine finishing file - superfine finishing file).
6. How do we select files?
(We have to consider the form of
the surfaces or edges to be filed, the hardness of the material to be filed, the
size of the surface to be filed, the amount of work and the surface finish).
7. How does a file act?
(Its many wedge-shaped teeth
penetrate into the workpiece by means of pressure from above and to the front
and remove chips).
8. Why are milled files well-suited to soft
materials?
“A” (They are provided with very sharp teeth and small
wedge-angles resulting in a cutting action).
9. Why are chiselled files well-suited to hard
materials?
“A” (Their teeth have large wedge angles and exert a
shaving effect).
10. Why must the files be operated with the arms in motion and
the upper part of the body kept steady?
“A” (Otherwise the motion
of the file would become arch-like instead of being horizontal and the filed
surface would not be flat).
11. What is the difference in handling large and medium-size
files?
(In the case of large-size files the guiding hand rests completely on
the file blade, whereas thumb and finger of the guiding hand will grip the file
blade of medium-size files).
12. Which kinds of strokes have to be employed successively when
filing flat surfaces?
“A” (Oblique stroke, cross stroke,
longitudinal stroke).
13. Why can only cross-stroke files be used to achieve flat
surfaces of good surface finish?
“A” (The alteration in the
direction of working makes it possible to recognize elevations and depressions
on the worked surface very well by the working tracks left on it).
14. What is typical of file movements when filing small external
radii?
“A” (Rocking feed movement opposite to the radius in the
longitudinal direction of the curvature).
15. Which are the requirements to be met when using files for
working internal radii?
“A” (The file must have a smaller radius
than the curvature of the workpiece).
16. What is the difference in filing chamfers on large and small
components?
“A” (With large-size components the file position will
be 45 upwards; with small-size components the file position will be horizontal -
the component should be fixed in a saw sharpening vice).
17. Which are the conditions to be met when clamping the
workpiece?
“A” (You must clamp the workpieces so firmly and safely
that the components will not spring or slip. The file position must be
horizontal).
18. Which are the proper devices for clamping
workpieces?
“A” (Vice, sheet metal dog vice, protective jaws of
soft metal, clamping jaws for round pieces, vee clamps, thread
jaws).
4. Application of the working technique of “Filing”
The sequence of exercises can follow the order of the 6
exercises mentioned in the “Instruction Examples for Practical
Vocational Training”.
These “Instruction Examples...” comprise a list of
materials (initial material, working tools, measuring and testing tools,
accessories) as well as the sequence of operations for the manufacture of these
workpieces; also contained is an illustrative working drawing.
Thus, the trainees have the necessary information to begin their
exercises.
If the quality of the produced workpieces should be considered
insufficient, the trainee has to carry out comprehensive preliminary exercises.
For this purpose any waste parts may be used. If the respective skill has been
practised sufficiently, the envisaged workpiece can be produced.
The following hint should be taken into consideration:
The trainee has to do all the work involved alone - from the
very beginning till completion.
This is the only way to guarantee a just evaluation of the
achievements.
Should the offered “Instruction Examples...”
not be used in the exercises, then it is also possible to select other parts for
practising. In this case all the working techniques acquired earlier should be
also practised when working these
pieces.
4.1. Instruction examples
What follows is a brief description of the individual
instruction examples in order to give a survey of the parts to be produced for
practising the knowledge acquired:
Instruction Example 5.1.
Step Block
Filing of flat surfaces of square steel to finishing quality and
of sawn out, stepped surfaces of small dimensions. Together with the parts
produced as instruction examples 2.2., 5.2. and 5.5., it can be used as part of
a set of clamping tools for an upright drilling machine.

Figure
Instruction Example 5.2.
Sliding Block
Filing of flat and stepped small-size surfaces of square steel
to finishing quality and angularity. Additionally, the trainees practise filing
of chamfers. Together with the components produced as instruction examples 2.2.,
5.1. and 5.5. it will form another part of the set of clamping tools for an
upright drilling machine.

Figure
Instruction Example 5.3.
Locksmith’s Hammer
Filing of flat and inclined surfaces, radii, a break-through and
chamfers on square steel. After being hardened, the locksmith’s hammer can
be fitted with a handle and be used in the workshop.

Figure
Instruction Example 5.4.
Hexagon Socket Wrench
This exercise concentrates on filing small-sized, stepped
surfaces on round steel materials. Angularity and accuracy to size are
essential. A new degree of difficulty is added by filing a chamfer on round
material.
After hardening this workpiece it may be used for mounting
hexagonal socket-haed bolts in the workshop.

Figure
Instruction Example 5.5.
Box Wrench
This filing practise concentrates on flat and curved narrow
steel plate surfaces. The trainee will also practise how to produce a
true-to-size hexagonal break-through.
Being part of a set of clamping tools for an upright drilling
machine the size of this part complies with the size of the components produced
as instruction examples 2.2., 5.1. and 5.2.

Figure
Instruction Example 5.6.
Bevel
Here, too, flat and curved surfaces of flat steel are filed to
finishing quality. Extremely difficult tasks are associated with a long
break-through on a single component. This bevel can be used for transferring
angle values in the workshop.

Figure
4.2. Criteria for practical training
It is recommended to determine some major points of observation
and evaluation of the work to be performed.
The following criteria can serve as a guideline:
Flat surfaces and edges
- Is the trainee’s posture correct?
- Does
the trainee handle the file exactly horizontally or does the file
“swing” over the surface?
- Does the trainee apply the oblique
stroke technique to roughing?
- Does the trainee supply the cross stroke
technique to achieve flat surfaces?
- Does the trainee apply longitudinal
strokes to finishing filing?
- Does the trainee know how to check with the
bevelled steel straight-edge or bevelled edge square?
Curved surfaces
- Does the trainee handle the file in the
longitudinal direction of the round surface (with small-size round forms) and
does he rock the file opposite to the radius?
- Does the trainee handle the file at right angles to the radius
(with large-size round forms) and does he incline the file slightly?
- Does the trainee use a file with a smaller radius that the
curvature for big internal radii?
Cut-outs and break-throughs
- Does the trainee employ the proper kind and size
of file (in relation to cut-out and break-through)?
Chamfer
- Does the trainee employ the file at an angle of 45
with the file pointing upwards for large-size workpieces?
- Does the trainee use the saw sharpening vice when filing
small-size components?
- Does the trainee handle the file laterally inclined and
tilting towards the outside when filing round
workpieces?
5. Captions and legends of the “Filing” transparencies series
|
Transparency no. 5.1.: |
Design and action of a file (1) flat file |
|
|
1 - file blade |
|
|
2 - tang |
|
|
3 - handle |
|
(2) chip removal by the file teeth |
|
|
4 - file tooth |
|
Transparency no. 5.2.: |
Kinds of cuts |
|
(1) single-cut file |
|
(2) double-cut file |
|
(3) rasp-cut file |
|
Transparency no. 5.3.: |
Use of files |
|
(1) square rubber file |
|
(2) flat file |
|
(3) square file |
|
(4) triangular file |
|
(5) round file |
|
(6) half-round file |
|
(7) knife-edge file |
|
(8) barrette file |
|
Transparency no. 5.4.: |
Filing of flat surfaces |
|
(1) oblique-stroke filing |
|
(2) cross-stroke filing |
|
(3) longitudinal-stroke filing |
|
Transparency no. 5.5.: |
Filing of curved surfaces |
|
(1) filing of external radius - employing a flat file |
|
(2) filing of internal radius - employing a half-round file.
|


