3. Preparation for setting-up and operation of horizontal or vertical milling machines
Prior to operating the milling machines, all tools and
accessories are to be placed at disposal properly and conveniently and within
easy reach observing the following rules:
- Working tools must not lay one above another.
- Measuring and testing tools are to be stored on suitable
supports (soft supports: rubber and felt supports).
· Hammer
and file handles must be firmly fixed and not be damaged.
· Spanners (open-ended, box and
ring spanners), hand and vice cranks must be free from burrs and have the proper
size for the purpose of use (bent up openings at spanners and too big
spanners/cranks must not be used).
· Clamping tools (machine vices,
fixtures, clamping elements) must be suitable for the purpose of locating and
fixing.
· Clamping tools for milling
cutters (cutter arbors, chucks, collets) must be complete and not be damaged
(arbor collars, feather keys, bushings, cap nuts, etc.).
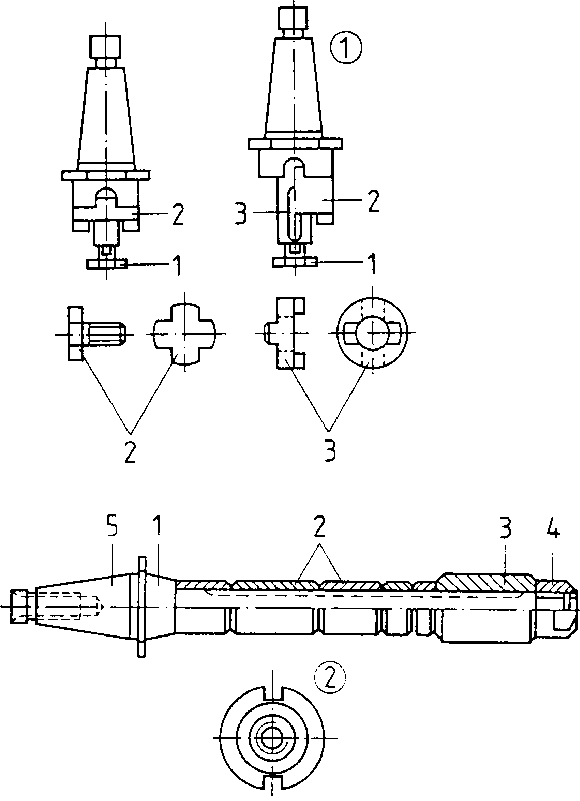
Figure 10. Clamping tools for milling
cutters
(1) stub arbor (short arbor)
1 cross screw, 2 driver, 3 feather key
(2) cutter arbor (long arbor) 1 arbor, 2 arbor collars, 3 bush,
4 arbor nut, 5 machine taper (steep
taper)
· Tools
are to be stored in clean condition.
· All auxiliaries necessary are
to be selected according to the work to be done and to be kept ready on proper
supports.
Milling of workpieces necessitates firm fixing of the workpieces
and cutters. Fixing of workpieces and cutting tools is called
“clamping”.
Clamping of workpieces for milling
Clamping of workpieces serves two purposes:
- locating the workpiece, and
- fixing the
workpiece.
Locating the workpiece means defining the position and direction
of the workpiece depending on the cutter and on the dimensions and datum faces
shown in the working drawings.
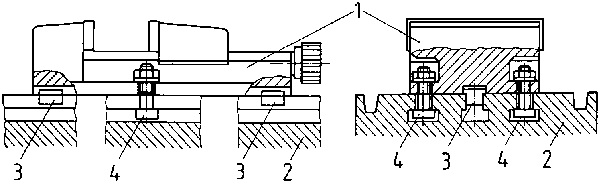
Figure 11. Machine vice located by
sliding blocks
1 machine vice, 2 milling table (machine table), 3
sliding blocks, 4 clamping screws
Fixing of the workpiece serves the purpose of holding
(retaining) the workpiece during milling in the position where it has been
located.
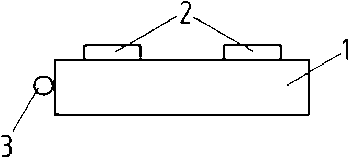
Figure 12. Workpiece located by
sliding blocks and stop
1 workpiece, 2 sliding blocks, 3 stop
There are several possibilities for clamping of workpieces which
depend on various factors, such as:
- the geometrical form (e.g. cylindrical or
prismatic) and the size of the workpiece and its rigidity (thin-walled, hollow
casting or square steel part),
- the position of the face of the workpiece to be machined,
- the number and frequency of the workpieces to be machined,
- the selection of clamping tools available and the type of the
milling machine used (horizontal or vertical milling machine).
Mostly used clamping facilities include:
- Machine vice (available in various versions).
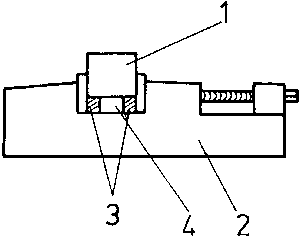
Figure 13. Clamping in machine vice
1 workpiece, 2 machine vice, 3 parallel blocks, 4
machined surface
- A variety of holding clamps, clamping screws and set-up
blocks.
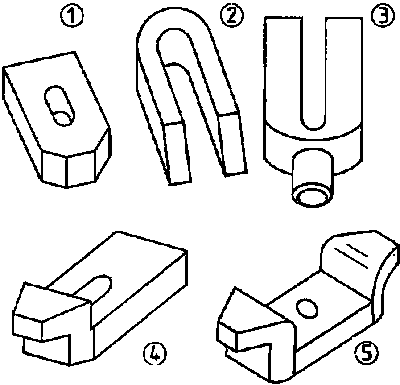
Figure 14. Holding clamps
(1) flat clamp, (2) channel-type, (3) fork-type, (4)
offset at one end, (5) offset at two ends
- Sliding blocks, for locating machine vices or directly
locating workpieces.
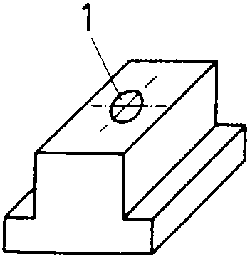
Figure 15. Sliding blocks
1 sliding block with hole for fixing
screw
- Angle plates of solid, rotary and swivelling types.

Figure 16. Angle plates
(1) angle plate (90°), (2) angle plate
(clamping table), rotary and swivelling
- Chuck jaws with or without rotary base plate.
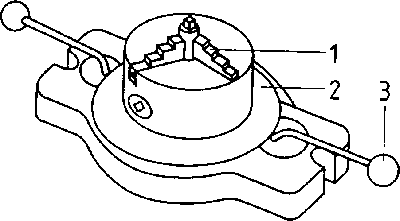
Figure 17. Jaw chuck
1 three-jaw chuck, 2 base plate with scale, 3
control lever
- Workholding fixtures for single or multi-component set-ups.
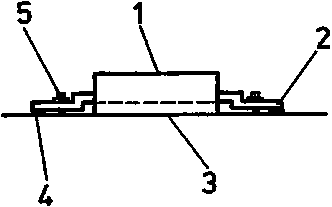
Figure 18. Workholding fixture in
direct table clamping
1 workpiece face to be machined, 2 holding clamp, 3
first face machined, 4 support, 5 clamping screw with nut and
washer
- Indexing attachments, direct-indexing attachments, universal
indexing attachments, rotary indexing tables.
- Clamping auxiliaries, such as stop bars, Vee-jaws,
pre-clamping angle plates and clamping mounts for rotary-table indexing.
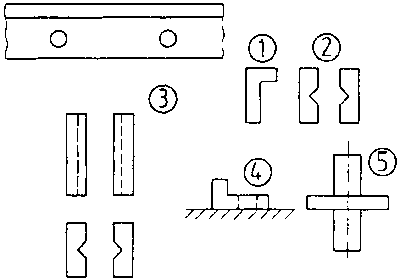
Figure 19. Clamping accessories
(1) stop bar with holes for fixing screws, (2)
Vee-jaws (horizontal vee), (3) Vee-jaws (vertical vee), (4) pro-clamping angle
plates, (5) clamping mount for rotary indexing table and locating hole in
workpiece
Workpiece clamping tools and auxiliaries must serve the
following purposes:
- Firm holding (fixing) of the workpiece to secure
them against displacement by forces applied during milling.
- Exact and definite location of the workpiece.
- Ensuring sufficient stability and rigidity to permit full
utilization of the machine and cutter.
- Quick and easy change of workpieces without any
danger.
When clamping the workpieces it is to be made sure that the
workpieces, clamping auxiliaries (e.g. jaws of the machine vice) and clamping
supports are clean and free from burrs.
Any impurities and burrs will result in deviations from the
location and, consequently, from the dimensions of the workpiece and in damage
to the workpiece surface.
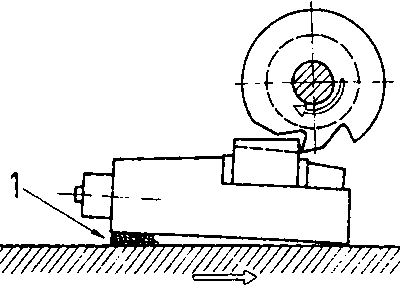
Figure 20. Impurities in clamping
1 chip under machine vice
When clamping thin-walled or instable components it is to be
made sure that the clamping force will not deform the workpiece so that it
becomes unusable.
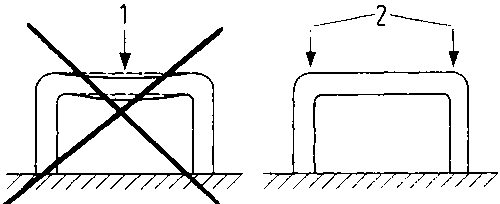
Figure 21. Thin-walled, instable
workpiece
1 wrong clamping area - workpiece becomes deformed,
2 favourable clamping areas
Why is it necessary to use serviceable tools and auxiliaries
only?
________________________________________________
________________________________________________
________________________________________________
What are the criteria for the selection of workpiece clamping
tools?
________________________________________________
________________________________________________
________________________________________________
________________________________________________
Clamping of milling cutters
Clamping tools for milling cutters differ with respect to the
purpose of use and geometrical form:
- Cutter arbors, long or short (stub arbors)
- Cutter chuck,
for straight-shank cutters
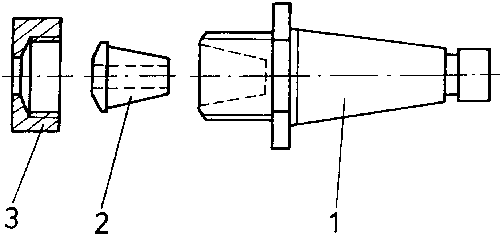
Figure 22. Clamping tools for milling
cutters
1 cutter chuck, 2 collet, 3 cap nut

Figure 23. Straight-shank cutter
(shank-type milling cutter)
- Cutter adaptor, for taper-shank cutters
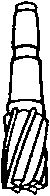
Figure 24. Taper-shank cutter
(shank-type milling cutter)
- Direct mounting of cutters on the milling spindle
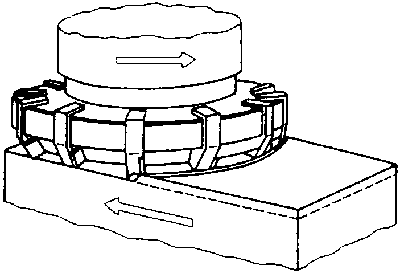
Figure 25. Cutter directly clamped on
milling spindle (face milling cutter)
Cleanliness must be ensured when clamping the milling cutters in
the clamping tools. Impurities (e.g. chips, dust, sand, etc.) on the contact
faces or between the arbor collars will adversely affect the cutting process by
radial or axial runout.
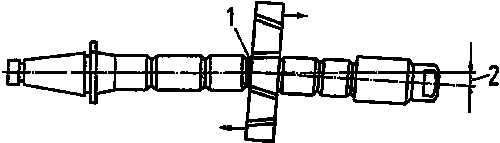
Figure 26. Impurities between cutter
and arbor collar
1 impurities, 2 radial runout
- When using long arbors on the horizontal milling machine, the
counter bearing is to be placed as close to the cutter as possible to prevent or
reduce vibrations generated during milling
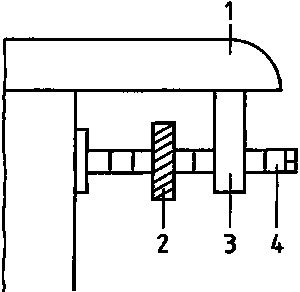
Figure 27. Counter bearing directly
at the cutter
1 overarm, 2 cutter, 3 counter bearing, 4 cutter
arbor
Vibrations during milling result in deterioration of the surface
finish of the workpiece, reduction of the feed rate and early wear of the
cutter. The use of a second counter bearing (at the front and rear of the
cutter) offers an additional possibility of further reducing vibrations
generated, particularly in cases where thick chips are to be removed.
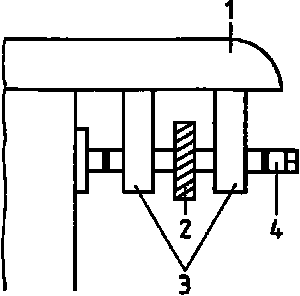
Figure 28. Use of two counter bearings
1 overarm, 2 cutter, 3 counter bearings, 4 cutter
arbor
What can be done to reduce vibrations during milling with a long
arbor?
________________________________________________
________________________________________________
________________________________________________
________________________________________________
________________________________________________
________________________________________________


