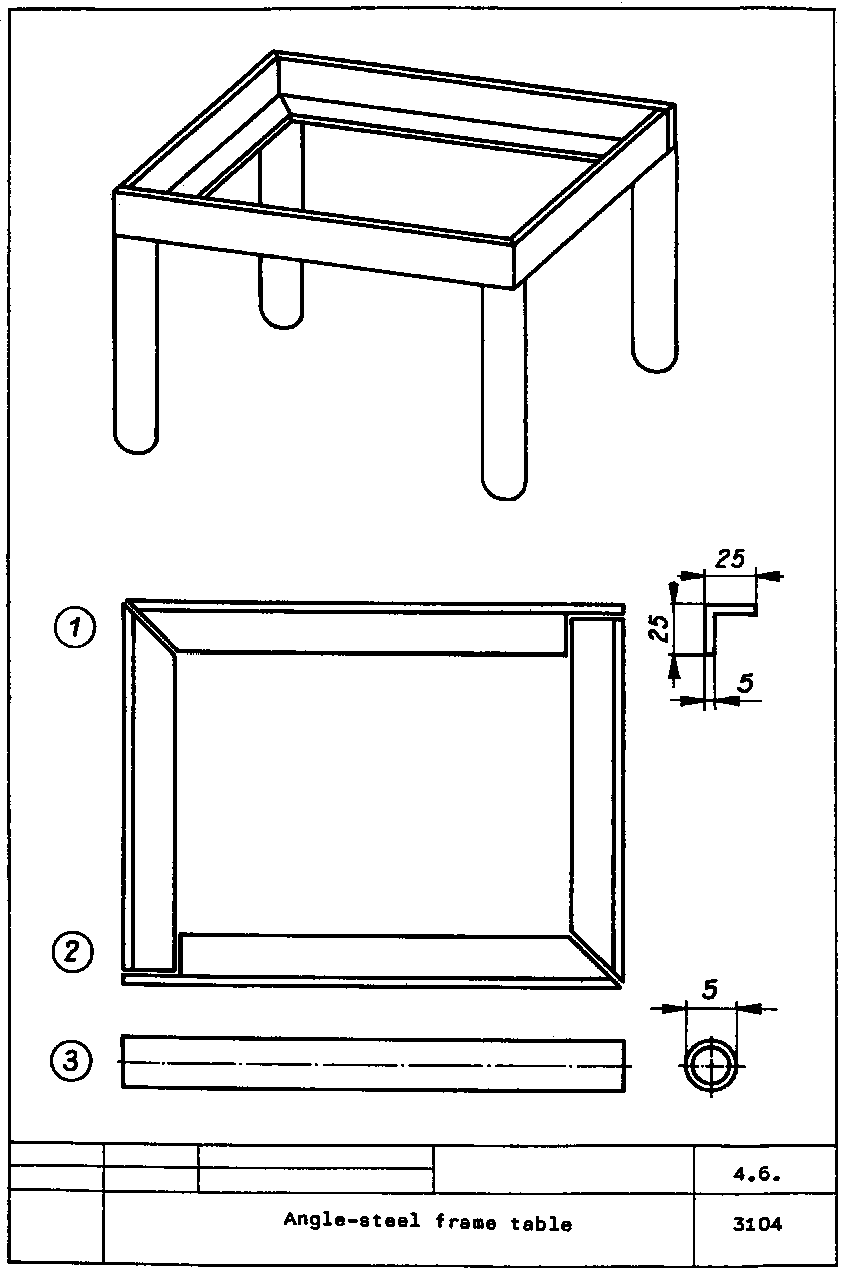
Instruction example 4.6. Angle-steel frame table
To practise straight and mitre cuts on angles for angle splices
to specified size.
Material
- Angles of 25 x 25 x 5 thick, length depending on
table size.
- Steel tube of 25 mm diameter, length depending on table size
(or to suit training example 4.2.).

Figure
Hand tools
Steel scriber, mark-out punch, engineers’ hammer, hand
hacksaw (saw blade With normal tooth pitch), smooth-cut file 250 mm (flat).
Measuring and testing tools
Measuring tape, try square, protractor or centre square.
Accessories
Vice, whiting, cutting oil
Required previous knowledge
Reading of drawings, measuring and testing, scribing and
prick-punching.
|
Sequence of operations |
Comments |
|
1. Arrange the working place, prepare the working materials.
|
- Check for completeness. |
|
2. Saw 4 angles roughly to specified length (5 - 10 mm longer
than specified). |
- Length to be specified by the instructor. |
|
3. Coat all end faces with whiting after drying scribe and
prick-punch the 45° angle for the mitre cut, saw the mitre. |
- Stage (1)
Scribe on the outside face. |
|
4. Scribe the exact length from the mitre side, mark and
prick-punch the cutout (square)/straight cut at this end face. |
- Stage (2)
Mitre cut, cutout and straight cut to be
specified as per drawing (straight cut to be scribed outside, cutout to be
scribed inside) |
|
5. Saw 4 steel tubes to specified length (depending on table
height), constantly turn the tubes while sawing 1 |
- Stage (3) |
|
6. Final inspection. |
- Quality of mitre cut and straight cut. |
Deburr the cut edges, put individual parts together and have
them welded together. Insert a steel plate or wooden plate.