Back to Home
Page of CD3WD Project or Back to list of CD3WD Publications
 |  |  | PHAST Step-by-Step Guide: A Participatory Approach for the Control of Diarrhoeal Disease (PHAST - SIDA - UNDP - WB - WHO, 2000, 137 p.) |  |  | Part III: Making a toolkit | |  | Guidelines for PHAST facilitators and programme managers | | | Guidelines for PHAST artists | | | How to make a pocket chart and more examples of how to use it |
|
PHAST Step-by-Step Guide: A Participatory Approach for the Control of Diarrhoeal Disease (PHAST - SIDA - UNDP - WB - WHO, 2000, 137 p.)
Part III: Making a toolkit
Guidelines for PHAST facilitators and programme managers
In the countries where PHAST has been tested, the results have
been inspiring: hygiene behaviours and sanitation have improved, and communities
have taken over management of sanitation and water facilities. The investments
made in developing the tools necessary for the approach paid off.
The toolkit materials are vital for helping group participants
to develop the skills and confidence to think problems through, identify
solutions and plan for change. We strongly recommend that you take the time to
carefully plan the development of your toolkit with an artist, or artists, using
the guidelines which follow here and in the Guidelines for PHAST artists.
For further information about making a toolkit see Srinivasan (1991).
Types of toolkits
The ideal toolkit consists of drawings made by local artists to
reflect the local culture and conditions. Most of the instructions which follow
refer to this type of toolkit.
Prototype toolkits: These are drawings that are generally
applicable over a wide cultural area where customs, housing and clothing are
nearly the same. Once a prototype toolkit has been made, it may only be
necessary to modify a few drawings to look like the specific local setting in
which you will be working. Modification will be much simpler if the prototype
toolkit drawings have been done as black and white line drawings. This makes it
easier to adapt and modify the drawings to suit different situations. These
modifications can be done by tracing or photocopying the original drawings and
using colour to show regional variations. A prototype toolkit is a good
investment at the national level. Remember, though, that rural and urban areas
are very different physical environments and often have different water,
sanitation and hygiene problems. For this reason you generally cannot use the
same toolkit for rural and urban areas, even within the same country.
Creating new drawings for each toolkit can be expensive, but
there are ways to cut costs by using a combination of different materials that
may be available to you. Some suggestions follow.
Using photographs: Existing photographs can be used to
help design specific tools. They can be reproduced in sizes appropriate to the
activity and several sets made. This can be an effective technique for some of
the tools, for example, for sanitation options and for planning
posters, especially if photographs of existing technologies and processes
are readily available. But it is less than ideal because details in the
photographs may distract participants from the purpose of the discussion. The
presence of familiar people and places in the photos can also be misleading and
can tend to personalize the discussions and even put people on the defensive.
Using existing materials: Existing hygiene education
materials, such as posters and flip-charts can be used creatively and
inexpensively to develop the materials for specific activities. Different
drawings are separated or cut apart and used in three-pile sorting, for
example. Such materials may need to be supplemented with additional drawings.
The disadvantage of using existing materials is that they are often not open to
different interpretations, which can create problems for the facilitator,
particularly with the more open-ended activities. Technical and project manuals
can also be a good source of pictures and drawings which can be cut out and
separated for specific activities.
Timeframe to make a toolkit
In most instances you will already have a prototype toolkit -
usually made up of black and white line drawings - obtained from a PHAST
training workshop. This kit will need to be modified to suit local
circumstances.
You should allow about one month to prepare the local toolkit
because:
- you will need to find an artist, or artists
- you will need to explain to the artist the methodology
underlying the PHAST approach so that the purpose of the drawings is
clear5
- you will need to take the artist to the community to get
familiar with the surroundings so that the drawings are very realistic
- the artist will need to do a few practice drawings
- the practice drawings will need to be pretested with community
members
- a lot of drawings may have to be
done.
5 A useful
strategy for providing this explanation is to arrange to have the artist or
artists attend a PHAST training workshop and to make the drawings during the
workshop. See section entitled, “Involve artists in a training
workshop”.
Cost
Artist's fees
You should make a budget for producing the toolkit. This will be
based on the number of drawings needed. If possible, it would be best to get
estimates of the cost for the same work from three artists, together with a
sample of their work. You can then compare prices and the skills of the
different artists. Sometimes the cheapest price will not be the best choice. One
of the artists might be a little more expensive. But the drawings may be a lot
better and the artist may understand what you want much more clearly than the
other artist(s) you are considering. In which case, provided you can afford it,
it would be better to choose the slightly more expensive artist.
More experienced and professional artists tend to charge by the
drawing, while others by the “set”, or by the time spent. If there is
a clear work plan and timeframe, and particularly when a workshop is involved,
it may be useful to draw up a contract for two, four, or even six weeks. In
recruiting artists, it is also useful to consider the possibility of
establishing a long-term relationship, giving preference to artists employed by
development organizations or freelance artists with an interest in and
sensitivity to participatory and development activities. Finally, when
negotiating with artists, it is useful to keep in mind that their important
skills are frequently undervalued.
Travel costs
Remember to make allowance for any travel costs that might arise
when the artist visits the community.
Materials
There will be costs for materials (such as paper and paints),
for making copies of the drawings and perhaps for having the drawings laminated
to make them more durable.
Estimate form
You may find it useful to provide the artist with a form to
estimate costs. You can use this form to compare the costs of several artists.
It may also mean that costs are not forgotten at the start. It can be a real
problem later on if an artist forgets to include, for example, the cost of
paper, special drawing pens and inks, and then asks you for more money.
Finding an artist
Try to find an artist who lives in or close to the communities
or ethnic group you will be working with. This will produce the best results and
also save time and money, as the artist will need to visit the community more
than once to observe the people, type of buildings and facilities, etc.
Explaining the task to an artist
Explain that a participatory approach is one that does not focus
on transferring a particular message from the facilitator to group participants.
Rather, the opposite is true, with more importance attached to getting the
participants to share their experiences, ideas, feelings and beliefs, and
through this process developing the ability to solve their own problems (see
Srinivasan, 1991). Explain that the drawings will be used to help group members
think for themselves and participate in the process of making environmental
improvements. Give a brief outline of the activities, explain what they are
designed to achieve, and show sample drawings.
Explain the number of drawings needed, what they should be of,
and how you want the drawings done. Use the Guidelines for PHAST artists
in Part III to help you.
Explain that the people, types of housing, vegetation,
clothing and types of facilities drawn must look similar to the community or
ethnic group you are working with and that this will help people to use the
drawings more successfully.
Invite the artist to visit the community with you.
Visiting the community
Arrange a time to meet the artist when you can walk around the
community together and get really familiar with the way people dress, where they
live, the type of water and sanitation facilities they have, and any problem
areas in the community, particularly those relating to water and sanitation.
Make notes and rough sketches of what you see, so that later it
will be easier to discuss the drawings that will be needed.
After you have visited the community, either on the same day, or
the day after, sit down somewhere quiet with the artist and discuss what you
have seen together. Make a list of the drawings you will need.
Involve artists in a training workshop
If possible, the artists should attend a complete PHAST training
workshop.
When the workshop participants visit a community, the artist
should come along and make initial sketches. Then, while the training workshop
continues, the artist should be making the drawings. The draft drawings can be
used and discussed in the training sessions, and during further visits to the
community, and modified as a result of these visits and discussions. This is a
practical and participatory form of pretesting.
Supervise the artist's work
The artist's work should be carefully supervised. Regularly
reviewing pencil sketches before they are completed and the final drawing made
is advisable. Making changes to a completed drawing can be difficult.
Pretesting drawings
The drawings should also be pretested with community members.
This is done by taking the drawings to the community and asking people what they
see, and whether they think the drawings look like their area and show cultural
features correctly. Drawings should be modified according to the feedback
received.
Quality of drawings
Drawings made for PHAST or other SARAR activities are generally
simple line drawings. They should be clear and uncluttered and preferably in
colour. However, it is best if the original drawings created for a prototype
toolkit are first made as black and white line drawings and plenty of copies
made, either by tracing or by photocopying the original drawings. These copies
can be adapted to reflect local regional situations much more easily than
coloured drawings.
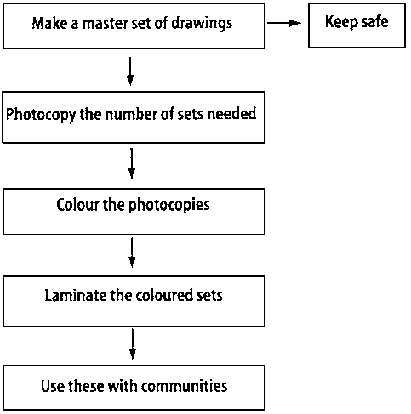
Copies of drawings
Facilitators will generally need a number of sets of drawings.
So keep a master set in black and white that can be photocopied; as many copies
as needed can be
coloured.
Guidelines for PHAST artists
General instructions
1. Drawings must match the community or ethnic group with whom
they will be used. Therefore, the people, houses, water and sanitation
facilities shown in the drawings must be similar to those in the community.
2. Visit the community or ethnic group with whom you will be
working. You should make notes on how people live, dress, interact and work;
what they do for entertainment; what problems they have, what they usually do to
solve them. You should look in particular at how people use (or misuse) water,
how they transport and store it, how sanitary (or unsanitary) the environment
is. Make a note of some of the common hygienic (or unhygienic) practices in the
community.
3. Attend a PHAST training workshop and do your drawings during
the workshop - but do only a few drawings at first, consulting with the PHAST
facilitator to make sure they are appropriate. Working in this way means you can
get feedback on your drawings and advice from those running the training
workshop.
4. Drawings should show men, women and children and combinations
of people to reflect situations in the actual community.
5. Keep the drawings simple. Do not put in too much detail or
too much background. Solid colours and simple outlines for figures work best.
Too much detail can cause confusion.
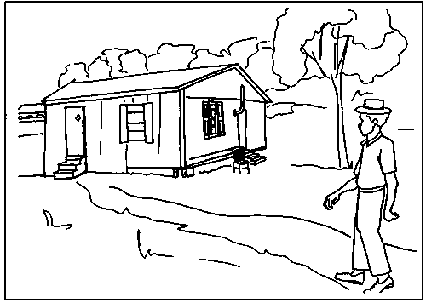
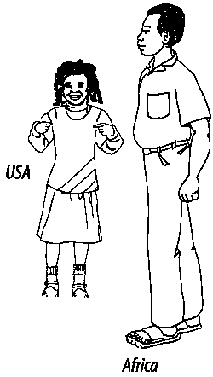
This drawing was done in the
USA.
You do not have to do perfect drawings. Quick, clear sketches in
solid lines, of recognizable scenes are preferable.
6. In the PHAST approach, drawings don't usually give a definite
message. Rather they reflect a situation or condition that people can discuss. A
set of drawings should include some that could have different meanings for
different people. See the sample drawing above.
Some people might think that the drawing is of a person going to
work, while others might think it is of someone going to a doctor's appointment.
This is intentional: it means people can use the drawing to create different
stories or discuss different topics. This is the purpose of
“open-ended” drawings. If, on the other hand, the drawing included
more detail, for example, a sign over the door saying either “OFFICE”
or “CLINIC”, the drawing would be “closed” to alternative
interpretations, and the participants' possibilities for creativity, imagination
and projection limited.
|
Checklist for artists
· attend a PHAST training
workshop
· visit the community
· do a few drawings first
· keep them simple
· don't give a definite message
· pretest drawings and revise as
needed |
7. Pretest the drawings with representatives of the community or
ethnic group.
Specific instructions
1. Do your first work as black and white line drawings and keep
them as a master set.
2. Do each drawing on a separate sheet of paper.
3. Make the drawings large enough so that they can be seen from
a distance.
4. Paper for the drawings should be at least 21 cm
(8¼”) in width and 29.5 cm (11¾”) in height - in other
words, A4 or standard letter size. Specific instructions for the size of the
drawings are provided with the instructions for each activity.
5. Paper used for the master set and for the copies should be
reasonably thick and strong as the drawings will be handled by a lot of people.
6. The drawings should be made in different sizes and shapes to
suit the different purposes of the different activities. These sizes are
indicated in the instructions which follow. Sometimes the same drawings can be
used in two or three different activities but it is best if they are different
sizes. If you have access to a photocopy machine you can reduce the number of
times you have to draw a drawing by using the photocopy machine to either make
them bigger or smaller, as required. It is therefore recommended that you make
your list of drawings first, so that you can identify those you will need to
reduce in size or enlarge.
7. If you have access to a photocopy machine, make photocopies
of the drawings before you colour them.
8. Colour the final drawings. Water colours tend to be the
easiest and fastest method.
9. It is a good idea to laminate the drawings for community use.
Steps for PHAST artists
Lists of sample drawings for activities
The list which follows is intended to help you create your first
toolkit on hygiene behaviours and excreta disposal, so that in future, when you
wish to use these participatory methods for other issues, you will have a good
idea about the range and type of drawings you may need. (See also Srinivasan,
1991.) If other water and sanitation issues are to be addressed, such as solid
wastes, or other diseases such as dengue fever, malaria, or schistosomiasis, or
other health issues such as AIDS, or alcoholism or smoking, then drawings
relevant to those issues will have to be drawn.
The drawings listed on the following pages are suggestions only.
Exclude those that are not relevant to the community you are working in. For
example, if people do not bury faeces, do not include a drawing of this
behaviour. Add drawings that seem more appropriate.
Tool: Unserialized posters
Size of drawings
· approximately 21
cm (8¼”) by 29.5 cm (11¾”), hereafter referred to as A4
size
Number and type of drawings
· 10-15 drawings
showing scenes of everyday community life. Some drawings should be of dramatic
but realistic aspects of everyday life, such as an illness, a disagreement
between two people, a celebration or conflict between two people. Others should
be quieter and more ordinary. The drawings should be drawn so that they can have
more than one meaning. For example, a scene showing a person walking towards a
building could be interpreted as a person is going to make a complaint, or going
to work, or to register the birth of a child. Or a small group of people running
could be interpreted as people chasing a criminal, an animal, or running away
from some sort of disaster or pursuer. The drawings should be drawn in such a
way that it is possible to put them together in lots of different orders to tell
different stories. The drawings should not be numbered and should not be
ordered. This is why they are called “unserialized
posters”.
Example drawings
· two women talking
together, one holding a baby
· a man and a
woman talking to each other
· a
celebration
· a meeting
· a man walking towards an official type of
building
· two people in discussion with a
person who is sitting at a desk
· a man or
woman sitting and thinking deeply about something
· a person carrying a large number of suitcases, boxes
and bundles
· a group of men
socializing
· a group of women
socializing
· a group of children
playing
· a disagreement between two
people
· a small group of people
running
· a woman crying
· a small group of people laughing
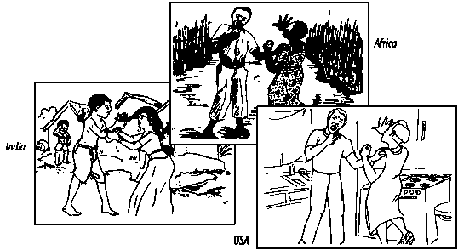
Figure
Tool: Nurse Tanaka
Size of drawings
· A4
Number and type of drawings
· a drawing of a
nurse/doctor at a health centre
· a drawing
of a traditional healer - if appropriate
· up
to 30 drawings of people in the community (they should not appear sick) or
enough for everyone in the group to participate
Note: The figures can be cut out around the shape of the
figure in question, or if preferred they can be made with flexible arms and legs
- these are called “flex-flans”. These flex-flans can be combined with
cut-outs of animals, plants, and buildings for use with other activities as
well. (See Srinivasan, 1991.)
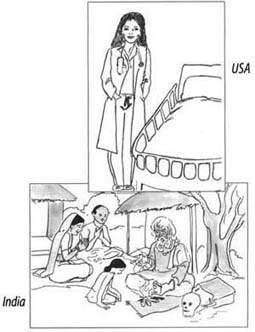
Figure
Example drawings of people
· an old
man
· woman with a baby
· a pregnant woman
·
boys of various ages - e.g. teenage boy, primary school-age boy
· girls of various ages - e.g. teenage girl, primary
school-age girl
· an adult man
· an adult woman
·
an old woman
· a grown-up with a young
child
Figure
Note: Similar drawings of people may be needed for the
pocket chart activity. It may be worthwhile to photocopy these drawings
at a size that fits the pocket chart, before you colour them. This way,
you can reduce the number of drawings you need to do.
Tool: Three-pile sorting
Size of drawings
¼ of A4 - so that they also fit a pocket chart
Number and type of drawings
· about 30 drawings
· the drawings should show
everyday hygiene practices in the local culture, both good practices and bad
practices
· the meaning of some of the
drawings should not be immediately obvious; participants will then have to think
carefully before they decide if the drawings should go in the “Good”,
“Bad”, or “In-between” pile
· a card with the
word “Good” on it; a card with the word “Bad” on it; a card
with the word “In-between” on it. Or instead of using words, these
cards can be replaced with symbols meaning the same thing. For example, a
smiling face can be used for “Good”, a frowning face can be used for
“Bad”, and a face without any expression can be used for
“In-between”. Coloured cards can be used instead, for example, green
for “Good”, red for “Bad”, and white for
“In-between”.
Example drawings
On sanitation
· an adult wiping a
baby's bottom
· an adult cleaning a
latrine/toilet
· a child defecating in the
backyard of a house
· an adult covering a latrine
hole
· an adult sweeping up faeces
from the backyard of a house
· an adult putting ash down a
pit latrine
· a person using a
latrine/toilet (show all types used in the local area)
· open defecation (such as in
fields, in the bush, on railway lines - make drawings for all the different
sites that could be used for open defecation in the local area)
· a person using water to flush
a latrine/toilet (if relevant to the local area)
· a dog or pig eating
faeces

Figure
On handwashing
· an adult showing a
child how to wash hands
· a boy washing his
hands outside a latrine/toilet
· handwashing
with water
· handwashing with water and
soap
· handwashing with water, ash or
dirt
On water
· a tank of water
outside a building
· a dog drinking from a
water-collection container
· a chicken drinking from a
water-collection container
· an adult washing the face of a
child
· an adult washing children
· an adult using a jug to take
water from a container to a cup for a child to drink
· an adult drinking from a
water-collection bottle
· a child using a jug to get
water from a large water-collection container
· an adult washing dishes
· an adult collecting water
(make multiple drawings to show all the local sources used to obtain water such
as a yard tap, house tap, water truck, water kiosk if relevant to the local
area)
· woman boiling water in a
container
· a person using
his/her hands to scoop up water from a large container of water
· a person washing
himself/herself
· a person watering a garden or
crops
· people swimming and washing in
a water source
· animals standing in and around
a water source
On food preparation and handling
· an adult preparing
food
· an adult washing hands before
preparing food
· a child and a cat eating out
of the same bowl
· a family eating food with
their fingers
· an uncovered, full water
container
· household dishes, cups and eating
utensils on the ground
· dishes lying
uncovered on a table outside a house
· plates
of uncovered food
Tool: Pocket chart
Horizontal drawings will be selected from the three-pile
sorting cards by the facilitator. Most pocket charts hold about 6
drawings across the top. The number selected depends upon the issue to be
investigated.
Vertical drawings are described below. The number of vertical
drawings should be kept to a minimum, usually between 5 and 7.
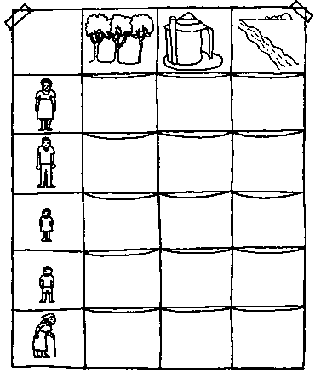
Figure
Type of vertical drawings
· frequently,
drawings are needed of the different types of people in the community or ethnic
group; you may be able to use some of the drawings of the people from the
Nurse Tanaka set depending on the type of pocket chart you are
using
Example vertical drawings of people
· adult
man
· adult woman
· boy
·
girl
· old person
· baby
· sick
person
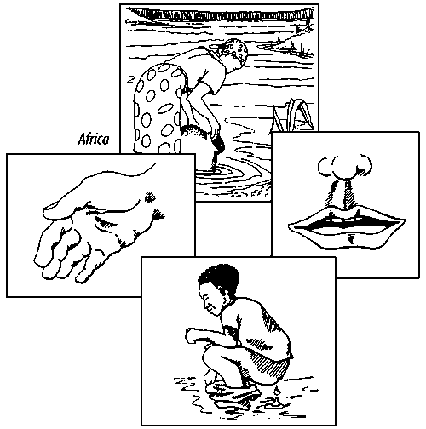
Tool: Transmission routes
Size of drawings
A4
Number and type of drawings
· 10 or more
· draw situations where people
could unintentionally come into contact with human faeces and the germs they
carry. You will need to think carefully about the conditions in the community
that might make this possible. Some examples of such situations are provided
below. Draw those that are relevant and include any other situations you may
have noticed in the community.
· also include situations where
people do not come into contact with human faeces. Including such drawings helps
people to think deeply about transmission routes.
Note: Some of the drawings from the three-pile sorting
set could be used in this activity. However, they should be enlarged. You
may be able to enlarge the relevant three-pile sorting drawings on a
photocopier before you colour them. They would then be suitable for use during
this activity. This could help reduce the number of drawings you need to do.
Drawings not used in other activities are listed first and marked*.
Example drawings
On faecal-oral transmission routes
· *a person's mouth
or face
· *a hand
· *fields of food crops or a vegetable garden
· *a bare foot
·
*flies, cockroaches or any other common vermin
· *milking a cow
·
*open defecation (if relevant)
· animals in
water sources
· people washing in water
sources
· plates of uncovered food
· someone collecting water
· animals eating from household plates
· uncovered water collection containers
· household dishes, cups, eating utensils
· a dirty latrine/toilet, or broken latrine/toilet, or
flooded latrine/toilet
· a person using their
hands to drink water from a container
·
someone preparing food
· dogs or pigs eating
faeces
Figure
Tool: Blocking the routes
Size of drawings
· ½ A4 size and
cut out in an oval shape. This helps to distinguish them from the
transmission routes drawings
Number and type of drawings
· 15 drawings of
different ways to stop or block the transmission routes of disease. Choose only
those relevant to the situation of the community or ethnic group. Add drawings
that may be used in the local setting but that may not be in the following list
of examples.
Note: Some of the same drawings used for three-pile
sorting can be used in this activity. You could reduce the number of
drawings required by choosing the relevant ones from the three-pile sorting
set and enlarging them on a photocopier before you colour them. You can
colour the larger ones and cut them out as ovals. This means you would then only
need to create new drawings for the scenes you don't already have. Drawings not
used in another activity are listed first and marked*.
Example drawings
· *covered
food
· *a fenced water source
· *animals in a fenced pen
· *a person burying rubbish
· *a person collecting children's faeces from the
yard
· *fly and insect spray
· *storing water in covered containers
· *a shoe
· a person
washing a childs' hands
· boiling
water
· washing hands with soap
· cooking or reheating food
· dishes on a table or drying rack
· a person using a dipper or cup to get water for
drinking from a large water container
· a
latrine

Figure
Tool: Gender role analysis
Size of drawings
A4 or larger
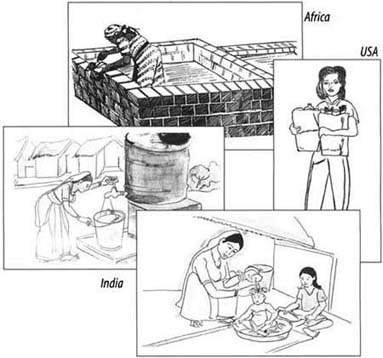
Figure
Number and type of drawings
· 3 separate large
drawings of: a man, a woman, and a man and women together
· include drawings of a boy, a
girl, and a boy and girl together if the community wants this. Remember, though,
that this activity focuses on gender, not age.
· 12 or more task
drawings
· the drawings
should be of daily household and community tasks that relate to water and
hygiene activities as well as other community and household tasks. Make the
drawings showing either a man or a woman doing all the tasks. The gender of the
person is not important. It is the task that should be emphasized. One way to
emphasize the task is to show only the hands, arms or body, or the person
performing the task in such a way that the gender of the person is not obvious.
Drawings not used in other activities are listed first and marked*.
Example drawings
· *washing
clothes
· *cleaning a baby after
defecation
· *showing children how to use a
latrine
· *feeding children
· *making the walls for a latrine/toilet
· *disposing of household rubbish
· *digging a latrine pit
· *collecting the building materials for a
latrine/toilet
· *cleaning up the inside of
the house
· *buying soap
· *replacing soap when it runs out
· *agricultural tasks (various different
ones)
· *a person at work (various types of
jobs)
· *collecting or carrying
wood
· *tending animals
· washing or bathing children
· showing children how to wash their hands
· feeding children
·
preparing meals
· washing dishes
· cleaning up around the outside of the house
· fetching water
Tool:
Sanitation options
Size of drawings
· A4
Number and type of drawings
· from 2 to 10
drawings, depending on options practised or available
· drawings should be of
different human excreta disposal methods practised in or available to the
community, both hygienic and unhygienic. You will need to have drawings which
show a range of options from the most basic form of excreta disposal (perhaps
open defecation) to better options. The better options must be affordable and
available to the community or ethnic group.
Note: These drawings can also be made for different water
collection and transport methods (“water options”). Make sure that
your drawings reflect the local situation and the disease being addressed.

Figure
Example drawings
· dogs or pigs
eating faeces
· open defecation
· pit latrine
· pit
latrine with squat slab
· pit latrine with
drop hole cover
· pit latrine with
handwashing facilities
· ventilated improved
pit latrine
· improved pit latrine with
handwashing facilities
· pour-flush
latrine
· flush toilet
· someone burying faeces
· communal toilet block
· flush toilet with handwashing facilities
· connection to a sewerage system (low cost or
standard)
Tool: Planning posters
Size of drawings
· A4
Number and type of drawings
· a set of
planning posters that show some of the possible steps which could be
taken to move from a problem situation to an improved situation. Remember to
include different activities which people themselves can do to solve the
problem, as well as those which will require additional outside help through
collaboration with other groups and organizations.
· 2 large drawings, one showing
a problem situation (a “now” scene) and another showing a greatly
improved situation or solution to the problem (a “future” scene). Make
sure the “now” scene looks like the local area and daily environment,
and not too much worse. The “future” drawing should show improvements
that can be made in a relatively short time at low cost without major changes in
buildings, and roads etc. (which might be very expensive).
Note: In other guides, this tool is called story with
a gap.
· the facilitator
will advise you on which “now” and which “future” drawings
to draw, together with the planning drawings relevant to the situation. The
following are examples only, to give an indication of the sort of drawings that
might be required.
Note: In this guide, the facilitator is advised to select
“now” and “future” drawings from the sanitation and hygiene
behaviour options.
Example 1
|
“Now” situation - drawing of open
defecation |
“Future” situation - drawing of latrines with
handwashing facilities |
Planning posters
- community meeting
- collecting
money
- buying building materials
- digging the pits for latrines
-
pouring the concrete for the slab
- building the walls
- putting the roof
on
- putting in the handwashing facilities
- teaching children about
handwashing
- new latrine in use
Example 2
|
“Now” situation - drawing of water being
collected |
“Future” situation - drawing of water collection
from unclean source from improved well |
Planning posters
- community meeting
- building a fence
around the water collection site to keep animals out
- collecting money
-
buying materials to build a new improved community well
- building the
well
Example 3
|
“Now” situation - drawing of schoolchildren
defecating in the open |
“Future” drawing - schoolchildren using a
latrine |
Planning posters
- community meeting
- two or three people
talking together
- a visit to the school
- improving latrines at the
school
- teachers teaching children to use latrines
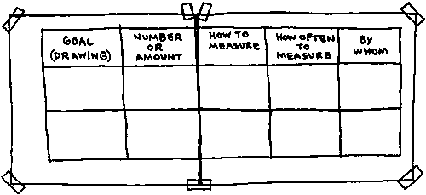
Tool: Barriers chart
Size
· a sheet of
flip-chart paper or newsprint approximately 40” (100 cm) by 27” (65
cm)
· draw the chart as per example below;
colours or symbols may be used instead of words
Figure
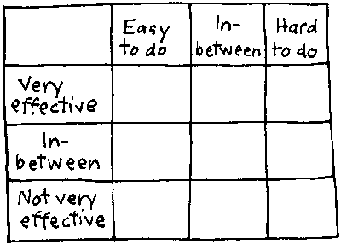
Tool: Monitoring chart
Size
· a sheet of
flip-chart paper or newsprint approximately 40” (100 cm) by 27” (65
cm)
· draw the chart as per example opposite;
colours or symbols may be used instead of words
Note: If large sheets of paper are not available, the
facilitator can make a chart using cards for the headings and string or tape to
mark out the chart sections. Or else, a chart can be created on the floor, using
sticks to mark out the chart sections.
Figure
How to make a pocket chart and more examples of how to use it
A pocket chart can be made of paper, plastic, cloth, or
with jars. If made of paper, plastic or cloth, the most practical size to use is
1-1.5 metres square (3-4½ ft)- A pocket chart of this size can
easily be rolled or folded for transporting from one meeting place to another.
1. Create a row across the top of the chart, with pockets in
which drawings can be placed. The drawings will represent subjects about which
data needs to be collected, such as where people defecate. There may be as few
as 3 pockets or as many as 7.
2. Create a column along the left side of the chart, with
similar pockets where drawings can be placed. These might represent the
different people who use the options, or other variables. There may be as few as
5 pockets or as many as 10.
3. Now attach rows of pockets across the chart so that there is
one for each option, both up and down and across, to form a grid pattern. See
model on this page.
Figure
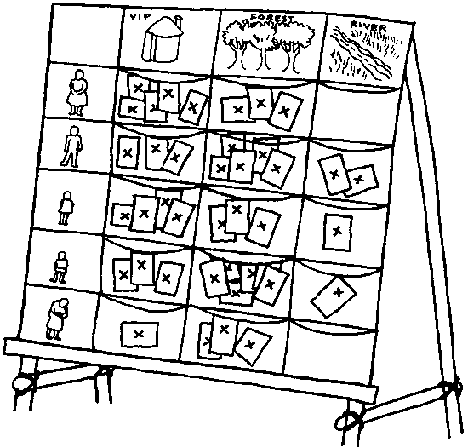
How to use a pocket chart
A pocket chart can be set up in many different ways,
depending on what the group wants to find out. Participants are provided with
tokens or slips of paper for voting. During the voting, the pocket chart
is turned away from the group so that voting is confidential. If transparent
plastic pockets are used, a blank card is placed inside each of them.
Participants then place their tokens behind this card. When all the participants
have given their information, the blank drawings are removed so that the
distribution of the tokens is visible. These tokens are then counted up by
volunteers and the information presented to the group. A discussion can now be
held on what this information reveals about actual practices in the community.
Other examples of how a pocket chart can be used are given below.
Other examples of pocket charts
Example 1: Defecation sites
· Drawings of
different sites or facilities used for defecation are used to create the row
across the top of the chart. The drawings can be taken from the three-pile
sorting drawings.
· The column down the left-hand
side shows a man, woman, boy, girl, elderly person, sick person, pregnant woman,
etc.
Participants will identify themselves in the left-hand side
column and then indicate the site or facility they normally use, then place
their token in the corresponding pocket.
Additionally, participants can carry out the activity for
urination sites. Give them two tokens of different colours (or shapes) (one to
represent the defecation site and one to represent the urination site), which
they then place to indicate the options they use for each function.
Figure
Example 2: Water sources and water uses
· The row across the
top of the chart is created using drawings (from the three-pile
sorting) of places where or the means by which water can be obtained;
for example, spring, river, well, tap, pond, rainwater collectors, water
vendor/truck.
· The column down the left-hand
side shows potential different uses of water; for example, drinking, cooking,
washing food, washing dishes, washing hands and face, washing baby, bathing,
watering garden.
Participants will use several tokens to indicate the water
source for each use applicable to them. Example: I wash my hands with water from
the truck, I water my garden with water from the river,
etc.
