
| Clinical Guidelines and Treatment Manual (MSF, 1993, 319 p.) | ||||
| Chapter 10 - Medical and minor surgical procedures | ||||
| Dressings | ||||
| Abscess | ||||
| Pyomyositis | ||||
| Burns | ||||
| Wounds | ||||
| Bites and stings | ||||
|
| ||||||||||||||||||||||||||||||||||||||||
Dressing is a set of procedures for treating a wound. A wound is an interuption in the continuity of the skin secondary to trauma or surgery.
Objectives
- Protection
· To prevent contamination from the external
environment.
· To protect against possible trauma.
- Cicatrisation
To favour tissue regeneration.
- Absorption
To absorb serous discharge.
- Disinfetion
To destroy pathogenic organisms.
- Compression
To stop hemorrhage.
Warning: a dressing occludes a wound and in certain conditions (humidity, heat) can encourage multiplication of pathogenic organisms.
Equipment
- 1 box of sterile instruments
· 1 set of dissection forceps
· 1 set of Kocher
forceps
· 1 pair of scissors
- 1 dressing tray (clean)
- 1 drum of sterile gauze pads
- 1 kidney dish
- Cotton wool (for equipment disinfection only, never use cotton wool directly on a wound)
- Adhesive tape
- Flasks containing antiseptics: chloramine and/or
chlorhexidine-cetrimide, and polyvidone iodine
(dilution: see table 25).
N.B.: Never use polyvidone iodine with soaps containing mercurial derivatives. Solution preparation should be rigorous. Solutions should be renewed every week (every 3 days for chloramine).
General rules of asepsis
- A room should be kept for dressings. It should be carefully cleaned everyday and dressing tables should be disinfected between each patient.
- Use a sterile box of instruments for each dressing, or at least for each patient.
- Always start from the clean area and move to the dirty one.
- Wash hands carefully after each dressing, and after removing bandages or adhesive tape.
Technique
EQUIPMENT AND INSTRUMENT PREPARATION
- Cleaning of the dressing tray with chlorhexidine-cetrimide.
REMOVAL OF THE PREVIOUS DRESSING
- Removal of bandages and adhesive tape (not the gauze pads).
- Hand washing (clean water + soap).
- Removal of gauze pads, using Kocher forceps
· If the dressing adheres, soak it with sodium chloride solution or an antiseptic.
· Act gently not to remove the granulating epidermis.
WOUND EXAMINATION
- Sutured wound and/or aseptic wound
· Check the stage of cicatrization if wound is weeping, has a hematoma, or is infected.
- Septic wound
· Check the nature of secretions and if there are new fleshy pimples.
· A bluish pus indicates the presence of pyocianic (quickly spreading, very resistant bacillus spreading very quickly).
· Look for any signs of lymphangitis.
· Use new forceps after removal of the dirty dressing and the first cleaning of the wound.
CLEANING OF THE WOUND
- Use the sterile dissection forceps to remove sterile gauze pads from the container, and place them on the tray.
- To make a sterile sponge fold the pads twice using the Kocher and dissection forceps (as illustrated).
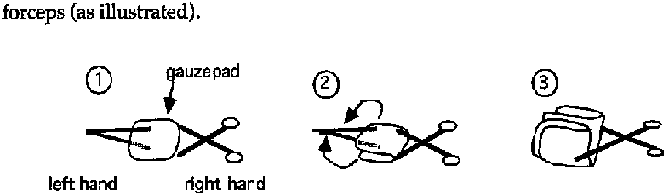
Figure
- Pour an antiseptic solution on the pad (infected wound, burns, abcess, ulcers: chlorhexidine-cetrimide; non infected surgical wound: polyvidone iodine; see table 25).
- Clean the periphery of the wound either with a circular movement, or from top to bottom. Change gauze pads as often as necessary.
- Clean the wound from top to bottom with a new tampon.
- Dry the periphery of the wound and then the wound itself with different gauze pads.
DRESSING A WOUND
- Apply one or several gauze pads to the wound.
- Apply strips of adhesive tape:
· perpendicularly to the axis of the limb or the
body;
· Leave the central part free to avoid maceration.
N.B.: When sterile disposable material is limited, sterile pads should be reserved for aseptic and surgical wounds.
Frequency of dressings
- Surgical wounds, or non infected sutures
· First day dressing should be well protected.
·
Further dressings, every 48 to 72 h (check the process of recovery).
- Infected wounds
· Dress every 24 h.
- Deep or large burns
· Dress on the first day, then leave until the 7th day (unless obvious infection).
- Phagedenic ulcers
· Dress every 24 h, with hospitalisation if possible.
Associated antibiotic treatment
As a rule, systemic antibiotic treatment should not be prescribed routinely.
- Deep and soiled wounds, to prevent gas gangrene procain-penicillin (IM): 4 or 5 IU per day x 5 days at least.
- Abcess
Antibiotic treatment is useless before incision.
- Burns
Only if they are infected.
- During conflicts or other disaster relief conditions, where access to health care and patient's follow-up are hazardous, the systematic use of PPF(or procain-penicillin) should be considered.
Wastes
All soiled disposable materials (gauze, coton, dressings, etc...) should be collected and bumed daily.
Choice and use of antiseptics and disinfectants
See table 25.
A collection of pus in the soft tissues. An abscess cavity is
not accessible to antibiotics.
Treatment is thus surgical only.
Indications
Incision and drainage (I & D) should be performed once the abscess is "ripe" i.e. fluctuant upon gentle palpation.
Material
- Sterile scalpel blade and handle.
- Surgical gloves.
- Plain curved forceps (Kelly forceps).
- Sterile corrugated drain.
- Antiseptic solution e.g. chloramine solution or chlorhexidine-cetrimide solution (preparation: see table 25).
- 5 or 10 ml syringe.
Anesthesia
Anesthesia of an abscess by local infiltration with lidocaine is not very effective. Furthermore, the act of traversing wider areas of tissue with a needle may spread the infection further. Regional anesthesia is preferable where possible: e.g. ring block of a finger. Otherwise, the skin can be briefly numbed using ethyl chloride spray.
General anesthesia may be necessary for an abscess that is large or deep such as some breast abscesses, "injection" abscesses of the buttock, and pyomyositis: ketamine 1-2 mg/kg by slow IV or 5-10 mg/kg IM. The smaller IV dose acts more rapidly and for a shorter time than an IM dose and may thus be preferable.
Technique
- Scalpel: the correct way to hold a scalpel is between the thumb and forefinger with the handle resting against the palm (see Figure 7a). It should not be held as one holds a pen. The plane of the scalpel blade should be perpendicular to the plane of the skin.
- Incision: the free hand immobilizes the wall of the abscess between thumb and forefinger. Incise in the long axis of the abscess with a single stroke to breach the skin. The incision should be long enough to allow insertion of an exploring finger.
- Precautions: take care not to incise too deeply if the abscess overlies major blood vessels (the carotid, axillary, humeral, femoral and popliteal regions). After breaching the skin, blunt dissect down to the cavity using Kelly's forceps.
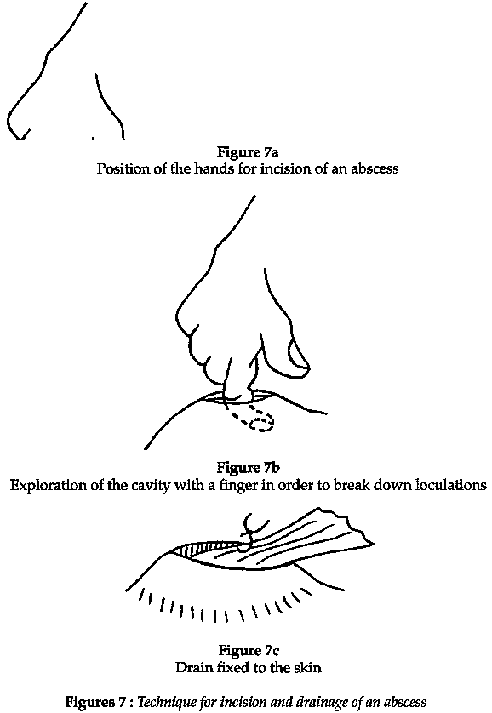
figure
· Explore the cavity with the forefinger, breaking any loculating adhesions and evacuating the pus (see Figure 7b).
· Abundant lavage of the cavity using a syringe filled with chloramine solution or chlorhexidine-cetrimide solution (preparation: see table 25).
· Insert a drain, if possible fixing it with a single suture at the edge of the incision. The drain is withdrawn progressively then removed altogether after 3 to 5 days (see Figure 7c).
BREAST ABSCESS
(see Figures 8a to 8d)
- The management of breast abscess is slightly different. Usually the abscess is superficial but deep ones, when they occur, are more difficult to diagnose and to treat.
- Early in the infection, before the infection loculates (mastitis), non-surgical measures should be applied:
· Antibiotics:
ampicillin(PO): 100 mg/kg/d x 5
days
or
chloramphenicol (PO): 75 mg/kg/d x 5 days.
· Anti-inflammatories:
indomethacin (PO): 75 mg/d
divided in 3 doses x 3 days
· Hot compresses, a constricting bandage to reduce lactation in the affected breast and expression of milk to avoid engorgement.
Material
- Same material as for other abscesses (see above).
Technique
- Incision:
· for superficial abscess: radial
· for abscess
near nipple: pert-alveolar
· for deep abcess: beneath the breast
- Gentle exploration with finger or Kelly forceps.
- Abundant
ravage with chloramine solution or chlorhexidine-cetrimide solution.
-
Insertion of drain.
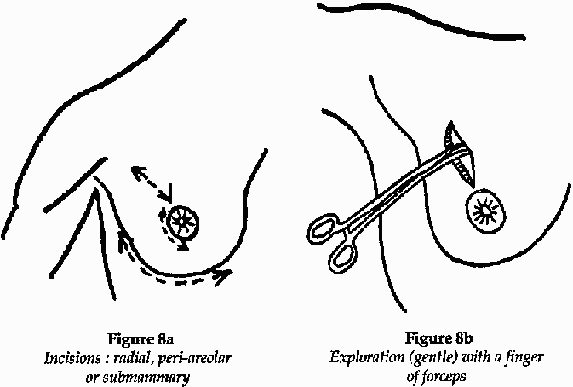
Figure 8a and 8b
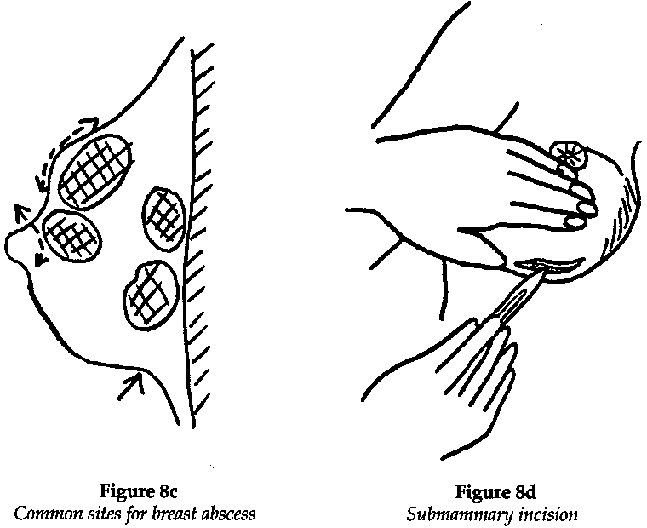
Figure 8c and 8d
ABSCESS IN THE PAROTID REGION
There is a danger of sectioning the branches of the facial nerve. The incision should be over the caudal part of the abscess and parallel to the lower border of the maxilla (see Figure 9).
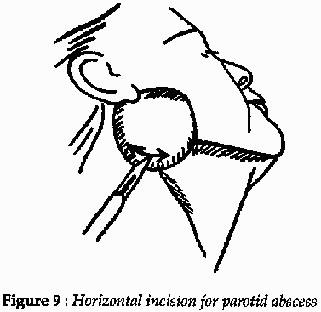
Figure
9
Infection and eventually abscess formation within muscde, most often due to Staphylococcus aureus.
At the start of infection, when the muscle is swollen, hot and painful, medical treatment may prevent abscess formation: immobilize, give antiinflammatory medication (indomethacin (PO): 75 mg/d divided in 3 doses x 5 days) and antibiotics (ampicillin (PO): Adult: 4 g/d in divided 3 doses;
Child:100 mg/kg/d divided in 3 doses x 7 days).
Indication
If the swelling becomes fluctuant conduct an exploratory puncture with a large-bore needle which will reveal thick pus.
Material
The same that for an abscess.
Anesthesia
Use ketamine (IM) if needed.
Technique for abscess drainage
- Generous skin incision, avoiding underlying neurovascular tracts, and incision of the fascia and muscle sheath, also with the scalpel (see Figure 10a).
- Blunt dissection with Kelly forceps down to the abcess cavity (see Figure 10b).
- Exploration with a finger to break adhesions and evacuate the pus (see Figure 10c).
- Abundant ravage with chloramine solution or chlorhexidine-cetrimide solution.
- Where possible, counter-incision of the skin near the edge of the abcess, cutting down onto a finger that is inserted deep in the cavity. The counter-incision should be anatomically posterior to the abscess to allow gravity drainage (assuming the patient will be supine during recovery). A strip of corrugated drain is threaded through the two incisions (see Figure 10d), fixed with a suture to the edge of the incision and withdrawn around the 5th day.
Note: Myositis of the right psoas muscle may present in a manner identical to that of acute appendicitis. Surgical evacuation is necessary.
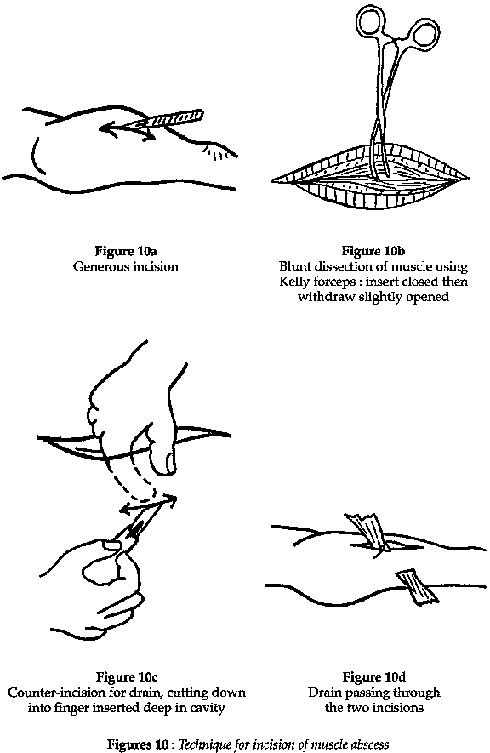
Figure
10
Thermal trauma to the skin, mucosa and deeper tissues. Burns are classified according to depth and extent.
Any burn that affects greater than 10 % of the body surface area is considered extensive and is thus serious because of fluid loss, cata-bolism, anemia and the risk of secondary infection. Burns are very comon in rural societies, particularly among children who fall onto or roll into cooking fires.
Clinical features
The extent of a burn is expressed as a percentage of total body surface area involved, easily estimated by the "rule of nines" (Table 26). The degree is a function of the depth to which tissue damage penetrates (Table 27).
A patient with extensive burns is likely to be in shock and requires appropriate resuscitation. Among children, the younger the patient the graver the danger presented by a burn of given extent and degree.
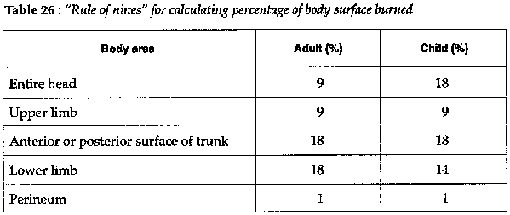
Table 26
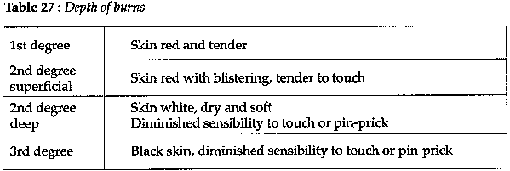
Table 27
Treatment
FIRST AID
- Immerse in cold water; this provides good analgesia and also arrests on-going trauma due to the heat retained in the tissues.
- Apply gentian violet.
- Do not cover.
RESUSCITATION
- Calculate the fluid requirements for the first 24 hours:
weight x 5% of surface burn x 2 = quantity of fluid required in rnls.
e.g.:
60 kg (wt) x 20 % (extent of burn)
60 x 20 x 2 = 2,400 ml
- 75 % of fluid should be given or ringer's lactate, the remainder as volume expanders or blood transfusion.
- During the first 24 hours, half the fluid requirements should be given in the first 8 hours.
FIRST DRESSING OF THE BURN
- Analgesia (pentazocine IM: 30 mg) and sedation if necessary (diazepam IM: 10 mg).
- Tetanus prophylaxis if available.
- Strict aseptic technique: drapes, gloves and instruments all sterile (Figure 11).
- Clean the burn with normal saline or ch/orhexidine-cetrimide solution (see table 25).
- Use a scalpel to debride blisters and non-viable tissue.
- Apply sterile vaseline gauze, then on top of that two layers of unfolded sterile gauze swabs. Do not use either antibiotic ointment or gauze impregnated with antibiotics or corticosteroids.
- Apply a bandage, not tightly. Do not wrap limbs, especially at the flexures as this will encourage contractures. Bandage each finger separately, never together.
- Immobilize limbs in the position of function.
- Alternatively: "open method": after wound cleaning leave the burn uncovered with the patient protected by a mosquito net.
SUBSEQUENT DRESSINGS
- Unless infection ensues, the first dressing should be left undisturbed for 5 to 7 days.
- Analgesia aseptic technique as for the first dressing.
- Remove any black eschars (which may hide purulent areas) and use scalpel to excise any necrotic tissue: skin, aponeurosis, muscle or tendon.
- Systemic antibiotics if obvious infection (not antibiotic
ointment):
PPF(or procain penicillin) (IM):
Adult: 4 MIU/d x 5 days at least
Child: 100,000 IU/kg/d x 5 days at least
- Same dressing as the first time. Again, this should not be removed for 5 to 7 days. Healing is signaled by granulation tissue: pink, mat and clean.
PATCH GRAFTING
(Figure 12)
- Skin grafting is necessary when the wound is slow to heal: often the case with deep second degree and third degree burns. Patch grafting is a simple technique and can also be used for treating tropical ulcers once the base is clean and granulating.
- Aseptic technique. Shave the donor area (usually anterior thigh or forearm) and prep with povidone iodine (see table 25). Infiltrate with lidocaine 1%.
- Lift up a patch of skin with fine toothed forceps and excise it with a scalpel. It should be full-thickness i.e. epidermis plus dermis. Take other patches from different parts of the donor site, leaving areas of intact skin between each excision.
- Spread each patch out on a sterile swab dampened with normal saline.
- Once a sufficient number of patches are excised, apply them carefully to the wound. Do not place them too close together: further healing will bridge the gaps and this allows a larger area to be grafted.
- Dress the donor and graft sites with sterile vaseline gauze, then layers of swabs and a non-compressive bandage.
- The graft will take within 7 days, during which time the dressing should not be removed and the patient should remain as immobile as possible.
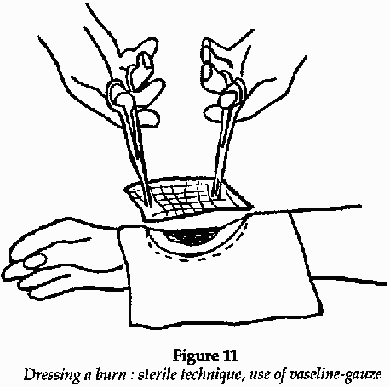
Figure 11

Figure
12
General principles
This chapter concerns only wounds that can be treated at a dispensary level. For major trauma, refer to a surgical manual.
- Immediate ("primary") closure of wounds is desirable but not always practicable and in some circumstances it may be dangerous (risk of infection).
- Classically, it is said that a wound of greater than 6 hours should not be sutured. In isolated rural practice, however, patients often present late because of distances and this limit may be extended up to 24 hours, provided the patient can be observed during the following days for signs of infection.
- An infected wound should never be sutured.
- War wounds,
animal and human bites should not be sutured.
- Any break in the skin
overlying a fracture is an "open fracture".
- A wound that communicates with
a joint is an open joint wound.
- Always give antitetanus prophylaxis if
available.
The following are steps in the treatment of a wound: preparation, exploration, debridement, closure, drainage, and finally removal of sutures.
Preparation
WOUND TOILET
Shave if necessary, then clean the wound and its periphery with polyvidone iodine (see table 25).
MATERIAL
(Figures 13a to 13c and 14a to 14d)
- Sterile gloves and fenestrated drapes.
- Lidocaine, needle and syringe.
- Suture material.
- Suture set (sterilized box of instruments): needle holder, needles, scalpel blade and handle, one or two artery forceps, fine curved scissors with rounded ends, plain scissors for cutting sutures, retractors.
LOCAL ANESTHESIA
- Only necessary for large or deep wounds requiring more than 2
stitches.
- Lidocaine 1% without adrenaline.
- Infiltrate subcutaneously
via the wound edges.
Exploration
Once anesthetized, the wound can be explored and thoroughly cleaned of any debris.
Have a gloved assistant using retractors if necessary. Be careful to exclude the following:
- Foreign body.
- Underlying fracture.
- Involvement of
nerves, major blood vessels, tendons or joints.
- For scalp wounds:
underlying fracture (if serious may contain brain tissue).
Closure
- Use interrupted sutures (not continuous).
- Non-resorbable sutures such as silk for skin, resorbable thread (chromic catgut, Vicryl...) for subcutaneous tissues.
- Some suture material is already mounted on a needle by the manufacturer ("atraumatic needles").
- A curved needle is easier to manipulate.
- For skin use a "cutting" needle (triangular in cross-section); for subcutaneous tissues use a "round" needle (circular in cross-section).
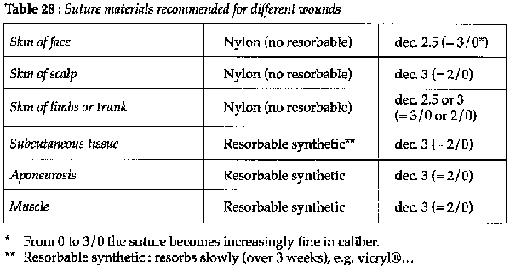
Table 28
Drainage
- Use a strip of corrugated rubber drain.
- Never use a drain for wounds of the face.
- Always insert a drain in wounds of the scalp and whenever a hematoma can be expected to form.
Removal of sutures
Face: day 5; other wounds: day 7 or 8.
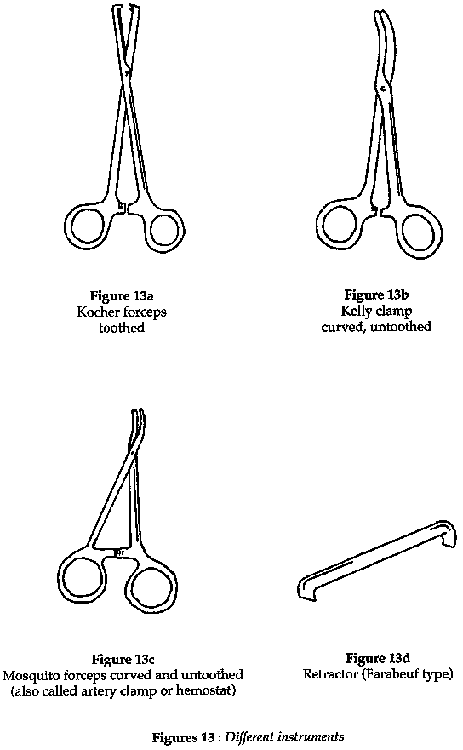
Figure 13
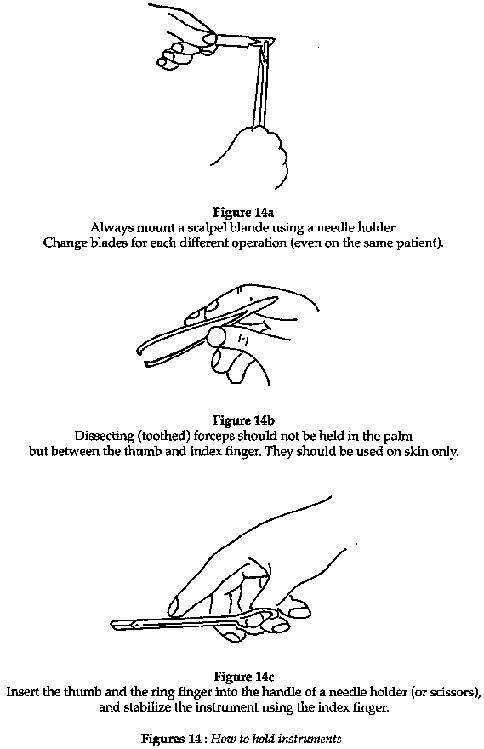
Figure 14
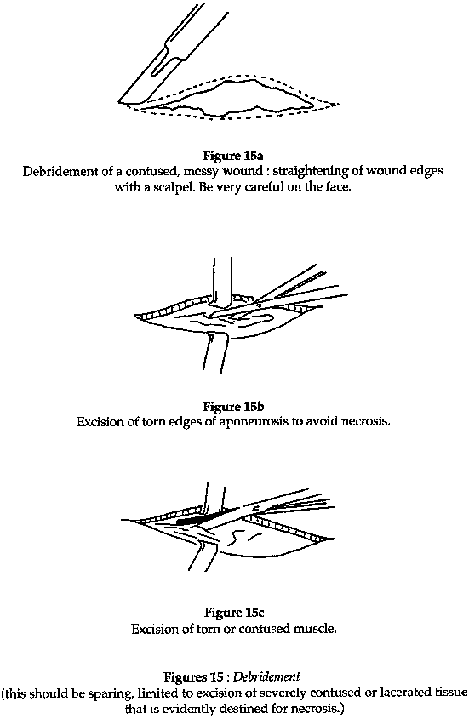
Figure 15
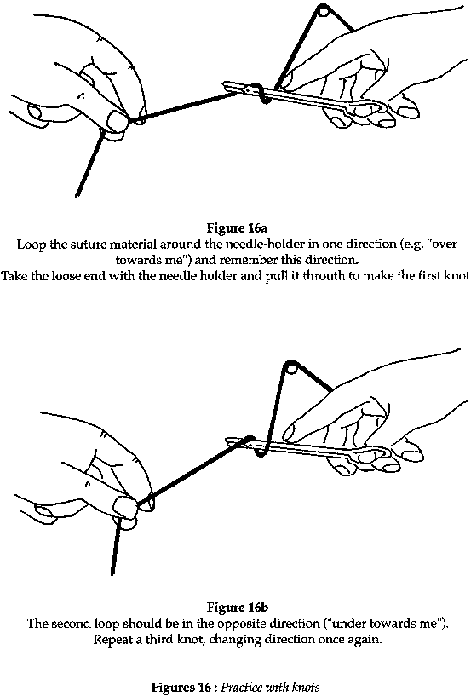
Figure 16
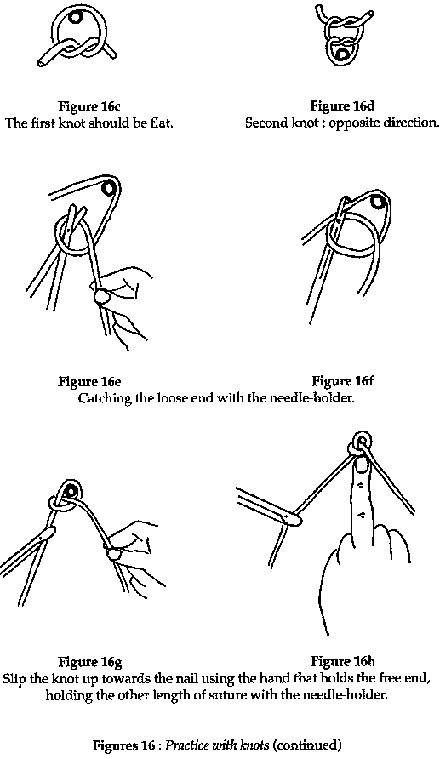
Figure 16
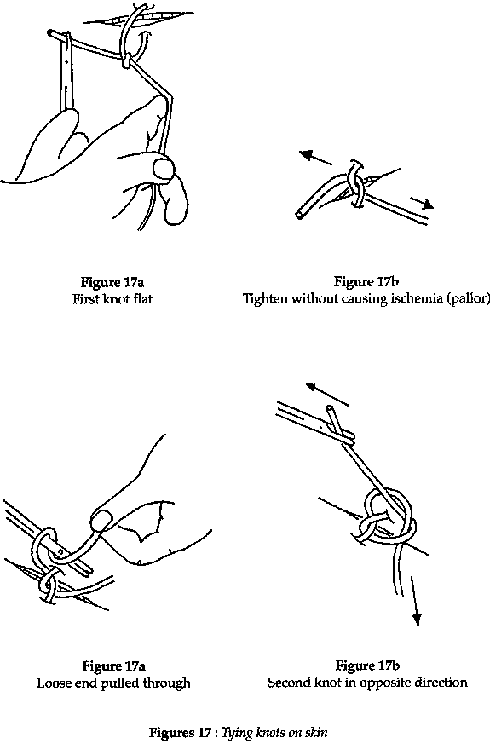
Figure 17
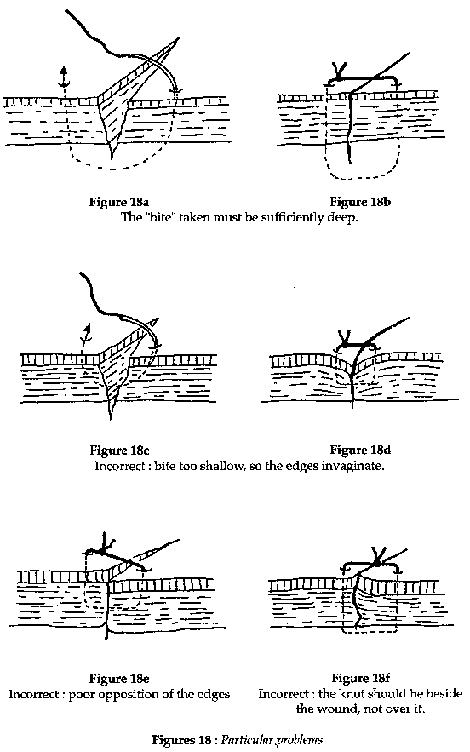
Figure 18

Figure 19
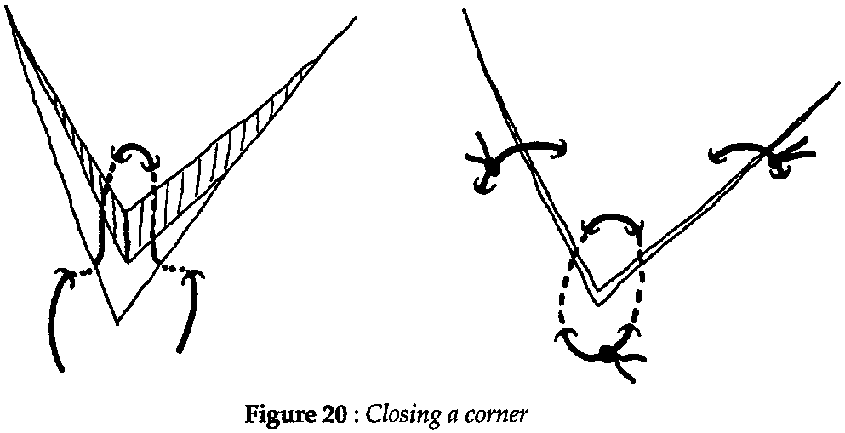
Figure 20
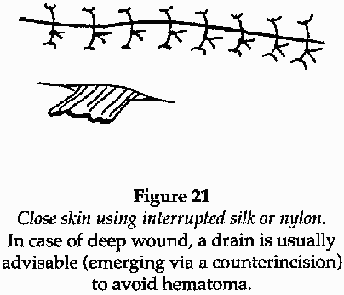
Figure 21
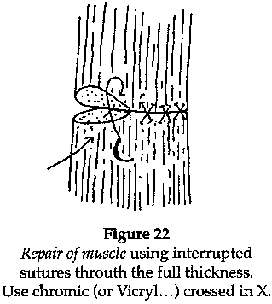
Figure
22
Trauma caused by venomous animals; bites are inflicted by the mouth-parts (e.g. snakes, spiders), stings by the hindparts (e.g. bees, scorpions).
Treatment (hospital)
ENVENOMATION BY INSECTS, SCORPIONS AND SPIDERS
- Stings by bees, wasps...
Usually benign, but in susceptible
individuals may provoke either laryngeal edema or anaphylactic
shock:
adrenaline (epinephrine) (SC):
Adult: 1 mg
Child: 0.01 mg/kg
dexamethazone (IV): 4 mg stat. Repeat if required
plus a
perfusion of ringer´s lactate or volume expander.
- Spider bites and scorpion stings
Gravity depends upon the particular species, however the majority of such envenomations are either benign or else cause local tissue damage only. If a truly toxic species is thought to be responsible apply first aid and supportive measures as for snakebite (see below). Otherwise, therapy is limited to analgesia, local wound toilet and reassurance.
Clean and disinfect wound:
noramidopyrine (IM) (or any other
analgesic): 500 mg in 1 injection IM
If pain very severe:
pentazocine
(IM): 30 mg in injection IM
or lidocaine 1% (without adrenaline) infiltrated
around the wound gives good relief for very painful scorpion stings.
SNAKEBITE
It is most often not possible to identify the snake reponsible. In any case, the principles of management are the same: first aid and supportive therapy as indicated from close monitoring of the victim's clinical condition. Antivenenes are costly, difflcult to store, difficult to use, sometimes dangerous (anaphylaxis), and moreover of arguable efficacy.
- First aid: the "pressure-immobilization method". The object is to confine the venom to the site of the bite, thus allowing time for the body to metabolize it and for attendants to transport the victim to a health care facility. Venom diffuses mainly via the lymphatics, not via blood, tourniquets are thus of little use.
· Apply firm constant pressure to the site of the
bite.
· Apply a crepe bandage (or substitute) firmly to the entire
limb.
· Immobilize the limb with a splint.
· Immobilize the
patient.
- Supportive therapy: see table.
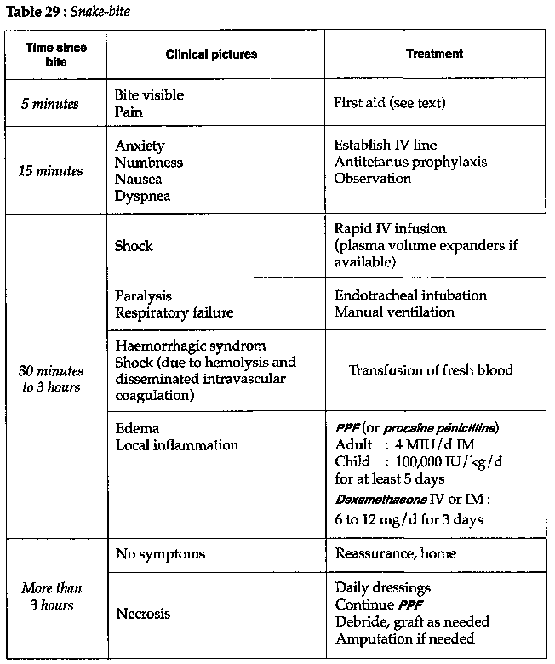
Table
29
