Back to Home
Page of CD3WD Project or Back to list of CD3WD Publications
 |  |  | Disabled Village Children - A Guide for Community Health Workers, Rehabilitation Workers, and Families (Hesperian Foundation, 1999, 676 p.) |  |  | PART 3: WORKING IN THE SHOP: Rehabilitation Aids and Procedures | |  | (introduction...) | | | Chapter 56: Introduction to PART 3: Making Sure Aids and Procedures Do More Good than Harm | | | Chapter 57: A ‘Shop for Making Aids’ Run by Disabled Villagers | | | Chapter 58: Braces (Calipers) | | | Chapter 59: Correcting Joint Contractures | | | Chapter 60: Correcting Club Feet | | | Chapter 61: Homemade Casting Materials | | | Chapter 62: Developmental Aids | | | Chapter 63: Walking Aids | | | Chapter 64: Decisions about Special Seats and Wheelchairs | | | Chapter 65: Adaptations for Wheelchairs and Other Sitting Aids | | | Chapter 66: Designs for 6 Basic Wheelchairs | | | Chapter 67: Artificial Legs |
|
Disabled Village Children - A Guide for Community Health Workers, Rehabilitation Workers, and Families (Hesperian Foundation, 1999, 676 p.)
PART 3: WORKING IN THE SHOP: Rehabilitation Aids and Procedures

Figure
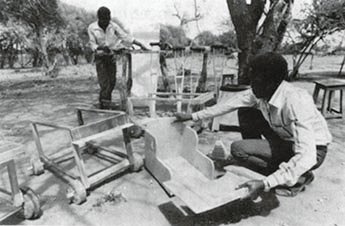
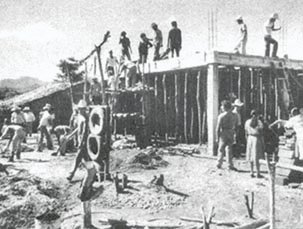
A lot of ‘shop work’ can
be done outside. Here young men in Kibwezi, Kenya (Africa) learn to make
low-cost aids (Photo Aids for Living,
AHRTAG)
Chapter 56: Introduction to PART 3: Making Sure Aids and Procedures Do More Good than Harm
When I (David Werner) was about 10 years old, I was taken to a
doctor because I was having problems with my feet I kept falling over things and
spraining my ankles. No one knew yet that these were early signs of a
progressive muscular atrophy.
The doctor examined my feet. They were somewhat weak and floppy,
so he prescribed arch supports. An ‘orthotist’ across town
would make them
When the arch supports were ready, the orthotist put them on my
feet “Do they hurt?” he asked ‘No,” I said. So I was sent
home with instructions to wear them every day
I hated the things’-not because they hurt, but because it
was harder for me to walk with them than without them. They pushed up on my
arches and bent my ankles outward I fell and sprained my ankles more than ever
I tried to protest, but nobody listened to me. After all, I was
only a child ‘ You have to get used to them’” I was told
“Who do you think knows best-you or the doctor?”
So mostly I suffered in silence. I took the arch supports out of
my shoes and hid them whenever I could. But when I was caught I was punished. I
was made to feel naughty and guilty for not doing what was ‘best’ for
me
Several years later, as my walking continued to get worse, I was
prescribed a pair of metal braces. They held my ankles firmly, but they were
heavy, uncomfortable, and made me feel more awkward than ever I hated them, but
wore them because I was told to
One holiday I took a long walk in the mountains. The braces
rubbed the skin on the front of my legs so badly that deep, painful sores
developed I refused to wear them again
It was not until many years later, long after I had begun to
work with disabled children, that a brace maker and I figured out what
kind of ankle support would best meet my needs. So now I use lightweight,
plastic braces that provide both the flexibility and support that best suit me
When I look back, I realize that the doctor did not know more
about what I needed than I knew. After all, I was the one who lived with my
feet’ True, at age 10, I could not explain the mechanics and anatomy for
what was happening. But I did have a sense of what helped me manage better and
what did not. Maybe if the adults who were so eager to help had included me in
deciding what I needed, I might have had aids that better met my needs. And I
might not have felt so guilty and naughty for expressing my opinion
I learned something from these childhood experiences. I learned
how important it is to listen to the disabled child, to ask the child at every
stage how she feels about an aid or an exercise, and to include the child and
her parents in deciding what she needs. The child and her parents may not
always be right. But doctors, therapists, and rehabilitation workers are
not always right either. By respecting each other’s special knowledge and
looking together for solutions, they can come closest to meeting the
child’s needs.

Figure
|
Some of the best design improvements in aids and equipment
come from the ideas and suggestions of the children who try them out. |
PRECAUTIONS IN PROVIDING A CHILD WITH AIDS, EQUIPMENT, AND
PROCEDURES
To make sure aids and equipment really meet the child’s
needs, consider the following:
1. How necessary are the aids or equipment? Might it help the
child more to learn to manage without them? For example:
Elena has arthritis. Her thighs have become too weak to support
her body weight. You can fit her with braces and crutches. But watch out! These
aids will not make her thighs stronger. They may even make them weaker, since
she could then walk without having to use her thigh muscles.

LESS APPROPRIATE
A better solution might be exercise to strengthen her thighs.
For example, walking in water will make it easier for her legs to support her
weight.

MORE APPROPRIATE
Also, using a cane instead of crutches helps her to use and
strengthen her thigh muscles.
|
AVOID MAKING THE CHILD TOO DEPENDENT ON AIDS! |
2. As any child grows and develops, his needs keep changing.
Frequent re-evaluation is necessary to find out if an aid should be
changed or is no longer needed. Ask the child what he wants. For example:

Misha has been slow to develop balance for sitting. At first,
straps helped him sit in a stable, upright position.

APPROPRIATE ONLY AT FIRST
But as he continues to develop, keeping him strapped in a chair
may keep him from improving his balance more or from learning to sit without
help.

APPROPRIATE LATER
Misha might be helped more by a seat that gives support to his
legs and hips but lets him balance the top part of his body without help.
3. A simple, low-cost aid that is designed and made to
meet the needs of a particular child often works better than an expensive
commercial one. For example:
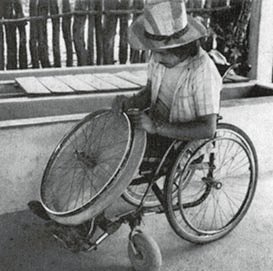
Commercial wheelchairs are often too big for children, and hard
to adapt to their positioning needs. Repairs are difficult and expensive;
replacement parts are hard to get.
LESS APPROPRIATE
A simple wood or plywood chair can be easily made to fit the
child’s size and positioning needs. Repairs and replacements are easy
because bicycle wheels and other standard parts are used.
MORE APPROPRIATE
4. Consider the economic limitations of the family and
community. Growing children will frequently need larger sizes of aids such
as leg braces, artificial limbs, and special seating. Use either aids that
are cheap enough to replace often, or that can be easily made bigger. For
example:
Poor families sometimes spend as much as a year’s earnings
on an expensive, modern brace with knee and ankle hinges and special shoes.
LESS APPROPRIATE
When the child outgrows the brace, or it breaks, the family
cannot afford to repair or replace it - so the child goes back to crawling,
develops contractures and may never walk again.

MORE APPROPRIATE
A cheap brace without hinges will not let the child bend his
knee to sit. But the brace can be cheaply replaced, so the child is able to stay
on his feet. Up to 20 low-cost braces can be made for the price of one expensive
one.
5. Make use of the special opportunities in rural areas.
Look for ways that a child can do her exercises as part of daily work and play
with other people - not as a boring chore that keeps her separate and different.
For example:
If a child needs a special aid to strengthen her weak arm
Figure
avoid making her do the exercises in a way that isolates her.

LESS APPROPRIATE
Instead find ways for her to do her exercises while taking part
in activities with others
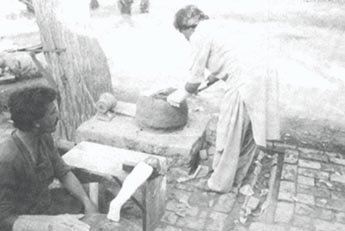
Another child can help lower the grinder
MORE APPROPRIATE

Figure
(1) If the grinder is too heavy to lift, you can put
another weight here.
In places where people grind grain with a handmill this can also
be used for exercises. So can grinding grain on a stone dish. A mill can be
adjusted from easy to ‘hard’.

Figure
6. Whenever a choice can be made, keep orthopedic aids as
light and unnoticeable as possible. For example
|
Tina is from a village where most children wear sandals. A
rehabilitation center in the city fitted her with a heavy metal brace and boots
like this. She hated them and refused to leave the house with them on. |

Figure
|
|
Six months later Tina’s father took her to a village
rehabilitation center where they fitted her with a lightweight plastic brace.
She could wear it under stockings and still use her old sandals. She was happy
to wear it anywhere |
Figure
|
|
Note. In areas where children do not wear shoes
and socks, a brace with a wood clog leaving most of the foot open to the air,
may be preferred (and may be cleaner) |
Figure
|
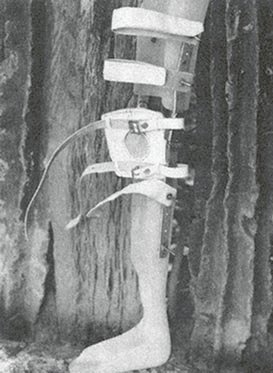
7. Try to adapt aids and equipment to the local culture and
way of life. An example of adaptation to the local situation is the
‘Jaipur limb’ (see also Chapter 67):
In India, villagers squat a lot. They cook and eat at ground
level. A person with a standard artificial leg cannot squat because the leg does
not bend enough in the knee and ankle. Also, the standard leg is not made to be
used when barefoot, or in water.

Figure
The “Jaipur limb” was designed for the needs of
villagers in India. It has a knee with a joint that bends all the way. The foot
piece is made mostly of rubber and is very flexible, allowing the person to
squat. It is the color and shape (including toes) of a normal foot. It is
waterproof, so that people can work in water or rice fields without harming it.
The leg is low cost and quick to fit.

Figure
8. Make aids and equipment as attractive and enjoyable as
possible. To test the attractiveness of an aid, find out:
· Does the child
take pleasure or pride in his aid?
· Do the
parents like it?
· Do other children want to
use it or play with it?

Figure
9. A common error is to provide children with more bracing than
they need. Often a child will come to the rehabilitation center already fitted
with big heavy braces that he never needed or no longer needs. They may actually
slow him down. Always check to see what a child can do with and without his
aids. Try smaller, lighter aids, or none at all. Above all, ask the child what
he prefers.
|
Figure
|

Figure
|
Figure
|
|
LESS APPROPRIATE |
MORE APPROPRIATE |
STILL MORE APPROPRIATE
(for this child) |
EVALUATING WHICH DEFORMITIES SHOULD BE CORRECTED AND WHICH
SHOULD NOT
PART 3 of this book, in addition to aids and equipment, also
discusses methods for correcting joint contractures, which are discussed in
Chapter 59. Just as you need to decide if a brace is appropriate, you need to
decide whether correcting a contracture will actually help a child. Although
many contractures increase difficulty for a child, some may actually help and
should be left uncorrected. For example:
For this child it may be best NOT to correct the
contracture.
In a child with polio, the weaker leg is often shorter.

Figure
The foot hangs down and often develops a tiptoe
contracture (1) which, in effect, makes the leg longer.
If we correct the foot contracture, the leg will, in effect,
become ‘shorter’. This can cause tilting of the hips, a spinal
curve, and more awkward walking.

Figure
To correct the tilt and spinal curve, the child
will need a lift on the shoe, and probably a brace too (1).
This usually makes walking more difficult, and the
disability more noticeable, than before the contracture was
corrected.
Other examples of contractures that are sometimes more
beneficial than harmful are finger contractures in persons with hand
paralysis and tightness of back muscles in persons with spinal
cord injury or muscular dystrophy.
|
CAUTION: In children with spastic cerebral palsy,
sometimes orthopedic surgeons perform operations to correct contractures or
awkward positions, without completely evaluating the effects on the children.
Often children find it harder to walk or function after the surgery. Always
seek the opinion of therapists and other orthopedists before deciding to have
the operation.

Figure
|
Before deciding to correct any contractures or deformities,
try to be sure that the correction will help the child to do things better.
WHAT IS MORE IMPORTANT-APPEARANCE OR FUNCTION?
When a choice needs to be made between an aid that is more
useful and one that is more attractive (or perhaps no aid at all), it is
important to consider the cultural factors and to respect the wishes
of the child and her parents. Here is another story.
|
A HELPING HAND FOR SRI
When Sri was 13 years old, one day she was helping her father at
a small sugar-cane mill that was pulled round and round by a mule. Her hand got
caught in the gears of the mill and was crushed. It had to be cut off at the
wrist.
The stump healed quickly, but Sri’s spirit did not. It
seemed as though it, too, had been crushed. She had been a happy girl. Now she
lust sat around. She did not help with housework, and refused to go outside. She
kept her stump hidden in her clothing or behind her back
Sri’s family worried about her. They took her to a
specialist in the city who examined her and suggested an artificial limb. She
gave Sri the choice between hooks, which would be useful, and an artificial
hand, which looked more natural but would be less useful. The specialist
encouraged her to choose the hooks, and explained how well she could learn to
use them. But Sri picked the hand.

Figure
The hand was very expensive, but it looked almost real, and the
family agreed. Her father had to sell his mule to pay for it, and was in debt
for more than a year
As time went by, however Sri never really used her new hand. She
tried it on a few times but it seemed cold and dead. One day when her mother
took her to the market wearing the hand, Sri thought everyone was looking at
her. Two little boys, who had been her friends, pointed at the hand and laughed.
She never wore it again.
One day a village health worker visited Sri’s home. She saw
that everyone was busy working and doing things except Sri, who sat quietly in
the corner.
After talking with her family, the health worker suggested that
they make an effort to treat Sri just like the other children. Encourage her to
help with work, and to take part in all your activities, she said. Don’t
pretend that Sri’s hand isn’t missing. Just accept her as she is. Let
her know that you love her and need her help as much as before”
So instead of feeling sorry for Sri, or letting her just sit and
feel sorry for herself her family began to treat her as they had before the
accident. They asked her to help with the housework, prepare the meals, and care
for the baby. At first Sri was unwilling and found everything difficult. But
soon she learned how to do many things by using her good hand and her stump. She
began to gain new confidence in herself and in time started going to the market
alone. At first, people took notice of her missing hand, or whispered, “Oh
poor thing!’ But when they saw how well she did things, they soon stopped
feeling sorry for her and began to treat her like any other person |

It is important that the family
not let the disabled person be separated from daily work and activities

Instead, look for ways to let the
disabled person help as best she can
When trying to decide about an aid, we need to seek the
balance between usefulness and attractiveness that helps the child fit in best
with his or her family and community.
Rehabilitation experts often place great importance on
usefulness, or ‘function’. But acceptance in the community is also
very important. In some places it may be more important. So, before trying to
convince a child like Sri to accept an aid that will make her deformity more
noticeable, we must consider how this could affect her. In some communities,
people will soon accept both the child and her aid. But in some societies,
people have beliefs or deep fears about a person whose body is
‘incomplete’. In other societies, amputation of a hand has
traditionally been the punishment, and sign of a thief. Or a girl who is seen as
defective may not be likely to find a husband. So, it may be socially very
important for her to have an aid that looks real or is less noticeable, even if
it does not function. (If the family can afford them, sometimes the best
solution is 2 artificial limbs - hooks for home use or work, and a
‘hand’ for ‘dressing up’ and going out.)
|
APPEARANCE CAN BE IMPORTANT
For example, one of the most useful solutions to amputations of
both hands is an operation which uses the two bones of the lower arm to create
‘pinchers’. The operation is fairly simple for an orthopedic surgeon,
and once completed no aids are needed for grasping and handling a wide variety
of things; The biggest advantage is that the person can feel what he handles.
But few people choose this alternative because, they say, it looks so
strange.

Figure
|
It is, of course, unfortunate that a child feels ashamed or
thinks she has to hide her disability. We must work for greater understanding.
But people do not change their attitudes quickly. Often the child and her
parents have good reasons for their fears, and we must learn to accept them.
However, we must also help the child, her family, and the community to become
more accepting of the child’s disability and to provide as many
opportunities for the child as possible.
We need to help the child find courage. A child with a new
disability will often be afraid to go out into the community, or back to school.
And other persons or children may at first take notice and ‘feel
sorry’ for her-or even tease her. But if she can be helped through this
first difficult period, usually other people and children will soon get used to
her ‘difference’ and accept both it and her. As more disabled persons
find the courage to go out into the community, it will be easier for those who
follow, because people will become more open and accepting.
In the story of Sri, the rehabilitation specialist tried to
solve her problem by giving her an artificial limb. Her family spent a lot of
money on it. But the new ‘hand’ did not solve her problem. She never
really accepted or used it. Her problem, which was partly emotional, was finally
solved by the whole family helping her to join them again in daily activities,
and to gain new confidence in herself.
This is very important. Too often we try to find technical
answers to problems that are mostly personal, social, or emotional. So we
turn to special aids and equipment. Sometimes these are needed. But sometimes
they are unnecessary, too costly, or make life more difficult for the child
(even though they may be of some help physically). So...
|
Before deciding if a child needs special aids, braces,
surgery, or equipment, and what kind, carefully consider the needs of the whole
child within her family and community. |
Chapter 57: A ‘Shop for Making Aids’ Run by Disabled Villagers
In PART 2 of this book we talked about the value of
village-based rehabilitation centers run by local disabled village workers.
One important feature of such a center is a simple but
adequately equipped shop for making basic orthopedic equipment
and rehabilitation aids at low cost. The shop also gives disabled
persons a chance to learn useful skills, to earn some money, and to be good
examples for other disabled children and their families.
There is no formula for how big the shop should be or what it
should include. Often it is best to start small but to leave room for
growth.

Disabled villagers at work in shop
- PROJIMO, Mexico.
A ‘rehab shop’ might include areas and equipment for
any or all of the following activities:
· plaster casting
for correcting contractures and club feet
· brace (caliper) making
using metal, plastic, or both
· woodworking - for
making crutches, walkers, lying and standing frames, special seating, wooden
wheelchairs
· welding and metalwork
for making and repairing wheelchairs and other metal aids
· leatherwork for
making brace straps, adaptations for shoes and sandals, and
knee pieces
· sewing (with machine if
possible) for wheelchair seats, straps, special clothes, and other articles
· artificial limb making -
for making simple bamboo or leather limbs and perhaps more complex ones of
wood, aluminum, or resin
· game and toy making (or
this can be done in a separate ‘children’s workshop’. See Chapter
49).
Income-producing activities as a part of the shop
function
The skills and tools for welding, woodworking, sewing, and
leatherworking can also be used to make things other than those needed for
rehabilitation. The village shop and its workers can make things that can be
sold to help pay for program costs.
For example, disabled workers in the shop of PROJIMO in Mexico
make metal framed chairs with woven plastic seats, sandals with auto tire soles,
and silk-screened goods such as bags, T-shirts, and aprons. The shop also
provides welding or repair services for plows, bicycles, machinery, shoes, and
many other things. Selling these things and asking small charges for repair
services brings in some money to the program, helping it toward self-sufficiency
It also provides training and work experience for disabled workers who may later
choose to work independently
However, caution must be taken not to try to do too many
things in one workshop-especially if space is limited. It can easily become
too disorganized.
Villagers and visiting students
building the PROJIMO workshop.

The completed workshop - at the
edge of the playground.
The building
You may have to start with whatever space or building you can
find. If you have enough funding or community cooperation (or both) you may be
able to build a shop. However, it is often best to start in some old rented
or borrowed building, and not build your own shop until you have experience and
a better idea of just what you need.
Three things are important:
1. Try to put the shop close enough to the
rest of the rehabilitation center for convenience, yet far enough away so
that shop noise does not disturb discussions and therapy with children
and their families.
2. In hot climates especially make sure the shop is well
ventilated (allows air movement). A roof with one or more walls that are
open, except for bars or fencing, works well.
3. Be sure there is plenty of storage space. This is
especially important if old braces, wheelchairs, bicycles, and other used
equipment are collected for used parts, to save money
Figure
The PROJIMO workshop first opened on the back porch of an old
house. A year later a new shop was designed and built with community
participation, and some outside funding. It is 8 × 12 meters. Two walls are
screened, on the sides the rain is least likely to blow in. A large loft
provides storage space and helps to keep the work area below cooler. The new
shop is already too small!

Figure
Arrangement of work space
Each program needs to plan its own use of space. However, a few
things are important if persons in wheelchairs will be workers:
· Enough
space should be allowed everywhere for 2 wheelchairs to pass each other.
· At least some of the
workbenches should be low enough to work at from a wheelchair or stool.
Build them so that wheelchairs can get close to or under them with as few
obstacles as possible
· Tools and supplies
should be stored within easy reach of workers in wheelchairs. Also,
switches and power outlets.
The drawing shows how the workshop of PROJIMO is arranged. We
include it as an example, not as a model.
Figure
Photo: Richard Parker, PROJIMO
Tools and Equipment
What is needed will depend on what activities the shop includes,
how simple or complex is the technology used for each activity, and whether or
not electric power and tools are available. Nearly all aids can be made of
local materials with hand tools, and without electricity. Even wheelchairs,
if made of wood, can be built with few tools or equipment. The small amount of
welding required for axles could perhaps be done by the nearest welding or auto
repair shop. However, having a few time - and effort-saving tools can make
work easier, faster, and more enjoyable: a sewing machine, a grinding wheel
(whether hand crank or electric), and a gas or electric stove (to heat plastic
for braces). Welding equipment or a blacksmith’s forge and bellows makes
possible the production of many things.
Basic tools and equipment for the shop will be discussed in more
detail in this section of the book, PART 3, the chapters of which describe
making different kinds of aids.
|
One very expensive but important piece of equipment is an
electric cast cutter. It is an extremely useful tool for removing plaster
casts and for cutting molded plastic braces from plaster forms. It is also a
relatively safe tool, because the blade vibrates, but does not turn, so it cuts
I hard things like plaster more easily than soft things like skin and flesh.
Figure
|
Training for shop skills
Possible ways for learning different shop skills were discussed
in Chapter 54. Here we will only repeat that one of the best ways to learn
shop skills is through ‘apprenticeship’, or
learning-by-doing under the guidance of someone with more experience. Perhaps
local craftspersons, such as carpenters, welders, and shoemakers would be
willing to help teach members of the team. If the team has one or two persons
with basic crafts experience, they can teach the others. For brace and limb
making, it may help if one of the rehabilitation team has a chance to visit and
learn in an orthotics and prosthetics shop. Or perhaps a skilled
brace or limb maker can come for a few weeks to help set up shop, obtain basic
materials, and teach the local team.
With an active, learning-by-doing approach, together with hard
work to meet daily needs, team members can quickly become relatively skillful.
On the other hand, if the team is made up, at least in part, of young disabled
persons who have never worked before or cooperated as members of a team, both
learning and work may at first progress more slowly.
Management and job assignment
How work is organized in the shop, and who organizes it, are
decisions that need to be carefully discussed and decided by the group. Some
programs have someone acting as ‘boss’ or ‘foreman’ who
assigns each person a job. This may be more efficient. But programs that are
‘people centered’ prefer a more cooperative approach, where the whole
group is involved in making key decisions. With such an approach, a coordinator
may be chosen (or different coordinators can be chosen for different
responsibilities). The coordinator does not give orders, but rather takes orders
from the group. This approach is usually less efficient and more confusing.
However, it is more enjoyable. Workers tend to take more interest,
responsibility, initiative (and time off) than they do under a boss.
Also, the team needs to decide about how work is divided, and
who does what jobs. Some workshops employing disabled persons use an
‘assembly line’ approach. Each person does a simple, repetitive job,
such as cutting out one piece of tubing time after time or putting spokes into
wheels. This approach requires relatively little training for each worker.
Mentally retarded workers who learn by repeating something over and over again
often do well working this way.
However, most people work better when they are able to make
something from beginning to end. Then they can share the satisfaction of a
child and her family when a wheelchair or brace or toy they made looks nice and
works well. In PROJIMO, whenever possible, workers (individually or in pairs)
are responsible for the complete production of an aid. They start by helping to
evaluate the child’s needs and end by seeing how well the finished aid
meets those needs. This way, each worker can see the personal value of each aid
that he or she makes. This approach may be less efficient, but it is more
satisfying. Thus the team watches the results rather than the clock, and works
first for the people, not the money. This personalized approach is very
important to a program designed to serve those in greatest need.
PART 3 of this book provides information on two main areas: (1)
non-surgical orthopedic procedures (straightening contractures and club feet
with casts), and (2) the production of low-cost rehabilitation aids. All of
these things can be done in a village-based workshop such as the one just
described. However, many of the aids can also easily be made at home by the
family of the child.
To encourage family participation in making aids, and later
repairing them, mothers, fathers, sisters, or brothers can be invited to the
shop to help build the aid. Or disabled children can help make their own aids.
Some of the best workers in the PROJIMO workshop today began as young people who
helped make their own crutches or wheelchairs-and then began to help make aids
for others.
The ideal is that everyone does what they can to help and learn
from each other: one big, human family working together and enjoying each other.
In Peshawar, Pakistan, the
Community Rehabilitation Development Program makes leg braces from plastic bus
windows. Here a worker heats the plastic over an outdoor mud stove.
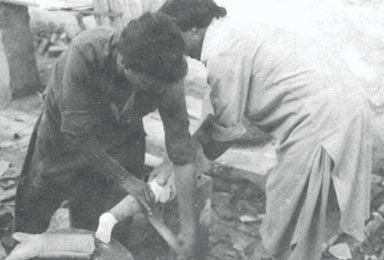
When the plastic is hot and soft,
workers drape it over the plaster leg mold. Then they wrap it tightly with
strips of rubber inner tube until it
hardens.
Chapter 58: Braces (Calipers)
Braces are aids that help hold legs or other parts of the body
in useful positions. They usually serve one or both of 2 purposes:
1. To provide support or firmness to a weak joint (or
joints). For example, this child had polio:

His leg is too weak to support
his weight without help.

This brace keeps his knee from
bending forward
2. To help prevent or correct deformity or
contracture. For example, this child had a club foot:
He was born with a club foot

His club foot was corrected with
a cast

After, correction, his foot is
kept in a good position with a brace
|
CAUTION: The need for braces should be
carefully evaluated. Braces should be used only if they will help the child move
better and become more independent. Too much bracing may actually weaken
muscles and cause greater disability. As a general rule, try to
use as little and as light bracing as possible to help the child function
better. (See Chapter 56) |
Different braces for different needs
The main lower-limb brace types are:
Foot brace

usually made of molded
plastic

for deformities in the foot (not
ankle) such as severe flat foot
Below-knee braces (ankle brace)

for weakness or deformities in
the lower leg, ankle and foot
Above-knee brace (long-leg brace)
for weakness in the upper leg and
knee - possibly also ankle and foot
Above-knee brace with a hip-band
for severe weakness in hips and
legs
Less commonly used types include:
Leg-separating braces

for dislocated hips or damaged
head of thigh bone
Foot-positioning night brace

for holding the feet, legs, and
hips at a set angle when they tend to turn in
Body brace or corset
for curve of the spine
Body brace with leg braces

for body and back weakness
together with hip and leg weakness
Different materials and ways to make braces
As we discussed in Chapter 56, an ideal brace should:
· serve its purpose
well (help the child walk or function better)
· be comfortable
·
be lightweight yet strong
· be as attractive
as possible
· be easy to put on and take
off
· do no harm
· be low cost
· be
easy and quick to make with local tools and limited skills
· use local or easily available materials
· be easy to repair and adjust as the child grows or
develops
· be long lasting
Unfortunately, no brace will meet all these requirements. As
much as possible, try to put the child’s needs first.
In this chapter we give ideas for making different braces using
various materials. When deciding how to make a brace, carefully evaluate both
the child’s needs and the available resources (see Chapter 56).
Sometimes it is wise to start with a simple low-cost temporary
brace or splint to see how well it works and what the problems are.

Figure
Keep old and outgrown braces for testing on new children before
final braces are made.
But take care not to discourage the child by making him use
braces that do not fit him well.
Figure
Examples of very simple, low-cost braces and splints:
A temporary leg splint of cardboard, folded paper, or the
thick curved stem of a dried banana leaf, or palm leaf.
Figure
Aluminum tube finger splint

Figure
Mango seed finger splint

Figure
Remove the woody coat of a mango seed, and wrap the coat firmly
onto the finger. It will dry into a firm splint. To change its shape, first soak
it in water.
Bamboo ankle splint
A piece of seasoned bamboo can be heated and bent.

Figure
Plastic cup ankle braces for night or temporary use on a
small child.

For a small baby

For a child
Metal or plastic braces
Modern, high-quality braces are usually made out of metal or
molded plastic.
The best metal is a mix or ‘alloy’ of aluminum and
steel which is both light and strong. However, this is very costly and often
hard to get. Pure aluminum is very light, but breaks easily, especially when you
try to bend it. Steel is cheaper and easier to bend and weld, but is much
heavier.
The best plastic for braces is probably polypropylene, which is
strong, light, and fairly easy to shape when hot.
Pre-formed metal parts for making these braces are sold at
orthopedic supply stores. Unfortunately, they are usually much too
expensive for a community program. However, sometimes you can get large
orthopedic centers to donate old braces, from which locking knee joints and
other pieces can be used to build high-quality metal or plastic braces. Also,
many broken or outgrown braces are lying in the corners of thousands of homes. A
campaign to get families to donate these can greatly reduce the costs of making
high-quality braces.

plastic below-knee brace

metal below-knee brace with wood
clog
Low-cost metal or plastic braces can be made in a village shop.
They can be made simply, with or without joints. Since children grow quickly,
they often need a larger brace every 3 to 6 months. Therefore, keeping cost low
and work simple is essential. (See Chapter 56.)
Metal and plastic braces each have advantages and disadvantages.
In Mexico, we have found that for most children who need
below-knee braces, plastic works best. And the children (and parents) like it
more.
However, a child with a lot of muscle tightness (due to
spasticity or contractures) which pulls his foot a lot to one side,
like this, may need a metal brace with an ankle strap. After the brace is on,
the strap is tightened to pull the foot into a better position.

Figure
Above-knee braces can be made
using a combination of plastic and metal.
|
Whenever possible, equip your village shop to make both
plastic and metal braces. That way, you can make what seems most appropriate for
each child. |
|
FITTING PLASTIC OR METAL BRACES
IMPORTANT: Correct measurements are essential for a
good fit.
Figure
(1) Below-knee brace should reach almost to knee,
yet allow knee to bend all the way.
(2) Brace or clog should grip heel and ankle closely.
(3) Above-knee brace should reach to about 2 cm, below groin.
(4) Upper part of leather or plastic of brace should fit around
the thigh closely.
(5) Knee hinge (if used) should be at the middle of the knee,
both in height and from front to back.
(6) Side pieces should be close to knee but not touch or rub the
child when he walks.
If the leg is very weak or joints are damaged, the top of the
brace can have a lip on which the butt rests, to bear part of the body weight.
(For design, see “Artificial Legs”)

Figure
KNEE PIECE
Figure
(1) Ankle hinges, if used, should be at the level of
the bony lumps of the ankle.
(2) Note: A brace with a hinge at ankle level is
better than one with a hinge at foot level because it bends at the same
height as the ankle joint. (However, a metal brace with ankle hinge is more
difficult to make.)
(3) Side rod should attach at a point
directly below the midline of leg. |
METAL BRACES
The advantages of simple metal braces are that they are
quick, easy, and cheap to make. They often last longer, and, if used with
sandals or clogs, in hot weather they are cooler than plastic. However, they
also have disadvantages: because a shoe, sandal, or wood ‘clog’
must be built or attached to the brace, there is additional work and cost. Also,
they are heavy, clumsy, and more noticeable. In hot or wet weather, leather or
cloth, or even the metal starts to rot. Shoes or boots which the child cannot
change, even when they get wet, begin to stink.
METAL ROD BRACES* using ‘re-bar’ (reinforcing
rod for use in cement building construction)
* Much of the information on metal braces, on this
and the following pages, is taken or adapted from Poliomyelitis by
Huckstep, and Simple Orthopaedic Aids by Chris Dartnell.
For a brace shorter than 50 cm. (20 inches) you can use rod that
is 5 mm. thick. For a longer brace, the rod should be thicker - up to 8 mm.

Figure

Figure
Figure

ABOVE-KNEE BRACE
(1) Note: These flat-bottomed soles
make walking more difficult.

ABOVE-KNEE BRACES

BELOW-KNEE BRACE
SHOES AND CLOGS FOR METAL BRACES
High-top leather shoes often work best, especially in
communities where children usually wear shoes.

Figure

Figure
Shoes are easier to put on when the whole top can open wide. It
may help to cut off the front part of the shoe (1).

Figure
Leaving the toes open to “breathe” is also important
if a child is not likely to wear (or wash) stockings.
For adding thicker soles and making other changes, it helps to
buy shoes with soles that are sewed on. (Today, many shoes have plastic
or rubber soles that are glued on or molded with the shoe. These are much harder
to work with.)
Unfortunately, leather shoes are costly. Also, they may not last
long in rain and mud. So, you may want to make simple, low-cost wooden-soled
shoes, or clogs. This design is from Simple Orthopaedic Aids.

Figure

Figure
|
1. Draw around the foot on a piece of wood about 2 ½ cm.
thick. Be sure to use a wood that is not likely to split.

Figure
2. Leave extra space as shown (to allow for child’s
growth). Cut out the piece of wood.

Figure
3. Carefully draw this shape on a piece of paper, using the
length of the clog as a guide. Then cut it out. Drill hole for brace, 1/3 of the
way up clog.
Figure
4. Now draw both sides of the leather top. Between the 2 sides
add the width of the clog.

Figure
|
In communities where most children go barefoot, a disabled child
may prefer more open clogs. This design is adapted from Huckstep’s
Poliomyelitis, and the ‘Jaipur Sandal’.

Figure
Note: These open clogs are hard to fit on deformed
feet or feet with tiptoe contractures. In such cases, high-top clogs or boots
work better. Or use plastic braces molded to fit the foot.
HOW TO CONTROL UP AND DOWN MOVEMENT OF FOOT
CONTROLLING FOOTDROP AND TIPTOE DEFORMITIES
|
A child with ‘footdrop’ or a floppy foot that hangs
down so that she has to lift her leg high with each step, |
needs a brace that holds the foot up. Use a plastic brace, |
or a metal brace with a backstop that lets the foot bend up,
but’ not down |
|

Figure
|

Figure
|

Figure
|
Making a backstop
|
Cut a thin plate of steel |
Bend it |
Screw it to the heel piece |
Assemble clog. Put in a lining to protect foot. |
|

Figure
|

Figure
|

Figure
|

Figure
|
Note: A child with spasticity whose foot pushes down hard
may need a longer plate to keep it from working loose
Figure
Toe-raising spring
Another way to help prevent footdrop is with a toe-raising
spring

This is a more complicated
design

This is a simpler design
CONTROLLING FOOT-RISE AND UNWANTED KNEE-BEND
Figure

Figure
may (or may not) be helped by a trace that prevents the foot
from bending up as much. If possible, use a stiff plastic brace (1).
Or use a metal brace with a stop placed in front of the upright
bars
Figure
A strong stop with a long plate will be less likely to work
loose or damage the clog.
Figure

Figure
A child whose weak leg bends at the knee when he tries to put
weight on it (1).

Figure
But sometimes a below-knee brace that stops the foot from
bending up will help push the knee back enough so that the child can support his
weight on it.
The brace can be of stiff plastic, or metal with stops to
prevent foot-rise
Figure

Figure
If a brace with an ankle joint is used to prevent the ankle from
bending up, the base piece will need a long, strong, forward plate (1).
The joint can be adjusted to allow only the desired range of
motion (2).
KNEE HINGES
Braces with locking knee hinges permit the child to bend her
knees for sitting or squatting.
Non-bending knees are satisfactory for most children. The child
can sit with her leg straight.

Figure
However, in some communities, a child may ‘fit in’
better if he can squat.
However, hinged braces have disadvantages: they are more costly
and take longer to make. A child outgrows them quickly-unless they are
adjustable. So use your judgment.
The knee hinge locks for walking and unlocks for sitting or
squatting.

Figure
Hinges on a round-rod brace
Child pulls up tubes to bend
knee.

A BETTER HINGE
A simpler hinge such as the ones above for a round rod can also
be used on a flat rod.
A hinge for flat metal bar

OPEN

LOCKED
BRACES THAT FOLLOW THE SHAPE OF THE LEG
Flat metal bar can be bent to fit the shape of the leg more
closely. This is not always necessary but if done well the brace will fit better
- especially when the bar is used with molded plastic.

Figure
ADJUSTABLE BRACES
As the child grows, a brace made like this can be lengthened.
Teach family members how to do this.

Figure
HIP BANDS
Braces with a hip band may be needed for the child:
whose leg (or legs) is so weak at the hip that it flops or turns
far out to one side,

WITHOUT HIP BAND
or whose legs tend to twist too much inward (or outward).

WITHOUT HIP BAND

WITH HIP BAND

Figure
A common problem with hip bands is that the low back bends
forward (1) and the butt sticks out. This can cause back problems, and hip
contractures.

Figure
A hip band that dips down in back down to push in the butt (1)
helps prevent this problem. If necessary, add an elastic strap here (2).

The back of the hip band can be
made of thin metal lined with leather, or of strong plastic.
On plastic braces the side bars and hinges can also be made of
thick, strong plastic. This adds some flexibility, which will be better for some
children but not provide enough support for others.

Figure
A child who tends to flop forward at the hips (1), may need a
hip band with a locking hinge.

Hip band without lock

Hip band with lock
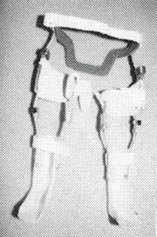
Braces with plastic hip band and
locking plastic hip hinges. (PROJIMO)
|
For a young child whose feet turn in a lot, a night brace to
hold the feet (and hips) turned outward may help. It can be made from a thin
metal bar or from wood.
Figure
|
KNEE PIECES
A child with a weak leg that straightens normally,

Figure

Figure
needs a slightly loose strap behind the knee (1) and a firm,
comfortable knee piece (2).
A child with a leg that does not quite straighten,

Figure

Figure
needs a knee piece that firmly pulls the knee back (1)
A child with a knee that bends backward,

Figure

Figure
needs a firm strap behind the knee (1) that lets the knee go
back only a little. (A front strap may also be needed).

Figure
For children with a severe back-knee problem, it is often better
to use a plastic brace that distributes pressure over a wide area (1) above and
below the knee. (This is more comfortable than a behind-the-knee strap that
presses only on a small area.)
A leg that bends in at the knee, needs a knee piece that pulls
the knee outward

Figure

Figure
and also one that pulls the knee back (1) (as shown above).
A leg that bends out at the knee, needs a knee piece that pulls
the knee inward.

Figure

Figure
and also one that pulls the knee back (1).
When necessary, you can use 3 knee pieces:
Figure
ANKLE STRAPS

Figure

shape of ankle strap

Figure
RAISED SOLES OR ‘LIFTS’ for one leg that is
shorter
For a child who has one leg shorter than the other

Measure the difference in leg
length
|
Note: Almost all children have one leg that is a
little shorter than the other, and this does not usually affect how they walk.
Raised soles (‘lifts’) are usually not needed if the difference in leg
length is less than 2 cm.
However, a child who drags a foot because his hips tilt down on
that side may be helped by a small lift on the other side - even if that leg is
the same length or longer. |
IMPORTANT: Before putting a permanent lift
on a shoe or sandal, test it by tying or taping on a temporary lift.
Watch the child walk and ask how he likes it. You may want to try several
heights before deciding on the one that works best.
Tie on a temporary lift with
string, tape, or a loop of inner tube.
Material used for lifts should be as lightweight as possible.
You can use cork or a light, porous rubber. If the material is heavy but strong,
to make it lighter you can drill holes through it. Put a thin, strong sole on
the bottom.
Figure

flat middle section for firm
standing
(1) Back slopes in for a softer heel strike.
(2) For a lift with a stiff-ankle brace, the child can often
walk more smoothly wit a “rocker-bottom” sole.
(3) rounded in front for easy “roll over” at the end
of a step.

Figure
(1) A child with a mild to moderate
“back-knee”, may be helped by a heel that extends backward. This helps
push the knee forward when the child puts her weight on the foot.
For a more severe back-knee, the child may need a long-leg
brace.

A high lift, when needed, can be
built into a bar brace
Design from Simple Orthopaedic Aids, by
Dartnell
|
Ask a local shoe or sandal maker to teach you how to fasten on
the soles and lifts |
PLASTIC BRACES
Below the knee
For most children who need a below-knee brace, plastic braces
molded to fit the leg and foot of the individual child have many
advantages:
· They are
lightweight and often more comfortable than metal braces.
· They fit the child comfortably
and exactly (if made well).
· They can be worn with ordinary
shoes or sandals, which can be easily changed when they get worn out or wet.
Shoes can be changed for school and for work.
· They are water resistant and
easy to clean.
· They are less noticeable than
metal braces. If desired, socks can be worn over them to hide them.
· Children usually prefer them
and are more likely to keep wearing them.

Figure
Although a little more equipment and skill are needed to make
plastic braces, once a village worker has learned the basic technique, they can
be made as quickly and easily as a simple metal brace with a clog.
A disadvantage to plastic braces is that usually after a
year or two the plastic ‘gets tired’ and breaks. However, growing
children need larger braces fairly often. It is wise to keep the plaster mold
of each child’s brace so that a new brace can be easily made if needed.
|
A suggestion to save time and money:

Figure
Keep the mold of the child’s foot-or have the family keep
it. |
The biggest expense in making plastic braces is the plaster
bandage used for casting a mold of the leg. The cost can be reduced a lot by
making your own plaster bandage material.
Plastic braces can feel uncomfortable in hot weather and can
lead to skin irritation and fungus infections if care is not
taken. They can be made cooler by drilling “breathing holes” in them.
(1) Or cut out a hole in the back. (2)

Figure
|
CAUTION: Do not put breathing holes in the lower
part of the brace which has to be the strongest |
Sometimes if you cut a hole put behind the heel, the brace rubs
less and is more comfortable. (3)
To prevent skin irritation, it is important to bathe daily. It
also helps to wear cotton (not nylon) stockings under the brace and to use clean
stockings every day.

This design of plastic brace
supports the knee from the front and pushes it back.
How to make plastic braces
Here we describe 2 methods for making molded plastic braces:
The first method uses old plastic buckets or containers,
and needs less equipment. Unfortunately, these braces tend to break easily when
used for walking. However, they make excellent, low-cost night braces (to
wear while sleeping).
The second method uses sheets of polypropylene plastic.
Additional equipment (such as a vacuum sweeper) is needed, and it is a little
more expensive. However, the result is a high-quality brace that can last for
months or sometimes years
Method 1: Plastic bucket braces
Equipment and materials needed
|
· ‘stockinette’,
old stocking or thin cloth strips (for wrapping leg before casting) |

Figure
|
|
· plaster bandage rolls
for plaster casts (To reduce costs, roll your own) |

Figure
|
|
· a sharp knife or
single-edged razor blade |

Figure
|
|
· a piece of soft rope
about 1/2 meter long |

Figure
|
|
· a piece of old reinforcing
rod, pipe, or iron bent to fit inside the foot cast |

Figure
|
|
· fast-setting building
plaster for the solid plaster mold |

Figure
|
|
· 2 pieces of wood nailed
together to form a rack to hold cast in this position |

Figure
|
|
· several long rubber
strips cut from car tire tubes |

Figure
|
|
· tools for smoothing plaster
and plastic file or rasp, piece of broken glass, piece of wire
screen |

Figure
|
|
· large plastic bucket or
containers to be cut up Plastic should be at least 2 5 mm thick and of
flexible (not brittle) plastic |

Figure
|
|
· other buckets or water
containers |

Figure
|
|
· saw or strong scissors
for cutting plastic |

Figure
|
|
· an oven (wood gas or
electric) |

Figure
|
|
· large metal cooking
tray or sheet of metal |

Figure
|
|
· thick gloves or
potholders |

Figure
|
|
· small soldering iron
|

Figure
|
|
· if possible a gas burner,
torch, or ‘heat gun’ to spot heat the plastic (Mote A hair
dryer does not give enough heat) |

Figure
|
|
· drill and bits (hand
or electric) |

Figure
|
|
· strap and buckle or
Velcro (plastic straps one with barbs and the other with hairs so that
they stick to each other) |

Figure
|
|
· glue or rivets or both
|
Figure
|
Making the plastic-bucket brace consists of 3 main steps:
|
A. Making a hollow plaster cast of the child’s leg |
B. Making a solid plaster mold of the leg |
C. Heat-molding the plastic-bucket brace |
A. Making the hollow cast
|
1. Tie a knot in the end of a soft rope. |

Figure
|
|
2. Put the rope on top of the leg with the knot between the
toes. |

Figure
|
|
3 Put the stocking tightly on the foot with the rope inside (or
wrap it with a thin cloth). Avoid wrinkles. Make sure the rope stays very
straight. |

Figure
|
|
4. Wet a plaster bandage and squeeze out the extra water. |

Figure
|
|
5. Wrap on a thin cast (about 3 layers) while someone else holds
the foot in a good position. Be sure the heel is covered with several layers.
|

Figure
|
|
6. While the plaster is still wet, smooth it gently with moist
hands, and press the cast gently into all the hollows of the foot. |

Figure
|
|
7. Before the plaster becomes firm, place the foot in exactly
the position that you want the brace to hold it in. Sometimes it works well to
hold the foot in your hands. But often it works best to have the child step
firmly on the floor, or on a padded board.
Be sure to position the leg straight up, from side view
and front view. |

Figure
|
|
8. Draw some lines over the front of the cast. |
Figure
|
|
9. When the cast is almost firm but still damp (usually in 5 to
10 minutes), carefully cut through the plaster over the rope. Take care not to
cut the child. |

Figure
|
|
10. Then gently remove the cast without changing its shape.
|

Figure
|
|
11. Quickly (before it is fully hard) close the cast, line up
the lines you drew, and tie it shut with cloth or string |
|
|
12. Tie a cloth tightly over the opening of the toes. |
Figure
|
B. Making the solid plaster mold
|
1. Put a bent piece of rod into the hollow cast. |

Figure
|
|
2 Hold the cast in a standing position - perhaps in a box of
sand. |

Figure
|
|
3. Mix the plaster Put water in a container, enough to fill the
cast While stirring, sprinkle dry plaster into the water. Keep adding until the
mix is just thick enough that wrinkles stay a moment on the surface. |
Figure
|
|
4. Quickly pour the mix into the cast. Jiggle the rod and tap
the cast to be sure the mix fills all spaces. |

Figure
|
|
5. Hold the rod in the middle until the plaster is firm. |

Figure
|
|
6. After plaster hardens fully (about one hour) remove the solid
mold. |

Figure
|
|
7. Being careful not to change the shape or size of the mold,
use fresh plaster to fill in any holes or pits that are not caused by the shape
of the foot. Add a little fresh plaster over bony places (so final brace will
not rub). |

Figure
|
|
8. Smooth the surface (with a file, piece of wire screen, or
piece of broken glass). Do not reduce any of the bumps caused by
the bones. |

Figure
|
C. Heat-molding the plastic-bucket brace
|
1. Mark on the child’s leg the shape of the brace. |

Figure
|
|
2. Take measurements as shown for the width and length of the
brace. |

Figure
|
|
3. Draw an outline on paper, according to the measurements and
cut out the pattern. |
Figure
|
|
4. Mark the pattern on the plastic. |

Figure
|
|
5. Cut out the pattern with a saw or strong scissors. |

Figure
|
|
6. Make V-shaped cuts here to help bend the hot plastic around
heel. |

Figure
|
|
7. Heat the oven to at least 450° F(230° C) If you
cannot measure or control heat, put a small piece of plastic into the oven and
heat it until the plastic becomes soft and gooey. |

Figure
|
|
8. Heat the plaster leg cast in the hot oven for 15 to 20
minutes. |

Figure
|
|
9. Put the hot mold on the rack. |

Figure
|
|
10. Lightly sprinkle dry plaster or talc on a metal sheet or
tray |

Figure
|
|
11. Put the plastic form on tray and put the tray into the hot
oven. |

Figure
|
|
12. Leave it in oven only until plastic becomes somewhat
flexible.* |
Figure
|
|
13. Take hot plastic out of oven with gloves. Bend it over the
hot mold. |
Figure
|
|
14. With strips of rubber, wrap plastic tightly to force it
against the mold. |
Figure
|
|
15. And put it back into oven until plastic gets softer* |
Figure
|
|
16. Remove from hot oven and press forcefully (with gloves) to
fuse overlapped plastic at heels. |
Figure
|
|
17. Also press in any hollows around bones and on bottom of
foot. Keep pressing until plastic begins to cool and stiffen. |
Figure
|
|
18. While brace is cooling, heat soldering iron. Heat to
moderate heat - nor red hot. |

Figure
|
|
19 Unwrap cloth from brace while still warm and use soldering
iron to smooth and weld heel joint. |

Figure
|
|
20. When cool, trim and smooth the edges of the brace. |

Figure
|
|
21. Glue or rivet a strap near the top of the brace.
For night splints, add 1 or 2 more straps at the ankle and foot
(1). |

Figure
|
|
For easier fastening, use Velcro straps |

Figure
|
|
For day use, or use with sandals or shoes, only the upper strap
is needed. |

Figure
|
Note: Braces made from plastic buckets
or containers tend to break fairly easily it a larger child uses them for
walking. It is better to use polypropylene plastic (see next page).
* Take care not to overheat the plastic, because the
plastic used for many buckets and containers tends to wrinkle like bacon when it
gets too hot.
Method 2: Polypropylene braces
Polypropylene is a special plastic available in large sheets
from orthopedic supply stores and some plastic factories. For most braces,
sheets 30 cm. by 60 cm. (1 foot by 2 feet) are large enough. Thickness should be
3 mm. (1/8 inch) for thinner, more flexible braces and 4 mm. to 5 mm. (3/16
inch) for stronger, less flexible braces.
|
Polypropylene, where available, is usually
the best plastic for braces. It is flexible but strong. It is easy to stretch
and mold when hot. Cost is US $1.00 to $2.00 per brace.
Polyethylene can also be used but is more likely to wrinkle
like bacon if it gets too hot. You can experiment with whatever plastic you
find. A program in Pakistan uses plastic bus windows, although this hard
clear plastic (Plexiglas) is more difficult to stretch and shape when
hot. |
This method is the one used by professional brace makers. Here
we simplify it as much as possible. Equipment and materials needed are mostly
the same as in Method 1. However, high-quality braces can be made more easily
with a few extra pieces of equipment (they are not absolutely necessary).
This extra equipment includes:
· special oven*
* Some brace makers in Pakistan use no oven, but
simply hold the plastic sheet over a ‘chula’ (earth pot) of hot
coals.

SIMPLE SHEET-METAL BOX OVEN
(riveted or soldered together)
(1) window for looking at plastic when it is in
healing with sliding or hinged color.
(2) handles
(3) Box should be at least 70 cm. (28 in.) long, 40 cm (16 in.)
wide and 10 cm (4 in.) high
(4) sheet of metal (preferably aluminium, because it spreads
heat best) at least 6 mm (1/4 to 1/2 in.) thick.

Figure
If you can get it, rivet a piece of
“Teflon” cloth over the metal sheet (1). This will help
keep the hot plastic from sticking to the metal. Or you can use a
Teflon spray.
The “oven” can be placed over any source of heat. Use
the cooking fire, or if you want to build a simple fireplace to support
it.

COMPLEX GAS OR ELECTRIC OVENS
(designs from Huckstep’s Poliomyelitis.)
· vacuum sweeper
(if electricity is available) or other form of suction. (The
suction pulls the hot plastic tightly against the cast until it cools. However,
this is not absolutely necessary.)
· metal pipe

Figure
Tape it to the end of the vacuum sweeper hose.
The pipe should be a little bigger than the rod used in the leg
cast. By bending the rod slightly, it will fit very tightly into the pipe.
Figure out some way to clamp or bolt the pipe firmly to a strong
bench or table.
Figure

Figure
Put 2 notches in the pipe (1) so it will breathe
when pushed up against the plaster.
· electric cast-cutter
These are very expensive but a great help if you are
making a lot of plastic braces.
Figure
If you do not have a cast-cutter you may have to use a hammer
and chisel to cut the plastic. You can heat the chisel so that it will melt the
plastic.

Figure
Making the polypropylene (or polyethylene) brace
Steps A and B are the same as described for Method 1.
Step C. Heat-molding the plastic brace
|
1 Put the rod of the plaster mold into the vacuum pipe. Be sure
it is very tight (If not, take it out and bend the rod a bit more) |

Figure
|
|
2 Stretch stockinette or stocking tightly over the cast and tape
it to the pipe |

Figure
|
|
3 Sprinkle dry plaster powder or talc over the entire foot and
smooth it with your fingers |
Figure
|
|
4 Preheat the oven and sprinkle plaster powder or talc evenly
over the hot metal sheet |

Figure
|
|
5 Cut a piece of polypropylene plastic large enough to stretch
around the entire foot, and put it into the oven to heat |
Figure
|
|
6 As the plastic gets hot enough to mold, it will turn clear so
you can easily see through it. It often gets clear in the middle first |

Figure
|
|
7 To move the hot plastic, 2 persons must wear thick gloves.
Sprinkle dry plaster powder, lime, or talc on them |

Figure
|
|
8 As the plastic is getting hot, turn on the suction (vacuum
cleaner) and listen for a hissing sound where the pipe joins the cast (This
means the suction is working) |

Figure
|
|
9 When the plastic is hot enough (clear and limp), remove the
oven lid, lift the hot plastic by its 4 corners and quickly stretch it over the
whole cast |

Figure
|
|
10 Quickly pinch the edges of the plastic together along the
bottom side of the leg and around the pipe. Squeeze together all edges to form a
seal. You must work quickly to complete the seal before the plastic gets
too cool |

Figure
|
|
As soon as the seal is complete the suction should pull the hot
plastic close against the cast. But if necessary help by pushing it into the
hollows * |
|
|
11 While the plastic is still hot and soft cut off the extra
with a sharp knife or strong scissors |

Figure
|
|
12 After it cools, draw the form of the brace on the plastic,
|

Figure
|
|
13 and cut it out either with a cast cutter, |
Figure
|
|
or a hammer and chisel, |

Figure
|
|
or a red hot soldering iron, or however you can |
|
Finish the brace in the way described under Method 1
(steps 20 and 21)
* If no suction equipment is available, you can heat mold the
plastic by stretching it over the cast and pushing in the hollows until it
cools. With practice, this gives almost as good results, and you only need about
half as much plastic.
Making sure plastic braces fit well and are comfortable
The most common problem with plastic braces is that they
press on bony bumps. To avoid this,

Figure
put small pads over bony bumps before casting foot. Or, put the
pads on the mold, and add a little fresh plaster to the bony bumps before
molding the plastic (1).
Soft padding inside the brace can make it more
comfortable. Places that may need to be padded are:

Figure
When the child wears the plastic brace, if it presses too much
on bony places, or elsewhere, heat a small area over the spot where the bone
presses, and with a smooth, rounded stick push the hollow deeper. (Use a heat
gun if you have one.)

Figure
For padding you can use a product called ‘moleskin’,
or a special foam plastic material available from orthopedic supply stores. Or
you can glue in pieces of cotton blanket or car inner tube (but make sure the
child wears cotton stockings to avoid skin problems).
|

Figure
The sole (1) of the brace can end at the ends of the toes
(or slightly beyond to allow the growth)
The side (2) of the brace at the foot can extend to the
toes if necessary for support.

Figure
Or the sole can end at the base of the toes (1).
For better comfort and shoe fit, the side can dip down around
the base of the big toe (2).

Figure
AVOID brace edges that stop at middle of toes (1).
Avoid an edge that curves in (better to heat it and bend it out
a time) (2).
AVOID brace edges that pass across the middle of bony bumps. The
edge should be either behind or in front of the bump (3). |
Deciding how wide or narrow to make the sides of the brace at
different points will depend on the needs of the particular child.
A child whose ankle or foot is floppy or deformed, or who needs
a stiff ankle brace to push back a weak knee may need a brace with wide sides at
the ankle and foot.

Figure
A child who needs only the ankle stabilized may walk better with
a brace that lets the front of the foot bend up and down a little.

Figure
Many children benefit by a brace that allows some up and down
ankle movement but prevents sideways movement.
This can be done by cutting back the sides of the brace here.
This will be the weak point in the brace. So , the plastic must
be extra thick here.

Figure
Or you can strengthen it by putting extra strips of hot plastic
on the back of the plaster mold before stretching the whole plastic over
it.

Figure
Different plastic brace models for different needs
In various places in this book we have shown different brace
models and how they meet the particular needs of a child. Here are a few more
ideas for different plastic braces:
Below-knee brace that gives knee support

Figure
|
CAUTION: The shoe or sandal may affect the angle
of the foot. Allow for this when deciding the angle for the foot of the brace.

Figure
|
|
A similar brace can be made in 2 parts
1. Make the lower part, and place it back on the plaster mold

Figure
2. Place the mold like this and form the top part of the brace
over the lower part

Figure
When the child grows, this brace can be made longer by removing
the rivets and separating the 2 ends more |
Side-support knee brace
A brace that supports the knee may help a child that has a
sideway bend or partial dislocation of the knee
|

Figure
|
Make the brace higher on the side that needs more support |
|

Figure
|
Also make the brace higher on the side of the ankle that needs
more support |
|

Figure
|
Also, in an above-knee brace, you can put extra support on the
side of the knee that needs it. |
Above-knee plastic braces
The simplest kind of above-knee plastic brace is a single piece
without a knee hinge. You can make it in the same way as a below-knee brace,
with or without a footpiece. These braces are useful on small children

Figure
To make a jointed above-knee brace:
|
1 Draw the shape of the child’s leg on paper |

Figure
|
|
2 Mark the height of the |

Figure
|
|
hip bone (1) |
|
|
crotch (2) |
|
|
mid-knee (3) |
|
|
ankle bone (4) |
|
|
3 After forming the plastic pieces on plaster molds, bend metal
joint pieces so they fit the shape of the leg |

Figure
|
|
4 Temporarily pin or bolt the plastic pieces to the metal
pieces. Then you can adjust the front-to-back angles with the brace on the child
|

Figure
|
|
5 When the angles are right, mark the position, and after
checking all aspects of fit, rivet the pieces together and add straps and knee
supports |
Figure
|
|
Hinged braces can also be made using the plastic itself for knee
hinges.
And even ankle hinges
However, these hinges may not last long with
heavy use. |

Figure
|
BODY SUPPORTS

Figure
Figure
In most cases, a body brace or body jacket probably does little
or nothing to correct or prevent further curving of the spine. However, a child
with a ‘flail’ spine that curves so much that it makes sitting
difficult or awkward, may sit more comfortably and have more use of her arms if
she has a body brace
Making a plastic body brace
|
1 Put small pads over upper outer corners of hip bone |
Figure
|
|
2 Put a stockinette or old tight-fitting shirt on the child
|
Figure
|
|
3 Cast the child’s body with plaster bandage while holding
her in a sitting position*. While the plaster dries hold the child as straight
as you can. Bring plaster down to the level of the seat. |

Figure
|
|
4 Cut the cast into 2 halves and remove |

Figure
|
|
5 Tape or tie the 2 halves of the cast together and put it into
a plastic bag |

Figure
|
|
6 Make a solid plaster mold inside the cast |

Figure
|
|
7 Remove the plaster mold and smooth it carefully to keep its
shape especially the waist and hip curves. You can make it lighter and save
plaster by mixing sawdust or bits of plastic foam into the plaster |
Figure
|
|
8 Stretch hot plastic over the mold as described. If your oven
or sheets of plastic are not big enough you may have to mold it in 2 halves
front and back |

Figure
|
|
9 Mark and cut the plastic. Leave a little room under arms. Cut
breathing holes and perhaps a large central hole over the stomach |
|
|
10 Try it on the child. Make adjustments. Smooth edges. Add
padding and straps. The bottom of the brace should just touch the seat when the
child seats. |

Figure
|
|
A body brace attached to leg braces may be needed by a
child whose body is weak from the chest down |

Figure
|
* Casting can also be done with the child lying
lengthwise over a wide strip of cloth stretched between two
points
Chapter 59: Correcting Joint Contractures
In this chapter we discuss different aids used for gradually
straightening limbs that have joint contractures.
Information on contractures, their causes and prevention is in
Chapter 8. Exercises to prevent and correct contractures are in Chapter 42.
Joint contractures can often be gradually straightened with
casts or braces that gently but firmly hold the joint in a stretched
position for a long time. We stress gently because unless great care is
taken it is very easy to cause injuries.
To straighten a limb, 3 areas of pressure are needed
Figure
In theory, the leg could be straightened like this

Figure
In fact, this would cause pressure sores on the
small areas where the splint presses (1).
Figure
Also, the knee (2) could be dislocated if the calf
is not supported while stretching.
Always use
wide areas of pressure. Avoid pressure on the knee, behind the heel, and
over bony areas.

Figure
If a child stays in bed, a stretching aid like one of these
might work. (But try to keep the hip straight, so that the aid does not cause a
hip contracture while it straightens the knee.)

Figure
There are several ways to straighten contractures that let the
child continue to move about. These include:
1. a series of plaster casts

Figure
2. adjustable braces

Figure
3. elastic stretching aids of bamboo or inner tube

Figure
4. adhesive strapping
Figure
The advantages and disadvantages of the first 3 ways are
discussed. It is important that you read this before deciding which one to
use for a particular child. The 4th method (strapping) is used mostly on
clubbed feet of newborn babies.
HOW TO CORRECT CONTRACTURES USING PLASTER CASTS
The example we give here is for the knee, but the basic methods
are the same for contractures in ankles, feet, elbows, and wrists.
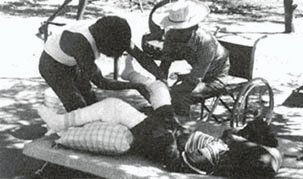
Correcting contractures with
casts. (PROJIMO)
Casting the leg
FIRST WEEK

Figure
(1) Put stockinette or a close fitting cotton on the
leg. Avoid wrinkles
(2) Put cast padding or cotton roll (or wild kapok) evenly
around the leg.
(3) To protect the knee, it helps to put a soft sponge or piece
of sponge rubber over the knee.
(4) Put extra padding around the thigh, the knee and the
ankle

Figure
(5) Out a plaster cast on the leg. Be sure it
reaches high up the thigh.
(6) Put lengthwise strips of plaster for reinforcement over the
knee.
(7) Holding the calf below the knee, gently straighten the leg
as far as it will go, without using force.
(8) Position the foot at a right angle (or as near to it as you
can without using force).
STRAIGHTENING THE CAST WITH WEDGES
The cast is straightened a little every few days. In a small
child or a person with recent contractures it can be done every 2 or 3 days. In
persons with old contractures progress will be slower. To save on costs change
the cast every week or 10 days
SECOND WEEK
1. Cut through the plaster behind the knee.

Figure
2 Use steady gentle pressure so that the leg straightens
a little and the cut opens.

Figure
3 Hold the cut open with a small wedge of wood

Figure
4 Wrap a piece of cloth around the knee

Figure
Then wrap a thin ring of plaster around it to keep the wedge in
place.
|
CAUTION: When stretching the leg use gentle steady
pressure until it begins to hurt a little. Do not try to advance too fast
as you may cause permanent damage to nerves, tendons, or the joint
For a day or so after stretching the child may have some
discomfort behind the knee. This is normal unless it hurts too much. You can
give aspirin. If the child complains of pain over pressure points or bony bumps
remove the cast or cut open a window in the cast to check if a sore is forming
WARNING: When casting a child who does not feel in
his limbs take great caution to avoid pressure sores and use very little
pressure |
THIRD WEEK
1 Cut and remove the ring of plaster

Figure
2 Gently stretch the joint and put in a wider wedge

Figure
3 And cover it with a new ring of plaster

Figure
FOURTH WEEK

Each time you change the ring put
in a bigger wedge
FIFTH WEEK
Continue casting until the knee is completely straight or bends
backward just a little. Then use a brace for at least a few weeks (day and
night) to keep it straight

Figure
SIXTH WEEK

Figure
The time to straighten a contracture may vary between 2
weeks and 6 months - or more. If the leg stops straightening for 3 or more cast
changes stop casting and try to arrange surgery
Straightening a leg that is hard to stretch
In an older child who has a knee contracture with strong
muscles that bend the knee, it may be hard to straighten the knee
more with each cast change

STRONG MUSCLE HERE
If the leg does not move when you pull it ask the child to

Figure
When he relaxes keep pulling and the leg should straighten a
little

Figure
Repeat this several times while you steadily pull the leg. Each
time the knee should straighten a little more.
Straightening a tiptoe contracture
A foot with a contracture like this,

Figure
can sometimes be straightened with casts and wedges

Figure
Put lots of padding under the on top of the ankle(1).
Be sure the cut reaches (2) fairly high up the ankle (not
across the top of the foot.)
Try to overcorrect the contracture so that it will rest easily
at a (90°) right angle when the cast is removed
Figure
Do not let the child walk on the cast until the day after it is
put on-and then only if you put a walking heel on it. Otherwise the sole of the
cast will become floppy and will not help. Active children need very thick
plaster on the bottom of the foot.

Figure
|
CAUTION The above method of correcting tiptoe
contractures sometimes causes pressure sores here |

Figure
|
To prevent pressure sores it often works better to cut a
complete ring out of the cast |

Figure
|
For more precautions see on the casting of club feet |
For the child who lives too far away to have her cast changed
every few days, you can try to make an aid that will gradually pull the foot up
without needing frequent cast changes. Here is one idea

Figure
|
CAUTION: If the child is sent home with a cast
be sure the family knows the danger signs. If any of these appear have them
quickly bring the child back or remove the cast themselves
Danger signs:
· constant severe
pain - especially in areas where pressure sores can occur
· a darkening or change of color in the toes
· numbness or burning
· a smell like rotting meat (a late very serious
sign)
To take off the cast without tools, in an emergency soak
it in warm water and unwrap or tear it apart |
Note: This cast is not as strong as a fully
covered one and will not last on a very active child. It will usually only work
on a child without much sideways deformity of the foot or ankle. The cast may
need to be changed 2 or 3 times as the foot straightens
HOW TO CORRECT CONTRACTURES USING ADJUSTABLE BRACES
The advantage of these braces is that children do not have to
visit the rehabilitation center so often to have them adjusted.
The family can adjust them at home.
Orthopedic suppliers in some countries sell
special knee and ankle joints that can be locked in different positions. But
these are very expensive. However, a skilled village craftsperson can put
together something similar:

Figure
Knee and ankle joints can be adjusted every few days to
gradually straighten the joints (1).
(2) leather or plastic cuffs.

Figure
Space the holes on the 2 pieces differently (1) so that lining
them up allows a range of small adjustments.
(2) adjustment screw or pin
A much simpler low-cost model can be made of round or flat
metal bar.
|
Round metal rod (re-bar)
Bend rod just a little less than knee will straighten

Figure
(1) rod about 80 mm (1/4 inch) thick (depends on the size of
child)
(2) plastic heat-molded to fit leg, or simply bent with heat (or use
leather)
(4) knee pad with extra width above knee
(5) tabs bent back with
heat to grip bar
These metal bar braces are used in a way similar to a standard
above-knee brace. Every 2 or 3 days, bend the bar a little straighter at the
knee. The brace can be made cheaply, and can be removed for walking and
exercise, and to check for sores. As the leg becomes straighter, any of these
braces can be used as a regular walking brace with a clog.
Figure
|
|
Flat metal bar
Use flat steel bar that is strong enough to hold leg firmly.

Figure
Twist the middle part of the bar in a vise so that it can be
bent for easy adjustments

Figure
|
Two designs for adjustable braces to correct ankle
contractures
|
1.

Figure
Figure
(1) Fit different wedges between stop and rod to
change adjustment.
Note: This design is complicated to make but can
be adjusted while the brace is on the child |
|
2.
Figure
Figure

Figure
Bend rods up a little more every few days. |
An adjustable wood brace for knee and ankle contractures
The positions of these 2 cross pieces can be changed to adjust
the angle of the knee and foot

Figure
Using “wing nuts” makes it easier to remove the bolts
for clamping the position of the cross pieces.

Figure
Use thin pieces of hard wood about 2 cm wide and 6 to 8 mm thick

Figure
|
WARNING:
If a knee looks like this, it is probably dislocated. Trying to
straighten it could make the dislocation worse. Take great care to put pressure
only on the leg just below and behind the knee, not at the foot. Gradually try
to correct the dislocation (bring the lower leg forward) before trying to
straighten. If possible, get advice or help from an experienced health worker or
specialist

Figure
|
Chapter 60: Correcting Club Feet
|
Note: In Chapter 11 we discussed club feet. We suggest
you read before trying to correct a club foot. |
The younger a child is when you begin, the more easily and
quickly her foot can be straightened. For best results, begin 2 days after
the baby is born. If the child is over 1 year old, usually a good correction
is only possible with surgery. Ways to predict how easy or difficult correction
may be for a particular child are listed.
club foot
Method 1: STRAPPING
This method works well in a baby with mild to moderate clubbing,
especially when the foot can be put into a nearly normal position. The method is
easier and cheaper than casting, and sometimes gives better results. You will
need:
· tincture of
benzoin (to paint on the skin to help the adhesive felt stick firmly. Zinc oxide
in the tincture will help protect the skin.)
· cotton wool
· adhesive surgical felt
(padding) 8 mm. thick and at least 2.5 cm (1 inch) wide
· adhesive tape (sticking
plaster) or zinc oxide strapping 2.5 cm. wide
1. Paint tincture of benzoin on the skin areas to be covered by
the tape.
2. Hold the baby’s foot like this and gently straighten it
as far as you can without forcing.

Figure
3. With the knee bent as far as possible, stick strips of felt
around the foot and over the knee and leg as shown

SIDE VIEW
FRONT VIEW
4. Stretch adhesive tape over the felt. Start on the outer side
of the foot, go around the foot, up over the knee, and down the other side. Use
the tape to pull the foot into a better position.

SIDE VIEW

FRONT VIEW
5. Put a second piece of tape around the leg twice here to hold
the first tape.
FRONT VIEW
|
CAUTION: 10 minutes after putting on the tape,
check to see if any part of the foot has turned dark. If so, look for the
trouble spot and try to adjust the strapping. If it stays dark, take everything
off and start again |
Every 2 or 3 days, tighten the correction by stretching new tape
over the old, in the same way. On the 7th day, remove everything and leave the
leg free until the next day. On the 8th day, apply new felt and tape.
Exercises during strapping
While the baby’s foot is strapped, someone in the family
should do stretching exercises on his foot every time he is fed or changed (at
least 8 times a day).
1. Hold the baby’s leg like this and turn his whole foot
UP and OUT.
Hold and count to 10. Repeat 10 times.

Figure
2. Turn it as if you were trying to touch the little toe to the
outer side of the knee.
The strapping and exercises should be continued until the foot
is oval-corrected (bends outward a little).

Figure
3. If the foot is shaped like a bean, also do an exercise to
stretch the foot in the opposite direction of the deformity, like this.
Figure
4. After stretching the baby’s foot this way, help the baby
to stretch it himself by tickling the outer edge of his foot.
Figure
If the foot is not straightened completely within about 3 months
of strapping and exercises, surgery is probably needed.
Method 2: PLASTER CASTS
This method uses a casting technique similar to the one for
correcting contractures (see Chapter 59). A club foot is gradually straightened
in 3 stages:
|
Stage A ® |
Stage B ® |
Stage C |
|
Straighten the inward bend so that the foot points
down. Do not yet begin to lift the foot. |
Overcorrect so that the foot points down and
out. Keep the foot in this position until the heel no longer turns
in but is straight or turns out just a little. |
Now bring the foot up, making sure that the outside of
the foot is higher than the inside. Overcorrect. |
|

Figure
|

Figure
|
Figure
|

Figure
|
|
Stage A
1. In a young baby it is often necessary to cast the whole
leg with the knee bent to keep the cast from slipping down. First, wrap
cotton padding evenly around the whole leg.

Figure
Put extra thick padding over bony spots (1).
Put bits of cotton between the toes (2) (Take them out after the
foot has been cast).
2. Cast the leg and foot. Make the cast especially thick around
the knee and heel, where he is more likely to bump it.

Figure
3. After the plaster is dry, cut out a wide ring from heel to
mid-foot.
Figure
4. Gently and slowly begin to stretch the foot OUT and DOWN. (Do
not try to bring it up yet.)

Figure
5. To keep edges of cast from hurting the skin, bend - them out
with pliers.
Figure
6. Put a ring of cotton or soft gauze over the foot and cover
with new plaster bandage.
Figure
(1) gauze
(2) new plaster
(3) Press the soft plaster into groove and smooth with fingers.
Hold the foot in the new position until the plaster hardens.
7. Once or twice a week take off the outer ring of plaster, bend
the foot down and out a little more, and cover with a new ring of plaster.

Figure
Repeat Step 7 until the foot bends outward a little. This
usually takes several weeks. |
|
Stage B
1. Remove the whole cast and check the position of the heel.

Figure
Often the heel still bends in even after the bend of the foot
has been corrected.

Figure
2. If so, keep casting the foot in a down and out
position until the heel is straighter.

BACK VIEW
|
|
Stage C
1. After the sideways twist of the foot and heel is corrected,
begin to raise the foot, using casts.
2. As you wrap the foot with plaster bandage, hold it in a
raised position with 2 fingers.

Figure
3. Hold the foot up as the plaster dries.

Figure
As you hold the foot, keep it turned outward so that the little
toe is always higher than the big toe.
Figure
Take care to keep the toes straight.

Figure
4. Keep raising the foot little by little using the same casting
method as before.
Bend up cast edges with pliers.
Figure
(CAUTION: Be very careful cast does not pinch or dig into skin
here.)

Figure
5. Raise the foot a little in this way once or twice a week
until it is as high as this. or until it stops raising for 3 or 4 cast changes.
Figure
|
This child was born with a club foot. Village
rehabilitation workers used a series of casts to straighten it. First
they corrected the inner bend of the foot.
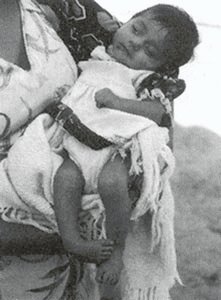
Figure
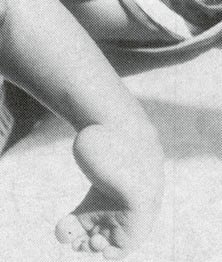
Figure
Then they gradually lifted her foot by cutting out rings on
the cast, closing the space, and holding it closed with a new strip of
plaster.
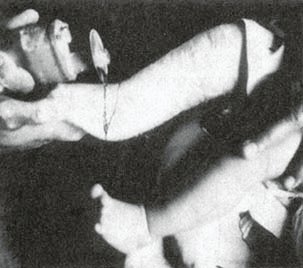
Figure

Figure
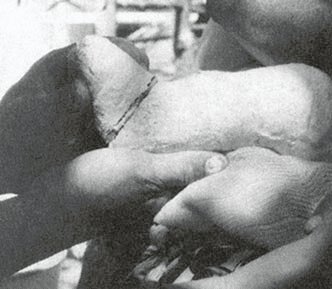
Figures
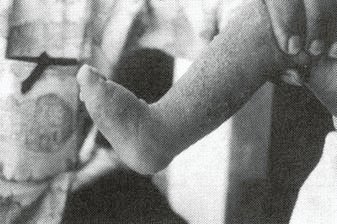
After 4 months of casting, the
foot was in a good position.
IMPORTANT
After a club foot has been corrected, great care is
needed to prevent it from coming back.
Both exercises and braces are essential. After strapping or
casts have been removed, continue the recommended stretching exercises twice a
day.
Many children need to wear braces until they stop growing
(age 13 to 18). If the problem keeps returning, surgery is probably needed.

Figure
This child who had club feet needs to use braces day and night,
at least until he begins to walk, and still at night after that.
Check his feet regularly, for years, for any sign that the foot
is beginning to turn in again. Improved bracing may be
required.
Chapter 61: Homemade Casting Materials
Plaster bandages
Although commercial plaster bandages work best, they are very
expensive. You can make homemade plaster bandages for as little as one tenth the
cost. Or some of the disabled children can learn to make them. You will need:
· plaster of
Paris. If possible, a high-quality type such as dental plaster of Paris.
Keep it in a tightly closed moisture-proof container.

Figure
· gauze cloth or
crinoline. Crinoline, which is a high-quality open mesh cloth, works best.
Good quality gauze can also be used. Holes should be about 8 to 10 per cm. (20
per inch). Cheesecloth also works, but not as well.
HOW TO PREPARE:
· If you use gauze
or cheesecloth, first dip it into a weak solution of laundry starch and let it
dry. This helps the bandage keep its shape.

Figure
· Cut the cloth into
strips of the width you want.

Figure
· Rub plaster powder
into the cloth and roll or fold it loosely. Do not roll it tightly or the
inner part will not get wet when dipped for use.

Figure
The most common problem is that the gauze does not hold enough
of the plaster powder. Even if you put on a lot, some powder always falls out.
The test is when you apply the wet bandage. As you rub each layer into the next,
the threads of cloth should disappear into the smooth, wet, plaster surface. If
not, there is not enough plaster and it will not set hard.
Suggestion: Have some dry plaster powder ready when you
are casting. If needed, sprinkle a little powder over each layer of bandage and
rub it smooth with wet hands. Add more to the final layer and rub it in to form
a polished surface.

Figure
Storage: Wrap the plaster bandages in old newspaper or
plastic bags and store in an airtight container. Do not prepare too many at a
time. They can absorb moisture and spoil.
CAUTION: When wetting for use, up to a third of
the plaster may be lost in the water. To reduce loss, put bandage gently into
water and then let it drip. If you squeeze it, hold the ends of the roll and
gently squeeze toward the center.

Figure
Homemade plaster takes longer to get hard than commercial
fast-setting’ plaster. To speed up hardening, heat the water or add a
little salt to it.
Casts made of wax
To prepare a mold of a leg for making plastic braces, the first
(hollow) cast can be made of wax instead of plaster. Use either candle wax
(paraffin) or beeswax. Wax can be much cheaper than plaster bandage,
especially if the wax is re-used. To make a wax cast:
1 Melt the wax in a can placed in hot water

Figure
2 Cut several strips of soft absorbent cloth

Figure
3 Soak the cloth in hot wax

Figure
4 When it has cooled enough not to burn wrap the waxed cloths
around the foot

Figure
|
Note: Before putting on the wax you can cover the
foot with stockinette. Also place a rope or strip of plastic along the top of
the leg to make cutting the cast easier. |
5 While the wax is still warm and soft rub and press it against
the leg
Figure
6 Hold the foot in the desired position until the wax hardens
(To speed hardening you can put the foot in cold water)

Figure
7 Cut the wet cast along the rope and carefully remove it. Go on
with the other steps as described.
Re-using the wax: After the positive plaster mold has
been made from the wax cast, the wax can be re-used. Heat up the pieces of waxed
cloth and use them to form a new cast. Or boil the waxed cloth in water, holding
the cloth under the surface with rocks or metal. The hot wax will rise to the
surface. When it cools, lift it off and re-use it.
OTHER POSSIBLE MATERIALS FOR CASTING OR MOLDING
Many materials can be used for casts. Most have the
disadvantage that they take a long time to harden. Possibilities include
1 Papier m�ch�. Very slow hardening. Careful
use of a heat lamp or ‘hairdryer’ speeds drying
2 Traditional cast materials. For
example
· In
Mexico, the juices of certain plants, boiled into a thick syrup and soaked into
a cloth, will harden into a cast (see Where There Is No Doctor)
· In India, traditional bone
setters make casts using cloth covered with egg white mixed with
flour
3 Flour made from cassava (manioc) is also
used in India to make casts
To make the solid (positive) mold of a limb, ‘building
plaster’ works well (Wax cannot be used because it melts when hot plastic
is placed over it) Clay also works, but takes several days to
dry
Chapter 62: Developmental Aids
In this chapter we look at the design details of aids for
lying, sitting, standing, balance, use of hands, and communication.
Aids for walking are in Chapter 63
Whether or not a particular child needs an aid, and what kind of
aid she needs, must always be carefully and repeatedly evaluated. An aid that
helps a child at one level of development may actually hold her back at another.
When considering aids, we suggest you first read the chapters on child
development, those covering the particular disability of the
child, and Chapter 56
|
Note. Many developmental aids have already been
shown in PART 1 of this book especially in Chapter 9 (cerebral palsy), and in
Section C on child development. Aids and equipment for play and exercise are in
PART 2 Chapter 46 (Playgrounds) Wheelboards and wheelchairs are in Chapters 64,
65 and 66. |
Lying aids
Lying face down is a good position for a child to begin to
develop control of the head, shoulders, arms, and hands, and also to stretch
muscles in the hips, knees, and shoulders. However, some children
have difficulty in this position. For example
|

Figure
|

Figure
|

Figure
|
|
Rosa cannot lift her shoulders. She has to bend her neck far
back to lift her head |
Juan does not have enough control and balance to reach out his
arms |
A firm pillow under the chest may help both these children to
lift their heads better and to reach out |
A ‘wedge’ or slanting support is often helpful.
The height depends on the needs of the particular child
|
Figure
|

Figure
|

Figure
|
|
Diana manages best on a wedge high enough so that she can lift
herself up a little at arms length (Height is the length from wrist to armpit)
|
Cassio does better on a lower wedge so he can lift up on his
elbows (Height is slightly less than length from elbow to armpit) |
Carmen and others with little or no arm or hand control do best
when their arms can dangle. She can see them moving when she moves her shoulders
|
Wedges can be made with:
|

Figure
|

Figure
|

Figure
|
|
stiff foam plastic or layers of cardboard |
a log and a board with a soft foam cover |
a stick frame |
|

Figure
|

Figure
|
|
If necessary, a leg separator can be added. |
Or sides can be included for the child who needs to be
positioned with supports or cushions. |
Design from Functional Aids for the Multiply
Handicapped.
Some children are able to control their shoulders, arms, and
hands better when lying on one side.
|
A side-lying frame may be helpful for some children with
severe cerebral palsy. Try cushions or padded blocks of different shapes until
you find what works best. Use straps only if clearly needed to keep a good
position. |
Figure
|
Also see lying frames for straightening hip flexion contractures
and lying frames with wheels.
ADJUSTABLE BEDS
This design from the Centre for the Rehabilitation of the
Paralysed in Bangladesh adjusts easily from an upper position to a lower
position.

The upper position is right for
moving to and from a regular wheelchair.
The lower position is right for
moving to and from a low-level wheelchair or ‘trolley’, which many
people use in their houses in Bangladesh.
These metal beds and wheelchairs are welded together
by paraplegic workers.
ADJUSTABLE BACK SUPPORT CLAMP
Supporting a severely paralyzed person so he lies
on his side can be difficult. Pillows easily move or slip. This simple clamp
helps solve the problem. It was designed and made by disabled workers at the
Centre for the Rehabilitation of the Paralysed, Dacca, Bangladesh.

Figure
|
CAUTION: To prevent pressure sores, be sure the
child changes position often (see Chapter 24). |
Sitting Aids
A wide variety of early sitting aids are included in the chapter
on cerebral palsy. Special seating adaptations for chairs and
wheelchairs are in Chapter 65. Here we include a few more ideas:

Figure
(1) seat for child with spasticity who has
knock-knee contractures (one of many possibilities)
(2) strap for keeping legs apart (one around each leg and tied
through holes in sides of seat)
Tire seat or swing bends head,
body, and shoulders forward to help control spasticity
A log or roll seat helps the child with spasticity or poor
balance sit more securely with legs spread. Log should be as high as the knees.
Leave a little room between the cut-out circle in the table and the child’s
belly

Figure

seat for a child with spasticity
whose body stiffens backward
Design from Handling the Young Cerebral Palsied
Child at Home.
OTHER IDEAS FOR HOLDING LEGS APART from Don Caston and
AHRTAG

A seat and table like this. In
the form of a fish on the ocean makes sitting in a special seat fun. So do the
village-made toys (PROJIMO, seat design by Don Caston).
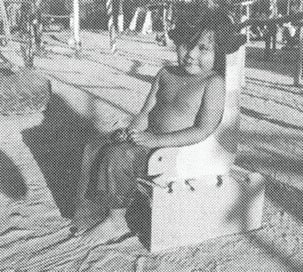
The seat can be used for straight
leg sitting, or put on top of the table for bent-knee sitting. Other designs
include ‘squirrel’ seats on ‘tree’ tables.
from other parts of this book
Figure
Figure
Figure

Figure

Figure

Figure
Figure

Figure

Figure
Figure
Figure
For more ideas on adapted seating, see Chapters 9, 35, and 65.
Also, see scooters and walkers with roll seats.
Standing aids
Many children who have problems with balance or control for
standing may benefit from standing or playing in a ‘standing aid’.
Even for the child who may never stand or walk on her own, being held in a
standing position with weight on her legs helps circulation and bone
growth and strength.
STANDING BOARD
Sometimes a child who does not have enough control or strength
to hold his head up when lying,

Figure
can hold his head up better when sitting or standing

Figure
A simple standing board can help hold the child in a stable
position. This one leans against a table

Figure
LEANING BOARD from Don Caston and AHRTAG

from Don Caston and AHRTAG.

Figure

Figure
BACK-BOARD
This can be used to gradually bring a child to a standing
position. It is especially useful for older children who get dizzy if stood up
straight too quickly. This can happen after a spinal cord injury or a long,
severe illness. The child can be stood up gradually and for longer each day

Use angle irons to hold boards
firmly
STAND-IN TABLE

Figure
(1) padded knee block
(2) hinges (cloth or
leather)
(3) adjustable foot board for children of different heights
(4)
door
(5) clasp
OTHER IDEAS

large tile or cement pipe

hollow log (like people use for
bee hives)

plastic garbage container (Fasten
it to a wide base to keep it from tipping over.)
STANDING FRAMES
These are mainly for a child with contractures or painful joints
who has difficulty standing straight. The child can gradually be straightened
up.

ADJUSTABLE MODEL
(1) bolt or pin for adjustment
(2) adjustable
padded hip support
(3) adjustable padded ankle foot support
(4) knee
pad
(5) chest pad
(6) table
(7) Remove backboard to stand child in
frame
(8) bolts or pins for adjustment

MOVABLE MODEL
(1) Uprights can be made of wood or metal
tubing.
(2) adjustable foot support
(3) adjustable board with padded
notches for knees
(4) wide belt of thick cloth with Velcro or strap
adjustment

SIMPLE FIXED MODEL
For some children, a chest belt will also be
needed.
STANDING-AND-WALKING FRAME
This is a useful aid to begin standing and walking, for children
paralyzed or severely affected below the waist (paraplegia, spina bifida,
diplegic cerebral palsy).

Figure
The back-board should tilt back slightly to let the child stand
straight up (1).

Figure
Instead of kneepads, you can hold the knees better using a firm
knee support molded form stiff-foam plastic or many layers of cardboard glued
together (1).
The base is oval (2) with the longer dimension sideways.
For walking, add runners with a curved front (3). This makes it
easier for the child to tilt forward and lift off.
STANDING-WALKING BRACE
This has the same use as the standing-walking frame above, but
is especially useful for children who need to learn how to walk before they are
fitted for braces with a hip band or body brace.

DESIGN THAT DOES NOT ALLOW
SITTING

DESIGN WITH HIP AND KNEE HINGES
TO ALLOW SITTING
(From Physically Handicapped Children - A
Medical Atlas For Teachers.)
Aids for balancing and body control
Activities for improving balance are discussed. Here we bring
together a few of the aids for balancing that are shown in different parts of
this book, together with a few new ones.
BALANCE BOARDS
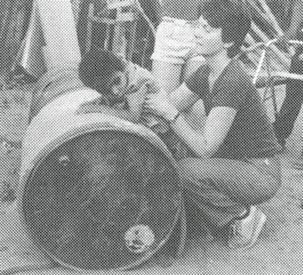
An old drum or barrel makes a
good ‘roll’ for exercise and positioning.

A balance board like this rocks
less smoothly because the center rocker is so narrow.

A wider rocker works better.
An upright stick can be used at
first to help her keep her balance
BALANCE BEAMS

fallen tree

logs

Figure

adjustable wide or narrow balance
beam
Design from UPKARAN Manual.

For the child whose ankles bend
in,
walking on a log helps bend the
ankles outward

Or the child can walk on slanting
boards, like this
For the child whose ankles bend
outward,

walking on boards like this helps
bend the ankles inward
To improve balance also see swings, rocking horses and
merry-go-rounds.
Figure

Figure

Figure
Other aids
Many aids not yet described in PART 3 have been described in
other parts of this book. Here is a brief summary of some of these to give you
basic ideas and tell you where to look. We also give a few ideas of aids not
shown before.

EATING AND DRINKING AIDS

TOILETING AIDS

HOLDING AND REACHING AIDS
SPIRAL HOLDING AID

Cut a piece of heavy rubber tube
like this

Bolt it to a piece of plastic
pipe or bamboo.
Use it like this.

spiral attached to washstand
Note: For larger objects such as a knife or
ruler, the spiral can be made of garden hose.

REACHING TOOL
From Don Caston and Joan Thompson.

ALL-PURPOSE TOOL
WRITING AIDS

pencil in a large gum eraser

loop of car inner tube
leather or thick cloth

Velcro

bamboo or tube or hose
rubber or plastic tubing
COMMUNICATION AIDS

page turner

aids for painting, writing, or
pointing

communication board
From Art and Disabilities.
PHYSICAL EXAMINATION, MEASURING AND RECORDING AIDS
INSTRUMENT FOR LEVELING HIPS

Cut 2 pieces of thin plywood like
this. Fasten them together so that they slide back and forth.

To use, close instrument around
child’s waist and push down against hip bones. Then raise or lower shorter
leg until the instrument is level

aid for measuring leg length
difference
(1) Cut rectangles of 1/4 inch thick boards and bolt
them loosely together at one corner.

‘flexikins’ for
measuring contractures and deformities

other methods for measuring
contractures

rib-hump angle measurer
aids for hearing examination

aids for seeing examination
FOOT CONTRACTURE PREVENTION AIDS

Figure
Also see Chapter 59, “Correcting Joint Contractures,”
and Chapter 58, “Braces.”
EXERCISE AIDS

Figure

Figure
Chapter 63: Walking Aids
In designing aids for a child, we need to think not only about
her type and amount of disability, but also the stage of progress she is
at. For learning to walk, she may progress through a series of stages and aids.
Here is an example:
|
1. Parallel bars |

Figure
|
|
2. Wheeled walker |

Figure
|
|
3. Crutches modified to form walker |

Figure
|
|
4. Underarm crutches |

Figure
|
|
5. Below elbow crutches |

Figure
|
|
6. Cane with wide base |

Figure
|
|
7. Walking stick (cane) |

Figure
|
|
8. If possible, no aids at all |

Figure
|
In this chapter we show a variety of aids for walking. Most can
be made easily out of tree branches or wood. Some can be made from building
construction bars (reinforcing rod) or metal tubing, and may require welding.
We include these ideas not to ask you to copy them, but with the
hope that they will ‘trigger’ your imagination. Take ideas from these
designs, and use the materials you have at hand. When possible, make your aids
to meet the needs of the individual child.
At a village rehabilitation center, it helps to
have a wide selection of aids on hand, so that you can try different ones on a
particular child to find out what works and what she likes best.
Parallel bars
Simple designs for outdoor parallel bars, both adjustable and
non-adjustable, are included in Chapter 46 on playgrounds. We also give
suggestions for adjusting the bar height to meet the needs of the individual
child. The designs shown are:
OUTDOOR BARS

simple, non-adjustable bars
(bamboo, wood, or metal)

bars with a leg separator for a
child whose knees pull together

2 designs for bars with
adjustable height
INDOOR BARS (design details for two of several models)

ADJUSTABLE MODEL
(1) wood or metal pole
(2) metal pipe (or try bamboo)
(3)
Adjust width by sliding the 2 blocks of wood in and out, then bolting.
(4)
tube metal or wood pole.
Adjust height by putting bolts through different holes.

NON-ADJUSTABLE MODEL
(1) triangular wood supports (best if bolted)
(2) slanted
edge to help prevent tripping
(3) angle irons
IRON PIPE BARS

NON-ADJUSTABLE BARS

WITH FOOT DIVIDER
Design from Functional Aids for the Multiply
Handicapped.

METAL CONDUIT TUBING - ADJUSTABLE
WIDTH BARS
(1) This pipe slides in and out of this one.
(2) welds

ADJUSTABLE WIDTH AND HEIGHT
Designs from Poliomyelitis,
Huckstep.
Walkers
There are many ways to make walkers or walking frames. Here we
show a range from very simple to more complex. Choose the design and height
depending on the child’s needs and size.
|
Julio has strong arms and good body control. He can use a simple
low walker |
Lico has weak elbows and poor balance or body control. He needs
a higher walker with armrests |
Anna has weak legs and poor balance. She does best with underarm
crutches built into the walker |
|

Figure
|

Figure
|

Figure
|
The above walkers can be made with 2 cm × 4 cm boards (such
as those used on roofs to hold tiles), or thin trees or branches. The wood or
plywood wheels roll easily when little weight is on them (when child pushes
walker) but have a braking action when child puts full weight on them (when
taking a step).

Figure

Figure
Finding the design that works best for a particular child often
involves experimenting and changing different features.
|
For example, Carlota has poor body and hip control and tends to
tall through the space between her arms when the handgrips are upright |
A higher walker with a bar as the handgrip works better for her
|
|

Figure
|

Figure
|
|
These walkers can be made out of welded or bolted metal tubing
|
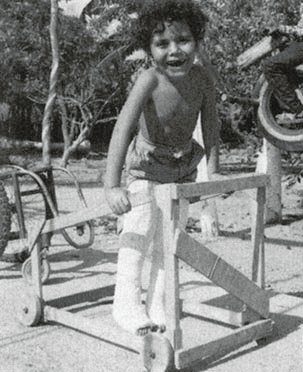
This walker with slanting bars
lets a child hold it at the height that he finds works best
Other walker designs
WALKER MADE FROM CANE, RATTAN, OR
BAMBOO
Design from Rattan and Bamboo Equipment For
Handicapped Children, J. K. Hutt.
Joints can be tied with cane, ribbon, nylon string, strips of
car inner tube or whatever.

WOOD WALKER
Design by Don Caston.
Wood walker for a child whose legs need to be held apart.
|
Note: A walker with no wheels is very stable but
harder to move. |
A walker with 2 wheels and 2 posts is fairly stable but easy to
move. |
A walker with 3 or 4 wheels is very easy to move but can easily
roll out from under the child (unless the child is seated). |
|
Figure
|
Figure
|

Figure
|
WALKER MADE FROM SOLID IRON ROD (RE-BAR) WITH
ARMRESTS-WELDING REQUIRED

Figure
Design from Simple Orthopaedic Aids, Chris
Dartnell.
Cut and bend rod.

Assemble walker.

Figure

Figure

Figure
SIMPLE WALKER MADE FROM SOLID IRON ROD (RE-BAR)-WELDING
REQUIRED
Figure

Cut and weld rod.
Design from Simple Orthopaedic Aids, Chris
Dartnell.
CART WALKERS
The added weight in the cart can help the child stand firmly -
and makes learning to walk more fun.
Figure
As the child progresses, he can change his grip from the front
bar to the side bars.
Figure
Design from Handling the Young Cerebral Palsied
Child at Home, Finnie.
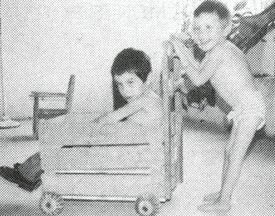
Wheels on this cart walker are
made from the round seed pods of a tree in Mexico, called Hava de San
Ignacio.
ROLLER SEAT AND TRICYCLE WALKERS

Figure
Useful for a child with cerebral palsy who ‘bunny
hops’ (crawls pulling both legs forward together). Seat holds legs apart.
The ‘chimney’ helps child keep his arms up and apart.
Design from Handling the Young Cerebral Palsied
Child at Home, Finnie.

Figure
WALKERS FOR SITTING AND STANDING

Figure
SPIDER WALKER
Figure
Useful for the small child severely affected by
cerebral palsy.
SADDLE-TYPE WALKER
Figure
Design from UPKARAN Manual.
|
CAUTION: Sitting walkers should usually be
used, if at all, as an early and temporary step toward walking. With them, the
child does not learn to balance well and the hips are often at an angle which
can form contractures (see Chapter 8). |
Crutches
MEASUREMENTS FOR UNDERARM CRUTCH

Figure
Top of crutch should be 3 fingers’ width below armpit (1)
so it does not press under the arms.
Elbow should be bent a little (2) so that arms can lift body
when walking.
Handgrip (3) should be placed for comfort - usually about 1/3 of
the way down crutch.

wrist drop from crutch
pressure
Figure
WARNING: Bearing weight under the arms like this
(4) can cause nerve damage that in time can lead to numbness and even paralysis
of the hands.
Teach the child to put weight on her hands, not on her
armpits.
Figure
One good way to make sure the child does not hang on the
crutches with her armpits is to use elbow crutches like this.
There are many designs for underarm crutches. Here we show a
few.
CRUTCHES FROM TREE BRANCHES, padded with wild kapok

Figure
|
These single support designs using tree branches are not as
strong as the double support design shown at left.

Figure
|
WOODEN CRUTCHES

Figure

Figure
Design from Poliomyelitis, Huckstep.

METAL CRUTCH
Figure
From Poliomyelitis, Huckstep.

ADJUSTABLE WOOD CRUTCH

LEATHER RING ELBOW CRUTCH
These crutches are easy to make and work well for children who
have strong arms and hands.
A disadvantage is that if a child falls he may have trouble
getting his arms out quickly.
OTHER ELBOW CRUTCHES
With these open elbow-ring crutches, the child can easily get
his arms out if he falls.

STANDARD ADJUSTABLE
USING LOCAL RESOURCES

Figure
Design from Philippines.

Figure
Design from PROJIMO
Gutter crutch (‘arthritis crutch’) For children
who, due to elbow pain or stiffness, cannot use straight-arm crutches.

STANDARD

USING LOCAL RESOURCES
Crutch for a child with weak elbow-straightening muscles.

Figure
These are only examples. Once you get the idea, you can invent
your own. A lot of experimentation is often needed to adapt crutches for
children with severe arthritis.
Canes and walking sticks
Straight poles can help a child with balance problems
Figure
Canes. Simple canes provide some balance and support but
the child has to use the walking muscles in both legs

Figure
|
CAUTION: Use poles that are taller than
child so if she falls they will not poke her eyes. |
For the child who needs to strengthen a weak or painful leg, a
cane makes him use his leg. A crutch lets him avoid using his leg so the muscles
that bend his leg get stronger, rather than the ones that straighten it
Figure
CANES CUT FROM FOREST PLANTS

Figure

Figure

ADJUSTABLE METAL TUBE CANE
3 OR 4 FOOTED CANE-FOR GREATER STABILITY
STANDARD METAL TUBE
ALTERNATIVE HANDGRIP
Rubber tip made from car tire for metal tube or bamboo
crutch or cane

STANDARD CRUTCH AND CANE TIP

Figure
For walking in sandy places make crutch and cane tips
extra wide.
Adaptations of walking aids for carrying things and for
work

CRUTCH SLING to free hands for
work

LEATHER OR CLOTH POUCH

BACKPACK
HOE ADAPTED AS CRUTCH
Reprinted from Accent on Living,
1984
Chapter 64: Decisions about Special Seats and Wheelchairs
In this chapter we look at the things you will need to consider
when buying or building a special seat or wheelchair, to best meet the needs of
a child. Adaptations of seats and wheelchairs for special
positioning needs are discussed in Chapter 65. Designs for building 6
basic wheelchairs are in Chapter 66.
Meeting the needs of the individual child, family, and community
Most children who need a wheelchair or special seat have severe
weakness in parts of their bodies, or muscles that pull them into awkward
or deforming positions. Seating should, as much as possible, keep these children
in healthy and useful positions. It must provide support, but
also allow them enough freedom to move, explore, and develop greater
control of their bodies. For example:
|
1. A child who is ‘floppy’ and slow to develop ability
to sit, |
Figure
|
|
2. may at first need a seat with straps and supports to hold her
up. |

Figure
|
|
3. As she develops better head control and then body control,
the supports can be removed little by little, |

Figure
|
|
4. until finally-if possible-she is able to sit anywhere, with
little or no special supports. Now low back support is all she needs. |

Figure
|
|
CAUTION: If a child needs to be supported
as much as the one in the second picture, do not keep her strapped in her
seat for long. She also needs periods of free movement and exercise to
develop more independent head and body control. Keeping her strapped in for too
long, or providing too much support after she has begun to gain more control,
may actually slow down her progress. Seating needs to be changed and supports
reduced as the child develops.
Also, children who do not feel in their butts need
frequent position changes and ‘lifting’, and special cushions. |
Special seats and wheelchairs need to be adapted not only to the
individual child, but also to the particular family, local customs, and
community situation. For example:
A ‘high chair’ lets the child join the family that
eats at a table.

Figure
A ‘low chair’ lets the child fit in where the family
eats at ground level.

Figure
Also, a ‘high’ wheelchair may be helpful where cooking
and other activities are done high up.
Figure
But a low ‘wheelboard’ or ‘trolley’ may be
better where cooking and other activities are done at ground level.

Figure
It is also important to consider the type of ground surface on
which a wheelchair will be used.
Where land is flat and fairly smooth, and entrance into houses
is level, a chair with a small wheel at the rear may work well and be
less costly to make.

Figure
But where there are curbs, steps, rocks, or other obstacles, a
chair with small wheels at the front works better.

Figure
Narrow back tires and small front wheels allow for faster travel
on hard smooth roads but are useless on rough, sandy roads.
To jump over obstacles, the child can learn to do a
‘wheely’ (tilt the chair back with the front wheels in the air).
On rough, sandy surfaces wide back tires and relatively
large, wide front casters make moving about much easier.

Figure
Wide tires, like the wide feet of a camel, help in sandy places.
|
Having the right wheelchair for the local situation frees the
child to move about more easily in the community. |
Healthy, comfortable, and functional positions
Whether or not a chair has wheels, the position in which it
allows a child to sit is very important. (See Chapter 65.)
For most children, the chair should help them to sit more or
less like this:

Figure

Figure
|
CAUTION: The seat should be wide enough to allow some
free movement and narrow enough to give needed support (see Measurements).
|
Common seating problems and possible solutions
Problem: Hips tilt back
In children with spastic cerebral palsy the hips often stiffen
backward. This triggers spasms that straighten the legs and cause other muscle
tightness with loss of control.

Figure
Also, children with weak hips or back, from spinal cord
injury, spina bifida, or severe polio, often sit slumped with their hips tilted
back and the back severely curved. This can lead to permanent deformity.
One of the most common causes of backward tilting hips is a
chair like this one that is too big for the child.

Figure
Other causes of backward tilt and bad position are:
a chair back that tilts far back
and a cloth back that sags.

Figure
These let the child lean back and cause the hips to slip
forward.
Also, footrests that are far forward so that knees do not
bend enough can increase spasticity that tilts hips back.
A good position can often be gained through:
a fairly stiff, upright back at a right angle to the
seat,
a chair that fits the child so that his hips reach the
chair back,
the knees at right angles, and feet firmly supported.

Figure
Figure
Most children, and especially a child who tends to fall forward
in his seat, will sit better and more comfortably if the whole chair tilts back
a little. But be sure to keep right angles at hips, knees, and ankles.
|
To tilt the chair back, the rear wheel mount can be moved
higher up. You may also need to move the wheel mount back farther
to keep the chair from falling backward with going uphill. Be si re the front
caster barrel is still straight up or making turns will be harder.

Figure
|
Keeping cost down and quality up
For many families, a wheelchair can be a great or even
impossible expense. There are many ways to keep costs down. But be careful. Some
low-cost choices may make the chair too clumsy weak, or unsafe. Other low-cost
choices may actually increase the chair’s usefulness and life. For example,
a very useful, long-lasting wheelchair can be made of wood - or from a cheap
wooden chair. Even wheels made of wood (if made well) may work well and last a
long time. But, making the hubs or bearings of wood usually leads to trouble.
Standard wheelchair wheel bearings are very expensive. However, you can often
get strong, high-quality used metal bearings free or very cheap at electrical
appliance repair shops or auto repair shops.
Factory-made or homemade wheelchairs?
Often you can save money by making your own wheelchair or by
asking a local craftsperson to make one. Also, a homemade chair design can be
more easily adapted to your child’s particular needs.
On the next pages we give information that may help you decide
about different wheelchairs and effective low-cost ways to make them.
You can make a fairly effective low-cost wheelchair by attaching
bicycle wheels or wooden wheels to an ordinary wooden chair. Also, it is easier
to attach special aids or supports to a wooden chair than to a metal chair. This
design is adapted from AHRTAG’s booklet, “Personal Transport for
Disabled People”.
|

Figure
Any wheelchair is better than none-but sometimes not much
better. Look for low-cost alternatives that make a chair better - not
worse. |

Figure
REMEMBER: A wheelchair needs to satisfy the
rider - not just the maker. Before (and after) buying or making a chair, think
carefully about the different features that will help it best meet the needs of
the particular child and family.
When buying or making a wheelchair (or any other aids),
consider:
· Cost.
Keep cost low but quality high enough to meet the child’s
needs.

Figure
· How long will
the chair last? The longer the better, unless it is only for temporary use.
· How easy and quick is it to
make? The easier and quicker the better, as long as it meets your needs.
· Availability of
materials. Make use of local low-cost, good-quality resources (local wood,
cheap metal, used bearings, bike parts, etc.).
· What tools and skills are
needed to make it? If welding equipment or skills are not locally available,
a wooden chair may be a more practical choice.
· How easy will it be to
adjust or repair? Wood chairs that are bolted together are often the easiest
to adjust or add special supports to.
· Weight. The lighter the
better, while making sure it is strong enough.
· Strength. Heavier
persons need stronger chairs and stronger axles. (A small child’s chair may
be supported by a bicycle axle attached on one side only. A bigger child needs
the axle to be supported on both sides, or a stronger axle.)
· Width and length. The
narrower and shorter the better while meeting the child’s needs (but not so
short that it tips over easily).
· How easily can it be
moved-by the child sitting in it or by someone behind? How easily can it
be tilted back to go over rough spots? Lifted up stairs?
Transported? (Does it need to fold to take up less space?)
· How well is it adapted to
the particular child’s wants and needs? Is it comfortable? Does it
allow the child to sit in a healthy position?
· Fit and growth factor.
How well does it fit the child now? How long will it continue to fit her? Can it
be adjusted to fit her as she grows?
· How well is it adapted to
living situations, the home, local customs, width of doorways, surface of
floors and roads, curbs and other barriers?
· Appearance. Is the
chair attractive? Does the child take pride in it? Do other children want to
ride it?
In considering choices for the design, building materials, and
special features of a wheelchair, be sure to carefully consider the above
questions.
Design choices for wheelchairs
|
FEATURE |
DESIGN DETAILS |
ADVANTAGES |
DISADVANTAGES |
|
WHEEL SIZE AND POSITION
2 big wheels with 1 or 2 small caster wheels

Figure
|
· Large wheels let rider push
herself.
· Small caster wheels allow easy
turns (on cement, not sand).
· For leg amputees, rear wheels
must be moved back to prevent tipping over backward

Figure
|
· Child can move it herself if
she has hand and arm control.
· Large wheels go over rough
surfaces easier. |
· takes up more space
· harder to get in and out of
from the side (because wheels need to be higher than seat so that rider can push
herself) |
|
4 small wheels

casters for easier turning
|
Very simple temporary chairs can be made by putting 4 wheels on
an ordinary wood chair.

Figure
|
· good only on smooth floors for
a child who cannot push or help push his own chair
· cheaper
· takes up less space
· easier to move child in and
out of |
· not good on rough surfaces
· Child cannot move it herself.
· creates dependency |
|
3 big wheels

hand crank and steering
|
· You can use 3 bicycle wheels.
· Some models have removable
front wheel so that chair can be easily changed to have small front wheels for
use inside the home. |
· excellent for long distance
and rough road travel
· can be used by a person with
strength in one hand only |
· too big for use inside home
· more costly
· more difficult to make |
|
|
Some riders have 2 chairs: one like this for road travel, and a
smaller one for home or work. |
|
BUILDING MATERIAL FOR FRAME
steel tube

Whirlwind wheelchair
|
· Thin-walled electrical conduit
tubing can be used - 5/8 inch to 1 inch diameter.

AHRTAG design
|
A strong, long-lasting, fairly light chair can be made better
and cheaper than most commercial chairs. |
· requires welding skills, some
design ability, and a fair amount of equipment
· a good chair for a
well-equipped rehabilitation center workshop to build, but not a family
· builders need to be trained
|
|
Wood
AHRTAG model
|

wood chair model design
|
· relatively cheap and easy to
make-mostly wood, few or no welds
· easy to adapt and to add
special supports or tray tables |
(For tighter joints and more adaptability, use nuts and bolts
instead of nails.) |
|
Re-bar (metal reinforcing rod used to strengthen cement)

Figure
|
Design can be the same as for metal tube chairs but it is easier
to adapt because the re-bar is easy to bend |
· relatively cheap
· easier to bend and weld than
steel tubing
· can have plastic woven seat
and back (easy to clean)
· especially good for small
chairs |
· A heavy person or rough
treatment may bend it out of shape
· fairly heavy |
|
PVC pipe (plastic water pipe)

Figure
|
· Use 15 mm PVC pipe
· comes with joints so that it
can be fitted together with a special glue
· For details see reference.
|
· lightweight
· can be built mostly by glueing
pieces together |
· costly materials (around $100
US)
· Plastic tubing will in time
sag or bend in the direction of stress
Therefore it may be necessary to fiberglass the frame-which adds
to cost, work, and weight |
|
SEATS AND BACKS
Soft canvas or leather stretched between supports
Figure
|
· For child who is likely to pee
or shit in the chair use a cloth that is easy to wash
· Plastic-coated canvas makes
cleaning easy but is hot and may irritate child’s bottom. Best to use an
absorbent washable pad over it |
· easiest seating and back
design for folding wheelchairs
· Adjustment to shape of butt
gives comfort (but cushion is needed to protect against pressure sores)
· Curving back may help keep
child from falling sideways |
Figure
· Soft, curving back lets child
bend in an unhealthy position
· hard to attach positioning
aids
· In children with spasticity or
muscle imbalance, this may increase the risk of developing knock-knee
contractures. |
|
Firm (but padded) back and seat
Figure
|
· Use wood or thin plywood
· Special designs allow a wood
seat to swing up for folding |

Figure
· Wood seat and back allow easy
addition of supports and adaptations
· Firm wood back and seat help
child sit with back straight and knees apart (especially important for children
with spasticity) |
· may be less comfortable
· without cushion may cause
pressure sores in child with no feeling in his butt
· heavier
· difficult or impossible to
fold the chair |
|
Woven seat and back

Figure
|
· Use natural basket fibers
reeds, or rattan
· or use plastic webbing
· or use tightly stretched
strips of car inner tube |
· An open weave is cooler in hot
weather
· Plastic or rubber woven seats
can be easily washed. Can be used as a chair to bathe in |
· must be kept stretched tight,
not useful on folding chairs
· may not last long if material
is not strong
· same sag problems as with
canvas or leather |
|
TIRES
Pump-up with air ‘balloon’ tires

Figure
|
· Bicycle tires and tubes work
well for the large wheels-20 inch (51 cm) 24 inch (61 cm) or 26 inch (66 cm)
wide or narrow.
Puncture-proof inner liners may be available |
· softer ride
· easy to replace
· wide tires good for
sand and rough ground
· narrow tires better on
smooth paved roads |
· Puncture (hole in tire)
may occur-especially on rough roads
· more costly than some other
tires
· wears out sooner than solid
tires |
|
Solid tires (standard wheelchair wheels)
Figure
|
Buy from wheelchair supply center to fit diameter and width of
rim |
· no flat tires
· good for speed on very smooth
surfaces |
· costly
· hard to replace
· very hard, bumpy ride on rough
surfaces
· very narrow - sinks into sand
|
|
Rubber hose inside bicycle tire

Figure
|
· Overlap ends and cut at
45° angle
· Fill those into tire

Figure
|
· no flat tires
· softer ride than with solid
tire
· cheap |
· Flattening of tire where it
touches ground means it moves slower, and is harder to push |
|
Thin strip of old car tire

Figure
|
· Cut strip in wedge shape to
fit rim
· Wire ends together

Figure
|
· no cost
· long-lasting

Figure
|
· bumpy ride
· difficult to fit well on rim
and to fasten ends firmly |
|
Large machinery fanbelt (discarded)

Figure
|
· Use old power belts or fan
belts from industrial machinery or tractors. Cut to fit and wire ends together
|
· no cost
· long-lasting
· wedged to fit wedge rim |
· bumpy ride
· difficult to fit
· may be hard to find at the
right width |
|
Piece of old bicycle or scooter tire
Figure
|
· used for middle-sized or
small wood wheels
· Notch edges, glue, and nail to
wheel |
· cheap
· If heavy tire is used it may
last a long lime
· Protects edge of wood wheel
|
· hard, bumpy ride (but softer
than on wood wheel alone)
· may tear off |
|
BIG WHEELS
Standard factory-made wheelchair wheels

Figure
|
· Buy to fit chair
· available from wheelchair
dealers
· 24 inch (61 cm) or 26 inch (66
cm) rims for adults
· 20 inch (51 cm) rims for small
children (may be hard to find) |
· little work needed (if they
are bought to fit standard hubs)
· May come fitted with hand push
rim |
· costly
· may be hard to find
· wide-wheeled models often not
available
· may not hold up on rough
ground
· poor quality bearings |
|
Bicycle wheels (rims and spokes)

Figure
|
· For children, standard
thickness spokes may be enough
· For large persons, heavy-duty
spokes may be needed |
· less costly than standard
wheelchair wheels
· available in different sizes
and widths |
· Putting on and lining up
spokes takes time and skill
· axles weak (but stronger ones
can be adapted) |
|
Bicycle rims with wooden spokes

Figure
|
· notched wood cross-pieces on a
triangular wood base can be greased and used as the hub |
· no need to know how to fit
spokes
· works with wood hub |
· Rim may easily get
bent-especially on rough roads
· hard to line up evenly
· Hub wears out easily |
|
Wood wheels - big or small

Figure
|
· Use boards or plywood
· To avoid splitting screw and
glue 2 layers together with grain running in opposite directions
· Cut notch in rim to hold solid
tire

Figure
|
· relatively cheap
· little skill required-mostly
carpentry
· works with wood axles
· heavy-duty bearing can be
added |
· often heavy
· may not hold up
long-especially in wet climate or mud. (Keeping wood oil-soaked helps them last.
Use old engine oil) |
|
CASTERS AND WHEELS
(Caster means that the wheel can swing in different
directions for making turns)
Standard wheelchair caster wheels

Figure
|
· Casters come with hard or
balloon tires in many sizes weights styles and prices
If possible, get (or make) casters with ball bearings |
· little work to
attach-especially if standard mount and bearings are used |
· usually very costly
· may not be locally available
|
|
Casters from other (non-wheelchair) equipment (used or
new)

Figure
|
· Use 3 inch to 6 inch wheels
· larger, wider wheels for rough
ground
· Be sure bearings are strong
enough and in good condition
· Drill holes in rubber wheels
to make them weigh less
Figure
|
· less costly (especially if not
new)
· often full wheel and caster
bearings come with them |
· Poor quality casters make
wheelchair much harder and more awkward to use
· Hard-rubber casters make a
bumpy ride
· Some used casters are too weak
|
|
Bent and welded steel caster forks

Figure
|
· Choose bolt width to fit
bearings
· A bent steel tube can be used
instead of a metal band |
· less costly than factory-made
casters
· strong (if well made) |
· needs special equipment
(bending lig) and welding skills |
|
HUBS, BEARINGS, AND AXLES
Standard wheelchair bearings

Figure

Figure
|
· A standard wheelchair uses 12
bearings 2 for each wheel axle and 2 for each upright caster bearing
· How a ball bearing works

Figure
|
· These bearings come as part of
standard wheelchair hubs and wheels
· Most factory-built wheelchairs
have unusual sized axles and therefore must be fit with special wheelchair
bearings |
· Bearings on most factory-built
chairs are costly, of poor quality, and wear out quickly
· Unusual hub size makes it hard
to replace commercial wheelchair bearings with other standard machine bearings
|
|
Bicycle bearings and axles

front wheel axle
|
For mounting alternatives see wheelchair designs. Also see the
AHRTAG Manual |
· cheap-especially if old
bicycles are used
· easy to get
· can be used with complete
bicycle wheels |
· Axle is too weak to be
supported by one end only (except in a small child’s wheelchair) |
|
Rear bicycle wheel axle and bearings

Figure
|
· First take free-wheel
mechanism apart and remove ratchets (1)
· Then attach hub to a metal
plate as shown and spot weld it.
· Other methods for one-end axle
support are in the AHRTAG Manual

Figure
|
· Allows axles to be attached by
one end only. |
· Needs fairly skilled work and
welding.
· heavy |
|
Used machinery bearings

Figure
|
· Find used high-speed bearings
of the size shown (or near the size). Volkswagen alternator bearings and
certain power tool bearings work well.
· Use 5/8 inch steel bolts for
axle. |
· no need to adjust, grease, or
clean
· usually free or vary cheap
· In wheelchairs they will last
a very long time.
· If done well, results are
better than with commercial hubs and bearings. |
· very careful exact work needed
for good results |
|
Wood bearing

Figure
|
· Use a hard wood that will not
split.
· Soak wood in old motor oil.
· For more ideas and details on
wood bearings, see AHRTAG Manual |
· cheap and fairly easy to make
|
· tends to wear out, wobble, or
crack quickly unless very well made; not as smooth or easy to ride as with ball
bearings |
|
SUPPORT OF AXLES
Axle supported on one side only
Figure

This is the standard mount for
factory-built chairs.
|
· Strong steel axles are needed
for support at one side only. Axle should be at least 5/8 inch thick for a large
person.
· For a very small child bicycle
axles can be supported by one side only. One way is to weld bicycle axles to a
thin metal pipe. (1)

Figure
|
· Not as wide or heavy as the
chair with 2-side support.
· easier for user to get a
full-length push with hands and arms
· narrow size important for
doorways and transporting

Figure
|
· For adults and large children,
standard bicycle axles are too weak for one-side support.
· Even for smaller children,
bicycle axles are weak, and rough use can bend them. Put a sign on chair:
FOR SMALL CHILDREN ONLY |
|
Axle supported on both sides
This can be done in several ways:

Figure
|
· Place outer bar of axle
support so that it allows as much room for hand pushing by the rider as
possible.

Figure
|
· 2-sided support allows use of
standard bicycle wheels and axles.
· easy to build and replace

Figure
|
· chair wider, more difficult to
get through narrow doors and spaces; more difficult to transport
· Wheel supports get in the way
of hands when user moves by pushing wheels.
· heavy
Figure
|
|
TO FOLD OR NOT TO FOLD
A typical folding chair

Figure
|
· folding mechanism usually with
2 scissoring flexible cross pieces and cloth or leather seat
· For details of a
make-it-yourself model |
Folding:
· narrow when folded
for easier transport or storage
· smoother
ride due to flexibility
Non-folding:
· cheaper and
lighter
· easier to make
· more adaptable
· often stronger |
Folding:
· heavier
· harder to make
·
more costly
· less adaptable
Non-folding:
· Transport in cars
and buses more difficult Consider how much this will affect the child’s
ability to go where she wants
·
stiff ride |
|
ARMRESTS
No armrests

Figure
|
Note: Many chairs are built so that armrests are
part of the main structure and strength of the chair The armrests cannot be
easily removed, even though this might benefit the child Carefully consider the
child’s need for armrests before buying or making a chair |
· Many children with strong arms
and trunk control prefer a chair with no armrests and a very low back support
· Moving by pushing the wheels
is easier
· less weight
· Getting off and on from the
side is easier-especially important when legs are completely paralyzed
and when arms are also weak |
· Many small children need arm
rests for stability, for positioning, or for comfort |
|
Fixed armrests

Figure
The so-called ‘desk arm’ lets front of chair fit under
a table (1) - but is often too high or too short.

Figure
|
· Armrest height and length
should be determined for each child and her needs |
· especially helpful if child
cannot use legs to get out of chair
· They can help child to sit in
a better position and be more comfortable
· They can sometimes be used for
attaching a removable table (2)

Figure
|
· They get in the way for
pushing wheels and for getting off chair to the side
· For many children, fixed
armrests get in the way more than they help. |
|
Removable armrests

Figure
|
· In folding chairs, armrest
attachments must be placed so they do not get in the way of folding

child transferring from a chair
on a board - one armrest removed
|
· Provides arm support when
needed, yet can easily be removed for travel and transfer |
· requires more work, materials,
and exact fittings
· adds slightly to weight
· Separate armrests may get lost
|
|
FOOTRESTS
Positions
In adult chairs, footrests often angle legs forward to leave
room for casters.

Figure
For a small child, often footrests can position legs straight
down. This is important in many cases.

Figure
A larger child may need to sit on cushions so that his feet are
above the casters. |
· Footrest should keep the knees
and ankles at right angles and the legs slightly separated.

Figure
· It should usually not twist
them or force them together.

Figure
|
· Good positioning and support
of the feet help the whole body to stay in a better position.

A footrest like this.

may help feet like these.
|
· A footrest that keeps the leg
at right angles may cause or increase knee contractures in some children.
Children should not stay sitting too long and should do daily exercises to
stretch their legs, feet, and hips.
Figure
To prevent or correct contractures, one or both legs may need to
be kept as straight as they will go. |
|
Fixed position footrests
The height of the rests should be carefully measured to fit the
child who will use them.
Figure
REMEMBER: Cushions or seating adaptations will change the
height needed for the footrests. |
· If the footrest is too low,
blocks can be ‘placed on it to make it higher. They can be removed as the
child grows. (1)

Figure
· However, fixed footrests that
are too high are more difficult to correct. So it is better if they are too low.
|
· easiest to build
· For a small child who can
easily be lifted in and out of the chair, they are fine.
· If footrests are screwed or
bolted onto a wooden wheelchair, their position can easily be changed as the
child grows. (2)

Figure
|
· They often get in the way when
the child gets in or out of the chair, or in the way of the person lifting a
larger child. (See other methods below.) |
|
Removable or swing-away footrests
wood chair swing-away footrest

Figure
|
There are many designs. Here we show one for the wood chair
shown above and one designed for a metal chair. (3)
Figure
|
· They make it easier to get in
and out of chair.
· The best footrests are those
the child can easily move out of the way herself.

Figure
|
· Removable footrests may get
lost.
· more work to make them
· Unless well-made, they may be
less stable than fixed footrests. |
|
Adjustable footrests

also serves as storage shelf.
|
There are many designs. Here is one of the simplest, for a
plywood chair.

Figure
For straight leg sitting, a longer board (4) fits into high
slots. |
· very adaptable
· easy to make
· can support a casted leg
Figure
|
· A cushion or padding should be
placed over the leg board (unless leg is casted).
· Side supports may be needed to
keep leg from slipping off.
Figure
|
|
No footrests

Figure
|
· Seat is mounted low so that
feet rest flat on floor. |
· useful for persons who can
pull their chair along with their legs and feet-especially when one or both arms
or hands are too weak to push the wheels |
· Feet may drag when someone
else pushes the child in the chair. Swing-away footrests may be the best
solution. |
|
PARKING BRAKES
Lever brakes
Brake for wooden chair

Figure
|
There are many brake designs. This one is from AHRTAG.

Figure
|
· takes little space
· fairly easy to use if made
right (which often they are not) |
· needs welding and skill to
make
· Homemade brakes often give
problems-yet it is important that chairs have them if possible. |
|
Parking block

Figure
|
Brakes on wheelchairs are for keeping the chair from rolling
when getting in or out, or stopped on a hill.
The simplest form of brake is a parking block that keeps the
wheel from turning.
Figure
To ‘brake’, roll wheel up ramp and into groove. |
· easy to make, requires no
welding, and is cheap
· If the child usually only gets
in and out of the chair in one or two places in the home, blocks in these places
may be all that is needed. |
· a heavy, awkward object to
move from place to place
· not practical outside the
house (or in it)
· have to tilt child to one side
to ‘park’ chair |
|
HANDRIMS FOR PUSHING
using thin metal tubing
(cane or wood have also been used)

Figure
|
Designs taken from ARHTAG.

Figure
|
· Handrims help keep hands
clean. (Otherwise child has to push on tire.)
· especially important where
there are very dirty paths and roads

Figure
|
· Added width makes it harder to
get through narrow doorways.
· adds weight |
|
Handrim grip improvers
Figure
|
Cut a piece of rubber hose lengthwise and tape it onto rim.

Figure
|
· For child with weak or
paralyzed hands, a smooth rim can be hard to grip - especially if it is chromed
or galvanized
· Putting rough cloth tape a
rubber hose or many small handles on the rim will make pushing easier.
· Or you can wrap the rim with a
long thin strip of car tire inner tube. (1) |
· Pegs sticking out from rims
increase width of chair
· Pegs sometimes cause hand
injuries - especially when going fast downhill.

Figure
|
Fitting the chair to the child: measurements
These measurements are for wheelchairs and for special
seating without wheels.

SEAT WIDTH
Measure across hips or thighs - whichever is wider.

Figure
(1) Add 1 cm. (1/2 inch) to both sides for seat width.
Note: Some specialists recommend wider
seats. But the child gets a better arm position for pushing the wheels if only 1
cm. is added on either side. However, you may want to leave a little more room
to allow for the child’s growth.
SEAT DEPTH

Figure
|
CAUTION: When measuring, be sure to allow for
cushions or backboards that will be added. |

Figure
Note: You may want to add 2 cm. or 3 cm. to allow
for growth - and use a backboard or firm cushion to fill in the extra space (2).
Subtract about 1 cm. for depth of seat to leave a little space
behind the knees (3).
SEAT HEIGHT
|
CAUTION: Be sure to include cushion when measuring
height for chair seat. |

Figure
Note: Raising the seat of a small child higher
lets his feet rest above the casters and therefore directly below the knees. The
higher seat also helps for eating at the table with the family. Sideways
transfers are also easier. Sometimes seats are placed even higher than shown,
but this makes pushing wheels with hands more difficult.

Figure
ARMREST HEIGHT
MEASURE FROM BOTTOM OF BUTT TO BEND OF ELBOW.
Before measuring, be sure child is sitting as straight as
possible.
Put armrest height a little higher than his elbow so that the
elbow will be positioned away from the body.

Figure
Note: This measurement is standard, but some
children need arm support at a higher level. Experiment.
BACK HEIGHT
MEASURE FROM BOTTOM OF BUTT TO ARMPIT.

Figure
Note: This measurement is standard, but some
children need a higher back, and sometimes head support. Others prefer a back
that supports only the hips.
IMPORTANT: Also check how much hips and knees
bend, as this may affect position of footrests and casters.

Figure
Wheelchair production as a small
‘village-industry”
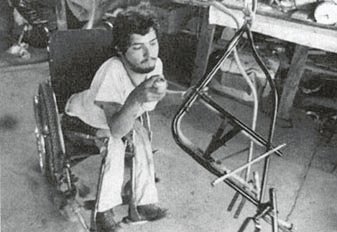
A disabled worker from PROJIMO
paints a wheelchair frame.
In several countries small groups of disabled persons have
started to produce low-cost, good-quality wheelchairs adapted to local needs.
Usually this is in places where standard factory-made wheelchairs are very
high-priced and are not suited for use on rough or sandy ground.
Some of these ‘little factories’ try to be
self-sufficient. A few have even succeeded in making a modest profit, while
keeping prices low.
Sometimes, a small-scale wheelchair making and repair shop is
set up as part of a community rehabilitation program. Self-sufficiency (selling
the chairs for a little more than it costs to make them) is often a goal. But
because families with the greatest need are often least able to pay, the chairs
must often be sold below cost.
WHAT KIND OF WHEELCHAIRS TO MAKE
This depends on many factors: cost, skills or training
available, tools and equipment needed, amount of money available to start,
building materials available, the possible market, the local economy and needs
of the wheelchair user and family
For example, folding tube-metal chairs are relatively expensive
to make and require more skill, training, and equipment. However, they often
work smoother, last longer, and are easier to transport than are many other
models. These high-quality good-looking chairs - painted or even chrome plated -
may sell the best, even if expensive, and may compete with factory-made chairs.

Figure
If the wheelchair users will be mostly children and poor
families, low-cost wooden chairs may be more appropriate. These can be easily
built to size and adapted to the needs of the individual child. The chair may
not last as long. But the child is growing and her needs may change. Simple wood
chairs also require fewer skills to build-mainly carpentry. They are easier for
the family to build, repair, or add changes to at home.
Ideally a village shop would make a variety of chairs out of
different materials and at different prices. Chairs of all models, sizes, and
adaptations should be kept on hand to give the child and family a chance to know
and try different possibilities. Be sure to make child-sized chairs. And make
chair inserts so that adult-sized chairs can be adapted for children.
Look for every opportunity to keep costs low.
Providing repair services for used and broken chairs are good ways to
keep children on wheels. Also use as much ‘waste’, and used and free
materials as you can: old bicycle wheels, old machinery bearings, scrap metal,
and bolts from junk yards. For basic building materials, check prices of
different sellers. Once you are sure of what you need, try to buy large amounts
at lower cost. If you explain to the sellers the purpose of your purchase, they
may lower prices or give you useful scraps.
How-to-do-it. Reference Materials for Wheelchairs,
Wheelboards, and Other Seating
It is impossible, in a book such as this, to give detailed
building plans for more than a few wheelchairs, scooters, wheelboards
(trolleys), and special seats. The following reference materials have more
detailed plans. You can send for them at the addresses shown. Some may also be
available from TALC, P.O. Box 49, St. Albans, Herts, AL1 4AX, England. With each
reference we give one or more drawings of key designs and a few comments about
their usefulness and cost.
Personal Transport for Disabled People - Design and
Manufacture

WHEELCHAIRS

TROLLEYS

TWO-HAND DRIVEN TRICYCLE
AHRTAG
Farringdon Point
29-35 Farringdon Road
London EC
1M 3JB
ENGLAND
Also available through TALC
· many good designs
and plans for low-cost aids
· does not
compare strengths and weaknesses or describe limitations of different
designs
· no design for wheelchairs with
casters in front (which are needed for many areas)
Independence through Mobility: A Guide to the Manufacture of
the ATI-Hotchkiss Wheelchair by Ralf Hotchkiss

Figure
c/o Wheeled Mobility Center
Dept. of Engineering SFSU
San
Francisco, CA 94132, USA
· design for the
‘whirlwind’, a high-quality middle-cost steel tube wheelchair that can
be built by disabled craftspersons as a village industry
· short training usually needed
to build it effectively; welding skills and simple math required
· cost of materials about US
$100
Local Village-made Wheelchairs and Trolleys by Don Caston

TROLLEYS

SALES CART
Figure

WHEELCHAIRS
Available upon request.
DON CASTON
202 Cheesman Terrace
London W14 9XD
ENGLAND
· simple, very
low-cost aids, made mostly out of wood, using bicycle or wood wheels
· all models are based on one
3-wheel trolley design
· Instead of a standard caster,
the front slides on its axle and is pushed back to center by a choice of simple
methods. (This method is cheap and clever, but unstable and does not turn as
well as designs with casters.)
Asia-Pacific Disability Aids and Appliances Handbook, Part 1:
Mobility Aids, 1982

TROLLEYS
ADAPTED TRICYCLE
ONE-HAND POWERED TRICYCLE

‘HOMEMADE’ ELECTRIC
WHEELCHAIR USING CAR FAN MOTOR AND BICYCLE PARTS

WHEELCHAIR TO BE PULLED OVER
ROUGH GROUND

TILT CART
ICTA
BOX 510 S-162-15
V�llingby, SWEDEN
· brief descriptions
and non-technical drawings and addresses for information on many
aids
An Accent Guide to Wheelchairs and Accessories

LAP TRAYS

REMOVABLE ARMRESTS

BACKS
ACCENT
P.O. Box 700
Bloomington, IL 61702
USA
· information about
different aids, features, and accessories of factory-made chairs
· basic information on cleaning and repairing
· design and building information limited to a few
accessories
UPKARAN-A Manual of Aids for the Multiply Handicapped
SEATS

WHEELCHAIRS

PUSH-ALONG

TRICYCLE WITH SUPPORT

WALKER-RIDER

TIRE SCOOTER
The Spastics Society of India
Upper Colaba Road
Near
Afghan Church
Bombay 400 005
India
· an excellent
resource
· many simple, practical designs
for seating, wheelchairs, crawlers, slanders, walkers, therapy aids, and
toys
How to Make Basic Hospital Equipment by Roger England and
Will Eaves

HOSPITAL WHEELCHAIR
OUT-OF-HOSPITAL WHEELCHAIR (2
wheels only)

BICYCLE AMBULANCE

CHAIR MADE WITH WHEELS OF RATTAN
(also works as a walker)
ONE-HAND DRIVEN TRICYCLE
Intermediate Technology Publications
103-105 Southampton
Row
London WC 1B 4HH
ENGLAND
Also available through TALC and AHRTAG
· simple, attractive
designs using tube steel
· welding skill
required, fairly costly to make
· no designs
for casters-in-front chairs
Poliomyelitis - A Guide for Developing Countries
by
R.L. Huckstep

WHEELCHAIRS

basic frame

2-HAND POWERED TRICYCLE
Churchill Livingstone
55 Fontenac Road
Naperville, IL
60563 USA
· detailed designs
for 3 models of wheelchairs commonly used in Africa
· only casters-at-rear designs (which often may not be
the most appropriate design)
Positioning the Client with Central Nervous System Deficits:
The Wheelchair and Other Adapted Equipment
by Adrienne Falk Bergen and
Cheryl Colangelo

SEAT BELTS - This child, whose
hips tilt forward, needs a higher belt.

SEAT BELTS - This child, whose
hips tilt back, needs a low belt.
Valhalla Rehabilitation Publications, Ltd.
P.O. Box
195
Valhalla, NY 10595
USA
· excellent detailed
discussion of specific needs of children with cerebral palsy
· many well-illustrated examples
· written for developed
countries but many aids and designs are simple and can be made anywhere at low
cost
‘Build Yourself’ Plastic Wheelchair
Directions for assembly available from:

Figure
Spinal Research Unit
Royal North Shore Hospital of
Sydney
St. Leonards, NSW 2065
Australia
· relatively
expensive (materials about US $100)
· plastic frame made of 9 m. of
15 mm. PVC pressure pipe; plastic set of 8 mm. soft PVC tubing; 2 rear 24 inch
bicycle wheels; 2 front casters (15 mm.)
· relatively expensive
(materials about US $100)
· Plastic will sag with
continued use,
· uses standard bicycle axles -
which will bend with the weight of an adult or large child
· relatively lightweight
· does not fold
· design plan complicated and
difficult to follow
Measuring the Patient

SEAT HEIGHT
Everest and Jennings, Inc.
Available through Everest and Jennings wheelchair dealers or:
Everest and Jennings
4203 Earth City Expressway
Earth
City, MO 63045 USA
· good information
on measurements for standard chairs
·
illustrated discussion of problems with chairs that do not meet a person’s
specific needs
Functional Aids for the Multiply Handicapped
by Isabel
Robinault

SMALL-WHEELED ADJUSTABLE
WALKERS

CHILD’S TRICYCLE WITH BODY
SUPPORT BOLTED TO FRAME

SCOOTER THAT IS ALSO A WHEELED
STANDER

SUPPORT FRAME
Harper and Collins Sales
10 East 53rd Street
NYC, NY 10022
USA
· mostly
factory-built examples but some are simple and well-illustrated enough to serve
as design guides
· many good wood special seats
· also support frames, standers,
walkers, toys, and eating
aids
Chapter 65: Adaptations for Wheelchairs and Other Sitting Aids
Many children need more support or special positioning
than is usually provided by a regular chair or ordinary wheelchair. So we should
try to get or make a chair designed to fit the individual child.
Unfortunately, many children get wheelchairs that are much too big. Often
no others are available. Here are 3 ways to adapt them.
1. If a folding chair is too wide, make the cloth seat
and back narrower The chair will not open as wide (but may be too high)

Figure
Be sure to check how well the child can reach to turn the wheels
2. If the chair is too big from front to back, or if the
child needs a better position, try a wedged cushion (1) and padded backboard
(2).

Figure
Some children need straps across their hips or ankles to keep a
good position (See the precaution)
3. If still more help is needed for positioning the
child, make a sitting frame designed to meet her needs Here is an example
|
CAUTION: Not all children will need all the
special features shown here. Some will need still other features. Adapt special
features to the needs of the particular child, and test them before making
them permanent. |

Figure

The sitting frame can be used on
the ground

It can be placed in a chair (or
strapped into the seat of a car)

It can be fitted into a
wheelchair
Or make a simple wood wheelchair
with all the features of the sitting frame.
Seating adaptations for specific
children
The various adaptations discussed here are designed to
meet specific needs of individual children, especially children with cerebral
palsy. Remember that each child’s needs are different, and
adaptations that are not carefully fitted to the needs of the child may do more
harm than good.
1. Carefully consider the child’s specific
needs before including any adaptation or special seating.
2. After making an adaptation, evaluate how the child uses
it.
3. Check often to see if it continues to help the child.
An adaptation for a growing child may help her progress at one stage of
development but hold her back a few weeks or months later.
General position
We have talked about this a lot, but it is worth repeating:
Most children who require special seating sit best with their
hips, knees, and ankles at right angles.

USUALLY RIGHT

USUALLY WRONG
A chair shaped like this may cause a child with
spasticity to stiffen and straighten, or cause a, severely
paralyzed child to slip forward and slump.
ANGLE OF BODY AND HEAD

A slight backward tilt helps most
children sit in a better, more relaxed position.

If the child still falls or
stiffens forward,
it may help to tip the chair back
even more.
However, this may cause his head to lean back so his eyes look
upward.

Figure
A head pad may help position him to look forward, and may
decrease some spasticity. It can also reduce spasticity in the eye muscles.

The heads of babies and small
children may be so big that the headrest tilts them forward so their eyes look
down.

Putting the headrest behind the
level of the backboard lets the child hold her head in a better position.
|
REMEMBER:
All the seating ideas shown on these pages apply to wheelchairs,
and also to special seats without wheels.

Figure
|
Other ways to help keep hips at a
right angle
HIP STRAPS
If the hips tilt back like this (1)

Figure
a high hip strap will not help much
A low hip strap helps keep the hips at a good angle

Figure
But if the hips tilt forward like this (1).

Figure
a low hip strap will not help much
A high hip strap helps keep the
hips at a better angle
Notice that in both of these children with cerebral palsy,
supporting the hips in a better position helps the whole body take a more normal
position.
SPECIAL CUSHIONS

WITHOUT CUSHIONS

WITH CUSHIONS
For the child whose hips tilt back, or whose upper body is
‘floppy, a padded support across the lower part of the back may help
her keep a good position (1).
A padded post may also help to keep hips back and legs apart
(2).
A footstrap or block that keeps knees bent may help keep the
child from straightening stiffly
|
Good cushions sometimes make straps unnecessary |
Keeping the body straight from side to side
Even with a firm board seat this boy’s body sags to one
side. This can lead to increasing curve of the spine (scoliosis)

Figure
Hip guides may help him sit straighter

Figure
Sometimes hip guides alone are not enough

Figure
He may also need carefully placed body guides to help keep his
body in a straighter position

Figure
Deciding where to place body
guides
1. Look carefully at how the child sits.
Figure
2. Draw a sketch of how he sits. Then draw arrows where you
would need to push to help him sit straighten

Figure
3. While someone holds the child in his best position, mark
where you think the guides ‘ should be placed.
Figure
4. First, build in the guides in a temporary way.

Figure

Figure
The guides (1) under the child’s arms should be thin. To
hold their position you can use angle irons.
5. See how well the child sits in the adapted seat. When you
cannot improve it more, fasten the guides firmly and pad them so they do not
hurt him.

Figure
|
An ‘H’ harness, with straps that pass through slots in
the backboard, is another way to help hold steady the body of a severely
disabled child.

Figure
|
Carefully evaluate what kinds of
support each child needs.
Maria’s legs straighten, press together, and turn inward.
Her whole body position is affected.
A hip strap holds her hips back some but does not help
her overall position much.

Figure
However, a backboard that bends her hips more, plus a
knee post, help improve her whole body position-without straps!

Figure
Pedro is a heavy child whose body stiffens and his knees push
open.
A combination of a backboard with guides, a special
cushion and a knee block does not help him.

Figure
However, a hip strap together with blocks outside
his knees gives him a much better position, (He may also need foot,
straps.)

Figure
SHOULDER-BLADE WINGS
Pablito’s spastic muscles pull his shoulders back and make
it hard for him to bring his hands together in front of him. The village team
had an idea.

Figure

Figure

Figure
They put “wings” behind his shoulder blades (1), to
help keep his shoulders forward.
Now Pablito can bring his hands together and play more easily
LAP BOARDS
These can be made from thin wood, plywood, or fiberboard. They
should be easy to take off, but grip firmly when in place.
Figure
You can make a simple instrument out of cardboard or stiff paper
to measure the child’s body for cutting out the lap board (1).

Figure
A lap board (1) can help keep shoulders, arms, and body
in a better position, especially if it has a part cut out measured to fit around
the child.
‘Velcro’ (stick-to-itself tape)
(2) can be used to fix the board to the chair for easy removal - and to adjust
it forward or backward.

Figure
Be sure to put the softer part of Velcro on the
chair arms (1). The rough parts could scratch the child when the boards is not
used.

Figure
(1) Extra holes for changing peg position.
(2) Raised edges help keep toys from falling.
(3) Two pegs to hold onto may help him sit, or move into
a better position. They also help him develop hand control (games with rings,
etc.)
Height of the lapboard is usually the same as for
armrests. Experiment to find out what works best.

Figure
If needed, arm guides (1) can be used with a lap board to keep a
child’s shoulders forward and his arms in a better position to use his
hands.
DESIGN FOR A WHEELCHAIR INSERT
This insert, from Positioning the Client with Central
Nervous System Deficits, provides a lot of control, and is
especially useful for some children with spasticity. Although it was designed as
an insert for a wheelchair, you can use it as the frame of a wooden wheelchair,
or chair without wheels built for a specific child.

Figure

Figure
measurements of an insert to fit a standard “junior growing
wheelchair”.
The height and depth measurements must be adapted to the
individual child.
|
Measurements are given in centimeters (cm.). To change to
inches, divide by 2.5. |
DESIGN FOR A STRAIGHT-LEG SITTING FRAME (mostly for very
young children)

Figure
To seat the child, the frame can be put on the ground, a table,
a chair, or into a wheelchair.

Figure
DESIGN FOR AN ADAPTED CASTER CART (WHEEL BOARD)
Use the same suggestions for supports, guides, and straps.

Figure
Note: The child’s weight is over
the large wheels. He can rock from one caster to the other. For travel over
rough ground, he will learn to balance on the center wheel and barely touch down
with the others.
|
CAUTION: Be sure to add cushions or adequate padding to all
seating designs. Children whose bodies push in uncontrolled ways can very easily
develop pressure sores (see Chapter 24). |
Chapter 66: Designs for 6 Basic Wheelchairs
There are dozens of designs for low-cost, ‘appropriate
technology’ wheelchairs. Some are lower cost and more generally useful than
others. In PROJIMO, we have built many different wheelchairs. In this chapter we
give designs for 6 of the ones that we have found most useful. Each has
advantages and disadvantages.
|
AHRTAG wood wheelchair made from a child’s chair,
bicycle wheels and axles at front, one rear caster |

Figure
|
Advantages: the simplest and one of the cheapest chairs
to make, easy to modify or adapt, very little welding needed, can be built in
one day by someone with some carpentry skill, low cost
Disadvantages: Single, small rear wheel makes it
difficult for either the child or helper to push over rough ground or up curbs.
Fixed footrest makes it hard for child to climb in and out without tipping chair
forward when weight is on footrest. Sideboard makes transfers to side and
lifting child from behind difficult |
|
Re-bar and woven plastic wheelchair steel construction
rod frame with woven plastic seat, back, and footrest |

Figure
|
Advantages: simple design fairly low-cost re-bar is easy
to bend, plastic woven seat is comfortable and easy to clean slide-away footrest
makes getting in and out easier
Disadvantages: Builder needs welding skills, relatively
heavy and not as strong as tubing chairs. Big bumps may bend the chair out of
shape |
|
Square metal tube wheelchair frame bolted together |

Figure
|
Advantages: strong, stable metal chair that can be built
with nuts and bolts (welding needed only to attach front wheels) Flat surfaces
make it easier to put on wood adaptations; fairly low cost
Disadvantages: more work and skill needed than for above
chairs design more complex, slightly higher cost than wood chairs |
|
Wheelchair with lying board made of steel tubing, with
removable wood lying board |
Figure
|
Advantages: useful for active child who must lie face
down to heal sores or stretch contractures. When board is removed, it is
a regular wheelchair, low cost very adaptable
Disadvantages: requires welding (but a simpler model can
be made of wood) does not fold board takes up a lot of space stiff ride |
|
Plywood frame wheelchair with 20 inch bicycle wheels and
axles, and 2 front casters |

Figure
|
Advantages: attractive, lightweight, low cost, easy to
make and adapt. Caster wheels in front (not in back) make it easier to go over
rough ground and curbs. Adjustable push-away footrest makes positioning
and getting in and out easy
Disadvantages: Plywood and double casters increase cost
(although it is still a cheap chair) Plywood (if not marine grade) may come
apart in wet weather. Bicycle axles may bend or break with a heavy child or
rough use |
|
Metal tube folding wheelchair made from thin-wall steel
tubing, strong axles with machinery bearings |

Figure
|
Advantages: Chair folds for transporting or storage, very
tough, flexible design good for uneven surfaces good for side transfers a very
high-quality chair if well-made
Disadvantages: needs more skill (tube bending, welding
exact fittings, wheel spoking, etc) to build, relatively costly, hard to adapt
|
Tools needed for making wheelchairs
Ideas for setting up a workshop for disabled workers are
discussed in Chapter 57 and Chapter 64. How you equip your workshop for making
wheelchairs will depend on (1) how much money you have (or can borrow) to do it,
(2) the kinds of chairs you hope to build (metal or wood), (3) the skills,
physical and mental abilities, learning potential, and
responsibility (regarding safety) of the workers, (4) the availability of
electricity and power tools, (5) how many persons will be working, and (6) how
many chairs you hope to produce.
Here we list the basic equipment you will need for making the 6
wheelchairs described in this chapter. Many choices are possible. More
specialized parts of the work can be done by outside crafts persons. For
example, in a wheelchair production center in Belize, axles must be machine
tooled on a metal lathe. Local machine shops cooperate by doing this free.
|
CODE
AN - Absolutely necessary
N -
A big help, but you might do without it
(N) - Necessary only for
axles
? - Depends on model |
TYPE OF CHAIR |
|
wood
chair |
re-bar
and
woven
plastic
|
square
metal tubes
with
wood
seat and
back |
wheelchair
with lying
board |
plywood |
round
metal
tube |
|
TOOLS REQUIRED |
|
|
|
|
|
|
|
bench vise |
N |
AN |
N |
AN |
(N) |
AN |
|
tubing bender |
|
|
|
AN |
|
AN |
|
welding (brazing) equipment |
(N) |
AN |
N |
AN |
(N) |
AN |
|
metal saw |
(N) |
AN |
AN |
AN |
(N) |
AN |
|
wood saw |
AN |
|
|
AN |
AN |
|
|
hammer |
AN |
AN |
AN |
AN |
AN |
AN |
|
wrench (set or adjustable) |
N |
N |
AN |
AN |
N |
AN |
|
metal file and/or grinder |
(N) |
AN |
AN |
AN |
(N) |
AN |
|
screwdriver |
AN |
AN |
AN |
AN |
AN |
AN |
|
sewing equipment (hand or machine) |
|
|
? |
N? |
|
N? |
|
drill (hand or electric) |
N |
? |
AN |
AN |
N |
AN |
|
drill bits for metal |
|
|
AN |
AN |
|
AN |
|
drill bits for wood |
AN |
|
AN |
|
AN |
|
|
spoke wrench |
? |
? |
N |
N |
? |
N |
|
bicycle pump |
? |
? |
? |
? |
? |
? |
|
center punch |
N |
N |
N |
N |
N |
N |
|
tape measure |
N |
N |
N |
N |
N |
N |
|
carpenter’s square |
N |
N |
N |
N |
N |
N |
Terms for metal tube or bar used to build wheelchairs
· Thin-wall
refers to thin steel tubing often used for electrical wiring work and sometimes
for lightweight metal furniture.
· Thick-wall refers to
heavy weight pipe such as the one used in plumbing.
· Re-bar refers to solid
metal rod, usually used to reinforce cement.
Jigs or guides for more exact welding
For making the metal tube chairs and the welded wheel mounts and
hand rims of any of the chairs, your work will be easier and more exact if you
make or purchase certain ‘jigs’ or guides to hold parts in the right
place while you weld them. For example, to weld the front caster fork you can
make a ‘jig’ like this. Details on ‘jigs’ and other
techniques for making different wheelchair parts are well described in Ralf
Hotchkiss’s book Independence Through Mobility. We strongly
recommend it to any group planning to make wheelchairs. (1)

Figure
|
Notes on measurements
For some of the wheelchair designs in this chapter, we give the
measurements for a standard child’s or adult’s model. Be sure to
adapt the measurements to the size and needs of the particular child.
In many countries inches (“) are used for measurements of
certain things, and centimeters (cm.) for others. We therefore also use both.
Centimeters is abbreviated cm. and inches is abbreviated
“. Two inches is written 2”. 1” equals 2.54 cm. You can use the
scale on the edge of this page (and on the inside back cover) to change inches
to cm. |
AHRTAG WOOD WHEELCHAIR (Somewhat modified from AHRTAG
manual)
The AHRTAG wheelchair is built onto an ordinary child’s
wood chair. Measurements should be adjusted to the child’s needs.
Figure

Figure
(1) A webbed plastic seat lets air move through it
and can be easily cleaned.

It uses standard 20” ×
1 3/4” bicycle wheels and axles.
Basic carpentry tools are needed to build this wheelchair. It
can be made in one day by someone with basic carpentry skills. The local
blacksmith may be able to help weld together the wheel supports if you cannot.
It is easy to add positioning aids or make other adaptations. The cost in Mexico
using new materials is about US $40.00.

SIDE VIEW

TOP VIEW
|
AXLES

Figure
Weld axles to ends of a steel tube 2 cm. longer than the chair
is wide.
Figure

Weld axle perfect straight.

Figure
(1) pass axle tube through holes drilled through
sideboards and front chair legs.
WARNING: Use standard bicycle axles this way only for
children under 20 kg (50 lbs.). A heavier child, or rough use, will bend or
break the axle.

Figure
(1) For children over 20 kg., use a stronger axle. Or support
the bicycle axle from both sides. |
|
CASTERS

Figure

BACK VIEW
This backward extension (1) distributes weight better and keeps
chair from tipping backward on hills.
Two back casters are more stable and make it easier for the
wheelchair to go up curbs.

Figure

Figure
|
RE-BAR AND WOVEN PLASTIC WHEELCHAIR
Total cost using new parts is about US $40.00.

Figure
Weave back, seat, and footrest with ribbon, (1) local wicker,
cane, rattan or polyethylene plastic.
For front fork and casters (2), use factory made casters
or make your own (see above).
Or use thin, tightly stretched strips of car inner tube, or
canvas webbing.
SIDE VIEW
SLIDE-OUT FOOTREST

Figure
|
MATERIALS NEEDED
· 1/2” re-bar
(4 1/2 meters)
· inner tube strips
· bicycle wheels (2)
· front casters (2)
· webbing for seat |
SQUARE TUBE WHEELCHAIR
This wheelchair, like other steel tube chairs, should use only
thin-wall tubing. Total cost in Mexico using new parts is about US $40.00. To
keep costs down, check with various sources of materials and ask at small fix-it
shops for advice and possibly even some free scrap material. Metal scrap heaps
are great for materials.
SIDE VIEW

FRONT VIEW

TOP VIEW

SIDE VIEW
|
MATERIALS NEEDED
· thin-wall square
tubing (1” × 3.64 meters)
· thick
canvas cloth (1 square meter)
· galvanized
steel tube (1/2” × 66 cm.)
·
bicycle wheels (2) (20” x 1.75”) caster wheels (2) (wood or
rubber)
· threaded rod (3/8” x 38”)
(Use extra 20” to bend 4 U-bolts.)
· 2
front casters
· 21 3/8”
nuts and 12 screws for seat and back supports |
|
HOW TO MAKE YOUR CHAIR
1. Review drawings. Adjust measurements to fit child.
2. Cut all sections of square tubing. Make sure that matching
tubes are equal in length.
3. Drill holes in bottom tubes and pass the threaded rod through
them. Adjust nuts until a ‘V is formed. (Weld tip of ‘V for extra
strength.)
4. Drill all holes in seat tubes. Pass threaded bolt through
seat holes.
5. Drill holes in back support tubes and front caster tubes.
Bolt to frame.
6. Weld axle nuts to ends of axle tube. Drill holes for U-bolts
and bolt axle tube to frame.
7. Weld front caster forks to front tubes.
8. Sew cloth back and seat supports. Screw into place.
9. Cut out and bolt wood footrest to frame. (Use wedges to get
the angle right.)
10. Attach axle tube with U-bolts and put on the wheels.
11. Paint frame to help keep tubes from rusting (if not
galvanized). |
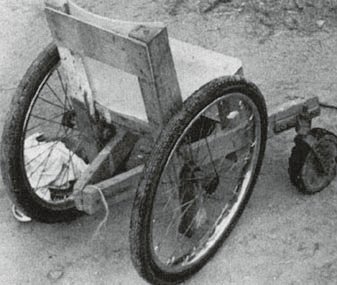
The same design can be made of
wood.
WHEELCHAIR WITH LYING BOARD
This is useful for an active child who must lie face down to
heal pressure sores or to stretch hip and knee contractures.
The board is sloped so that the child can play, look ahead, and
move about more easily. If necessary, you can make the lying board adjustable so
that the child can rest lying flat. This helps to improve circulation and
to prevent swelling of the feet.
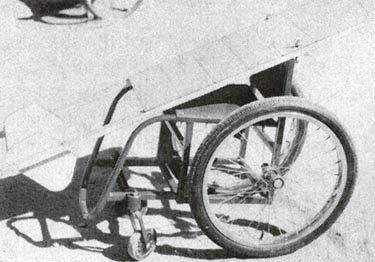
Figure
After the pressure sores heal, the lying board can be removed
and the frame is easily adapted to form a lightweight wheelchair. The cost for
materials in Mexico is about US $40.00.
The design we show uses a simple, non-folding steel tube
wheelchair frame with a wooden lying board mounted on top. However, many other
designs are possible. (See, for example, the photo of a lying and standing wood
wheelchair.)

WITH LYING BOARD

WITHOUT LYING BOARD and with
other additions
For tall persons, place the casters farther from the big wheels
to help prevent tipping
THE LYING BOARD
SIDE VIEW
Attach thin wood or plywood boards with small screws so that
they can be easily adjusted to leave open spaces under bony parts or sores

TOP VIEW
Make the board and wheelchair lust a little wider than the
child’s hips.

Figure
The board attaches to the chair with angle irons or wing
bolts (1). You can make wing bolts by brazing a stiff bent wire to a bolt.
FOOTREST
Use thin wood or plywood. (Pad sides and bottom well to
prevent sores. Examine feet daily.)

Figure
REMOVABLE HANDLE

Figure

Figure
FRONT CASTER WHEEL

Figure
You should now have enough information to make a wheelchair with
a lying board without step-by-step instructions. Adapt it, and make it the size
to tit the child that needs it.
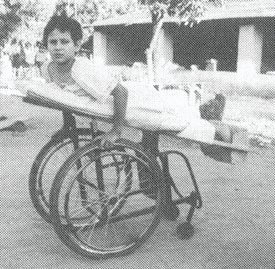
Wheelchair with lying board. A
wide strap holds the child in place (but take care it does not press on
sores).

Wheelchair without lying
board.
A variation of the wheelchair with lying board adapted for a
paraplegic child with both contractures and pressure sores of his hips and
knees. Urine is collected in a plastic container. The wheelchair seat has been
converted into a basket.

Figure

Figure

Figure
|
CAUTION: Remember that a child who has some
pressure sores can easily get new ones. Be sure the child lies and sits so that
there is little or no pressure over bony places. Examine her whole body at
least once a day and try to keep her dry. |
PLYWOOD FRAME WHEELCHAIR
This can be easily built by someone with basic carpentry and
welding skills. (Cost in Mexico using new materials is about US $40.00.)
Positioning aids (head rest, hip pads, etc.) can be easily added. The chair can
be designed to meet a child’s particular needs. For example, if the child
sits well without extra support, the tops of the side pieces can be removed to
allow more freedom of movement.
A plywood frame is a low-cost alternative to metal. However, if
not made well, or if left out in the rain, the chair may weaken and the plywood
can split. As with any wheelchair, it must be protected from misuse,
periodically examined for weaknesses, and promptly repaired.
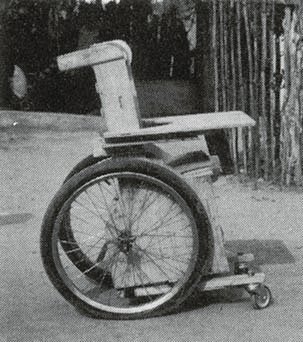
Figure
For active children the wheelchair can be strengthened by
reinforcing all joints and by adding strong hubs and axles.

SIMPLE MODEL
|
HOW TO MAKE YOUR CHAIR
1. Review drawings of chair and adaptive equipment.
2. Cut
out the two side pieces to the same shape; sand with sandpaper.
3. Cut out
back support, seat, and bottom piece of chair; sand with sandpaper.
4. Screw
or nail seat and bottom piece to back piece.
5. Screw or nail side pieces to
seat, bottom, and back.
6. Check that all pieces are lined up straight. Then
add glue and more screws or nails for strength.
7. Cut out footrest and guide
brackets for footrest.
8. Screw or nail guide brackets to side pieces under
seat.
9. Bolt front casters to chair and assemble rear axle tube.
10.
Drill holes in side pieces for axle tube; mount tube and rear wheel.
11. Let
glue dry 1 to 2 days; check for strength of all wood joints. |

These measurements are for a
4-to-8-year-old child.
|
MATERIALS NEEDED
· 3/8” plywood
(1 sheet)
· 20” bicycle wheels
(2)
· small caster wheels (2)
· 1/2 steel tube (66 cm. long)
· wood glue
·
sandpaper
· screws
· nails
· 1/2” by 1/4” wood strips (6 × 46 cm.
long) |
A plywood wheelchair with many adaptations
This wheelchair has a variety of additions sometimes needed for
a small child who has poor body control, head control, and urine or bowel
control. The head support and armrests tit into wooden holders and can be easily
removed. A lap table can be easily added. Holes can be cut out for chest and hip
straps for extra support.

SIDE VIEW

BACK VIEW
|
head positioner
Important: Pad it well
Bottom slides into
slot on rear of chair

swing-up armrests

padded hip and shoulder
positioners

potty bowl holder with leg
separator
Tree branch holds stiff legs apart.

lap table
The lap table should be cut to fit closely around the wheelchair
sides. The same wooden brackets for the armrests keep this table in place. If
the table wobbles, you can use small slats to strengthen the table. If the knee
separator is made a bit higher, the table can rest on top of it and prevent any
dips. |
SPRINGS FOR ALL 4 WHEELS
This plywood wheelchair has a springy ride. Old inner tube
rubber strips connect the rear wheel axle to the wood strips holding the front
caster wheels. These wooden strips should be strong enough to withstand the
springy motion of the front casters.
Special cut-away slots allow the rear axle to move up and down
freely. Other cut-away slots in the bottom of the wheelchair allow for the inner
tube strips to be wrapped around the wooden caster strips. The tighter the inner
tube strips are wrapped, the less bouncy the ride becomes.
Figure

Figure
WHIRLWIND STEEL TUBE WHEELCHAIR
The whirlwind (ATI-Hotchkiss) wheelchair is a very strong
lightweight folding chair. On rough ground it rides more easily and lasts longer
than more costly factory-made chairs. If it breaks, it can be fixed by the
neighborhood metalworker. It is narrow and helps the rider to move about crowded
rooms.

Figure
The frame of this chair is made of thin-wall steel tubing that
is easy to shape by someone with basic mechanical and welding skills. It can be
built in about 4 days in a small metalworking shop. More than 10 groups of
disabled mechanics throughout Latin America are building this wheelchair - often
at less than a quarter the cost of imported wheelchairs.
Most materials for this chair can be obtained locally. It uses
standard 24” (or 26”) bicycle wheels. The extra strong hubs use
standard small machinery bearings (which can often be obtained used for free or
at low cost from electric machinery repair shops). The axles are 5/8” (1.6
cm.) steel bolts. Seating is canvas (heavy cloth). If the small front wheels are
not available, you can make them out of wood.
The curved fender bar that follows the shape of the tire makes
transfers easier. The lightweight folding footrests are narrow at the front, for
moving more easily in crowded spaces.
Plans for making hubs, casters, and brakes are on the next page.
Complete plans for making this wheelchair are in the book Independence
Through Mobility. The book is essential for anyone planning to build
this chair.
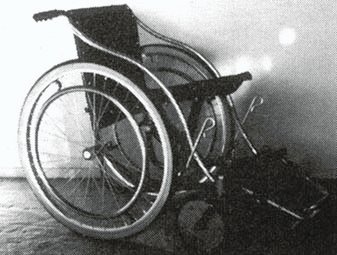
Model with wooden front
wheels
|
MATERIALS NEEDED
· thin-wall tubing
(from 1/2” to 1 1/4”)
· thick-wall
tubing (5/8” inside diameter)
· thick
canvas or nylon cloth (2 meters)
· square
tubing (thin-wall)
· bicycle rims and spokes
(24” or 26” diameter)
· caster
wheels (2)
· used sealed bearings
(8)
· re-bar steel (3/8”
round)
· flat bar steel (1/16” ×
3/8”)
· axle bolts (4) (5/8” ×
5”)
· washers (4) (1” diameter, 16
upholstery)
· screws (8 upholstery)
· machine screws (8) (1/4” × 1
1/2”)
· paint or chroming
chemicals
· bronze welding rod,
flux
· bicycle tires and inner
tubes (24”) |
FOLDING FOOTREST

X-BRACE
Figure
DETAILS OF HOW TO MAKE WHEELCHAIR PARTS (can be used with
many wheelchair designs)
|

HEAVY-DUTY WHEEL HUBS
· A thick bolt
should fit tightly inside bearing.
· Bearings
should fit tightly inside outer steel tube.
·
Carefully mark and drill the outer steel tube for spoke holes.
· Spacer tube fits over axle bolt and holds bearings
against spoke heads.
Note: Used sealed bearings with a 5/8” inner
diameter can often be obtained free or at low cost from electrical tool and
appliance repair shops. These used bearings often last longer than standard
wheelchair bearings.
Figure
To attach the heavy-duty hub to a wood chair, you can weld the
thick-wall tube to a metal plate (1).
The bigger the plate is the stronger the mount.
Figure
Figure
|
|
CASTER FORK AND HUBS
Figure
Mount the caster axle at least 7 cm. behind bolt. This help
prevent “flutter” at higher speeds.
Caster axle fits tightly inside bearings. |
|
BRAKES
Figure

Figure
|
|
SEAT AND BACK MADE OF CANVAS (strong cloth)
Cut canvas twice as wide as seat or back, allowing 4 cm. extra
on sides (for seams) and at least 20 cm. longer on length.

Figure

Figure

Figure

Figure
Drill holes and screw rods to frame.
CAUTION: Measure carefully. On a folding chair,
the width of the seat and back control the width of the chair. |
Examples of locally made wheelchairs
The plywood wheelchair, with the armrest in place (1) and swung
back (2).

Figure
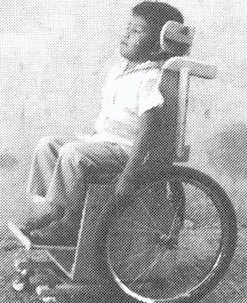
Figure

A plywood wheelchair for a child
with cerebral palsy with inner tube stretching aids to gently pull his feet and
straighten his severe knee contractures.
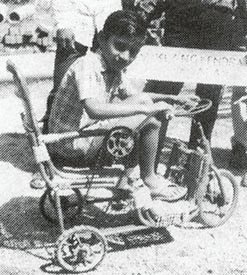
A bamboo hand-powered tricycle
made at Viklang Kendra (People’s Village), Allahabad, India.

A wheelchair made completely of
paper, including the wheels. Paper is glued together using rice flour in water
(Zimbabwe).
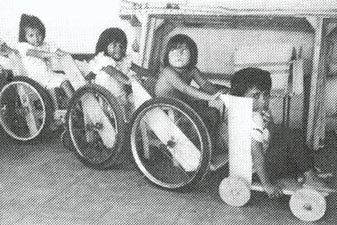
A wood design of the wheelchair,
two AHRTAG wheelchairs, and a ‘trolley’ made from half of a plastic
bucket and wood wheels.

A wood wheelchair in Thailand.
The bicycle wheel axles are supported on both sides to keep them from
bending.

A metal frame, wood wheel
‘trolley’ in Bangladesh. The rubber tube serves as a cushion and also
as a toilet seat.

This trolley, also from
Bangladesh, uses a cushion made of coconut fiber covered with
rubber.
Chapter 67: Artificial Legs
Artificial legs can be (and often are) made at home or in
village shops. How well they work and how natural they look depend on many
things, including costs, skills, and materials available.
BELOW THE KNEE
The most common leg amputation is below the knee, A leg that has
been amputated halfway between the knee and ankle works best for walking
with an artificial limb. Here are some examples of artificial limbs, from
simple to more complex.

Even a simple artificial limb can
make a big difference.
|
WITH THE KNEE BENT

HAND-HELD POLE LEGS
“SAWED-OFF CRUTCH”
LEG
CAUTION: Limbs like these 3 are quick and
easy to make, but they cause knee contractures. As a result, the knee cannot
be easily straightened to fit a better, more useful limb. Bent-knee limbs
should only be for temporary or emergency use. Do exercises every day to
keep the knee straight and strong. |
|
WITH THE KNEE STRAIGHT
BAMBOO AND PLASTER LEG

PLASTIC PIPE LEG WITH FOOT
These limbs are better because the knee has full range of
motion. Walking is easier and more natural. However, the person’s weight
must be supported evenly over the entire stump, not only at the end of the
stump. |
|
Positions for FITTING A LIMB

BAD will only work with a
bent-knee limb

DIFFICULT knee does not
straighten fully

GOOD knee straightens
completely
|
Exercises to strengthen and straighten the leg
From the time a leg has been amputated until a limb is fitted,
daily exercises are needed to keep the hip and knee muscles strong
and to avoid contractures. If weakness and contractures already exist, these
should be corrected as much as possible before a limb is fitted. Exercises are
discussed.
|
AVOID CONTRACTURES
Figure
Contractures here and here (1) need to be straightened before a
standard limb can be fitted. |
How soon can an artificial limb be fitted?
Children born without a foot or part of a leg (or legs)
can be fitted with an artificial limb as early as 10 or 12 months of age.
A child whose foot has been cut off can and should be
fitted with a temporary limb as soon as the wound has healed. However,
be very careful not to injure or put any pressure on the new scars or end of the
stump.

Figure
Note: On a very young or fat child, it may be
difficult to fasten the limb firmly to the knee (the bones may not stick out
enough). Straps to a waistband and even over the shoulder may be needed.
Temporary limbs - when to use them and why
Because a stump usually shrinks and changes shape in the first
weeks after a limb is fitted, it is often wise first to fit a low-cost,
temporary limb. This is especially true if the amputation is new or the
stump is swollen. A better-looking, more permanent limb can be made after 4 to 6
weeks, or when swelling is gone.
Preparing the stump
In the first weeks or months after an amputation, the stump
tends to swell up. The swelling may in time lead to a club-shaped, deformed
stump, which is difficult to fit with an artificial limb. For this reason, it
is important to wrap the stump with elastic bandage from the time the leg is cut
off until a limb is fitted, or at least until there is no more sign of
swelling.

BAD SHAPE

GOOD SHAPE
NOTE: When the person is not wearing the
artificial leg, he should also wear an elastic bandage to control the stump
shape
The art of limb making
Making artificial limbs that fit and work well is both a science
and an art. If possible, try to learn from a skilled limb maker.
‘On-the-job’ training for even a few days can make a big difference.
|
Before starting to make an artificial limb, STUDY THE
PERSON’S LEG. |
A good fit of the socket on the stump and at the knee is one of
the most important-and difficult - parts of limb making. It helps to have an
understanding of the bones and muscles in the leg.
FRONT VIEW

SIDE VIEW
Before beginning, study the person’s knee and stump
carefully. Note the positions of the kneecap, the bony bumps on the sides of the
knee, and the shin bone.
|
MEASUREMENTS YOU MAY NEED FOR A BELOW-KNEE LIMB
(Copy this chart and use it to record your measurements.)

Figure
Note: For the plaster and bamboo limb, only
lengthwise measurements are needed.
Figure
Note: The artificial limb should be the same
length or just a little shorter than the other leg. |
PLASTER AND BAMBOO BELOW-KNEE ARTIFICIAL LEG
This simple, low-cost leg was developed for refugee amputees in
Thailand by Op�ration Handicap Internationale. It is most useful as a temporary
limb for learning to walk. However, if the inner (plaster) part of the socket is
made with waterproof glue, or is protected from getting wet, the leg can last
for a long time.

A village rehabilitation worker
fits a young man with a bamboo limb. (PROJIMO)
Steps for making the plaster socket
1. Make a thick ‘cup’ or ‘cap’ of sponge or
folded cloth and tape it over the end of the stump (to give it a little extra
length).

Figure
2. Put a thick, tight-fitting stocking-without seams if possible
- over the stump and knee. (Several thin layers of stocking can be used instead
of a thick one.)
Figure
Putting holes near the top of the stocking makes it easy for the
child to pull it up tight against the skin while the cast is put on.
Figure
3. Put a thin plastic bag over the stocking.

Figure
4. Put a thin cotton stocking or stockinette over the plastic
bag and also pull tight to avoid wrinkles.

Figure
|

Figure
Note: If you do not have a stocking, you can mold
the socket directly on the stump. Shave any hair off the stump and cover it with
vegetable oil (for example, coconut or palm oil). |
5. With the stocking stretched tight, mark the important places
with a ‘grease pencil’. The pencil marks will ‘print’ onto
the inside of the plaster cast when it is removed.
Mark all these places:

Figure
6. Wrap the stump and knee with plaster bandage. Be very
careful to put the bandage on evenly and smoothly. (Elastic plaster bandage
works best, but is very costly. To reduce costs you can make your own plaster
bandages for casting).

Cast the knee with the stump
slightly bent
|
MAKING THE PLASTER WATER-RESISTANT
The plaster cast of the stump will become the inner layer of the
socket of the bamboo limb. So it should be strong and waterproof. To make the
cast stronger and water-resistant, wet the plaster bandage with glue instead of
water
Use a water-base glue that is water-resistant when it dries

Figure
Note: If the plaster cast is to be used only as a mold
for making a leather or resin socket, use water, not glue. |
7. As the plaster dries, hold the stump firmly below the knee.

FRONT VIEW
BACK VIEW
With the 2 middle fingers of each hand (1), press into the
hollow behind the knee.
Hold the stump like this until the plaster is hard enough hold
the shape.
8. When the cast becomes hard, mark where to cut the top edge
(see below).

SIDE VIEW

BACK VIEW
9. To remove the cast, roll the stocking over it. Put your hands
over the pressure points (as shown above). Have the child wiggle the stump as
you gently pull off the cast.

Figure

Figure
It may be necessary to cut the cast behind the knee, like this
(1), to get it off.
10. Cut the cast along the line you drew.

Figure
Preparing the bamboo post
1. Select a piece of strong, green bamboo a little longer than
the good leg from the knee to heel.
Figure
2. Split the bamboo to a little below the level of the stump
end. Split into thin strips-each about 3/4 cm. wide.
Figure
Hold the post up firmly (1) in a vise or a log with a hole in it
- or however you can.
3. Remove the softer inner layer from each of the thin strips.

Figure
4. Spread the bamboo, strips around the plaster socket.

Figure
5. Position the socket as correctly as you can. Then, with a
thin wire, wrap the bamboo tightly against the socket.

Figure
6. Put the limb on the stump and have the child stand on it.
Check the length. If necessary, cut some off the post.

Figure
Make sure the post is straight or at the same angle as the other
leg (1). If not, loosen the wire and re-adjust until you get it right.
Note: If child uses a shoe or sandal, be sure to
have her wear it when measuring the height of the limb.
7. After trimming the tops of the bamboo strips, cover the
outside of the socket with several layers of glue, sawdust, and gauze bandage:
· Brush on one layer
of glue.
· Press sawdust on the glue (with
gloves).
· Wrap tightly with gauze bandage.
Let it dry.
· Repeat 5 or 6
times.
Figure

Figure
8. Smooth the outside of the socket with sandpaper. Also smooth
and round the inner edges at the top.
Figure
9. Make a ‘cuff’ to hold the limb on. (If attached
correctly, it should also help keep the knee from over-straightening.)

Figure
10. Make a rubber ‘heel’ - a piece of thick truck tire
works well. If you can, cut the tire so that a ‘plug’ fits inside the
bamboo. Cut off bamboo as much as the heel is thick. (Be sure to allow for
height of sandal or shoe on other foot.)
|
Design for the knee cuff
Use strong leather and line it on inside with soft smooth
leather. It should be a few cm. longer than the distance around the knee.

Figure
Glue layers of leather and webbing together with rubber cement
and sew at edges. |
11. Have the child stand and walk on the limb for several
minutes. Then remove it and look for sore spots on the child’s skin, or
signs of too much pressure. Check especially over bony spots. An area that looks
pale when the limb is removed and then turns red or dark, is a sign of too much
pressure.

Figure

Figure
12. Scrape shallow pits into the socket from the inside, at the
points where it presses over bones. You may also need to build up around the
area where pressure occurs.

Figure
(To help you find the right points, it helps to have marked
‘bony spots’ before casting. They will then be ‘printed’
inside the socket.)
If stump presses on bottom of socket, you may need to build up

SIDE VIEW CROSS SECTION

BACK VIEW CROSS SECTION

Figure
If socket presses on the end of the bone, scrape out a hollow
here (1).
To build up these spots, dig a few pits into the socket surface
so new material will grip better. Fill with a paste of fresh plaster mixed with
glue.
|
During the first few weeks of using an artificial limb, the
stump becomes smaller, and several changes in limb size may be needed. To save
time, use a shorter bamboo post so that the plaster socket can be replaced
several times with new, smaller ones.

Figure
|
Artificial leg using PVC plastic pipe instead of bamboo
Where plastic PVC water pipe is available, it can be used
instead of bamboo. Use a 3 cm. (1% inch) thick-walled PVC.
1. Measure the tube the same as bamboo, and cut it to form 4
strips.

Figure
2. Heat the PVC in an oven until it gets a little soft.
Figure
3. Fit the hot PCV around the socket piece and wrap it tightly
with a long strip of cloth or rubber until it cools.
Figure
4. Fasten PVC firmly to socket with wire or rivets (or both). It
is best to attach it temporarily with wire and to have the child try it before
you fix it permanently
Figure
5. Cover with sawdust and glue, or with resin-base casting
bandage (very expensive) or with fiberglass and resin (also expensive).

Figure
Note: For a stronger, water-resistant limb, the
socket can also be made with resin-based casting bandage. But this is also
expensive.
|
Adjusting the PVC leg
Figure
After the child tries on the leg. If the angle seems wrong, you
can gently heat the PVC near the stump (1). |
|
Lengthening the PVC leg to allow for growth of the child
1. Cut through PVC pipe.

Figure
2. Cut a strong hardwood rod or plastic tube that just fits
inside the PVC. (1)

Figure
3. Cut a ring of PVC pipe as long as the additional leg length
needed. (Make it a little extra long to allow for more growth). (1)
4. Put the wood rod inside the PVC with the new ring of PVC. (2)
5. Drill holes and screw or bolt leg together tightly. (3)

Figure
6. When an even longer limb is needed, replace the short ring
with a longer one. (1)

Figure
7. If necessary, to make the joint stronger, cut a piece of PVC
lengthwise, heat it, put it over the leg tube, and attach it tightly. (1)

Figure
|
IMPORTANT: For both below-knee and above-knee
limbs, try to line up the limb as well as possible so that its angle is
similar to the other leg and ‘feels right’ when the child stands and
steps. Often this requires repeated tries and adjustments. Getting the limb
to line up right is the key to successful limb fitting. It helps to learn
this from someone skilled at fitting limbs.
ABOVE-KNEE ARTIFICIAL LIMBS
Children who are growing quickly need a low-cost limb that can
be easily replaced or lengthened. Small children usually learn to walk well with
a straight leg limb that does not have a knee joint.
1. A bamboo or PVC plastic tube above-knee limb can be
made in much the same way as for the below-knee limb.

BACK VIEW
The top edge of the socket should be rounded to form a wide lip
on the back, where the butt can sit (1). Weight bearing should be on the butt
bone and over the entire stump-and not just on the end of the stump.

FRONT VIEW
|

Figure
Note: In some countries, thin plastic cuffs
the right shape for socket tops can be purchased in different sizes from
orthopedic suppliers. They can be placed around the leg before casting
and can be re-used. Ask for ‘prefabricated ishial weight-bearing
cuffs’. |
|
Best shape for top of socket:

FRONT VIEW

BACK VIEW

TOP VIEW
Make the top of the socket (1) somewhat square. You can
reshape the wet plaster a little while it is still on the stump, or just after
you take it off. |
2. A leather and metal rod limb (adapted from Simple
Orthopaedic Aids).

MEASUREMENTS
Note: The socket is open at the bottom of the stump. This
makes it cooler than the one above, and also allows for growth.
Figure
To make sleeve, draw on paper a design like this based on A, B,
and C stump measurements. Then copy onto leather and cut it out.

Figure
Above-knee limb with knee joint (for older children and
adults)
Adapted from the OHI Manual: Simple Above-knee Prosthesis
Manufacture. (Write for the complete manual.)
SIDE VIEW
Socket piece of leather (1) (it can also be made of plaster
resin, or wood.)
FRONT VIEW
To help keep knee from bending when weight is on it, stretch a
piece of rubber across front of knee (1).
|
Note: This is a simple design for a knee joint.
Knee joints that work well are hard to make and you may need to experiment a
lot. Perhaps you can re-use a joint from an old limb that is not being used.
|
|
¯ |
|
Making the knee joint:
1. Mark and round the top of the post.
Figure
2. Drill hole at exact center of circle.
Figure
3. Weld or rivet angle piece at right angle. (Use flat metal
bar.)

Figure
4. Round back of post.

Figure
5. Drill hole in post and attach bolt with wire (to lock knee
straight, when necessary).
6. Ledge prevents knee from bending backward. Small strip of y
car tire acts as cushions

Figure
7. Add an angled piece to allow joint to stop in a squatting
position.

Figure
|
FEET
Putting feet on artificial legs makes them look better (with
shoes, sandals, or boots). Also, the wide base helps prevent the leg from
sinking into mud or sand. A well-made, flexible foot can make walking easier.
Here are 2 possibilities.

Figure
|
Note: By putting the pole through the foot (1), if
the foot breaks off the person can keep walking. |

Figure
The sponge rubber over the heel and toe (1) lets the foot bend
for smoother walking .
To mount a foot on a plastic PVC tube, use a metal pipe base
like this.

Figure
A foot can also be made for a metal-rod leg. Here is one
possibility.

Figure
Bolts should pass through all but last layer of rubber (1).
3 or 4 layers of car tire (2), cut to allow flexibility of toes
and heel.
Leave open space above bottom sole (3) for flexible heel.
OTHER WAYS OF MAKING ARTIFICIAL LIMBS
Wooden legs
The oldest, traditional way of making artificial limbs is to
make the socket out of wood.

Figure
This is best learned from a skilled craftsperson. Unfortunately,
this is a skill that is difficult to learn from a book. A book that describes
the method step-by-step is Manual of Above-Knee Wood Socket
Prosthetics by Miles Anderson, John Bray, and Charles Hennesey. It has
gone out of print, but you may still be able to find it. Unfortunately, the
methods described are complex and require a lot of special equipment. However,
perhaps they could be simplified. (We have not tried this method.)
Leather socket: Self-adjusting prosthesis
This method uses flat metal bars, a wood post, and a thick, firm
leather socket. To form the socket, wet leather is stretched over a plaster mold
of the stump. Methods are clearly and simply described in Simple
Below-knee Prosthesis Manufacture.

Figure

Figure
A leather socket has several advantages. Leather is available
almost everywhere, is more comfortable in hot weather, and can easily be
adjusted to the stump as it becomes smaller. Also, leather is soft and easily
takes the shape of the stump, and therefore self-corrects molding mistakes.
Stump protectors from old tires
For a child with both legs amputated above the knee, short
artificial limbs or even simple ‘stump protectors’ may allow her to
move about easier than long leg limbs.

Figure

Figure
Jaipur limb
The ‘Jaipur limb’ was developed in Jaipur, India to
meet the need for a limb that would (1) allow working ‘barefoot’ in
rice paddies, (2) look like a real bare foot, (3) bend at the foot in all
directions enough so the person can squat easily and walk firmly on uneven
ground, and (4) be low cost and quick to make.
The foot is made of wood and sponge rubber and then
‘vulcanized’ (heat molded) with rubber, using a metal mold. The rubber
gives the foot its life-like form and color and makes it strong and waterproof.

THE JAIPUR FOOT
Figure

squatting
|
The limb is made of SHEET ALUMINUM.
1. Take measurements of normal leg.

Figure
2. Mark a sheet of aluminum and cut out leg form.

Figure
3. Bend into tube.
Figure
4. Weld the seam.
Figure
5. Hammer tube into shape of leg. With repeated tests, fit it to
the knee just right.

Figure
6. Attach knee strap and foot.

Figure
(Total cost for the below-knee limb can be less than US $20.)
|
To make the Jaipur limb requires a lot of skill as well as
special equipment. But once a shop is set up and persons trained, the limb can
be made at very low cost, and fitted very quickly (one hour from the first
measurements until the person walks away on his new limb). For instructions,
contact Rehab Centre, SMS Medical College, Jaipur 302004, India.

JAIPUR ABOVE-KNEE DESIGN
Ideas for a limb-making shop. Earlier on this book there
is a description of the OHI prosthetics shop in Thailand, where amputee workers
make the bamboo and above-knee adjustable limbs shown in this
chapter.


