Back to Home
Page of CD3WD Project or Back to list of CD3WD Publications
 |  |  | Where Women Have No Doctor - A Health Guide for Women (Hesperian Foundation, 1997, 600 p.) |  |  | Health Care Skills | |  | (introduction...) | | | Preventing infection | | | (introduction...) | | | Washing your hands | | | How to disinfect equipment and tools | | | How to take temperature, pulse, respiration, and blood pressure | | | (introduction...) | | | Temperature | | | Pulse (heartbeat) | | | Respiration (breathing rate) | | | Blood pressure | | | How to examine the abdomen | | | How to examine a woman’s genitals (the pelvic exam) | | | Caring for burns | | | How to give fluids to treat shock | | | (introduction...) | | | How to make rehydration drink | | | How to give rectal fluids | | | How to give an injection | | | (introduction...) | | | Where to give an injection | | | How to prepare a syringe for injection | | | How to inject into the muscle (intramuscular, or im) | | | How to give an injection under the skin (subcutaneous injection) | | | Be prepared to treat allergic reaction and allergic shock | | | Acupressure Massage |
|
Where Women Have No Doctor - A Health Guide for Women (Hesperian Foundation, 1997, 600 p.)
Health Care Skills
In many parts of this book we refer to certain skills that can
help a person give the best care to someone who is ill, These skills include
preventing infection, giving an exam and getting information about a
person’s body, giving life-saving fluids, and giving injections.
This section gives more complete information about these skills.
You may think of these as ‘doctor’s’ or ‘nurse’s’
skills, but they are all skills that anyone can learn with time and practice.
Some skills, like giving an exam or an injection, are best learned
by having a skilled person show you how. Once learned, all of these skills can
make a careful person better able to help others
safely.
Preventing infection
Infections cause many kinds of sickness. People who are
already sick or hurt are often more at risk for getting an infection, and
getting one can make them much sicker. So it is important to do everything you
can to keep infections from developing. It is also important to protect yourself
from getting an infection from those you care for.
Figure
Infections are caused by germs, such as bacteria and viruses,
that are too small to see. Every person carries bacteria on her skin, and in her
mouth, intestines, and genitals all the time. These germs do not
usually cause problems, but they can cause infections if passed to sick people.
Germs also live on the equipment and tools used when caring for a sick person
and can easily be passed to others you help.
You can prevent infection by following the guidelines in this
chapter. For other ways to prevent infection.
IMPORTANT
You must follow these guidelines
every time you help someone, whether you use your hands, tools, or special
equipment If you do not, you may get a dangerous infection, or pass an infection
to the people you are
helping.
Washing your hands
Let your hands dry in the air
instead of using a towel. Do not touch anything until your hands are
dry.
Wash your hands before and after caring for another person. It
the most important way to kill germs living on your skin. You need to wash your
hands even more thoroughly and for a longer time:
· before and after
helping someone give birth.
· before and
after touching a wound or broken skin.
·
before and after giving an injection, or cutting or piercing a body
part.
· after touching blood, urine,
stool, mucus, or fluid from the vagina.
· after removing gloves.
Figure
Use soap to remove dirt and germs. Count to 30 as you scrub your
hands all over with the soapy lather. Use a brush or soft stick to clean under
your nails. Then rinse. Use water that flows. Do not reuse water if your hands
must be very clean.
|
Try making a Tippy Tap. It will save water and will make it easy
to keep a supply of clean water for washing hands.
Use a large, clean plastic bottle with a handle.
1. Pinch the handle together here with a pair of hot pliers or a
hot knife.
Figure
2. Make a small hole in the handle, just above where you sealed
it.
Figure
3. To hang the tippy tap, make 2 more holes in the other side of
the bottle and pass a string through them. Now you can hang it on a peg or tree
branch.
4. Fill the bottle with clean water and replace the lid.
5. When you tip the bottle forward, the water will flow out, so
you can wash your hands. Do not make the hole too large or it will waste water.
Figure
You can also hang a bar of soap from the string. |
How to disinfect equipment and tools
Cleaning tools and equipment to get rid of nearly all the germs
is called high-level disinfection.
Tools must first be washed and then disinfected if
they are used to:
· cut, pierce, or
tattoo skin.
· give an injection.
· cut the cord during childbirth.
· examine the vagina, especially during or after
childbirth, a miscarriage, or an abortion.
· when giving fluids in the rectum.
Figure
High-level disinfection: 3 steps
Steps 1 and 2 should be done right after using your tools. Try
not to let blood and mucus dry on them. Step 3 should be done right before you
use the tools again. All the steps can be done together if you can store your
tools so they will stay disinfected (see the next page).
1. Soaking: Soak your tools for 10 minutes. If possible,
use a 0.5% solution of bleach (chlorine). Soaking your tools in bleach
solution first will help protect you from infection when cleaning the tools. If
you do not have bleach, soak your tools in water.
Figure
How to make a disinfecting solution of 0.5% bleach:
|
If your bleach says: |
Use: |
|
2% available chlorine |
1 part bleach to 3 parts water |
|
5% available chlorine |
1 part bleach to 9 parts water |
|
10% available chlorine |
1 part bleach to 19 parts water |
|
15% available chlorine |
1 part bleach to 29 parts water |
For example:
If your bleach says 5% available chlorine, use this much
bleach:
Figure
and this much water:

Figure
Mix just enough solution for one day. Do not use it again the
next day. It will not be strong enough to kill germs anymore.
2. Washing: Wash all tools with soapy water and a brush
until each one looks very clean, and rinse them with clean water Be careful not
to cut yourself on sharp edges or points. If possible, use heavy gloves, or any
gloves you may have.

Figure
3. Disinfecting: Steam or boil the tools for 20 minutes
(as long as it takes to cook rice).
To steam them, you need a pot with a lid. The water does not
need to cover the tools, but use enough water to keep steam coming out the sides
of the lid for 20 minutes.
Figure
To boil them, you do not need to fill the whole pot with water.
But you should make sure water covers everything in the pot the entire time. If
possible, put a lid on the pot.
Figure
For both steaming and boiling, start to count the 20 minutes
after the water is fully boiling. Do not add anything new to the pot once you
begin to count.
IMPORTANT
Never use a tool on more than one
person without washing and disinfecting all the parts between each use.

Figure
|
Storing your tools
If you store your tools properly you can do Steps 1, 2, and 3 at
one time, and the tools will be ready to use whenever you need them. To store
tools:
· After boiling,
pour off the water and let the tools dry by themselves. Do not dry them with a
cloth. Put a lid or a thin, clean cloth over the pot to prevent flies and dust
from getting in. Be sure to let the tools dry completely. Metal objects will
rust if they are not dry.
· Do not let the tools touch
your hands or anything else.
· Store the tools in a covered
pot that has been disinfected. You can use the pot that was used for boiling
with a lid, or the steamer that was used for steaming, or a glass jar and lid
that have been boiled. If possible, put everything in a clean plastic bag to
protect from dust.
Make sure the pot and lid
where you store the tools have also been disinfected.
|
Disinfecting needles and syringes, gloves, and bandages
Needles and syringes. If a needle and syringe can be used
more than once (reusable), squirt bleach or soapy water through the syringe 3
times right after using it. Then take everything apart and follow Step 2 and
then Step 3. Carefully store the syringe until the next use. Be sure not to
touch the needle or the plunger.
Figure
If you are not able to store things in a clean and dry place,
boil or steam them again before use.
If a needle and syringe can be used one time only (disposable),
carefully put them in a covered container that cannot be pierced by the needle,
and bury the container deeply. If you cannot dispose of the needle safely,
squirt bleach solution through it 3 times.
Figure
Gloves
Gloves protect both you and the people you help against the
spread of infection. If you do not have gloves, use clean plastic bags to cover
your hands.
If you do not have gloves, you
can use dean plastic bags to cover your hands.
Sometimes it is OK to use gloves that are clean but not
disinfected - as long as you are not reusing them. But you should always use
high-level disinfected gloves when:
· putting your hand
inside the vagina during an emergency exam before or after childbirth or
abortion.
· touching broken
skin.
|
Using high-level disinfected gloves:
Be careful not to touch other
gloves as you remove a pair from the jar or container where they have been
stored.
When putting the gloves on, be
careful not to let anything touch the part of the gloves that is going to touch
the person.
¨ If you have a pair of
‘sterile ‘gloves in a package, save them for a time when you must be
especially careful not to spread infection. |
If you use gloves more than one time, they should be cleaned,
disinfected, and stored following the instructions. Always check washed gloves
for holes, and throw away any that are torn.
If possible, it is best to steam gloves rather than boil them
because they can stay in the pot they were steamed in until they are dry. If you
are unable to steam gloves and must boil them, try to dry them in the sun. You
will probably have to touch them to do this, so they will no longer be
disinfected, but they will be clean. Keep them in a clean, dry place.
Cloth dressings
If you do not have sterile gauze, use cloth dressings.
Follow the instructions for disinfection and storage. Dry the dressings in the
sun, but be sure to keep them off the ground, and to protect them from dust,
flies, and other insects.
|
Figure
Any items that have touched blood or body fluids (urine,
stool, semen, fluid from the bag of waters, pus) should be burned, or disposed
of carefully so that children or animals will not find them. This includes
supplies that are no longer useful but are contaminated, such as syringes, torn
gloves or gloves that can only be used once, gauze, or cotton.

Figure
|
How to take temperature, pulse, respiration, and blood pressure
When a person is sick or has a health problem, her basic
physical signs may change. The next few pages tell how to measure these signs to
know if a person has a
problem.
Temperature
If you need to know a person’s temperature and do not have
a thermometer, touch the back of your hand to the person’s skin, and
compare it with your own skin. If her skin feels much warmer, she probably has a
fever. To learn what to do for a fever.
Figure
If you have a thermometer, you can take a person’s
temperature in the mouth, armpit, or rectum. A person’s temperature is
normally cooler in the armpit, warmer in the mouth, and warmest in the rectum.
There are 2 kinds of thermometer scales. Either can be used to measure a
person’s temperature. Here is how they compare:
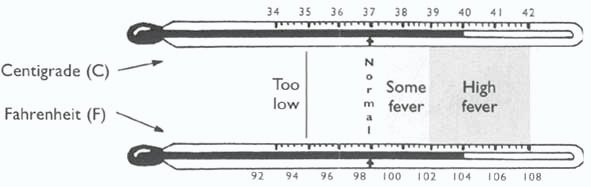
The levels listed here for
normal and fever temperatures are for the mouth.
|
How to take the temperature
(using a thermometer
marked in degrees centrigrade - °C)
1. Clean the thermometer well with soap and cold water,
or alcohol. Hold it at the end without the silver (or red) and shake it hard,
with a snap of the wrist, until it reads less than 36 degrees.
2. Put the thermometer...
under the tongue (keep the mouth dosed around it)

Figure
OR
in the armpit if there is danger that the person might bite
the thermometer
Figure
OR
carefully, in the rectum (wet or apply petroleum gel
first).
Figure
3. Leave it there for 3 or 4 minutes.
4. Read it.

Figure
5. Wash the thermometer well with soap and cold water.
Then, if you can, soak it for 20 minutes in a bleach solution and rinse with
clean water. |
Pulse (heartbeat)
The pulse tells how fast the heart is beating and how hard it is
working. After hard work or exercise, the heart of a healthy person beats fast,
but slows back to normal in a few minutes. The heart usually increases 20 beats
a minute for each degree (C) rise in fever.
A normal pulse in an adult is between 60 and 90 beats per
minute. A fast pulse can be a sign of:
· blood loss or
fluid loss, or shock.
· fever and
infection.
· problems with the lungs and
breathing system, or with the heart.
·
thyroid problems.
To take the pulse, put your
fingers on the wrist as shown (do not use your thumb).
If you cannot find the pulse
in the wrist, feel for it in the neck beside the voicebox,
or put your ear directly on
the chest and listen for the
heartbeat.
Respiration (breathing rate)
The breathing rate tells you about health of the lungs and
breathing system. It can also give information about a person’s general
health. To take the breathing rate, watch the chest rise and fall when a person
is at rest. Normal breathing in an adult is 12 to 20 total breaths per minute (a
complete breath equals one breath in and one breath out).
Breathing usually speeds up (along with the pulse) when there is
infection, fever, blood loss or dehydration, shock, lung problems, or
other emergencies.
Very slow pulse and breathing in a very sick person can mean she
is near death.
Fast, shallow breathing can be a sign of infection of the
breathing system. A breathing rate of more than 30 breaths per minute may be a
sign of
pneumonia.
Blood pressure
Blood pressure is a measure of how hard the blood presses on the
inside of the blood vessels.
Figure
It is useful to know a woman’s blood pressure at these
times:
· during pregnancy,
childbirth, miscarriage, or abortion.
· if
she is using or planning to use birth control pills.
· in emergencies, such as shock, severe abdominal pain,
or a difficult childbirth.
What the numbers mean
A blood pressure measurement (BP) has two numbers:
|
120 is the top (systolic) reading |
|
|
|
|
80 is the bottom (diastolic) reading |
Normal blood pressure for an adult is usually around
120/80, but anything from 907 60 to 140/85 can be considered normal.
The bottom number usually gives more information about a
person’s health. For example, if a person’s blood pressure is 140/90,
there is not much need for concern. But if it is 225/110, a person has seriously
high blood pressure and should lose weight (if she is fat) or get
treatment. A bottom number of over 100 usually means the blood pressure is high
enough to require attention (diet and perhaps medicine).
If a person regularly has low blood pressure, there is no
need to worry. In fact, blood pressure on the low side of normal - 90/60 to
110/70 - means a person is likely to live long and is less likely to suffer from
heart trouble or stroke.
A sudden drop in blood pressure is a danger sign,
especially if it falls below 90/60. Watch for any sudden drop in the blood
pressure of persons who are losing blood or at risk of shock. If you get an
abnormal blood pressure reading and you do not think the person is in shock,
wait a few minutes and take the blood pressure again.
You will often need to watch a person’s blood pressure
overtime (for example, during a woman’s pregnancy) to see how it changes.
It will help to keep a record:
This woman’s blood
pressure goes up and down a little from month to month. This is normal.
How to take blood pressure
There are several types of blood pressure equipment Some have a
tall gauge that looks like a thermometer. Others have a round dial.
Blood pressure equipment usually comes with a stethoscope.
Figure
|
To take a person’s blood pressure, first tell her what you
are going to do. Then follow these steps:
1. Fasten the cuff around the bare upper
arm.
Figure
2. Close the valve on the rubber bulb by
turning the screw to the right. The valve will get shorter.
Figure
3. Feel for a pulse just below the elbow, on
the Inside of the arm, and put the stethoscope over the pulse. Sometimes you may
not feel the pulse. If you cannot, put the stethoscope over the center of the
skin crease inside the elbow.
Figure
4. Pump the cuff up by squeezing the bulb.
Figure
5. As you pump, the needle will move.
When it reaches 200, stop pumping.
Figure
6. Then release the valve a little so that the
air leaks out slowly.
Figure
7. The needle will begin to go back down. (If
the valve is closed, it will stay at 200.)
Figure
As the air leaks out, you will start to hear the person’s
pulse through your stethoscope. Notice where the needle or the silver bar is
when you start to hear the pulse (this will be the top number) and when the
pulse disappears or gets very soft (this will be the bottom number).
Figure
|
How to examine the abdomen
If a woman has pain in the lower abdomen, first read the
chapter on “Pain in the Lower Abdomen”.
Then examine her abdomen:
1. Ask her to undress so that you can see her
abdomen from just below her breasts down to the hair between her legs.
2. Ask her to lie flat on her back on a firm bed, a
table, or a clean floor with her knees bent and her feet close to her buttocks.
Ask her to relax her abdominal muscles as much as she can. This may be difficult
for someone who is in pain.
3. Listen for bubbling and gurgling noises by putting
your ear on her abdomen. If you do not hear anything for 2 minutes, this is a
danger sign.
Figure
4. Ask her to point to where it hurts most.
Then begin pressing gently on the other side. Keep pressing gently as you move
around her abdomen to see where it hurts most.
5. As you press her abdomen, feel for lumps. Also, see if
her abdomen is soft or hard, and if she can relax it under your
hand.
Figure
6. To make sure she does not have another
problem like appendicitis, an infection in her gut, or a pelvic
infection (PID), slowly but firmly press on her abdomen on the left side,
just above where the leg joins the body (the groin). Press until it hurts a
little. Then quickly remove the hand. If a very sharp pain (rebound pain)
happens when the hand is removed, she may have a serious infection. Take her
immediately to a health center or hospital to see if she needs surgery. If she
does not have rebound pain, continue to examine her by looking at the outside of
her genitals for sores, discharge, bleeding, or other signs of
sexually transmitted diseases (STDs). For signs and treatment of STDs. If
you know how, do a pelvic exam (see the next
page).
How to examine a woman’s genitals (the pelvic exam)
Knowing how to examine a woman’s genitals can save lives.
It is necessary for giving some family planning methods and for finding
out about many serious women’s health problems, such as pregnancy in the
tubes, cancer of the cervix and of the womb (uterus), many
STDs, and complications from abortion. It is not difficult to learn, and with
practice, most women or health workers can:
· examine the outer
genitals.
· feel the reproductive parts
inside the abdomen.
But only do a pelvic exam if it is really necessary. Any time
you put something inside a woman’s vagina you increase her risk of
infection.
IMPORTANT
Do not do a pelvic
examination:
· when a woman is
pregnant and bleeding, or if her waters have broken.
· after a normal birth or uncomplicated
abortion.
Before you start:
1. Ask the woman to pass urine.
Figure
2. Wash your hands well with clean water and soap.
Always examine a woman where
others cannot see.
3. Ask her to loosen her clothing. Use a sheet or her
clothing to cover her.
4. Have her lie on her back, with her heels close to her
bottom and her knees up. Explain what you are about to do.
5. Put a clean glove on the hand you will put inside the
vagina.
Look at the outside genitals:
Using the gloved hand to gently touch the woman, look for lumps,
swelling, unusual discharge, sores, tears, and scars around the genitals and in
between the skin folds of the vulva. Some diseases have signs that appear
on the outside of the genitals (see the chapter on STDs).
Figure
|
How to do a speculum exam
A speculum is useful for looking at the cervix and vagina. If
you have one, follow the steps below and then continue with the exam on the next
page. If you do not have a speculum, you can get much of the same information by
following the steps on the next page.
Figure
1. Be sure the speculum has been disinfected before you
use it. Wet the speculum with clean water before using it.
2. Put the first finger of your gloved hand in the
women’s vagina. As you put your finger in, push gently downward on the
muscle surrounding the vagina. (Work slowly, waiting for the woman to relax her
muscles.) Use this finger to find the cervix, which feels like the tip of the
nose.
3. With the other hand, hold the speculum blades together
between the pointing finger and the middle finger. Turn the blades sideways and
slip them into the vagina. (Be careful not to press on the urine hole or
clitoris, because these areas are very sensitive.) When the speculum is
halfway in, turn it so the handle is down. Remove your gloved finger.
4. Gently open the blades a little and look for the
cervix. Move the speculum slowly and gently until you can see the cervix between
the blades. Tighten the screw on the speculum so it will stay in place.
5. Check the cervix, which should look pink and round and
smooth. Notice if the opening is open or closed, and whether there is any
discharge or bleeding. If you are examining the woman because she is bleeding
from the vagina after birth, abortion, or miscarriage, look for flesh coming
from the opening of the cervix. If you think she may have an infection, check
for green or yellow discharge, or bleeding from the cervix. If the woman has
been leaking urine or stool, gently turn the speculum to look at the walls of
the vagina. Bring the blades closer together to do this.
Figure
6. To remove the speculum, gently pull it toward you
until the blades are clear of the cervix. Then bring the blades together and
gently pull back. Be sure to disinfect your speculum again. |
How to feel the reproductive parts inside the abdomen
1. Put the pointing finger of your gloved hand in the
woman’s vagina. As you put your finger in, push gently downward on the
muscle surrounding the vagina. When the woman’s body relaxes, put the
middle finger in too. Turn the palm of your hand up.
Move the cervix gently from
side to side.
2. Feel the opening of her womb (cervix) to see if it is
firm and round. Then put one finger on either side of the cervix and move the
cervix gently. It should move easily, without causing pain. If it does cause
pain, she may have an infection of the womb, tubes, or ovaries. If her cervix
feels soft, she may be pregnant.
3. Feel the womb by gently pushing on her lower abdomen
with your outside hand. This moves the inside parts (womb, tubes, and ovaries)
closer to your inside hand. The womb may be tipped forward or backward. If you
do not feel it in front of the cervix, gently lift the cervix and feel around it
for the body of the womb. If you feel it under the cervix, it is pointed to the
back.
Figure
4. When you find the womb, feel for its size and shape.
Do this by moving your inside fingers to the sides of the cervix, and then
‘walk’ your outside fingers around the womb. It should feel firm,
smooth, and smaller than a lemon.
If the womb:
· feels soft and
large, she is probably pregnant.
· feels lumpy and hard, she may
have a fibroid or other growth.
· hurts when you touch it, she
probably has an infection inside.
· does not move freely, she
could have scars from an old infection (pelvic inflammatory disease -
PID).

Size of the womb during
pregnancy
5. Feel her tubes and ovaries. If these are normal, they
will be hard to feel. But if you feel any lumps that are bigger than an almond
(this size) or that cause severe pain, she could have an infection or other
emergency. If she has a painful lump, and her monthly bleeding is late, she
could be pregnant in the tube. She needs medical help right away.
Figure
6. Move your finger and feel along the inside of the
vagina. If she has a problem with leaking urine or stool, check for a tear. Make
sure there are no unusual lumps or sores.
Figure
7. Have the woman cough, or push down as if she were
passing stool. Watch to see if something bulges out of the vagina. If it does,
she could have a fallen womb or fallen bladder.
8. When you are finished, clean and disinfect your glove.
Wash your hands well with soap and
water
Caring for burns
Burns are a common injury for women and children. All burns
should first be cooled for 15 minutes with ice, cold water; or cloths soaked in
cold water. After cooling, treatment depends on how serious the burn is. It is
very important to keep burns as clean as possible. Protect them from dirt, dust,
flies, and other insects. For better healing, never put grease, fat, animal
skins, coffee, herbs, or stool on a burn. It is important for persons who have
been burned to eat body-building foods (protein). There is no type of
food that needs to be avoided.
Figure
There are 3 basic kinds of burns:
1. Minor burns (1st degree)
These burns do not form blisters, but the skin will get darker
or red. After cooling, no other treatment is needed. Use aspirin or paracetamol
for pain.
IMPORTANT
Wash your hands carefully before
caring for burns to prevent infection.
2. Burns that cause blisters (2nd degree)
After cooling, do not break the blisters. Do not make a hole in
the blister or take out the liquid inside - not even with a needle and syringe
that has been disinfected. If the blister does break, use scissors that have
been disinfected to gently remove all the dead skin. Then use mild soap and
boiled, cooled water on sterile cotton or gauze, or disinfected cloth, to gently
clean the burn. You can also use hydrogen peroxide. Remove any remaining
burned skin on and around the burn until you see the fresh pink skin underneath.
Cover this fresh skin with a piece of sterile gauze or disinfected cloth. If the
cloth sticks to the burn when you want to remove it, wet it with water that has
been boiled and cooled.
To prevent infection in the burn area, apply a sterile gauze or
disinfected cloth that has been soaked in a salt water solution for 15 minutes,
3 times a day. Each time you change the cloth, remove the dead skin and flesh
carefully with very clean tweezers, until you see fresh pink skin.
To make a salt solution:

Use 1 teaspoon of salt for 1
liter or quart of water. Boil both the cloth and water before use and cool
before putting on the burn.
If the burn does become infected, it will be even more painful,
more swollen, and the skin spreading out away from the burn will become hard and
red. Use an antibiotic, such as penicillin or ampicillin, 250 mg, 4 times
each day for 7 days. But if the infection has not gone away after 5 days, change
to dicloxicillin or erythromycin, 250 mg, 4 times a day for 7 to 10 days. Give
the person plenty of liquids.
3. Deep Burns (3rd Degree)
These are burns that destroy the skin and expose blackened and
charred flesh. These burns are always serious. Take the person for
medical help at once. In the meantime, wrap the burned part with a disinfected
damp cloth or towel. Make sure the water used to dampen the cloth has been
boiled and cooled. Give the person plenty of fluids.
If it is impossible to get medical help, treat the burn as you
would a 2nd degree burn. To protect the burn from dust and insects, cover it
with a loose, sterile cotton cloth or sheet. Change the cloth at least 4 times a
day, or 2 times a day if the cloth stays dry.
Give ‘rehydration drink’ as often as possible, until
the person passes urine frequently. If the person is unconscious or
cannot swallow, give the rehydration drink in the rectum.
Any person who has been badly burned can easily go into shock,
caused by the loss of body fluids from the oozing burn.
Comfort and reassure the burned person, and treat her or him for
shock if necessary. Give any strong pain medicine you have. Bathing open wounds
in slightly salty cold water also helps ease
pain.
How to give fluids to treat shock
If a women loses a lot of blood - for example, during childbirth
after a complicated miscarriage or abortion, or if she is badly burned - she may
go into shock.
When this happens a woman needs fluids fast in order to save her
life. If she is awake and can drink fluids, let her do so. Also, if you know
how, you can start an intravenous drip (IV). In an emergency, an enema
can be used instead (see the next page). But enemas should be used for
emergencies only. Using too many enemas can be harmful.

Figure
How to make rehydration drink
|
2 ways to make rehydration drink
If you can, add half a cup of fruit juice, coconut water, or
mashed ripe banana to either drink. These contain potassium, a mineral which
helps a sick person accept more food and drink. |
|
1. With sugar and salt. (You can use raw sugar or
molasses instead of sugar.)

In 1 liter of clean
WATER

put half of a level teaspoon
of SALT
and 8 level teaspoons of
SUGAR
CAUTION: Before adding the sugar, taste
the drink and be sure it is less salty than tears. |
|
|
2. With powdered cereal and salt.
(Powdered rice is best. But you can use finely ground maize,
wheat flour, sorghum, or cooked and mashed potatoes.)

In 1 liter of clean
WATER
put half of a level teaspoon
of SALT
and 8 level teaspoons of
SUGAR
Boil for 5 to 7 minutes to form a liquid gruel or watery
porridge. Cool the drink quickly and begin ton give it to the sick person.
CAUTION: Taste the drink each time before you give it
to make sure that it has not spoiled. Cereal drinks can spoil within a few hours
in hot weather. |
Rehydration drink will also help treat and prevent dehydration,
especially in cases of severe watery
diarrhea.
How to give rectal fluids
You will need:
· a clean enema bag,
or a can or tin with tubing.
· a cloth to place under the
person.
· 600 ml (a little more than
° a liter bottle) of warm (not hot) drinking water If you have them, sugar
and salt rehydration drink or a bag of IV solution can be used
instead.
Figure
What to do:
1. Tell the woman what you are doing and why.
2. Wash your hands.
3. Ask her to lie on her left side if she can. If
possible, her body should be a little higher than her head.
Make sure her body is higher
than her head.
4. If you have them, put on clean gloves.
5. Let the water come down to the end of the tube to get
the air out. Then pinch the tubing to stop the flow.
6. Wet the end of the tube with water, and slide it into
the anus. Ask her to take slow, deep breaths to help her relax.
Figure
7. Hold the bag or can just
high enough for the water to run in very slowly (about the level of the
woman’s hips). It should take about 20 minutes. If the water runs out of
her body, the bag may be too high. Lower the bag so the water runs in more
slowly.
8. Gently remove the tube. Tell her to try
and keep the water inside, and that the urge to pass stool will go away soon. If
the woman is unconscious, you can hold her buttocks together.
9. Clean and dry the woman. Then remove your gloves and
wash your hands.
10. Transport the woman for medical help right away. If
the woman is still in shock, you can give another enema one hour later. If she
is not in shock, try to give sips of rehydration drink as you transport
her.
How to give an injection
Injections are not needed often. Many medicines sometimes given
by injection are safer when given by mouth. But it can be necessary to give an
injection:
· when the medicine
does not come in a form that can be given by mouth.
· when the person cannot swallow
or keep medicine down without vomiting.
· in some emergencies, such as
bleeding or infections after childbirth or abortion.
It is important to give injections properly. They can be
dangerous when given in the wrong place, in the wrong way, or without properly
cleaning the syringe, hands, and injection site. Carefully follow all of the
instructions on ‘How to inject’.
Preventing infection
Needles and syringes that are not cleaned and disinfected
properly can pass a disease like HIV/AIDS or liver disease
(hepatitis’) to another person. They can also cause a serious
infection at the injection site or in the blood.
· Never use
the same needle and syringe to inject more than one person without cleaning and
disinfecting the needle and syringe first.
· After the needle has boiled,
do not touch it with anything that has not been disinfected.
· If needles are for one-time
use
only.
Where to give an injection
There are 2 basic kinds of injections:
· injections that go
into a muscle (intramuscular or IM)
·
injections that go into the fatty layer under the skin
(subcutaneous).
Where you choose to inject depends on how much medicine you need
to inject, the size of the person receiving the injection, and what kind of
medicine you are using. For information about how to give both kinds of
injections.
Most of the medicines in this book that need to be injected
should go into the muscle. IM injections can be given in a large muscle in the
buttock, upper arm, or thigh. It is best to use the buttock or thigh instead of
the arm if:
· the amount to
inject is more than 2 ml (2 cc). (But you should never inject more than 3 ml (3
cc) in a single dose. Use 2 injections instead.)
· the medicine is likely to
cause pain when injected.
· the person being given the
injection is very small or poorly nourished.
In the buttock, always inject
in the upper, outer quarter.
In the upper arm, keep the arm relaxed against
the body. Measure 2 finger widths down from the bone at the edge of the
shoulder.
In the thigh, inject into the
upper outer part. (This is the best way to inject babies.)
|
How to prepare a syringe for injection
Before preparing a syringe, wash your hands with soap and
water. If the syringe is reusable, start with step I. If you have a
disposable syringe, open the package carefully and start with step 2.
1. Follow the instructions for disinfecting syringes.
Figure
2. Put the needle and syringe together, touching only the
base of the needle and the end of the plunger.
Figure
3. Some medicines come ready to use. If you have this
kind of medicine, follow steps 4, 5, and 10. If the medicine needs to be mixed
with distilled water, follow steps 4 through 10.
4. Clean the glass container (ampule) of medicine or
distilled water. Then break off the top.
Figure
5. Fill the syringe. Be careful that the needle does not
touch the outside of the ampule.
Figure
6. Rub the rubber top of the medicine bottle with a clean
cloth or cotton that is wet with alcohol or boiled water
Figure
7. Inject the distilled water into the bottle with the
powdered medicine.
Figure
8. Shake until the medicine mixes completely with the
water.
Figure
9. Fill the syringe again.
Figure
10. Remove all air from the syringe. To do this, hold the
syringe with the needle upright and tap it lightly here to make any air bubbles
rise to the top. Then slowly push a little on the plunger until all the air
comes out through the needle.
Figure
Be very careful not to touch the needle with anything - not
even the cloth or cotton that is wet with alcohol. If the needle touches
anything, boil it again. |
How to inject into the muscle (intramuscular, or im)
The pictures below show how to inject into the buttock. Steps 2
through 6 are the same for injections into the arm or thigh.
1. The person should sit or lie down. Pointing the toes
together will relax the muscle to be injected.
2. Clean the skin with alcohol, or soap and water (it
will hurt less if you let the alcohol dry before injecting).
Figure
3. Put the needle straight in, all the way. If it is done
with one quick movement, it hurts less.
Figure
4. Before injecting the medicine, gently pull back on the
plunger a little bit (do not pull until the plunger falls out). If blood enters
the syringe, take the needle out and put it back in somewhere else close by in
the area you have cleaned.
Figure
5. Pull back on the plunger again. If no blood enters,
inject the medicine slowly.
Figure
6. Remove the needle and clean the skin again.
Figure
How to give an injection under the skin (subcutaneous injection)
· Grab the fatty
part on the underside of the arm. Hold the skin like this:
· Put the needle under the skin
at this angle. Make sure the needle does not go into the muscle.
Figure
Be prepared to treat allergic reaction and allergic shock
Some medicines, especially antibiotics like penicillin and
ampicillin, can produce an allergic reaction, usually within 30 minutes after an
injection. An allergic reaction can progress to allergic shock, which is an
emergency. To prevent allergic reaction and allergic shock, before giving an
injection ask the person: “Have you ever had a reaction to this medicine -
like hives, itching, swelling, or trouble breathing?” If the answer is yes,
do not use that medicine in any form, or any medicine from the same family of
medicines. Whenever you inject medicines, watch for signs of allergic reaction
and allergic shock and have medicines for treating them nearby.
Mild allergic reaction
Signs:
· itching
· sneezing
· hives
or rash
Treatment:
Give 25 mg diphenhydramine by mouth 3 times a day until the
signs disappear.
Pregnant or breastfeeding women may find the discomfort of a
mild allergic reaction better than the risks of taking an antihistamine.
Moderate to severe allergic reaction
Signs:
· itching
· swollen mouth and tongue
· difficulty breathing
· hives
Treatment:
1. Inject 0.5 mg of epinephrine immediately under the skin. Give
a second injection in 20 minutes if the signs do not get better.
2. Give 25 mg diphenhydramine or promethazine by mouth or by
injection into a muscle. Repeat in 8 hours or less if the signs do not get
better.
3. Watch the person for at least 4 hours to make sure the
reaction does not progress to allergic shock.
Allergic shock
Signs:
· itching or
hives
· swollen mouth and tongue
· weak, rapid pulse or heartbeat (more than 100 beats
per minute)
· sudden paleness or cool, moist
skin (cold sweats)
· difficulty
breathing
· loss of
consciousness
Treatment:
1. Inject 0.5 mg of epinephrine immediately under the skin. Give
a second injection in 20 minutes if the signs do not get better.
2. Inject 50 mg diphenhydramine or promethazine into muscle.
Repeat in 8 hours or less if the signs do not get better
3. Inject 500 mg hydrocortisone (cortisol) into muscle and
repeat in 4 hours if needed. Or inject 20 mg dexamethasone into muscle
and repeat in 6 hours if needed.
4. Watch the person for 8 to 12 hours to make sure the signs do
not come back. Leave her with steroid medicines to take by mouth if her signs
return. She should take 500 to 1000 mg of hydrocortisone and repeat after 4
hours if needed. Or she can take 20 mg of dexamethasone and repeat after 6 hours
if
needed.
Acupressure Massage
Pressing on special ‘points’ on the body can help
relieve some of the common health problems of women. These points come from an
ancient Chinese way of healing called acupressure. Local healers may know other
kinds of massage.
Use your own sense of how long and how often to press on these
points (an average amount of time is 3 to 10 minutes). Many women feel tender at
these points. If a point is very tender, be careful not to irritate it. If there
is an injury, do not use acupressure in that area.
Sometimes there are several points to help the same problem. You
can try all these points. If one seems tender or makes you feel better, focus on
that point. If not, use all of the points in any order.
IMPORTANT
Pressing on some of these points can
cause problems during pregnancy. If you are pregnant, watch for the warnings
mentioned below.
General pain from monthly bleeding
(For information
about monthly bleeding,)
1. To help prevent general discomfort during monthly
bleeding, such as sore breasts, feeling tired, and a full feeling in the lower
abdomen:
Figure
2. To lessen pain and cramps during monthly bleeding,
firmly hold and massage the tender place on your hand you will find between your
thumb and first finger. Pressing hard on this spot can ease many kinds of pain.
Figure
Figure
The following massage is also useful to relieve pain and
cramps, as well as signs of pre-menstrual syndrome (PMS).
Massage in between the toes, around the ankle bones, and up the
ankles on the outside of the feet. Look for areas that are sensitive and massage
these places longer. For a pregnant woman, do not massage the outside of the
big toe, the arch or the middle of the bottom of the foot or above the outside
of the ankle. It can make labor start.
Hand, wrist, and ear massage can also help with pain or signs of
PMS.
Pregnancy and childbirth
(See the chapter on
“Pregnancy and Childbirth”)
Figure
To bring on labor, or to make a weak labor stronger:
Figure
Menopause
(See the chapter on “Growing
Older”)
To help relieve general discomfort, press the following points
about once a day for 10 minutes:
Figure
It can also help to press these points on the ear:
Figure


