Back to Home
Page of CD3WD Project or Back to list of CD3WD Publications
 |  |  | Permanent Farming Systems Based on Animal Traction: Farmers Handbook (GTZ, 1995, 183 p.) |  |  | PART III: Draft animal implements | |  | (introduction...) | | | 3.1 Cattle harness | | | 3.2 Donkey harness | | | 3.3 The plow | | | 3.4 THE HARROW | | | 3.5 The ridger | | | 3.6 The tine-weeder/hoe | | | 3.7 The cart | | | 3.8 The roller cutter | | | 3.9 The seed planter |
|
Permanent Farming Systems Based on Animal Traction: Farmers Handbook (GTZ, 1995, 183 p.)
PART III: Draft animal implements

Figure
The farm implements help you to transform the power of your
draft animals into work effort in the farm. Without proper tools, no efficient
work.
The oxen farmer needs different tools for the different working
operations. All working tools like prow, harrow, ridger and cart, etc., are
attached to the draft animals by means of the harness.
Harness, we call that part of the equipment which is put on the
animal. All other farm implements are attached to the harness. The harness
allows us also to control the draft
animals.
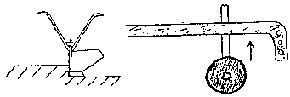
3.1 Cattle harness
The oxen harness consists of the following parts
- halter chain or nasal ring
- yoke
- head
joint rope
- steering rope
3.1.1 Halter Chain or Nasal Ring
To tie the head joint and the steering ropes to the oxen, there
are two systems:

Fig. 3.1: The Nasal Ring, made of
steel and applied by the veterinary staff to the nose of the ox, is very
effective. Oxen can be trained faster and are easier to control.
The Halter Chain, made of a chain and attached to the head of
the ox. is less effective. Oxen are more difficult to train and to control with
this system.
Adjust your Halter Chain correctly to the animals to avoid
wounds at the eyes, muzzle or mouth.

Fig. 3.2: Correct adjustment of the
halter chain
3.1.2 Head Joint and Steering Ropes
The head joint and steering ropes are attached to the halter
chain or nasal ring to control the oxen. The steering rope is 12 mm thick and 20
m long, head joint rope is 6 mm thick and 2 m long.

Fig. 3.3: The Head Joint joins the
two animals and the Steering Rope leads round their rears to the driver.
Avoid wrong adjustment of the head joint.

Fig. 3.4: No! The head joint is too
long.

Fig. 3.5: Yes! Head Joint and
Steering Rope are correct.

Fig. 3.6: No! The head joint is too
short.
3.1.3 The Yoke
The yoke connects the two oxen. All traction implements are
attached to the yoke by the pulling chain (prow, ridger, harrow) or the beam (
cart, roller cutter).
The yoke consists of the yoke beam, the yoke pegs and the peg
beam.
You have two kinds of yokes:
-The short yoke with a length of about 1.3 m, used
for plowing, harrowing, transport, clearing.

Fig:3.7: Use the short yoke for
plowing and weeding rice and wheat (40 cm rows)
-The long yoke with a length of about 1.7 m and
adjustable to different working distances, used mainly for ridging, weeding and
moulding.

Fig. 3.8: Use the long yoke for
ridging, weeding and moulding
Weeding/Ridging: Use the maximum distance between the oxen.
Leave central holes of the yoke free (80 cm ridges).
Plowing: Reduce the distance between the oxen by changing the
pegs Weeding: of 60 cm ridges
3.1.4 The Pulling Chain
The pulling chain connects the implements with the harness. It
is 3 m long and can be adjusted to different lengths.
3.1.5 Maintenance of the Harness
The Harness is made of wood. Wood is easily destroyed by
water.
A harness that is stored in a dry place like the cowshed can stay for
10 years.
If you expose your harness to rain and sun, it will rot and break
after 1 year.
Proper storage of your harness will save you
money.
3.2 Donkey harness
As for cattle, donkey harness is worn by the animals for the
purposes of pulling implements or carrying loads and to control animals at work.
3.2.1 Leading and driving harness
Controlling a donkey's head is the best way to control a
donkey's movements. When leading a donkey, it is necessary to keep its head well
above the ground to prevent it from eating and to keep it going in the wanted
direction. A rope attached to the donkey's head is necessary to achieve this.
3.2.1.1 Headrope and Halter
A headrope is very easy to make quickly and to slip on to the
donkey. It is also easy to keep it in the pocket when it is not being used.
Because the headrope is made of rope which can rub the skin, this should be for
temporary use only.

Fig. 3.9: How to make and fit a
headrope
A halter should be made of leather or strong webbing - in any
case some flat material so that a brow-band can be included, and even a
throatlash, which prevent the donkey from rubbing the halter off.
The halter also has the advantage of having strong metal rings
by the donkey's mouth to which a lead rope or reins for driving can be attached.

Fig. 3.10: Parts and correct fit of
a donkey halter
3.2.1.2 Bridle and Bit
For control from behind, the donkey's mouth is used. For this
purpose a bit, a round piece of metal is inserted in the donkey's mouth. In many
countries pony bridles (see Fig. 3.11 ) are sold which will fit donkeys, and
also pony bits

Fig. 3.11: The bridle and how to fit
it correctly on the donkey's head, with a commercial bit and one made in a local
workshop.
The bit must be buckled to the bridle by its rings. For each
donkey, the cheekstraps of the bridle should be adjusted so that the bit fits
snugly but not painfully at the top of the mouth, and the donkey cannot move it
with its tongue. Inserting the bit into the donkey's mouth and fitting the
bridle over its ears are all part of one smooth operation.
3.2.1.3 Reins (Steering rope)
The driver or rider is connected to the bridle and bit (or
halter) through the reins or steering rope, which attach to the rings of the bit
(or halter) on each side of the head. A strong leather strap is softer to human
hands than a rope.
3.2.2 Pulling Harness
Pulling implements and carts are the main tasks of working
donkeys. For draft work, therefore, a suitable harness is most important. A yoke
is not suitable for donkeys, not only because it does not reach the shoulder
where the donkey's horizontal force is exercised, but the donkey has no muscles
to form a cushion at the withers like an ox and thus withstand the damage that a
yoke can do. For draft work, therefore the donkey must be harnessed round the
neck. There are two types of harness suitable for donkeys: The breastband and
the collar harness.
3.2.2.1 Breastband

Fig. 3.12: The breastband is a simple
and cheap design, which is usually made of thick rubber, old tyres, canvas
belting, transmission belt or similar strong but flexible materials, joined
together with bolts or rivets.
The breastband has the disadvantage of not only pulling on the
shoulders, but also on the chest which may obstruct the donkey's breathing.
Also, since the fitting is not very adjustable, this harness is often too loose
on the donkeys, causing rubbing and wounds. In order to make the breastband more
comfortable, the sharp edges of the belting have to be filed down and the heads
of the bolts or rivets inside the harness have to fit smoothly into the belt
material.
3.2.2.2 Collar harness

Fig. 3.13: The Collar Harness can be
fitted exactly to the donkey's shoulders, and is adjustable for the donkey's
comfort. Also it does not interfere with the donkey's windpipe so that it can
breathe freely.
The collar harness is more comfortable, but it is more complex
in design than the breastband, yet it can be made of materials that are easy to
find in rural areas, such as wood, cloth, leather, some nails, stuffing for the
cushions - best material for this being the tail brush of cattle or even the
donkeys themselves. Anybody with reasonable craft competence can make a collar
harness if provided with the design.
3.2.2.3 Saddle and girth
A saddle over the donkey's back is necessary to take the
vertical force or weight. Since the force is not very great, the saddle need be
no more than a wide, strong strap, sometimes over padding. If the breastband is
used, the saddle is included in the design..

Fig. 3.14: The saddle takes the
vertical force on the donkey's back
A collar harness does not provide for the vertical force, so if
a collar is used, the saddle has to be provided separately - but then it can
have the advantage of being made more stable with a girth or bellyband under the
donkey's belly. The girth also, should be a wide, soft strap which is adjustable
to make the whole apparatus tight. The shafts of a cart should be attached to
the saddle for the balance of the weight.
3.2.2.4 Breeching

Fig. 3.15: Breeching acts as a brake
when the donkey is pulling a cart.
Breeching is required when a cart is being used, as it acts as a
brake, taking the force which is parallel to the ground when the cart is going
downhill, when the weight of the cart becomes part of that force.
The breeching strap is a wide strap of the same materials as the
breastband that passes under the tail of the donkey. In the correct position the
breeching strap does neither interfere with the donkey defecating nor with the
movement of the legs.
When connected to the other parts of the harness, the breeching
strap should be fitted snugly to the donkeys skin, it should never be loose to
rub the donkey's skin. So as not to cut the donkey's skin, it must be wide and
soft as well as strong.
3.2.2.5 Swingles, Eveners and Traces
The swingle allows the pulling harness to follow the donkey's
uneven movements when walking, as it moves one leg after another.
The evener has a similar function like the swingle, only it
compensates the uneven movements and pull where more than one donkey is pulling
a load. The evener allows the animals at work more freedom to move and it can
compensate for uneven pull if the animals are not equally strong by attaching
the implement nearer to the stronger animal.
Both, swingle and evener are made of good, hard wood, which is
both light and strong. Any farmer can easily make them.
They should not be thicker than a childs wrist
They should be
long enough so that the traces through which the animal is pulling, are held
clear of the animal's belly and legs as it moves.

Fig. 3.16: Swingles and evener for
two animals seen from above
The traces are the lines that transmit the pull from the
breastband or collar to the cart or implement itself. Because of the strain they
take, traces need to be strong and chains are often therefore used. At the
correct length the traces can't get entangled with the legs of the animals.

Fig. 3.17: Swingles, evener and
traces in use with two donkeys pulling a plow.
3.2.3 Equipment for Carrying
The main requirements for carrying equipment are that it should
be:
-able to keep the weight off the donkey's
spine;
-able to distribute the weight of the load onto the
upper part of the donkey's ribs and close to the centre of gravity
-light, so that it adds as little as possible to the
load
-of strong materials, to withstand being pulled
against rocks and branches and thorns in narrow places;
-well-balanced, to ensure that the load is divided
equally on both sides of the donkey's back;
-secure against sliding backwards or forwards when
the donkey is climbing or descending slopes;
-not able to rub or cut the donkey;
-able to
carry the correct weight;
-able to be tightly Packed, so that the load does
not project too far from the donkey, and lies flat down its sides;
-reasonably high above the ground, so it is not
encountered by the donkey's moving feet;
-far enough away back and front from
the donkey's moving legs;
-possible to offload from the donkey within seconds
in the event of an emergency
As a general rule, a folded blanket should come between the
donkey's back and anything it carries, to prevent rubbing and catching of hairs.
It will also absorb the donkey's sweat and the dust from its back. Being
separate, it can easily be washed and cleaned.
3.2.3.1 Bags and Soggies
Bags can be home made out of strong material such as canvas,
they can easily be made and repaired.

Fig. 3.18: A saddle bag with straps
fastened under the chest, the tail and the belly of the donkey
Disadvantages of bags are:
-they are connected, so must be lifted together on
and off the donkey
-too much of the weight might be taken directly by the
donkey's spine.
Straps under the donkey's chest, under its tail and under its
belly should all have their fastenings close to one of the bees on the same side
(traditionally on the left hand side) of the donkey, so that they can be undone
without the need too move around the donkey.

Fig. 3.19: The soggie is a kind of
bag woven of rushes, grass or palm leaves.
The soggie is really just another kind of bag which is widely
used in East Africa, and has been found to be one of the best ways of loading a
donkey. It has no straps to secure it, but nonetheless seems not to move once it
is loaded. The soggie is usually woven out of strong and long lasting materials
like rushes, but can equally well be made from grasses or palm leaves, and any
competent basket weaver is able to make one.
3.2.3.2 Sawbuck Saddle and Pannier

Fig. 3.20: The sawbuck saddle is used
in many parts of the world and it can easily be made by a carpenter or wood
carver.
A sawbuck has the advantage that it is suited to many types of
load, even those of awkward shape, and one half of the load at a time can be
lifted on or off the donkey. Another advantage is that it serves to transfer the
weight of the load from the donkey's spine to its ribs. Lashing is the safest
way of attaching any load to the sawbuck saddle.
A pannier is a more rigid container than a bag or soggie, so
that it incurs less risk of poor packing and shape to the load. Also it can be
made of a stronger material, such as bamboo or reed basketwork, or even a light
metal.
Panniers can be separate and so designed that they hook onto a
sawbuck saddle, or they can be joined in such a way that they form a saddle of
their own. Being rigid, this saddle can be shared so that the weight of the load
is not taken by the donkey's spine, but its ribs. It should also be cushioned so
there is no risk of any part of it digging into the donkey.
The safest way of tying loads to donkeys is shown in Figure
3.21, it is called lashing. This method of fastening a load has the advantages
of:
-the load being secure at all points where gravity
may cause it to slip
-in an emergency, the load may be released within
seconds and removed from the donkey.

Fig. 3.2 1: Lashing, a safe method of
tying loads carried by
donkeys.
3.3 The plow
3.3.1 Why plow?
Plowing is a method of cultivating whose main purpose is to
loosen the surface laver of the soil in which seed will be sown later. This
loosening is achieved by turning over the furrow slice, thus exposing it to air,
rain and sun.
Plowing is carried out for the following reasons:
-to take virgin land into cultivation
-to soften
the soil for the establishment of the seedbed (ridges) .
-to uproot
weeds

Fig. 3.22: The furrow slice is cut by
the courter and by the share and turned over by the mouldboard.
3.3.2 Parts of the Plow and their Function
The plow is the tool for the draft animal farmer to dig up the
soil. It is made up of the following parts.
-The share, is one of the main parts of the prow. It
cuts the slice of the earth horizontally and starts turning it
over.
-The courter is a steel cutting blade which cuts the
soil vertically along the furrow wall. The shaft of the courter is attached to
the beam. The cutting edge of the courter is not exactly on the axis of the
forward movement of the plow. It is turned slightly towards the furrow wall thus
helping to keep the plow in the furrow. The courter must always be kept
sharp.
-The mouldboard is the other main part of the plow
which turns over the earth previously cut by the courter and the share. It is an
extension of the share to the rear.
-The beam is the main frame of the plow
to which all the other parts are attached, directly or indirectly.
-The stay
is a part of the rear end of the beam to which are attached the main parts of
every prow.
-The frog is the part attached to the lower part of the stay. Its
front part is called the Sole Plate. It is to the frog that the mouldboard and
the share are attached. It's rear end is the heel piece.
-The landside is
another wearing part bolted to the frog. Its purpose is to prevent wear of the
frog and of the stay, as a result of friction along the furrow
wall.
-The handles enable the plowman to control the plow
when working.

Fig. 3.22: Parts of the Plow Body
which are fast wearing

Fig. 3.23: All parts of the
animal-drawn plow
3.3.3 Working Adjustment of the Plow
For good and easy plowing, it is important that the adjustments
of your plow be correct.
The working adjustment of the plow can be done with:
-the pulling chain
-the vertical adjustment
control .
-the horizontal adjustment control
Problems
1. Plow not running upright, tips to the unplowed soil.
Solutions
Decrease length of pulling chain, lower hitching
point of chain.

Figure
2. Plow not running upright, tips to the plowed soil
Solutions
Reduce length of the chain or raise hitching point
of chain.

Figure
3. Landside is pressing on the ground, wheel is above ground
Solutions
Reduce length of the chain or raise hitching point
of chain.

Figure
4. Landside is not touching the ground operator has to press
down the handles
Solutions
Lower hitching point of the chain, reduce length of
pulling chain

Figure
5. Plow is working too shallow not digging deep enough
Solutions
Raise hitching point of chain, extend length of
pulling chain, reduce wheel standard
Figure
6. Plow is working too deep
Solutions
Lower hitching point of chain, reduce length of
pulling chain, extend wheel standard

Figure
7. Working width is too small
Solutions
Shift chain to the end of chain adjuster where land
is already plowed

Figure
8. Working width is too wide
Solutions
Shift chain to the end of chain adjuster where land
is not plowed

Figure

Fig. 3.24: Do not work until your
plow adjustment is correct!
3.3.4 When to plow
If your soil is not hard, you start plowing during the dry
season so that you can start planting as soon as the rains are steady.
On
hard soils we start plowing as soon as the rains have softened the soil. Start
plowing on the plots with heady soils (silt and clay). Once they are very wet,
they stick to the mouldboard and make the work difficult.
3.3.5 How to plow
1. The whole area of the plot has to be plowed. Not
one little piece remains unplowed!
2. Always work the long side of the field, so that
your furrows are as long as possible. You lose less time by turning round at the
end of the field.
3. Always plow across the slope! Plowing down the
slope provokes damage by erosion.
4. If your field is wider than 30 m divide up the
area to be plowed into 'plots" so as to reduce walking at the ends of the furrow
to a minimum.
A contoured field divides the field already into smaller
plots.
There are two methods of plowing, depending on where you start and end
work.

Fig. 3.25: The Gathering plowing
method - you stars plowing in the middle of the land and you continue towards
the edge of the land, one says you are opening Up or gathering.

Fig. 3.26: The Casting plowing You
start plowing at the corner of the land and work towards the centre of the land,
one says you are casting or finishing off
You are finishing off where your field has been opened up the
previous year.
You are opening up where your field has been finished off the
previous year.

Fig. 3.27: A field with 4 plots
being plowed one year

Fig. 3.28: The same field plowed the
alternate year. Plots which were gathered last year are now cast. Plots which
were cast last year are now gathered.
3.3.6 Disadvantages of Plowing
Repeated plowing can have negative effects on the soil. The
organic matter of the soil decomposes faster. The soil is losing fertility and
is more susceptible to erosion.
To reduce plowing, you reridge the ridges
with the ridger - plow.
3.3.7 Maintenance of the Plow
To save money and work more effectively, you have to maintain
and care for your prow.
-check and tighten all bolts and nuts of your plow
before starting work
-oil your prow, especially bolts and nuts every week
end
-grease your plow wheel regularly
-store our plow in a dry place
(cowshed) to avoid corrosion
-don't file the share of your plow too
often
3.4 THE HARROW

Fig. 3.29: The harrow is made of an
iron frame with iron tines.
The harrow is mainly used for
-raking
-harrowing and
-levelling
You can use the harrow after clearing, to rake the grass before
you start plowing.
After plowing, you use the harrow to break big clods of earth
and to remove unrooted weeds.
In the rice fields, the harrow is used to level the plot for
uniform irrigation.
Some rules for harrowing
1. Harrow the field not more than 2 to 3
times.
2. Use the harrow across the direction of the prow.
3. Do the
second harrowing across the first harrowing.
4. Never park your harrow upside
down. The tines can wound man and
animal.
3.5 The ridger
The adjustable ridger is one of the most important tools of the
Farmer.

Fig. 3.30: The big adjustable Ridger
It is used for
-the preparation of the field ridges
-reridging
of ridges
-weeding
-line application of fertilizer
-incorporation of
manure

Fig. 3.31: The adjustable wings of
the ridger allow the preparation of ridges with a distance of 50-100 cm.
3.5.1 Why make Ridges
Traditionally, all crops are grown on ridges or mounds.
Cropping on ridges has many advantages
-erosion control
-better growing conditions for
young plants, especially root and tuber crops
-prevents water
logging
-reduces spreading of fungal diseases
-harvesting of tuber / root
crops is easier
-planting and weeding is easier
-incorporation of large
quantities of organic matter is easier
3.5.2 How to make Ridges
When the soil is under cultivation or softened by plowing it is
easy to make ridges with the ridger-plow. The adjustments of the ridger are done
as for the prow. In addition, you can adjust the distance between your ridges by
the adjustable wings.

Figure

Fig. 3.32: No! These ridges are not
correct, they have hollows on top. Yes! These ridges are correct.
The ridges must not have hollows on top! If they do not have the
correct shape after ridging once, you ridge for a second tune.
3.5.3 Reridging, Weeding, Band Application of Fertilizer

Fig. 3.33: When the rain has washed
down soil from the top of the ridges into the furrows and weeds have grown, the
ridger is used for weeding and reridging.

Fig. 3.34a: Reridging can be
combined with weeding and band application of fertiliser.
-reridging gives the ridges a correct shape again
and uproots the weeds at the same time (weeding)
-reridging covers the surface roots with soil and
protects them against drying out
-reridging increases the ridges and the
seedbed for root and tuber crops
-reridging combined with fertilizer application
mixes the fertilizer with the soil and places the fertiliser grains near the
plants (band application)

Fig. 3.34b: For reridging or
weeding, the adjustable ridger is attached to the long yoke.
3.5.4 Splitting of old Ridges
When cropping on ridges, you don't have to plow after harvest.
You use your ridger to split old ridges and mould new ones.
If you put organic matter (corn stalks, manure, etc.) into the
furrows before splitting the old ridges, you can add plenty of manure to the
soil.

Fig. 3.35: Split the old ridges
after the cultivation season and incorporate organic matter in the soil.
3.5.5 Maintenance of the Ridger
To save money, you have to maintain and care for your ridger
-check and tighten all bolts and nuts of your ridger
before starting work
-oil your ridger, especially bolts and nuts every week
end
-store your ridges in a dry place (cowshed) to avoid
corrosion
3.6 The tine-weeder/hoe
The tine weeder is a special implement for the weeding and
hoeing of crops (inter- cultivation) which are planted on the flat, like rice
and wheat.

Fig. 3.36: The tine weeder/hoe
consists of a tine carrier, that is attached to the plow beam and the spring
tines with a duck foot or small share, which are attached to the tine carrier.
Inter-cultivation (weeding/hoeing between plant rows)
-uproots weeds
-breaks the surface layer of the
soil to improve air and water circulation
-increases the yield when early and
repeatedly done

Fig. 3.37: When weeding crops, the
distance between the tines and the plants rows should be as wide as your
palm.
3.7 The cart
The cart consists of the iron frame with the loading platform,
the axle with the wheels, the break system and the beam, to attach it to the
harness.
The cart is used for transportation of
-manure from the cowshed to the farm
-implements
(e.g. roller cutter) from the compound to the farm
-fertiliser from the
compound to the farm
-produce from the farm to the compound
-produce from
the compound to the market
-many other things (e.g. firewood,
water...)
The cart makes transportation easy and fast. You don't have to
carry things on your head again.
You can use the cart to transport your things and for commercial
purposes, e.g. transport of maize or rice for other farmers.
Don't use the oxen more than 4 hours a day for transportation.
The cart is a very expensive implement. To run it economically
-you will have to use it well .
-you will have to
care for it well
3.7.1 Loading of the Cart
The cart has a loading capacity of about 500 kg. This
corresponds to
-5 bags of maize .
-6 to 7 bags of paddy
rice
Never overload your cart. It can damage the wheel drums and
other parts of the cart.
If you have young oxen, do not load up to 500 kg. You will
over-work your oxen.
Start loading in the middle of your cart. Extend to both
ends evenly.
Always balance the load you are putting on your cart.

Fig. 3.37: NO! The load is placed at
the front of the cart. The load will press down the neck of your oxen.

Fig. 3.38: NO! The load is placed in
the rear part of the cart. The harness is lifting up and strangling your oxen.

Fig 3.39: YES! The load is well
balanced on top of the wheels. Your oxen will feel fine when pulling.
3.7.2 General Checks before using the Cart
1. Check the nuts and the tyre pressure
2. Check
the brake system
3. Check your harness if it is well fitted
4. Check if
the cart beam is correctly attached to the yoke
5. Check if your oxen are
well.
3.7.3 High-Way Code
When using the cart, you have to follow certain rules to provide
safety for you and your oxen.
1. Keep right.
2. Consider other road
users.
3. Before turning left or right, consider other road users.
4.
Remember to indicate with your hand before you turn.
5. Shout or hoot to warn
other road users.
6. Do not stop at corners, junctions, bridges or narrow
roads.
7. Never overtake at those places in six above.
8. Do not transport
with oxen at night because there are no lights.
9. Do not overload the
cart.
10. Tie your ox or oxen at every long stop.
11. Tie and brake your
oxen when loading.
12. Do not use untrained or stubborn oxen.
13. Do not
use oxen for more than 4 hours even during transporting.
14. When you drink,
do not drive with your oxen.
15. Obey all the road signs and signals.
16.
Brake your cart on slopes.
17.When you have a breakdown, put a sign on the
road to warn other road users.
18. Do not leave your oxen loose on the
higkway.
3.7.4 Maintenance of the Cart
The cart is expensive. You have to care for it well to avoid
high repair cost.
-Do not overload the cart to avoid damage,
especially to the wheel drums.
-Park your cart in the cowshed to avoid
rotting of wooden parts and corrosion of the iron parts.
-Check and tighten
all nuts regularly.
-Grease the brake system from time to time.
-Check the tyre pressure. Never use the cart with a
flat tyre. The tyre, the inner tube and the wheel drum can be
damaged.
-Protect the tyres against direct
sunlight.
3.8 The roller cutter
The Roller Cutter is an implement for clearing pulled by the
oxen. In addition it can be used to break up earth lumps (harrowing) and to
puddle.
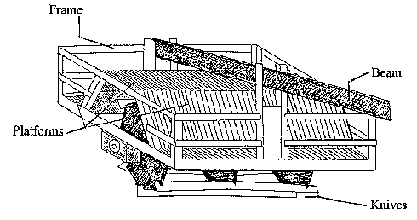
Fig. 3.40: The roller cutter consists
of an iron frame with the platform on which to put load, the axle with the
rotating knives to clear and the beam to attach it to the harness.
In action, the roller cutter pushes down grass, small bushes or
harvest residues, which are overrolled and cut into small pieces by the rotating
knives. The resulting mulch (cut organic matter) is easily covered with soil by
using the plow or ridger.
The roller cutter
-makes the clearing of the fields easier and
faster
-enables the oxen farmer to extend his cropping area and to prepare
his field for timely planting
-can be used for harrowing and puddling (swamp
rice)
-promotes organic farming. Grass or harvest residues
are cut into small pieces, which can be easily buried in the soil
3.8.1 How to use the Roller Cutter
To avoid breaking the beam and other damage to the roller
cutter, never turn on one spot when loaded. Allow a larger turning circle,
operate as indicated in Figure 3.41.

Fig. 3.41: If the space between two
contour bonds is too narrow to allow the roller cutter to turn round, work on
two fields at the same time.
Depending on the type of work, you add different quantities of
load (stones or sandfilled bags) to the platform of the roller cutter:
-no load for puddling of swamp-rice fields
-small
load for harrowing
-medium load for dry harvest residues .
-heavy load for
wet residues and tall grass
For optimum performance, you may need several passes. Time
required to clear hectare is about 3 days.
3.8.2 Maintenance of the Roller Cutter
The roller cutter is an expensive implement. You have to care
for it well to avoid costly repairs.
1. Clean the knives after use.
2. Tighten all
nuts before use.
3. Store it in a dry place (cowshed).
4. Do not use it in
a stony fields.
5. Transport of the roller cutter from the compound
to the farm is done by cart. If you roll the roller cutter on stony or firm farm
roads, the knives become blunt or
broken.
3.9 The seed planter
This Planter is used to plant the following seeds:
- Maize
- Beans
- Soyabeans
-
Groundnuts
- Cowpeas

Fig. 3.42: This Seed Planter has
three different kinds of adjustments:
-Adjustment of the seed distribution hole according
to the different kinds of seed you want to plant.
-Adjustment of the planting distance, from 0 to 30
cm.
-Adjustment of the planting depth, from 0 to 8 cm.
For the adjustment of the distribution hole, three distributors
are given:
1. A distributor with a distribution hole of 16.5 mm
diam. used for planting conditioned maize
(over 8 mm) and beans.
2. A distributor with a distribution hole of 13 mm
diam. used for planting conditioned soyabeans (over 6 mm).
3. A distributor
with a distribution hole of 18.5 mm diam. which is thicker and used for planting
of conditioned groundnuts (over 8 mm).

Fig. 3.43: Details of the seed
metering mechanism
Here are the adjustments for the different crops:
|
CROPS |
CONDITIONMENT |
DISTRIBUTION HOLE |
PLANTING DISTANCE |
PLANTING DEPTH |
|
Maize |
Sieved (> 8 mm) |
16.5 mm diam |
25 cm. |
5 cm. |
|
Beans |
Not sieved |
16.5 mm diam |
10 cm. |
3 cm. |
|
Soyabeans |
Sieved (> 6 cm) |
13.0 mm diam |
10 cm. |
3 cm. |
|
Groundnuts |
Sieved (> 8 cm) |
18.5 mm diam |
15 cm. |
3 cm. |
For the conditioning of the seeds, two sieves are provided:
1. One sieve with holes of 8 mm diam. for sieving of
maize and groundnuts.
2. One sieve with holes of 6 mm diam. for sieving of
soyabeans.
Special adjustment for groundnuts:
-The distributor is thicker ( 12 mm thick) with a
distribution hole of 18.5 mm diam.
-Since the seeds are very fragile there
are two adjustments:
1. Inside the seed box, there is a predistributor rubber which
is too strong for groundnuts.
Remove the seed box, take away this rubber and replace it with a
very soft one which is provided with the planter, then install the seed box in
its place.
2. Normally the injector pushes the seed inside the soil, but
for groundnuts, the injector will break the seeds. To stop the injector, put a
bolt with a nut (which are provided with the planter) in the hole which is at
the above part of the Planter.

Fig. 3.44: Lateral view of the seed
planter.
General Observations:
-When you are planting, do not go too quickly, so
you can hear the sound of the seed falling down into the collector. If you don't
hear any sound, it means the seed has not fallen, and you have to repeat the
injection. If you are going too quickly, it may affect the regularity of the
distribution of the seeds.
-If the mechanism is rubbing, put some oil in the
different places of the mechanism.
-Do not completely fill the seed box:
better fill it halfway.
-When you are adjusting the planting depth, be
careful that the piece of the sheet closing the bottom of the planter is well
adjusted (it must be well closed when the injector is up).
-From time to
time, check if the bottom of the planter is closing well (no mud or no seed
preventing it from
closing).
