Back to Home
Page of CD3WD Project or Back to list of CD3WD Publications
 |  |  | Glazes - for the Self-reliant Potter (GTZ, 1993, 179 p.) |  |  | 9. Glaze application | |  | (introduction...) | | | 9.1. Work place, cleaning area | | | 9.2. Application methods | | | 9.3. Density, binders, glaze thickness | | | 9.4. Waxing | | | 9.5. Single-fire glazing | | | 9.6. Handling, drying before firing | | | 9.7. Salt glazing |
|
Glazes - for the Self-reliant Potter (GTZ, 1993, 179 p.)
9. Glaze application
Glaze application is a skill that takes some time to learn. In
order to get consistent results, it needs to be done carefully and the same way
every time. Thin and thick application will give different results, and careless
application is always ruinous.
Glazing should be done just before loading the kiln, as glazed
pieces that lie around gather dust and get damaged. Some glazes tend to crawl if
fired right after glazing. If you have such problems, allow the glazed ware time
to dry completely before
firing.
9.1. Work place, cleaning area
Before glazing, you should have a neat and clean area to work
in. Dust thoroughly and remove small children. The biscuit to be glazed should
be organized in one place, with all like items grouped together (cups, bowls,
vases etc.). Ware boards are cleaned and arranged, ready to take the glazed ware
to the kiln. The glaze should be sieved and checked just before starting the
application. Clean water and sponges should be available.
Large items are usually glazed first, as they require a full
bucket for even application.
Correct application depends on many different factors:
- Density of the glaze
- Viscosity of the
glaze
- Particle size (depending on grinding time)
- Expertise of the
worker
- Porosity of the biscuit
- Thickness of the piece
- Dipping
time.
Although some of these factors can be controlled accurately in
large industries, the small producer will have to depend on experience. Mistakes
will be made at first, and it is important to be able to understand what went
wrong, so it can be
corrected.
9.2. Application methods
The particular method of applying glaze depends on the type of
ware -small, big, sculpture, tiles, open forms, closed forms etc.
Generally the inside of an object is glazed before the outside,
to prevent handling defects.
Loading systems need to be considered carefully. Most pots are
loaded on shelves directly, so the feet must be left unglazed. If foot rings are
to be glazed, then each piece must be individually set on special kiln furniture
in the kiln.
9.2.1. PAINTING
Glaze is sometimes applied with a brush. This is not recommended
because it takes a great deal of skill to obtain an even coat, as well as a lot
of time. Painting is used on sculptural objects that cannot be dipped or
sprayed. Three to four coats are brushed on, letting each coat dry before
applying the next. In order to see each coat, sometimes organic color dye (food
coloring) is added.
9.2.2.
DIPPING AND POURING
Dipping and pouring constitute the most common method.
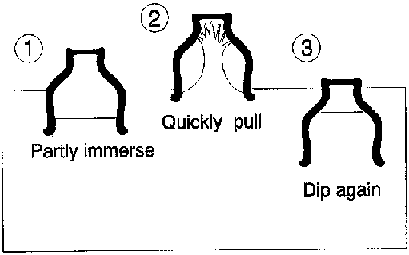
Figure 9.2.2.D. Three steps of
glazing the inside and outside of a cup in one dip.
The glaze needs to be stirred frequently during application
time.
Cups and bowls
Cups can be glazed inside and out in one movement (after some
practice). Hold the cup by the foot and dip it at a slant to let glaze inside,
while the outside is also coated with glaze. Then quickly pull up and push down.
This results in a "fountain" of glaze that covers the entire inside.
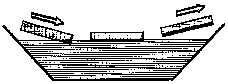
Figure 9.2.2.H. Dipping tiles in
glaze.
Tiles
To dip tiles, hold them by the edges and dip them in the glaze
while moving sideways. This also requires practice!
Double dipping
Applying a second coat of the same or a different glaze over the
first is known as double dipping. This often happens inadvertently. When glazing
the inside, sometimes there will be runs of glaze on the outside. These should
be sponged clean before doing the outside. Larger items are often partly dipped
to cover the top, then turned over and dipped again to coat the bottom. This
usually results in a line of double glaze, which will look different. If the
overlapping area is chosen carefully, it can become a part of the design.
Otherwise, it will look like a mistake.
For decorative effects, a pot is sometimes dipped partly in one
glaze and then again in a different glaze. This results in a third color where
the two overlap.
Waterfall glazing
In the commercial glazing of tiles, the "waterfall" system is
used. This consists of a conveyor belt, which carries the tiles under a thin
waterfall of glaze that pours over them. The thickness of application is
controlled by the speed of the conveyor belt and the amount of glaze flow.
Excess glaze runs into a tank, which is again pumped up to the waterfall. These
machines are often equipped with automatic cleaners that take excess glaze off
the sides of the tiles.
9.2.3. SPRAYING
Spraying is used for items that cannot easily be dipped or
poured. It requires an air compressor and a spray gun, as well as a spray booth
equipped with an exhaust fan. This is not recommended for the small producer,
unless it is required for frequent use or for special decorative effects.
Ordinary spray guns for paint can be used, but they wear out quickly because
glaze is abrasive. Special spray guns for glaze are equipped with silicon
carbide spray heads.
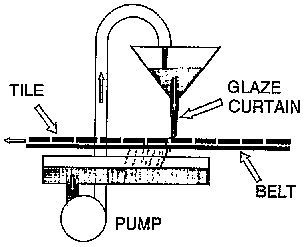
Figure 9.2.2.J. Waterfall glazing of
tiles. The tiles run through a curtain of glaze which is continuously recycled
with the help of a pump.
Spraying has the disadvantage of wasting a lot of glaze that
goes into the air. This is dangerous to inhale, and a spray booth should be
provided with an exhaust fan to the outside, as well as having a filter to catch
excess glaze. If a great deal of spraying is done, the excess glaze can be
collected from the filter and the inside of the booth and reused.
As usual, the inside of the item is glazed first (usually by
pouring), and the spraying is done in several even, systematic coats. Each one
must be applied before the first one dries, or the glaze may lift off the pot.
Each coat should be lightly applied, so that it looks a bit powdery.
It is difficult to judge the correct thickness of glaze and to
get it even all over, especially in difficult areas like under handles. In time
the glazer will learn to measure the thickness by feeling it with a fingernail.
Airbrush
An airbrush is a very small spray gun that can be adjusted from
a pencil-thin spray to a wide pattern. These are not used for glaze application,
but are often used for decorative effects-with underglazes and overglazes.
Care of the spray gun
Spray guns are very sensitive. They tend to get clogged, so make
sure that your glaze is sieved before putting it in the gun. Clean the spray gun
immediately after use by rinsing it out and spraying clean water through it
until there is no sign of glaze. Glaze left in the spray gun will corrode it and
make it unusable.
Glaze fountain
For glazing the inside of large items a glaze fountain as shown
in Fig. 9.2.3.D is helpful. The pot is placed over a nozzle from which an
electric pump provides a powerful upward shower of glaze when activated with a
switch on the
floor.
9.3. Density, binders, glaze thickness
As described above, it is important to have the correct a nouns
of water in your glaze. The glaze should always be checked and corrected by test
dipping some biscuit before starting and then relying on your experience to
judge if the thickness is correct. Checking specific gravity with a hydrometer
or by weighing is a good practice but should not be relied on.
It is best not to use binders unless you have no choice. CMC gum
is the most satisfactory.
Nonporous biscuit
As previously mentioned, differences in biscuit firing
temperature cause differences in porosity and can cause problems in glaze
application. Overfired biscuit is especially difficult to glaze, as it will not
absorb water. In the making of whiteware, the biscuit temperature is usually
higher than the glaze temperature. This results in a semivitrified body that has
special glaze application problems. If it is necessary to reglaze pots that have
firing defects, they also require special handling.
If you only have a few pieces, they can be heated until almost
too hot to handle and then dipped, poured or sprayed (spraying is most
satisfactory). The heat will make excess water evaporate.
If glazing vitrified ware is part of your standard production,
then it is best to flocculate your glaze. This is the opposite of deflocculation
(as used with casting slip) and results in a thick, pudding-like glaze with the
normal water
content.
9.4. Waxing
In order to keep glaze from being applied to the foot of your
pots, it is often more efficient to wax the bottoms as compared to sponging them
clean. The coating of wax prevents glaze from sticking. There are two common
waxing methods:
Hot wax
Paraffin wax is kept melted in a shallow metal pan over an
electric heater or a smoldering charcoal fire (an open fire should not be used
as the paraffin may start to burn). It should be hot, but not so hot that it
starts to smoke. Before applying the glaze, the foot rings are dipped in the
paraffin.
Liquid wax resist
It is much easier to use liquid wax resist, which is a wax
emulsion in a water base. It can be thinned with water but after drying cannot
be dissolved. This is commercially available in some countries specifically for
glaze application. It is also possible to use liquid floor wax.
Liquid wax resist is also used for
decoration.
9.5. Single-fire glazing
Single-fire glazing is sometimes called "raw glazing", but this
term is confusing as "raw glaze" also is used for unfritted lead or borax
glazes. Glaze is applied directly to bone-dry or leather-hard ware and fired
once up to the glaze temperature. Not all glazes and bodies are suitable for
single firing, and each combination needs to be tested.
Glazes that work on biscuit ware will often also work on
bone-dry clay with a small addition of a plastic clay or bentonite. Glazes for
leather-hard glazing will need more clay so the glaze layer will shrink along
with the clay during drying. The leather-hard method is less practical, since
each batch of leather-hard pots must be glazed immediately, causing problems in
the work flow.
The advantage of single firing is that it avoids the fuel and
extra handling needed for biscuit firing. The main problem with single firing is
crawling caused by different shrinkage rates of clay and glaze in the early
stages of the firing. Single-fire glazes usually have a high percentage of clay.
Delicate ware cannot usually be single-fired successfully, as it
tends to be damaged by the water.
Single-fire glazing needs to be done quickly and carefully,
without letting glaze stand inside the pot for a long time. Dipping and pouring
can be used, and spraying is also effective.
Firing needs to be done more slowly than usual, so that pots do
not explode. The early stages of firing should be done as with biscuit firing.
Single firing is used most often in large tile industries, where
it saves
fuel.
9.6. Handling, drying before firing
Good glaze application requires careful handling. Many pots are
spoiled by fingerprints or glaze that is knocked off during handling. Pots
should be allowed to dry before loading in the kiln.
The kiln loader should be responsible for checking each pot as
he places it in the kiln. This means inspecting the foot to see if it is clean
and rejecting pots with damaged or thick glaze. The loader should constantly
clean his hands of glaze dust especially when loading ware with different
colored glazes. Otherwise colored fingerprints will mark the
pots.
9.7. Salt glazing
In salt glazing, no glaze is actually applied to the pot before
firing. The ware is single-fired up to the maturing point of the clay and rock
salt is then introduced directly into the firebox. The salt breaks down into
sodium and chlorine gas. The sodium combines with silica on the surface of the
pot to make a durable glaze and the chlorine goes up the chimney, combining with
water in the air to form hydrochloric acid. This is an irritant, as well as
causing damage to vegetation and metal structures in the immediate vicinity.
Another problem is that the salt erodes the firebricks in the kiln rather fast.
Salt glazing normally is done on stoneware at temperatures above
1100°C. Salt is often mixed with borax to lower the melting point (see also
page
19).


