Back to Home
Page of CD3WD Project or Back to list of CD3WD Publications
 |  |  | Low-external Input Rice Production (IIRR, 292 p.) |  |  | Integrated nutrient cycling | |  | (introduction...) | | | Integrated nutrient cycling in lowland rice production: an ecosystem approach | | | Nutrient cycling on a basic irrigated or rainfed rice farm | | | Using soil test values to determine fertilizer needs for rice | | | Fertilizer placement in wetland rice | | | Using limited nitrogen fertilizer with HYVs | | | Treatment for zinc deficiency in lowland rice | | | Fertilizer from livestock and farm wastes | | | Chicken manure for lowland rice | | | Food, fodder, fertilizer and fuel from paddy dikes | | | Using rice straw for lowland rice farming | | | Azolla: green manure profile | | | Using azolla as fertilizer for lowland rice | | | Multiplying the azolla | | | Troubleshooting common problems in azolla production | | | Green leaf manuring in lowland rice | | | Green manure utilization in lowland rice | | | Sesbania aculeata: a bio-fertilizer source for lowland rice | | | Indigofera: green manure profile | | | Crotalaria: green manure profile | | | Lablab bean: cover crop/green manure profile | | | Rice bean: green manure profile | | | Sesbania spp.: green manure profile | | | Animal and green manure practices among the Mangyans (Alangan tribe in Mindoro) | | | Waste management practices (Tuwal and Ayangan tribes in Ifugao) |
|
Low-external Input Rice Production (IIRR, 292 p.)
Integrated nutrient cycling
Integrated nutrient cycling in lowland rice production: an ecosystem approach

Basic features
OTHER FEATURES:
· Each component introduced into the system should
contribute toward the goals of regenerating the land and sustaining the farming
system.
· The system exhibits redundancy: each function meets more
than one need, each need is met by more than one function.
· It starts simply and through careful observation and
analysis of the area's resources, it evolves into a more complex, stable system.
TECHNICAL PROFILE:
As an example, a small area of marginal land near a water source
(irrigation canal, creek or spring) can be used for the components below:
· Pig pen (2m x 4m) -- Good for 2-3 heads of upgraded
breed. Use local materials like bamboo for pen enclosure, cogon or nipa for
roofing. Cement the flooring.
· Sedimentation pond (2m x 4m) -- One meter deep. Install
spill pipe in the dike 30 cm above pond floor for excess water going to the
Azolla pond.
· Azolla pond (3m x 4m) -- Maintain 30-40 cm water depth.
Install another spill pipe in the dike for excess water going to the fish pond
and to control water depth in the Azolla pond to 40 cm above floor level.
· Duck pen (1.5m x 3m) -- Constructed near the Azolla pond
for 1 male and 8-10 female ducks.
· Fish pond (10m x 3m) -- Maintain 100 cm water depth for
600 Tilapia nilotica or other fish species fingerlings.
· Fish breeding pond (2m x 10m) -- Maintain 65-70 cm water
depth for 8-10 female and 2 male Tilapia or other fish species breeders.
· B.l.G. plots (1.5m x 3m) -- For production of various
indigenous vegetables.
POTENTIAL PRODUCTION:
· Pig pen -- Gross sales in the amount of P6,000.00 for 3
upgraded (75%) pigs in 6-7 months using low-cost feed combinations.
·
Sedimentation pond -- Ready source of sludge for the garden and material for
composting.
· Azolla -- Provides fresh or cooked feed for swine, ducks
and fish or can be used as green manure or composting material.
· Ducks
-- Regular source of meat and eggs for the family after 6 months.
· Fish
pond -- 50-55 kg of Tilapia can be harvested within 6 months.
· Garden
-- 1-1/2 kg of various vegetables can be produced daily throughout the
year.
· Compost --1.5-2.5 tons of compost can be produced
annually.
· Woodlot -- Fast-growing shrubs or trees can provide the fuel
needs of the household. When planted along the paddy dikes and other waste
spaces, the woodlot can also be a good source of wood for fence posts,
trellises, etc.
EXERCISE TO INCREASE FARMER AWARENESS OF INTEGRATED NUTRIENT
CYCLING:
While rice-based lowland farm systems are principally devoted to
rice production, they also can involve a variety of production components and
complex integrated systems. Small farmers have traditionally managed these
complex farming systems and have an acute awareness of the cycles and flows of
nutrients which occur on their farm within a cropping season or throughout the
year.
However, resources can oftentimes be more intensely optimized by
allowing farmers to critically analyze their farm nutrient flows in a systematic
manner. This process can be implemented using a simple exercise with farmers.
This exercise also helps field workers improve their skill in eliciting
indigenous knowledge from farmers through the use of farmer's diagrams.
1. Explain the entire process to the farmers or ask them to help
you (the technician) understand their systems -- an important reversal for those
who are usually telling farmers what to do.
2. Farmers are asked to list the individual components which
make up their farm, i.e., paddy, fishpond, carabao, etc.
3. Farmers discuss the concept of nutrient flows within the
farm. Linkages between the different components should be emphasized. The
technician or farmer-leader can facilitate the discussion with leading
questions.
4. Farmers are shown a design of the nutrient flows of an actual
farm and asked if they could produce a similar design for the conditions found
on their farm. Many may answer negatively, stating that they cannot draw such a
"professional" design ("I can't draw like that.").
5. The farmer-leader or technician should then begin drawing a
design using newsprint and pens.
6. The farmers are then provided with sheets of newsprint and
pens and are asked to attempt to diagram the components of their farm and the
nutrient flows which integrate those components. Exhaust all enterprises for
possible inputs and outputs. Include all plots and land types that farmers have
access to, even community resources.
7. The farmer-leader or technician should then assist the
farmers and guide them in mapping out their individual farm design. All attempts
at drawing should be validated -- anyone can draw to some extent.
8. Upon completion, the farmers are asked to present their
designs for peer review and discussion by their farmer colleagues.
9. Finally, if desired, an artist can draw the design, based on
the farmer-drawn diagram, to give the reproductions a "professional" touch.
This exercise provides a valuable methodology for farmer
interaction. It is a learning process for farmers showing alternative uses of
farm wastes and by-products being used by other farmers. The visual presentation
reinforces what a farmer learns long after the exercise is completed. It is a
learning process for technicians and field workers who learn about traditional
knowledge. It helps to build a more equal relationship between farmers,
extensionists and researchers. It helps to build self-reliance and confidence
among farmers to make changes and adaptations of their farming systems, as well
as validating farmer knowledge among farmers.
The following pages present artist reproductions of rice-based
farming systems. The first design depicts a "typical" rice farm with little
integration, under-utilized resources and costly offfarm resources. The other
four are actual farmer designs of rice-based farming systems from the
Philippines. All of these designs were developed using the exercise outlined
above and have helped farmers to increase their own awareness of nutrient flows
within their
farm.
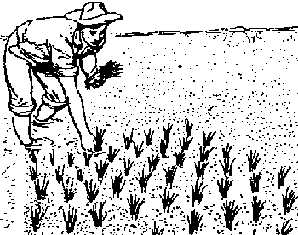
Nutrient cycling on a basic irrigated or rainfed rice farm

Nutrient cycling on a basic
irrigated or rainfed rice farm

R. Primero, Novarro, Gen.Trias
Cavite, Philippines

V Pakingan, Niuqan, Sn. Francisco
Cavite, Philippines
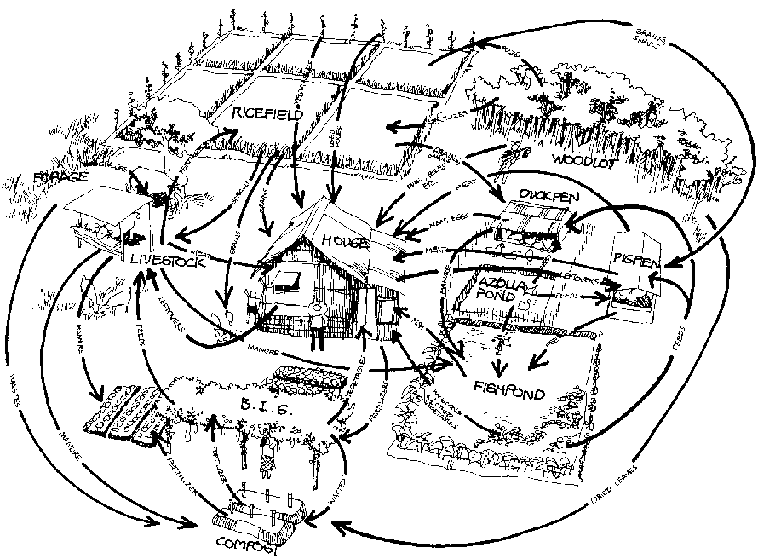
D. Martinez, Aglipay, Quirino
Philippines

L. Ignacio, Sn. Francisco Cavite,
PhiIippines
SOME POTENTIAL NITROGEN SOURCES FOR LOWLAND RICE THAT COULD
SUPPLY 80 KG N/HA.

One hectare lowland
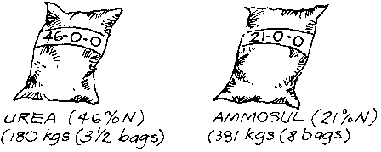
Chemical fertilizer

Green manure

Animal
manure
Using soil test values to determine fertilizer needs for rice
Soil test values are a good guide to determining plant nutrients
to be added in the form of organic and inorganic fertilizers. Many nutrients
when limited can be major factors in reducing crop yields -- even when they are
needed in very small quantities.

Interpreting soil-test data
|
Soil Test Value |
Fertilizer Need |
|
1. Soil pH greater than 6.5 |
Zinc is needed. |
|
2. Organic matter content: |
|
|
a. Less than 1.7% |
Nitrogen need is high. |
|
b. 1.7 - 3.4% |
Nitrogen need is moderate. |
|
c. More than 3.4% |
Nitrogen is not needed. |
|
d. More than 5.0% |
Zinc is needed. |
|
3. Available phosphorous (Olsen P in ppm): |
|
|
a. Less than 5.0 |
Phosphorous is needed. |
|
b. 5.0 - 10.0 |
Phosphorous is probably needed. |
|
c. More than 10.0 |
Phosphorous is not needed. |
|
4. Exchangeable potassium |
|
|
a. More than 0.2 meq/100 g. |
Potassium is not needed. |
——————————————————————————————————————————
SOURCE:
Ponnamperuma, 1984.
DEFICIENCY SYMPTOMS:
Observing deficiency symptoms in the standing crop itself is
another useful method of determining plant nutrients which might be lacking.
1. Nitrogen Deficiency
· yellow to yellowish-green color, appearing first on older
leaves
· stunted and spindly growth
· reduced
tillering
· if deficiency persists until maturity, the number of grains
per head is reduced.
2. Phosphorous Deficiency
· reduced tillering
· stunted growth
·
decreased grain formation
· older leaves show orange or purplish
discoloration.
3. Potassium Deficiency
· low tillering and stunting
· in severe cases,
includes a yellowish-orange to yellowish-brown discoloration starting at the tip
of older leaf blades and gradually moving toward the base
· necrotic
spots may appear on the leaf blades
· short, droopy and dark green
leaves.
4. Zinc Deficiency
· brown spots appear on older leaves
· the spots
enlarge and coalesce, giving the leaf a brown color
· low tillering and
stunted growth
· the midribs of the younger leaves, especially the base,
become
chlorotic.
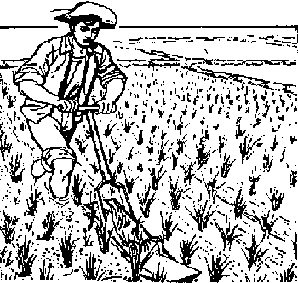
Fertilizer placement in wetland rice
Paddy soils are characterized by two distinct layers: 1 ) a
surface oxidized layer a few millimeters to a centimeter present at the soil
interface; and 2) an underlying reduced layer (anaerobic) which is the principal
zone of root development. The fate of applied N and its efficient use depend on
where it is placed.
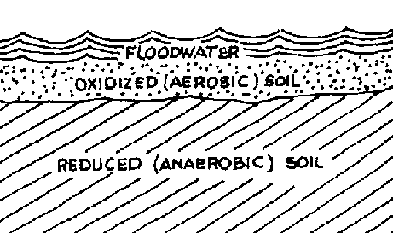
Paddy soils
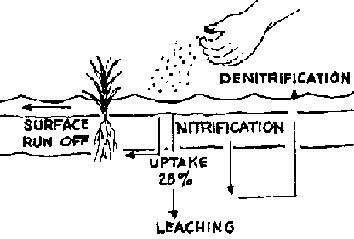
Broadcasting ammonium-based fertilizer in the oxidized layer is
an inefficient method of fertilizer application. In this method, nitrogen is
lost by a combination of nitrification-denitrification, ammonium volatilization,
leaching and surface run-off. As a consequence, a maximum of only 28% of the
total applied nitrogen is eventually taken up by the plant.
Broadcasting ammonium-based
fertilizer
DECREASING N-FERTILIZER LOSSES IN PADDY SOILS:
N-availability could be increased by applying fertilizer in
soils without standing water or by deep placement into the reduced zone. The
following are methods by which this could be accomplished:
1. Apply N in split. Broadcast the first split to a puddled
field without standing water, thoroughly incorporating it into the soil and
introducing water 4 days after transplanting. The final top-dressing of N should
be made at 5-7 days before panicle initiation into floodwater not exceeding 5
cm. Thorough incorporation could also be done by using a rotary weeder.

Apply N in split
2. Another method is deep placement or applying fertilizers into
the reduced zone. This method limits N losses and assures longer availability of
nitrogen for the plant. A maximum of 68% of the total N applied can be obtained
by the plant.

Applying fertilizers
Deep placement could be accomplished by manually placing
fertilizer 10-15 cm deep from the soil surface and between alternate rows and
hills after transplanting or just before or at panicle initiation. Prilled urea
or a pinchful of urea may be used for this method. However, no data are
available for urea. The mudball could also be used. This technique, developed by
the Japanese, consists of covering a certain amount of urea with mud and then
placing it 10-15 cm from the soil surface. Although the mudball technique is
known to increase plant recovery of N. this has not been widely adapted because
it is too labor-intensive.
A less laborious procedure is applying N fertilizer between rows
right after transplanting or at panicle initiation and then incorporating it
using a rotary
weeder.
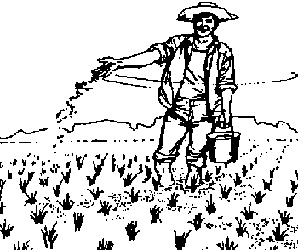
Using limited nitrogen fertilizer with HYVs
Even when using biofertilizers, farmers often use small amounts
of chemical nitrogen (N) fertilizer to obtain increased yields. One of the
simplest, lowest-cost ways to increase the effectiveness of these small amounts
of fertilizers is by applying them at the right time and in the right manner.
With good fertilizer management, yields can be increased by 0.50.8 ton/ha over
poor management practices even when using small amounts (15-30 kg N/ha) of
fertilizer.

Using limited nitrogen fertilizer
· Best split method.
The best method of fertilizer application for lowland rice is
still the best Split where 2/3 of the nitrogen and all the phosphorous and
potassium fertilizers are broadcast and incorporated thoroughly into the soil
without standing water during final harrowing. The remaining 1/3 is top-dressed
5-7 days before panicle initiation (DBPI) of the crop. This should be practiced
if the rate of application is 60 kg N/ha or more.
· Time of application if less than 60 kg N/ha is available.
Considering the limited availability of fertilizers due to high
costs, the rates of application may be as low as 13 kg N/ha. The table on the
other page shows how to use limited N fertilizer with the commonly grown
high-yielding rice varieties.
· Procedure when basal application of nitrogen fertilizer
is missed.
Topdress one half of the total N requirement at 10-15 days after
transplanting for early-maturing varieties (100-1 15 days) and 20-25 days for
medium-maturing varieties (116-135). The remaining half should be applied 5-7
DBPI.
· Use of green manure in combination with chemical
fertilizers.
Research has indicated that in addition to supplying the green
manure N. using green manure can also increase the efficiency of chemical
fertilizers used. When using minimal amounts of chemical N (30 kg/ha N or less)
with a green manure, all chemical N should be applied 5-7 DBPI.
REFERENCE: Rice Production at Cost-Reduced Technology. Compiled
by: Damaso Callo, Jr., Rizalino Dilag, Jr., Jesus Sumangil and Rustica Bautista.
FERTILIZER MANAGEMENT:
|
Amount of Nitrogen |
Method of Application |
|
If only 30 kg/ha N (or less) is available (1 1/2 bags 45-0-0 or
3 bags 21-0-0) |
No basal application should be made. The entire amount should be
applied into 5 cm of water at 5-7 days before panicle initiation(5-7 DBPI).*
|
|
If only 40 kg/ha N is available(2 bags 45-0-0 or 4 bags 21-0-0)
|
20 kg N/ha (1 bag 454-0 or 2 bags 21-04) should be applied to a
puddled field with or without any standing water and thoroughly incorporated
into the soil and water is introduced 4 days after transplanting (DAT). The
remaining 20 kg N/ha is to be applied into 5 cm of water at 5-7 DBPI. |
|
If only 50 kg/ha N is available (2 1/2 bags 45-0-0 or 4 bags
21-0-0) |
30 kg/ha (1 1/2 bags 45-0-0 or 3 bags 21-0-0) should be applied
to a puddled field without any standing water and thoroughly incorporated into
the soil and water is introduced 4 DAT. The remaining 20 kg N/ha is to be
applied into 5 cm of water at 5-7 DBPI. |
|
If only 60 kg/ha N is available(3 bags 45-0-0 or 6 bags 21-0-0)
|
40 kg N/ha (2 bags 45-04 or 4 bags 21-0-0) should be applied to
a puddled field without any standing water and thoroughly incorporated into the
soil and water is introduced 4 DAT. The remaining 20 kg N/ha is to be applied
into 5 cm of water 5-7 DBPI. |
Note: Beyond 40 kg N/ha, always split the application of
fertilizer.
Treatment for zinc deficiency in lowland rice
Many farmers in lowland areas mistakenly identify zinc
deficiency symptoms (yellowing of rice plant during vegetative stage, stunted
growth and reduced tillering) as tungro disease resulting in heavy usage of
pesticides and serious damage to ecological systems.
Zinc deficiency generally only occurs in those ricelands where
water is present year-round or where soil pH is above 7.0. Locations in the
Philippines where zinc deficiency has been reported include Agusan del Norte and
del Sur, the Bicol region, Cebu, Davao, Ifugao, Laguna, Leyte, Misamis Oriental,
Negros, Quezon and Pangasinan. It causes a significant reduction in yield where
it occurs and is easily and inexpensively remedied.
By familiarizing themselves with the symptoms of rice tungro
virus and zinc deficiency, farmers can quickly determine if tungro-like symptoms
appearing in their fields are due to zinc deficiency. This will help aid them in
correcting the problem accordingly.
When tungro-like symptoms appear in the farmers' fields in the
locations listed above, farmers can compare the symptoms of zinc deficiency and
rice tungro virus to aid them in correcting the problem.
|
ZINC DEFICIENCY |
TUNGRO |
|
1. First symptoms appear 2-4 weeks after transplanting. |
Symptoms occur at any stage of rice growth including seedling
stage. |
|
2. No presence of green leafhopper or zigzag leafhopper. |
Presence of green leafhopper and zigzag Ieafhopper. |
|
3. In each stage patches of affected plants are found throughout
the ricefield. |
In early stages, individual infected plants are scattered
throughout the rice seedbed or field. |
|
4. Rusty brown discoloration on the old leaves and chlorosis at
the base of the younger leaves. Interveinal chlorosis or stripping at the base
of the emerging leaf. |
Leaf color changes from green to light yellow to orange-yellow
to brown-yellow, starting from the tips of older leaves young leaves are often
mottled or have pale green to white strips of dfflerent lengths running parallel
to the veins. |
|
5. When zinc deficiency is severe, NP fertilization
significantly lower yields or even kills plants. |
No negative response to NP fertilization. |
Since zinc deficiency is caused by prolonged submergence, the
problem can often be reduced by simply draining the field for several days.
However, this is only effective in soils with pH below 7.
For succeeding crops, zinc deficiency should be treated directly
by applying zinc to the soil or by dipping rice seedlings in a zinc oxide
solution.
HOW TO TREAT ZINC DEFICIENCY:
Option No. 1
1. Evenly broadcast zinc sulfate at 3-5 kg/ha just before the
final harrowing. The zinc sulfate can be mixed with other basally applied
fertilizers (if being used).
2. Harrow/level the rice field and transplant
rice seedlings the next day.
Option No. 2
1. If zinc sulfate is not available or if zinc oxide is cheaper,
zinc oxide can be used. Mix 1 kg of zinc oxide with sufficient water to make a
solution of large enough volume to soak the seedlings needed to plant 1
hectare.
2. Put the mixed solution in a container for dipping the seedlings,
or if no available container is large enough, the seedlings can be soaked in the
field by preparing a shallow dipping pond lined with plastic.
3. Soak the
rice seedlings in the mixture for at least 3 hours (or overnight) before
transplanting.
Note: For safety reasons, read the label before using zinc
oxide.
Fertilizer from livestock and farm wastes
The usual method of handling livestock wastes results in the
loss of most of the nutrients found in the urine. The use of bedding materials
helps minimize the loss by absorbing the urine and capturing those nutrients.
Moreover, these materials contain residual plant food, adding to the overall
nutrient value of the compost.

Fertilizer from livestock and farm
wastes
PROCEDURE:
1. Chop or shred the materials (dried rice straw/rice stubbles,
grass clippings, uneaten green feeds, etc.) so that they are easier to spread
and will decompose faster. Coffee hulls and saw dust can also be used.
2. Spread a six-inch layer of litter bedding over the floor
space. Allow manure and urine to accumulate.
3. After 34 days, the bedding materials will have been fully
soaked with urine. Mix them so as to incorporate the manure. Put the bedding in
a pit or a pile fully covered to conserve the nutrients. The compost is ready
for use in one and a half months or less.
4. Provide fresh bedding materials as in #2.
TECHNOLOGICAL PROFILE:
· Cattle with an average initial weight of about 150 kg can
produce a total of 2.23 tons of fresh manure over a fattening period of 180
days.
· On the average, a cattle or carabao excretes fresh manure
equivalent to about 7.5% of its body weight.
· By wise management,
animal manure can return to the soil 70% of N. 75% of P and 80% of K.
·
Excess nitrogen from the digested protein is excreted in the urine as urea in
cattle and goats.
- Fifty percent of the value of the waste is contained in the
urine.
- Urine contains 2/3 of the N and 4/5 of the K discharged by an
animal.
- Elements in urine are more quickly available because they are in
solution.
- Urine is also an especially good activator for converting crop
residues to humus.
REFERENCES:
P.S. Faylon and M.R. Deriquito. Livestock Manure as Fertilizer:
Waste Not, Want Not.
J.F. Rodale. The Complete Book of
Compost.
Chicken manure for lowland rice
The prohibitive costs of inorganic fertilizers have led farmers
to look into less expensive substitutes. Among those with good potential,
chicken manure is preferred because it is readily available and has a higher
nutrient composition. A fresh litter can contain as high as 3.17, 3.05, and 2.35
percent of N. P and K, respectively. In addition, chicken manure slowly builds
up the organic maker of the soil and supplies trace amounts of some
micronutrients (Cayton et. al, IRRI).

Chicken manure for lowland rice
|
Micronutrients |
Contribution in kilogram per 100 kg. dry chicken manure
|
|
Mg Magnesium |
1.08 |
|
Fe Iron |
1.17 |
|
Zn Zinc |
0.055 |
|
Mn Manganese |
0.175 |
|
Ca Calcium |
0.25 |
|
Cu Copper |
0.010 |
1. Studies show that raising chickens year-round can assure the
farmer a steady supply of fertilizer for his farm. One hundred (100) birds
reared in 42 days (6 batches/yr) is expected to reduce requirement for urea by
27.4 %/ha/yr (2 croppings).
2. The birds are raised following the all-in-all-out method,
with two weeks interval between batches to allow for thorough cleaning of the
poultry house. This also prevents possible pest outbreaks.
3. The birds fed with commercial feeds are known to produce
0.045 kg./bird/day with 3.17, 3.25, 2.35% of N. P. K, respectively.
4. Two batches with 100 birds per batch (3% mortality) could
provide 366.66 kgs. chicken manure equivalent to 11.62 kg N, 11.92 kg P and 8.61
kg K.
Savings from substituting urea (45-0-0) with chicken manure from
two batches of broiler chicken at 100 birds per batch.*
|
First Cropping** |
|
· Average kg urea (45-0-0) applied/ha |
127.50 |
|
· Multiplied by N content of urea |
x 0.45 |
|
· Computed kg N applied/ha |
57.38 |
|
· Less kg N from chicken manure |
11.62 |
|
· Kg N required from urea |
45.76 |
|
· Divide by N content of urea |
- 0.45 |
|
· Kg urea that still needs to be applied |
101.69 |
|
· Total kg urea substituted by chicken manure |
25.81 |
|
· Savings using chicken manure (total kg x price of urea
P4.00) |
103.24 |
Note: To avoid possible negative effects on the rice crop,
chicken manure should be incorporated in the field during land preparation.
* Savings can be increased as the amount of chicken manure
applied to the field is increased.
** All cost data were taken from the
baseline survey on Navarro farmers conducted by the Research Division, llRR (2
croppings) in Navarro, General Trias,
Cavite.
Food, fodder, fertilizer and fuel from paddy dikes
Throughout Asia, trees, shrubs and grasses have been grown on
dikes to supply the needs of many families. Using paddy dikes or bunds to
produce food, fodder, fertilizer and fuel saves both time and labor. Space is
used that would otherwise be wasted.

Food, fodder, fertilizer and fuel
from paddy dikes
· Time and Labor Saving. Instead of having to go long
distances to get firewood or fodder for livestock, the farmer can harvest these
right on the farm and eliminate problems of transporting them. Fertilizer also
can be grown right where it is needed.
· Space Saving. Production on
dikes and marginal areas allows more productive land for crop use. For tenant
farmers, the produce from the dikes may be theirs without sharing with the
landowners.
1. FOOD
· Bananas. Commonly planted along borders and canals, they
provide food for humans, feed for pigs and cattle and windbreaks for crops
growing in the paddies.
· Pigeon Pea or Kadios (Cajanus cajan). Pigeon
pea can yield more than 1 kg of dry beans in 4 months for every 10 linear meters
of dike planted (using no fertilizers or insecticides). This crop, when cut back
and allowed to regrow, can provide 1 kg fodder (fresh weight/linear meter) plus
a second crop of dry beans. It can be grown throughout the dry season to provide
high protein fodder for livestock. (Data from trials in Cavite using
highyielding varieties from ICRISAT in India.)
· Pole Sitao (Vigna
unguiculata). Can produce as much as 1 kg green pods/linear meter.
2. FODDER
On days that draft animals are used for plowing, they oftentimes
do not have enough grazing time to eat all they need. Night-feeding with grasses
from dikes supplements this. In the dry season when grasses have died and rice
straw is the main feed available for cattle and carabaos, leguminous trees grown
on the dikes can provide high- protein fodder.
· Trees and Shrubs. The following species of shrubs and
trees have exhibited excellent growth on paddy dikes: kskawati (Gliricidia
septum), kadios (Cajanus cajan), Sesbania sesban, katurai (Sesbania
grandiflora), kupang (Enterolobium cyclocarpum), acacia (Samanea saman) and
Flamengia macrophyllum. Other species with good- fodder production which have
been reported to do well include: acacia hapon (Acacia auriculiformis),
Arundinaria ciliate, karikut-ritkut (Codariocalyx gyrans), Erythrina
poeppigiana, ipil-ipil (Leucaena leucocephala), Sesbania bispinosa (Desmodium
species) and pongam (Derris indica).
· Grasses. Fast-growing grasses planted on dikes have
excellent potential for supplying topquality fodder for livestock. Napier or
elephant grass (Pennisetum purpureum) has shown yields of more than 3 kg dry
matter production/10 linear meters every 30 days during the rainy season. Seven
hundred and fifty (750) linear meters planted to grasses would be enough to meet
the entire fodder needs of one draft animal.
3. FERTILIZER
Asian countries have a strong tradition of growing trees,
particularly nitrogen-fixing trees on dikes or in waste areas to provide
fertilizer to the rice crop. The nitrogen they provide can supply more than half
the fertilizer requirements of one rice crop.
· Four-year old Gliricidia septum in India produced more
than 18 kg leaves/shrub/year. Based on the nitrogen content in those leaves (1/2
kg N), 100 shrubs would produce more than 50 kg N/yr. which is equivalent to two
sacks of urea. Recent trials with Derris indica on paddy dikes in Negros have
also borne promising results.
· All the trees grown for fodder can supply fertilizer as
well. In addition, other trees which tolerate poor drainage can be grown to
provide green leaf manure.
· In an adaptation of the above practice,seeds of green
manures (which will later be grown directly in the paddies) can be produced on
the dikes.
4. FUEL
All the trees planted for fertilizer and fodder provide wood for
fuel as well: the leaves provide the first two products, the stems and branches
provide the fuel. In one farmlot in Cavite, 5 Samanea saman, 1 Pithecellobium
dulce and 1 Tamarindus indicus harvested on a two-year cycle produced enough
wood to meet the fuel needs of two households.
5. OTHER PRODUCTS
Trees and shrubs planted on dikes also provide fence posts. Neem
(Azadirachta indica) and Pongam (Derris indica) may be used as botanical
pesticides and Sesbania grandiflora has been used as a wood substrate for
mushroom growing in Thailand.
When planting on dikes, certain practices should be followed:
· Keep trees pruned when crops are growing in the paddies
to minimize shading of the crop.
· Periodically check dikes for
potential seepage caused by tree roots. Do not plant trees on fish pond or
rice/fish paddy dikes.
· Practice good weed management around the trees
to discourage rats from colonizing the
dikes.
Using rice straw for lowland rice farming
The increased cost of energy-dependent fertilizer and the need
to conserve plant nutrients by recycling them have focused attention to organic
material sources of fertilizers. One of the cheapest and most available organic
substances is rice straw.
In the tropics, the straw mass corresponding to 1 ton of
sundried paddy rice is 1.5 tons which contains about 9 kg Nitrogen (N), 2 kg
each of Phosporous (P) and Sulphur (S), 25 kg Potassium (K), 70 kg Silicon (Si),
6 kg Calcium (Ca) and 2 kg Magnesium (Mg) . (F. N. Ponnamperuma, IRRI, 1984).
Because straw yields are usually not available, this is a rough guide to the
nutrient content of the straw of a paddy crop. Rice straw is thus a good source
of those macronutrients.
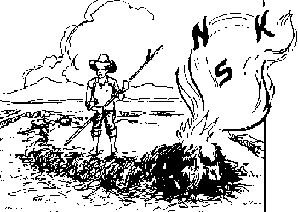
Burning straw
Burning straw, a usual practice in most farms in the
Philippines, destroys most of the nitrogen and sulfur and some of the potassium
and makes silicon less available.
MAKE USE OF RICE STRAW
· To return the nutrients of straw to the soil, cut rice
stalks higher during harvest time. More stubbles are then incorporated into the
soil during land preparation.
· Threshed straw can be fed to animals or can be conserved
for feeding livestock (mandala) during fodder shortage. Some of the straw
nutrients are subsequently returned to the soil as animal excrete.
Cut rice stalks higher during
harvest time
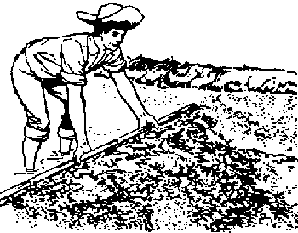
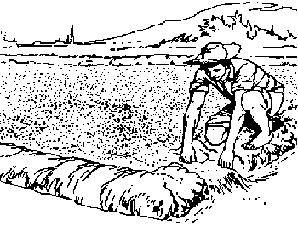
· Pile straw in mounds in successive quadrants in the field
each cropping season to even out nutrient distribution. The straw will decompose
slowly when incorporated into the soil during land preparation. The practice of
piling and spreading straw saves labor but reduces the area planted to rice.
Incorporating the straw produced in situ achieves fertilizer savings and aids
nutrient recycling.

Pile straw in mounds in successive
quadrants
· The effect of time of straw incorporation on grain yield
depends on temperature, cultivar and amount of straw. In warm regions, one month
after straw incorporation, all the rice straw produced in a field could be
plowed in immediately before transplanting without adverse effects. The
application of chemical N and P enhances the benefit of straw incorporation.
· The initial yellowing of leaves of the rice seedlings
caused by the decomposition of straw can be checked by the addition of chemical
N and P. Fertilizer N is used by the rice at the early stage of growth. The peak
of N absorption from straw comes in the middle growth stage, coinciding with
peak crop demands.
· The incorporation of straw reduces the incidence of
tungro, rice blast and blight.
· The benefit of straw incorporation on rice yield appears
during the season of application and increases with subsequent incorporations of
straw.
REFERENCES:
1. Principles and Practices of Rice Production, IRRI, Los Ba�os,
Laguna.
2. Rice Production Manual, Philippines. UPLB. Rev. Edition,
1983.
3. F.N. Ponnamperuma. Straw as a Source of Nutrients for Wetland
Rice. IRRI, Los Ba�os, Laguna.
1984.
Azolla: green manure profile

Azolla: green manure profile
CHARACTERISTICS:
· Azolla is a small aquatic fern (usually 1-5 cm large)
which can also grow on saturated or moist soils. It is capable of doubling its
weight in 3-5 days.
· A blue-green alga (Anabaena azollae) lives in the
cavities of Azolla leaves and fixes nitrogen from the atmosphere. The daily
nitrogen-fixing rate of the Azolla-algae complex is 3-7 kg N/ha.
Azolla contains 4% nitrogen on a dry-weight basis (dry weight is
5% of fresh weight); 0.5-0.9% phosphorous; and 24.5% potassium.
· Azolla is not really new. It has been used as a green
manure for rice in Northern Vietnam and Southern China as early as the 11th
century. Use of Azolla is an Asian, indigenous technology.
IMPORTANCE AS FERTILIZER:
· Azolla is an excellent source of nitrogen fertilizer for
rice which can cut down or even eliminate the use of chemicals. It can increase
yield equivalent to that produced by 30-60 kg. nitrogen (N) fertilizer/ha.
Residual soil N is increased. Protein content of the grain is also increased.
· Azolla increases available potassium (K) by absorbing
water- soluble K from the irrigation water and returning it into the soil upon
incorporation.
· The large amount of biomass produced (10-15
tons/ha/incorporation) increases soil organic matter (OM) content dramatically,
improving soil physical structure and increasing phosphorous availability.
· The OM from Azolla also contains micronutrients.
HOW TO USE AZOLLA AS FERTILIZER:

Under optimum conditions, a 15 kg
inoculum can multiply to become 10-15 tons
· Ideally, Azolla multiplication must be initiated 1 month
before transplanting.
· Under optimum conditions, a 15 kg inoculum can multiply
to become 10-15 tons of biomass in 100 days. (When incorporated, this should
provide 3045 kg N/ha). About half of the total N is available in 3 weeks and 80%
in 6 weeks.
· Incorporate the Azolla into the soil before
transplanting. Subsequent incorporations can be timed with the regular weeding
operations.
· At any time, only 75% of the Azolla is turned under. The
remaining 25% is allowed to multiply again for the following incorporation.
REQUISITES FOR GOOD AZOLLA GROWTH:
· Azolla is a fern, thus water is the most critical
requirement for its survival. The water situation in which Azolla can grow
ranges from nearly saturated soils to deep standing waters.
· The soil should have at least 30 ppm phosphorous. If soil
test indicates a lower level, apply 16-200 or 0-18-0 at kg/ha/wk.
· Optimum temperature is 25°C or less. Temperatures
above 30°C can cause slow growth rate and insect problems.
· Conduct site suitability test to determine the Azolla
species or strains most tolerant to local constrainsts.
OTHER BENEFITS FROM AZOLLA:
· An optimum Azolla cover between the rice plants reduces
weed growth by 50% or more.
· Azolla can be a good compost
material.
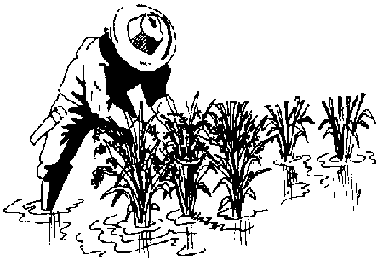
Using azolla as fertilizer for lowland rice
The agronomic importance of azolla arises from its capability to
fix nitrogen through its symbiotic relationship with the blue-green algae,
Anabaena azollae. The azolla-anabaena association can fix nitrogen proportional
to the biomass produced. Chemical analysis showed that azolla contains 4-5% N.
1-1.5% and 2-3% K on a dry weight basis.
When azolla is grown in paddies and then incorporated into the
soil as green manure, its nitrogen content is released upon decomposition and
can be used by the crop. Azolla can replace at least 50% of the inorganic
nitrogen requirement of rice.
There are three methods of producing and utilizing azolla on a
one hectare lowland rice farm: the tatluhan, dalawahan and isahan methods. The
choice of which method to use depends on the water supply, drainability of
paddies, doubling time of azolla and cultural practices on the farm.
TATLUHAN METHOD:
If the ricefield has a steady supply of water, good drainage,
enough phosphorous and the farmer adapts the transplanted, straight-row method,
the best way of producing and utilizing azolla is the tatluhan method. The
azolla is grown with the rice crop and incorporated into the soil three times --
during the first and second weedings and during land preparation for the next
crop.
1. Make sure that the paddies are flooded and then plowed and
harrowed once every 3 weeks before transplanting.

Tatluhan
2. Twenty days before transplanting of rice seedlings, gather
the azolla from the inoculum pond and broadcast it evenly on the one hectare
area. Leave at least 10 kg in the pond for future use.
Gather the azolla
3. One day before transplanting (DBT), drain most of the water
from the paddies and apply basal fertilizer. (Note: Half of the nitrogen
requirement of the crop will be supplied from urea or other inorganic nitrogen
fertilizer.)
Drain most of the water
4. Make sure the paddies are flooded about 1 cm deep to float
some of the azolla and prevent all of them from being turned under during
harrowing. The azolla will have increased to about 1,600 kg.

Make sure the paddies are flooded
about 1 cm deep
5. Transplant the seedlings in straight rows.
Transplant the seedlings
6. Let the azolla grow. Twenty days after transplanting,
incorporate the azolla in the soil with a rosary weeder. The incorporation
should coincide with the first weeding. Allow the remaining azolla plants to
grow and if necessary, re-seed the field with azolla from the inoculum pond.
Let the azolla grow
7. Forty days after transplanting, drain the paddies and
incorporate the azolla in the soil with a rotary weeder during the second
weeding. Let the surviving azolla plants multiply further until harvest time.
Turn them under during land preparation for the next cropping.

Forty days after transplanting
DALAWAHAN METHOD:
The dalawahan method is best used when only one weeding of the
field is needed and/or when the growth of azolla is below normal because of
insufficient phosphorous. The azolla is grown with rice and incorporated during
weeding 20 days after transplanting and then again during land preparation for
the next crop.
1. Follow steps 1-5 in the tatluhan method.
2. Allow the remaining azolla to multiply further and re-seed
the field with azolla from the inoculum pond to increase biomass production.
Allow the remaining azolla to
multiply
3. Incorporate azolla into the soil during the land preparation
for the next cropping.

Incorporate azolla into the soil
ISAHAN METHOD:
In the isahan method, the azolla is grown with the rice crop but
it is not incorporated during cropping. It is best used where doubling time of
azolla is slow, where paddies cannot be drained, where water supply is
inadequate or where direct seeding is practiced. The biomass is incorporated
only once -- during land preparation for the following crop. It is this next
crop that will directly benefit from the azolla.
1. Prepare the land, apply basal fertilizer end transplant the
seedlings.
2. Seven days after transplanting, gather azolla from the
inoculum pond and broadcast it uniformly over the one hectare area. Leave at
least 10 kg in the pond to multiply for future use.
Seven days after transplanting
3. If the doubling time of azolla is 7 days, after 56 days the
50 kg azolla will have increased to about 13 tons. Maintain the rice crop and
control the weeds with rotary weeder or handweeding. Do not drain to prevent
dehydration and death of azolla.
4. Allow the azolla to proliferate until harvest time or as long
as there is moisture. Incorporate it during land preparation for the next
cropping.
Allow the azolla to proliferate
Isahan Method for direct seeded rice
1. Prepare the land according to the approved cultural practices
in lowland rice culture.
2. Drain most of the water, leaving at least 1 cm
deep to facilitate levelling of the soil.
3. Apply basal fertilizer and
broadcast the rice seeds uniformly.
4. Two weeks after germination, broadcast
azolla evenly into the field. Leave at least 10 kg in the pond for future
use.
5. Allow azolla to proliferate until harvest time and incorporate it
during the land preparation for the next cropping.
Table 1. Environmental Factors Affecting Growth of Azolla
(Summary).
|
FACTORS |
RANGE |
|
Temperature |
20°C - 25°C |
|
Light |
50% full sunlight |
|
Relative Humidity |
85 - 90% |
|
Water |
5 - 12 cm |
|
pH |
4-7 |
|
Salinity |
90 -1 50 mg/li |
Table 2. Guide in Using the Isahan, Dalawahan or Tatluhan
Methods.
|
CONDITION IN FIELD |
METHOD |
|
Water Supply |
Drainage |
Azolla DT |
1st Choice |
2nd Choice |
3rd Choice |
|
Good |
Good |
Fast1 |
Tatluhan |
Dalawahan |
Isahan |
|
Good |
Good |
Moderate2 |
Dalawahan |
Isahan |
- |
|
|
to Slow3 |
|
|
|
|
Good |
Poor |
Fast to Slow |
Isahan |
- |
- |
|
Poor |
Good or |
Fast to Slow |
Isahan |
- |
- |
|
Poor |
|
|
|
|
1 Fast -- 4 to 6 days
2 Moderate -- 7
to 9 days
3 Slow -- more than 9 days
SOURCE: National Azolla Action Program, UPLB, Los Ba�os, Laguna,
Philippines.
Multiplying the azolla
Azolla grows best under conditions of 50% full sunlight and
slowly flowing water. Therefore, the multiplication pond should be located near
the water source (but in a paddy which is protected from potential flooding)
where partial shade can be provided. The pond should be protected from wind to
minimize the piling up of Azolla.
FIRST WEEK:
1. Construct a 200 sq.m (10m x 20m) pond. The dike surrounding
the pond should be at least 15cm high end screens placed in the wafer inlet and
outlet. The screens will prevent both the entry of snails which eat Azolla and
the escape of Azolla with the exiting water. Plow the land and harrow it twice.
Any pond size can be used depending upon the amount of Azolla
needed. A 200 m pond will produce enough Azolla for 1 hectare of rice paddy when
the Isahan method of Azolla utilization will be used.
2. Divide the pond into four plots with the following
dimensions:

Divide the pond into four plots
The pond is subdivided to reduce the amount of water and
fertilizer needed in the first week of multiplication, as well as the time
needed to manage the pond.
3. Flood plot A with 5-7 cm of water. This is about midway
between the second and third lines of the middle finger.
4. Broadcast 40 g (or 3 level tbsp) phosphorous* fertilizer on
the standing wafer of plot A. Then broadcast 5 kg (or 1 kerosene can, 20 liter)
Azolla evenly on the water. The Azolla should be weed, disease- and insect-free
and should be of the type that is adapted to local conditions. (Please see the
separate sheet on selecting Azolla varieties.)
5. For insect control, use only those insecticides recommended
for Azolla and only if necessary. Based on IlRR's experience, once a variety
which has been selected locally is well-established, it tolerates higher levels
of pest populations and usually does not require insecticides. Occasionally, in
the early stage of multiplication, insecticides may be needed. If insect pests
remain a problem, another variety or species should be selected.
SECOND WEEK:
6. At this time, the surface of plot A will be fully covered
with Azolla. Broadcast the phosphorous Fertilizer (40g) on plot B.
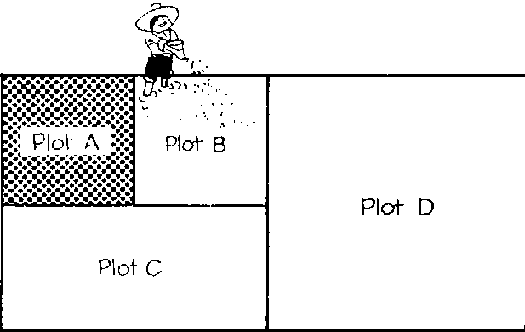
Second week
7. Remove the dike separating plots A and B to allow the Azolla
to spread evenly on the two plots. After one week, plots A and B will be fully
covered with Azolla.
Remove the dike separating plots
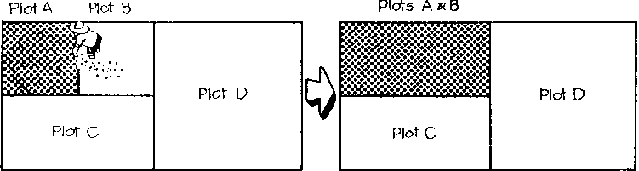
THIRD WEEK:
8. Broadcast the phosphorous (150g or 3-4 handsful) on plots A,
B and C.
9. Remove the dike separating plot C from plots A and B to allow
the Azolla to spread evenly on plots A, B and C combined. After 1 week, plots A,
B and C will be fully covered. (Illustration next page.)
Third week
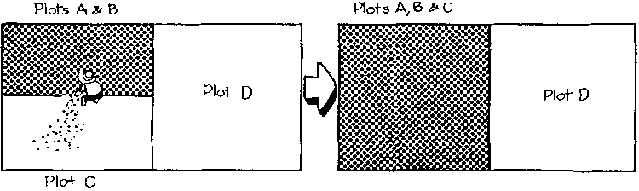
FOURTH WEEK:
10. Broadcast the phosphorous (150 g) on plot D.
11. Remove the dike separating plot D from plots A, B and C to
allow the even spread of the Azolla. After one week, plots A, B. C and D will be
covered fully with Azolla weighing approximately 200250 kg (fresh weight).
Fourth week
FIFTH WEEK ONWARDS:
12. Apply 5 kg (or 1 liter) superphosphate or 16-20-0 once a
week for 1 hectare of land (or 500 9/1,000 sq.m).
13. Remove one-half of the Azolla biomass each week and tap the
remaining Azolla with a broom to stimulate vegetative growth.
14. If the Azolla is to be used for rice, introduce (inoculate)
it to the paddies after the first plowing (land preparation) when the land is
still rough and maintain a low water level to keep them from piling up.
Note: This material was adapted from a publication of the
National Azolla Action Program (NAAP) in Los Ba�os. Modifications relate to some
technical content and the presentation
format.
Troubleshooting common problems in azolla production
1. Slow growth
Slow growth of Azolla is usually due to phosphorous deficiency,
insect/snail damage, high temperature, intense sunlight or herbicide use.
a. Phosphorous deficiency
· Concentrate the Azolla into one or two paddies for better
management.
· Apply 5 kg/ha monoammonium phosphate (16-20-0) or
superphosphate (0-18-0) weekly. Mudpress or other locally available substitutes
can be used.

Slow growth
b. Insect/snail damage -- Symptoms are the presence of snails,
caterpillars, or moths. Other symptoms include a purplish or brownish color
(caused by Azolla snout beetle); silken threads (Azolla moth); or segregated
rootless plants (snails).
· Use varieties that are relatively resistant to prevailing
major pests. Conduct tests for your location.
· Use insect/snail-free
inoculum. (One way to clean Azolla of insect pests which the Chinese and
Vietnamese use is to pile the Azolla seed material into a heap and plaster it
with mud. This treatment will suffocate the insects. After 2-3 days, the Azolla
can be used in the seedbed or in the field.)
· Do not allow the Azolla
to overlayer as this increases the chances of insect infestation and
damage.
· Use appropriate insecticide if there are plenty of
caterpillars, but only if it is absolutely necessary.
c. High temperature/intense sunlight -- A brick red color of the
Azolla indicates high light intensity. Too much heat will cause the Azolla to
turn brown/reddish pink. The loss of the plant's green pigment (chlorophyll )
will retard photosynthesis, consequently causing slow growth and multiplication.
· Select a heat-tolerant variety.
· A slight flow of water through the pond is essential in
summer.
· Partially shade the Azolla by growing Sesbania or gabi in the
multiplication pond. Growing a trellised crop over the pond will also
help.
· Allow the Azolla to grow on saturated mud which is cooler than
the water
Allow the Azolla to grow on
saturated mud
Partially shade the Azolla
d. Herbicide contamination of water -- Symptoms are slow or no
growth Azolla is extremely sensitive to herbicides Drainage water from
neighboring farms where herbicide have been used can stunt or kill the Azolla
2. Piling up of Azolla at one end of the paddy/smothering of
rice plants
· Introduce Azolla into the paddies 2-3 weeks after
transplanting
· Begin initial Azolla multiplication in paddies that are
relatively protected from the wind.
· Maintain only a minimal water
level to allow the Azolla to partially anchor itself to the soil.
·
Using small-leafed species such as A microphylla and A. caroliniana also helps
prevent smothering (esp when dapog seedlings are used)
3 "Escape" of Azolla during flooding
· Double screen "gates" placed at the water outlets coupled
with good dike maintenance The circular screen increases surface area for water
to pass through, at the same time prevents clogging of the outlet pipes.

Double screen
4. Weeds in Azolla
· Allow the Azolla to grow thick as this can cover and
shade out small grasses and sedges. (Caution: Extreme crowding of Azolla is
conducive to insect infestation.) Uproot broadleaf weeds. Never use herbicides
because Azolla is sensitive to them.
5. Oxygen deficiency in the roots of rice plants
· If Azolla (in dual culture with rice) becomes too thick,
the Azolla mat cuts off the oxygen supply from the atmosphere, thereby
suffocating the rice roots. Incorporate the Azolla as needed, or use for other
purposes, e.g. Animal Feeds, compost, etc.
CREDITS: AZOLLA PRIMER by Manzoor
Khan.
Green leaf manuring in lowland rice
INTRODUCTION:
Green leaf manuring (using the leaves of leguminous trees for
lowland rice) has been used in South Asia for centuries with yield increases of
up to 2 T/ha compared to unfertilized rice fields. Recent work with farmers in
Negros and Cavite has shown that green leaf manuring works in the Philippines as
well.
Advantages of using green leaf manures (GLM) include:
· Up to 4 tons dry leaf matter (equivalent to 120 kg N) can
be produced from 400 trees spaced 2 m apart on the bund.
· No need to
replant green manure crops. The trees are perennial and provide leaves for GLM
2-3 times/year.
· Woody branches can be used for firewood.
·
Easy to use. No complicated cultural practices for production or use are needed.
GLM trees can be integrated into almost any rice farm. Three
options are described here based on planting systems used in Negros and Cavite
with Gliricidia septum (kakawate or madre de cacao).
Option No. 1 -- Gliricidia is planted along the paddy bunds.
Spacing is 50 cm-2 m between plants.
Option No. 2 -- Gliricidia is planted around field boundaries.
Distance is 2 m between plants. Dikes should be 50-75 cm wide and 40-50 cm high.
Option No. 3 -- Cut-and-carry system: Gliricidia is planted in
areas away from the field. The major disadvantage of this system is the
transport of biomass from the growing area to the field.

Green leaf manures
HOW TO USE GREEN LEAF MANURE:
The practice of GLM is very simple. Any fast-growing leguminous
tree species which tolerates poor drainage can be used. The leaves are lopped
regularly (every 6 mos) and applied to the rice paddies during final land
preparation as green leaf fertilizer. In order to reduce the labor requirements,
the trees should be established at or near the rice production site.
1. One day before transplanting, cut branches of Gliricidia
(with leaves). Chop the tender stems. The woody ones can be used as firewood.
2. Scatter the leaves evenly throughout the field. There should
be no standing wafer in the paddy in order to fully incorporate the leaves.
3. Incorporate the leaves into the soil during the last
harrowing/leveling of the field.
4. Transplant rice seedlings immediately after incorporation.
NOTES ON THE USE OF GLIRICIDIA:
· Two loppings are recommended per year. If there will be
no second crop to put the GLM on, the second cutting should be done 1-2 mos
before the onset of the dry season. This stimulates new growth which can survive
a 6-month dry season without dropping its leaves. The loppings could be used as
fodder.
· Gliricidia may have pesticidal properties against major
pests of rice.
· Gliricidia can serve as living stakes for climbing plants
like pole beans. It is also an excellent source of firewood, building materials
for livestock pens and fence materials.
Two methods of establishing trees for GLM are used: seeds and
cuttings. Recent work at IIRR has shown that the method of planting cuttings
greatly affects the establishment and growth rates of trees. The recommended
method of planting cuttings of Gliricidia is described below:
OTHER SPECIES RECOMMENDED FOR GLM FOR RICE
|
Species |
Local Names |
Quantity of Leave
Recommended/ha. |
|
1. Leucaena leucocephala |
Ipil-ipil |
1,000-8,000 kg/ha(freshly cut) |
|
2. Samanea saman |
Acacia |
- do - |
|
3. Acacia auriculiformis |
Japanese Acacia |
|
|
4. Pithecellobium dulce |
Kamachile or Kamunsil |
- do - |
|
5. Derris indica*
Pongamia indica |
Bani or Balok-balok or ponggam |
- do - |
* Please note that this is not Derris elliptica or Tubli.
Gliricidia septum (kskawate) has the same quantity of leaves recommended/ha as
the GLM species given
above.
Green manure utilization in lowland rice
With the range of green manures and short-duration grain legumes
available today, it is possible to grow or substitute at least one-half of the
chemical nitrogen used by farmers in their rice crops. In irrigated rice-growing
areas, nearly all the crop nutrient requirements could be met by big-fertilizers
with good planning and management.
Even for farms wherein sufficient chemical nitrogen fertilizer
is affordable, green manure (GMs), green leaf manures (GLMs) and grain legumes
(GLs) provide the following benefits that chemical fertilizers cannot:

Green manure utilization in lowland
rice
· GMs and GLs improve the rice crop's performance in
drought as compared to the unmanured crop.
· They have a long-term cumulative effect on soil fertility
in addition to the short-term effect. The long-term effect occurs in small
increments but does result in noticeable yield increases by the third or fourth
year of green manuring.
· Part of their production can be used to provide food for
humans or feed for livestock.
· Weed reproduction is reduced by planting an otherwise
fallow area.
· In soils low in phosphorous (P), rice yields are higher
when P fertilizer is applied to the GM and GL than if the same amount of P
fertilizer is applied directly to the rice crop.
In order to produce his own fertilizer at minimal labor and
capital cost, the farmer needs to know what GMs and GLs are available, their
characteristics and how they might best be used on his farm. He needs to be able
to identify those times of the year when GMs and GLs could be grown.
CHARACTERISTICS DESIRABLE IN LEGUME GREEN MANURE CROPS:
· Multipurpose
· Short duration, fast-growing,
high-nutrient accumulation ability
· Tolerance for shade, flood, drought
and adverse temperatures
· Wide ecological adaptability
·
Efficiency in use of water
· Early onset of biological nitrogen
fixation
· High N accumulation rates
· Timely release of
nutrients
· Photoperiod insensitivity
· High seed
production
· High seed viability
· Ease in
incorporation
· Ability to cross-inoculate or responsive to
inoculation
· Pest and disease resistant
· High N sink in
underground plant parts
Information needed includes the approximate dates of the
beginning and ending of the rainy season, maturity times. For all crops being
considered products desired by the farmers, e.g., fodder, grain or sale or
consumption, fertilizer, etc. Additionally, water availability from irrigation,
if any, and soil drainage pattern should be known.
In lowland rice, water availability and soil drainage play major
roles in determining the types of green manures to use. A GM planted at the
beginning of the dry season, for example, needs to be able to withstand drought.
Planted before or with rice, it will need to be flood-tolerant. Soils that drain
well can be planted to desirable crops which are susceptible to flooding or
waterlogging. What is important is to fit the crop to the agro-ecology of the
farm.
A large number of legumes have been tested for their potential
as green manures in rice. Some grow well in waterlogged conditions; some do well
in very dry conditions; and a few, in both. Many serve dual purposes: by
producing food as well as fodder and/or green manure.
|
Ecology |
GM Species |
|
Flooded soil |
Aeschynomene afraspera, A. americana
Phaseolus semierectus
and all Sesbania sp. |
|
· Sown in standing rice before harvest to be grown
throughout dry season
(Drought-tolerant) |
Intercropped with grain legume |
|
Dolichos lablab |
|
Indigofera sp. |
|
Cnavalia ensiformis |
|
Crotalaria quinquefolia |
|
Mucuna pruriens |
|
Stylosanthus guayanensis |
|
Pueraria species |
|
Monocropped |
|
Crotalaria juncea |
|
Saline soil |
Sesbania serecea and S. aculeata |
|
Low temperature |
Astragalus sinicus |
(Modified from Vacchani and Murty, 1964)
Lowland rice-based cropping systems can be classified into any
number of types (according to cropping patterns and water availability) but in
the Philippines, the four general ones are:
· Fully irrigated: 2-3 rice crops
· Partially
irrigated or rainfed with standing water throughout crop cycle: 2
crops
· Rainfed: 2 rice crops
· Rainfed: 1 rice crop
Systems vary from country to country but in any location,
determining what GM to use and when to use it would greatly depend on the
cropping pattern and more importantly on water availability (which would include
water source, the amount and length of time water is available and the degree of
regularity of the water supply).
It should be noted that, as the amount of water and the length
of time it is available increases, farmers have more options regarding what GMs
to use; total biomass and N production will be higher; thus, yields will likely
be higher (or the amount of fertilizer N substituted by GM will be higher).
Described below are some options for multiple, relay and
intercroppings under different regimes. They illustrate the possibilities for
intensifying production of food, fodder and fertilizer by using grain legume and
green manures.
FULLY IRRIGATED:
Options 1 and 2 are the most flexible. Sesbania rostrata or
another waterlog-tolerant GM can be grown before rice to supply the basal N to
crop 1. Azolla is multiplied during S. rostrata's growth for incorporation with
rotary weeder at 20-25 days after transplanting (DAT). Nitrogen becomes
available by panicle initiation. Azolla is also incorporated three more times
for the second crop: at post-harvest incorporation of crop l's stubble, 1 day
before transplanting (DBT) of crop 11 and 25 DAT crop 11 (using the rotary
weeder). GL is intercropped with GM in the dry season. The 3-day option is the
same as 1 and 2 but a vegetable or other cash crop is grown during the dry
season.
Fully irrigated
PARTIALLY IRRIGATED (OR RAINFED WITH STANDING WATER):
Azolla can be grown throughout the rainy season but should be
regarded as the N source for the second cropping season only. In this system,
Azolla is multiplied during the first cropping season (and provide some weed
control) and incorporated during post-harvest plowing. Enough Azolla is left to
serve as inoculum for the second incorporation 20-30 DAT of crop 11, which
coincides with the rice weeding operation. Azolla supplies about 60-70 kg N/ha
to the second crop.

Partially irrigated
The N source for the first crop can come from the GLs
intercropped with drought-resistant green manures relay-planted into the second
rice crop from the previous year to grow on residual moisture (1). Where there
is no distinct dry season, a waterlog-tolerant GM like S. rostrata could be
grown (2). In areas where there is a long lag time between the first rain and
the arrival of irrigation water, S. rostrata can be planted. Some small amounts
of chemical N and P for the Azolla may have to be applied.
RAINFED -- TWO RICE CROPS:
Options are fewer here. Azolla is not feasible and usually a
pre-rice GM is not either. In areas with a distinct dry season, a combination of
drought-resistant GM and grain legume can be relayed into the second crop. Rice
straw mulch will help conserve moisture. In areas with no distinct dry season, a
waterlog-tolerant GM can be used. Trees can be planted on paddy dikes or in
waste spaces to provide green leaf manure to supplement chemical fertilizers in
both crops.
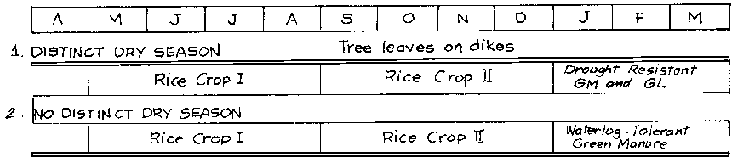
Rainfed - two rice crops
RAINFED -- ONE RICE CROP:
Depending upon the topography and soil texture (if a field is
well-drained), GLMs or vegetable legumes plus a GM are possible both before and
after the rice crop. If an upland grain crop such as corn or sorghum is grown
before or after rice, a GM can be intercropped.
GLMs provide an additional fertilizer source for use when
in-situ green manure production is inadequate for the rice crop's needs.
For all but the most fibrous GMs, rice should be transplanted as
soon as possible after incorporation to minimize loss of GM-nitrogen.
Transplanting one day after incorporation is ideal.

Rainfed - one rice
crop
Sesbania aculeata: a bio-fertilizer source for lowland rice
CHARACTERISTICS:
· S. aculeata (Willd.) Poir is referred in some literature
as S. bispinosa (Jacq.) W. F. Wright and S. cannabina (Petz.) Poir. Its common
name is dhaincha or daincha.
· S. aculeata is a leguminous, shrubby annual with thick,
hairy stems and large (35 cm) feather-like leaves.
· Its flowers are yellow. It seeds easily and is
self-pollinated.
· Although it can accumulate a lot of biomass and nitrogen
(N), it has not received much attention as a green manure crop.
ADAPTABILITY:
· It is suitable for wet, waterlogged areas and heavy
soils. It is well adapted to saline soils and has been successfully used to
rehabilitate salt-infected soils.
· Although adapted to dry, arid conditions, its growth and
biomass production are less than S. rostrata.
· Requires 600-650 mm rainfall.
· It can withstand temporary waterlogging. However, its
nodulation and N2 fixation may be impaired.
· It is useful as a short-duration pre-rice green manure.
ADVANTAGES AS BID-FERTILIZER:
· Leaflets degrade rapidly in most soils. About 50% of
accumulated N is released within 4 weeks after incorporation.
· After 75 days of growth, it can provide 20-26 T/ha fresh
biomass with an N concentration of 0.43%.
· Before blooming, the average composition is 28% organic
matter, 0.47% N. 0.05% P and 0.35% K.
· 21.1 tons of fresh biomass is equivalent to the addition
of 133 kg N/ha. Incorporating biomass resulted in a 207% increase in rice grain
yield as compared to no application. Furthermore, under continuous green
manuring using S. aculeata, soil N increased from 0.079% to 0.141%.
HOW TO USE S. ACULEATA AS BID-FERTILIZER:
· N content reaches a peak and starts to decline 45-50 days
after planting. Incorporation at this period is recommended.
· When the field is submerged with enough water for land
preparation, incorporation is better ensured by using an animal-drawn slicer.
The first pass of the slicer flattens the S. aculeata and slices
off its branches. A second pass at a right angle to the first further slices
branches into smaller portions and drives it down to the mud. Subsequent
operations follow without significant additional effort.
SOME DISADVANTAGES IN USING S. ACULEATA:
1. Difficulty in collecting seeds: Dhaincha is small-seeded and
pods easily shatter.
2. Stems are hard and difficult to plow.
OTHER USES:
Leaves of S. aculeata may be utilized as fodder and stems may be
used as poles and as a source of
fiber.
Indigofera: green manure profile
Indigofera tinctoria, commonly called Indigo, Tayum, Tagum or
Tayung, is a shrubby herbaceous plant, 1-2 m tall with erect and copiously
branched stems. Leaves are pinnate and 8-15 cm long. The small rose, purple or
white flowers are borne in spikes or clusters. The seeds, usually 6-12/pod, are
much longer than broad. Pods are 1.5-2.5 cm long.
In Northern Luzon, Indigo has been integrated in farmers'
systems since the late 19th century. It has been used as a green manure and
grown as a post-rice crop, cultivated in combination with other crops.

Indigofera
ROLE OF INDIGO IN RICE FARMING:
· The Indigo can be planted as a monocrop after rice
harvest. When planted as a sole crop, a seed rate of 6-8 kg/ha is needed.
· It can also be planted in between the standing crop after
the last interrow cultivation at 30-50 days after planting (DAP). The seed is
dibbled in the furrows created during the hilling-up operation. (This is the
most common method used by farmers in the llocos region.)
· It is not suited as a short-duration pre-rice green
manure due to its slow initial growth. It needs 45 months to accumulate high
amounts of biomass and N.
· It can be grown after rice (Oct-Nov) as a companion crop
to upland crops, such as corn, mung bean and tobacco. As an intercrop, it has
not been observed to exert a yield-depressing competitive effect on its
companion crop. It can be grown in combination with any of a number of food
crops like mung bean, cowpea, peanut, corn, etc., because its slow, initial
growth does not allow it to compete for sun or water.
· Indigo is plowed under at the start of the wet season to
serve as a big-fertilizer for the rice crop.
· Under saturated conditions, the Indigo seeds plowed under
were not observed to emerge. Therefore, the plant does not appear to be a
significant weed problem in rice.
· It can withstand a long dry season (6 months or more),
thereby providing soil cover during dry months.
IMPORTANCE AS FERTILIZER:
· At 45 DAP, total N accumulated by Indigo was estimated to
be equivalent to 45 kg N/ha.
· When planted as an intercrop prior to wet season rice, it
can produce a biomass of 4-19 T/ha, equivalent to 84-267 kg N.
· Average amount of N required by rice can be reduced by
one-half to two thirds when preceded by Indigo.
· Only a single application of fertilizer at 45-53 days
after transplanting need be applied to rice when Indigo is incorporated.

Produce a biomass
HOW TO USE INDIGO AS FERTILIZER:
Indigo may be:
· broadcast after fields are drained. The field is then
harrowed to cover seeds. Furrowing to accomodate the intercrop can subsequently
take place. In llocos, an average of 6-8 kg/ha of Indigo seeds are
broadcast.
· pre-soaked and dibbled between rows of a standing post-rice
crop after interrow cultivation (3050 DAP).
· planted after harvesting
the post-rice crop in the same furrows in which these crops were planted.
The Indigo. is incorporated once the field accumulates enough
water for land preparation for the rice crop. A pegtooth harrow drawn in one
direction is usually used to flatten the stand. Then the Indigo is plowed under
in the same direction as it was flattened. Harrowing and transplanting follow
very soon after in order to avoid loss of nitrogen from the decomposing biomass.
SEED PRODUCTION:
For a dependable harvest of good quality seeds, planting of
seeds should be done in October-November so that pods mature in March or April,
ahead of the early rains. In areas where there is still some soil moisture,
January or February is also a good time to plant for seeds. Harvesting is done
by clipping the clusters of pods. For high-quality seed, individual pod picking
is recommended. Seeds can be stored without using special equipment. Eight
months after storage, seeds are still capable of good germination (70-80%).
OTHER USES:
Indigo can be used as fuelwood and the leaves can be processed
into
dyes.
Crotalaria: green manure profile
CHARACTERISTICS:
· There are eight species of Crotalaria which are
considered potential green manures.
· Most of these species are
short-lived, hollow stemmed, fast-growing and produce dense foliage.
·
Species differ in leaf form (simple, trifoliate), flower color, growth rate,
plant height and other morphological characteristics.
· Pods contain 5-8
seeds.

Crotalaria
ADAPTABILITY:
· More adapted in dry areas which are not waterlogged, C.
juncea is more adapted to areas with low rainfall than S. aculeata.
·
Requires full sun for maximum growth and cannot tolerate partial
shading.
· Adapted as a short-duration pre-rice green manure.
IMPORTANCE AS FERTILIZER:
· Crotalaria leaves decompose within 1-3 weeks after
incorporation.
· It ranks next to Sesbania in N yield and green matter
production. It is capable of supplying up to 100 kg N/ha.
· Among the Crotalaria species, C. juncea and C.
usaramoensis gave consistently the highest N yields. After 45 days, total N
acculumation was 169 kg N/ha (3.75 kg N/ha/day).
· In India, Crotalaria biomass production was estimated to
be 20-28 T/ha. The biomass had a total N content of 0.43%. This is equivalent to
134 kg N/ha. When incorporated in the soil, rice grain yield was 128% higher
than yields obtained without incorporation.
· Continuous addition of Crotalaria green manure increased
soil N from 0.079% to 0.109%.
HOW TO USE CROTALARIA AS FERTILIZER:
There have been no conclusive results published on the best time
and age for incorporating Crotolaria in wetland rice. However, faster release of
N was observed when 30-day old Crotalaria was incorporated.
· Provided there is enough water, Crotolaria may be planted
30-40 days before plowing wetland rice. Stems should be cut using either manual
or animal labor. These will be incorporated into the soil by plowing and
subsequent tillage operations.
· For upland crops, Crotalaria may be incorporated during
hilling-up by uprooting it, spreading it near the plant base and then covering
it with soil.
DIFFICULTIES OBSERVED IN USING CROTALARIA:
· It is susceptible to insect infestation when planted in
the same area for more than 3 years.
· Seed setting could be a problem
in certain areas. However, enough seeds could be obtained despite reports of
insect pests (particularly pod borer).
OTHER USES:
Crotalaria can be processed into fiber. It is very palatable,
hence, a highly acceptable source of
fodder.
Lablab bean: cover crop/green manure profile
CHARACTERISTICS:
The lablab bean, commonly called bataw or jarabilla, is
widespread throughout the tropics. It has so many uses, so many varieties and
wide adaptability.
· There are two botanical types: (a) the garden type which
is viny and has to be grown on support; and (b) the field type which is erect
and bushy.
· There are more than 200 recognized genotypes with pods,
seeds, flowers, leaves differing in size, shape, texture and color. Each variety
has physiological differences like seedling vigor, drought tolerance, day-length
sensitivity, flowering time, maturation time, pest- and disease-resistance and
seed viability.

Lablab bean
· It is remarkably adaptable to diverse conditions like
soil of low pH and is affected by low soil nitrogen content.
· The plant establishes easily. Its dense growth
suffocates/reduces weed growth.
· Dry seeds contain 20-28 percent crude protein. It is one
of the best sources of iron (155 mg/100g of leaves dry weight). Yields of dry
seeds gives as high as 4 t/ha.
USES OF LABLAB BEAN:
Food
· Young pods make an excellent table vegetable.
·
Dried seeds are a wholesome palatable food, either cooked and eaten directly or
processed to bean cake.
· Leaves and flowers are cooked and eaten like
spinach.
· Sprouts are comparable to soybean or mung bean
sprouts.
· Protein concentrate can be made from the seeds.
Forage
· The plant is grazed by different types of
animals.
· Bean hay is palatable. It also makes good silage.
Other Uses
· Excellent green manure.
· Effective for soil
erosion control and soil protection.
· Can be used as a nitrogen-fixing
crop grown alone, interplanted with field crops or grown in rotation with these
crops.
· Good cover crops for plantations.
· Often planted as a
second crop in ricefields after the harvest of paddy.
ADAPTABILITY:
The lablab bean is remarkably adaptable. Its various strains
thrive in a number of different areas and under diverse conditions. There are
varieties for:
· arid, semi-arid and humid regions (that is, for range of
200 - 2,500 mm of annual precipitation);
· warm-temperate, subtropical
and humid rainforest regions where mean summer temperature ranges from 22 to
35°C;
· lowlands and highlands (It is grown widely up to 2,100 m
altitude.);
· many types of soil, including some of the poorest and most
toxic soils;
· both mechanized, large-scale farming and labor-intensive,
small-farm agriculture;
· field agriculture and home gardens;
and
· resistant to pests and diseases (especially root diseases).
IMPORTANCE OF LABLAB IN RICE FARMING:
· It is best grown as a post-rice harvest crop during
fallow periods in the dry season for marketable pods and nitrogen rice
biomass.
· It can be intercropped with rice in dryland areas (with
clippings so as not to depress the rice yield).
HOW TO USE LABLAB AS FERTILIZER:
· Plant lablab seeds either in furrows or broadcast after
the rice harvest (towards the dry season).
· Allow the lablab to grow
and cover the ground until the rainy season starts. Allowing the plants to cover
the soil suppresses the growth of weeds and protect the soil from direct
exposure to sunlight.
· Before plowing the soil for the next planting,
either chop the plants by passing a slicer or pull every plant then allow to
wilt.
· Incorporate the herbage into the soil by
plowing.
Rice bean: green manure profile
The rice bean (Vigna umbellata) is an important crop because of
its potential as a post rice crop.
CHARACTERISTICS:
· It is an annual that bears clusters of 5-20 bright yellow
flowers that produce narrow pods containing 7-10 seeds.
· It is adapted
to high temperature and humidity as well as to heavy soils.
· Some
varieties are resistant to major insect pests and diseases.
· It
produces easy to cook, good tasting seeds.
· Seeds are rich in protein
and contain high amounts of calcium, iron and phosphorous.
· Immature
pods and seedlings are excellent green vegetables and the plant makes forage
which are eagerly consumed by livestock.
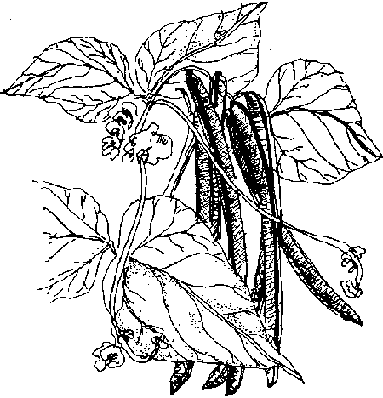
Rice bean
VARIETIES:
Cultivars of rice bean vary from short-stemmed, erect plants to
twining plants that may grow up to 3 meters long and need stakes or other
support for maximum yield. Seeds of these different cultivars have either black,
red-violet, greenish, brownish or mottled seeds.
ROLE OF RICE BEAN IN RICE FARMING:
· Rice bean as a post rice crop can benefit the rice by
improving the nitrogen and humus contents of the paddy soil.
· It is
particularly valuable because it provides fodder at a time when other sources of
feeds are scarce.
· It can be used as a green manure before the planting
of the first rice crop and can be grown as a cover crop during times when the
ricefield is left idle.
USING RICE BEAN FOR GREEN MANURE/COVER CROP:
· Plant the seeds either in furrows or broadcast them after
the rice harvest towards the dry season.
· Allow to grow (take over the
field) until the onset of the rainy season.
· Before plowing for the
first planting of rice, either chop the plants by using a slicer or bolo or
uproot the whole plants and allow to wilt.
· Incorporate the herbage by
plowing and allowing it to decompose before planting the rice.
LIMITATION:
· Rice bean is sensitive to day length. Flowering and
seeding are initiated only when days are short. When planted at other times, the
crop produces masses of vegetation but little
seed.
Sesbania spp.: green manure profile
Sesbania, such as S. rostrata, S. aculeata or S. sesban, are
green manure crops which are fast-growing even in flooded conditions. Unlike
most other legumes, they fix nitrogen even when the soil contains high amounts
of nitrogen (N). A 45-60 day growth of Sesbania can yield the following:
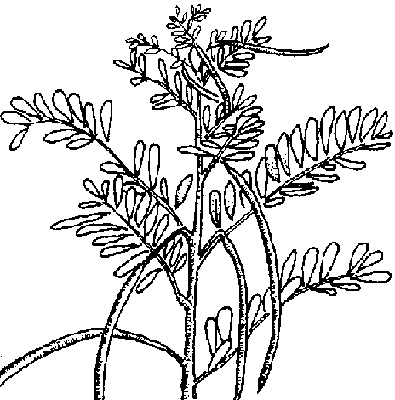
Sesbania spp.
|
Field |
Condition |
Tons/ha Kg N/ha |
|
Flooded |
25-30 |
100 |
|
Dry |
30-35 |
115 |
Sesbania can be incorporated during land preparation. It also
decomposes quickly. Rice can be transplanted the day after incorporation. The
herbage cited above can result in rice yields of 0.52.0 T/ha.

Figure 1. The comparative vegetative
growth of Sesbania at different planting dates.
Sesbania is photoperiod sensitive. Flowering is triggered by
short daylength. Flowering and seed production suppress the plant's vegetative
growth.
To maximize herbage production (and therefore N accumulation),
the best time to plant Sesbania as pre-rice green manure is during longer
photodaylength periods -- from March to July in the Philippines.
The best time to plant for seed production is from November to
mid-January. The short daylength induces early flowering (3-4 wks after
emergence). Seed production during the dry season has less pest problems and
eliminates seed germination in the pod.
Table 1. Seed Production of S. rostrata on the Rice Paddy Bunds
(Navarro, General Trias, Cavite, 1987 DS)
|
PLANTING DENSITY/ SPACING |
Date of Priming and Actual Seed Harvested (kg) |
Production Cost* |
|
First Priming |
Second Priming |
Third Priming |
Total |
|
|
Plant/m row |
1.868 |
2.341 |
1.968 |
6.177 |
52.50 |
|
2 Plant/m row |
3.001 |
3.846 |
2.688 |
9.535 |
74.37 |
|
3 Plant/m row |
5 546 |
6.0 |
5.127 |
16.673 |
96.25 |
* Cost of seeds + harvesting costs. Hired labor is P25.00/day.
CULTURAL MANAGEMENT:
For Green Manure
1. Planting Methods:
· Broadcasting or row-seeding after conventional land
preparation (1 plowing and 1-2 harrowings)
· Direct seeding under zero
tillage conditions using a suitable seeder
· Broadcasting onto weed-free
field (untilled) and covering lightly with straw
2. Sesbania nodulates freely in most soils without inoculation.
However, to ensure root nodulation, apply inoculant to seeds before planting.
3. S. rostrata is the species which nodulates both on its roots
and stems. Stem nodulation can be easily induced if it has not yet started by
doing the following:
· Collect nodules from the stems of any available S.
rostrata plant.
· Crush these, mix with water and filter the
mixture.
· Spray the filtered water on the stems of the S. rostrata The
tiny light green dots are the locations where the nodules will form.
4. The seeding rate ranges from 20-40 kg/ha. A 45-60 day growth
may provide the N requirement of a wet season rice crop. The larger the amount
of seed planted, the fewer days are needed to produce sufficient green manure.
5. Plants should first be slashed or chopped if the
incorporation will tee done by animal-drawn plow and harrow.
6. With the use of scythe or bolo, the standing plants can be
chopped into short pieces from the top to the base. Plants that were cut and
partially cried are tougher to chop than the fresh plants. Slashing may not be
necessary if a power tiller or hydrotiller will be used in the incorporation.
Transplanting of the rice should be done as soon as possible after the
incorporation of Sesbania to minimize N losses which begin within 2-3 days after
incorporation.
For Seed Production
1. Planting methods:
· Planting Sesbania separately from the rice crop during
rainy season or at early dry season
· Relay planting into the last rice
crop (by broadcasting Sesbania seeds before rice harvest)
· Planting on
rice paddy dikes either by direct seeding or transplanting during the rice crop
season
· Planting and growing it together with the rice crop.
Little is known about the quantity of seed produced using the
last two methods. For the first two methods, during rainy and dry seasons, seed
production of about 12 and 9 kg/100 sq. m respectively can be attained.
2. Seeding rate is 16 kg/ha or about 300,000plants/ha. Seeds
should be planted in rows 40-75 cm apart at 1 5-20/linear m.
3. Some insect pests may attack the pods and seeds; except with
very high infestations, no insecticide is needed.
4. Harvesting and cleaning the seed is time-consuming; one
person can pick and clean approximately 5-7 kg seeds/day. Three or more primings
will be needed to harvest all the seeds.
COMBINING SEED PRODUCTION WITH OTHER USES OF SESBANIA:
1. The woody stem of the mature plant can be used as firewood or
as trellis for climbing vegetables.
2. If water is available, the plant can be ratooned to provide
green manure for the next rice
crop.
Animal and green manure practices among the Mangyans (Alangan tribe in Mindoro)
Pigs and chickens are housed underneath the home over bedding of
cornstalks, straw, etc. Decomposed beddings serve as fertilizer.
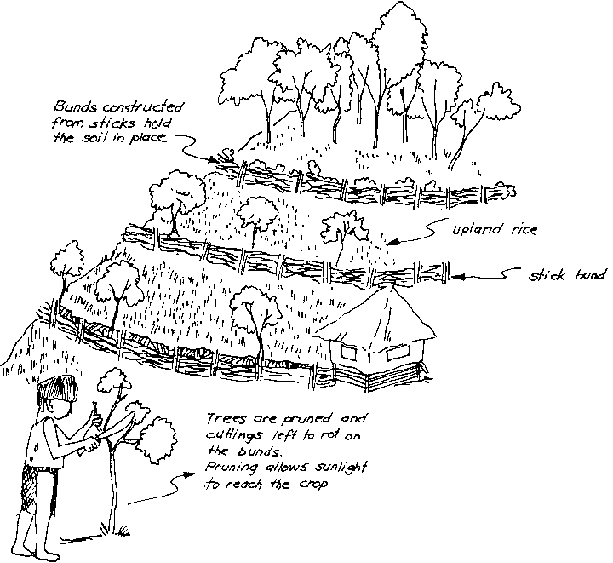
Animal and green manure
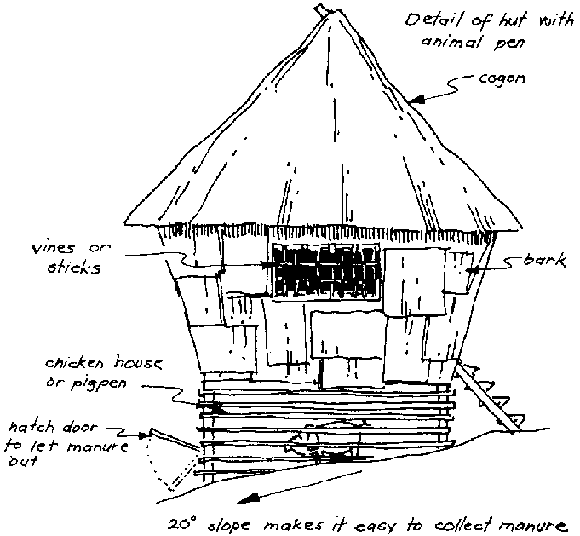
Decomposed
beddings
Waste management practices (Tuwal and Ayangan tribes in Ifugao)
DUG-OUT PEN SERVES TO RESTRAIN THE PIG.
The following materials are laid on the earth floor:
· rice straw and hulls
· kitchen refuse
·
grass cuttings
· carabao dung
· chicken manure
· other
organic matters
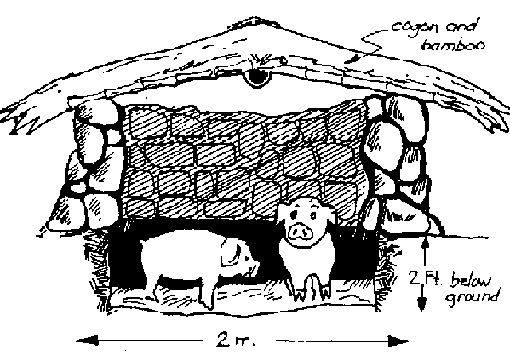
Dug-out pen
COMPOST COLLECTION METHOD:
The old bedding is collected and used as fertilizer to be
incorporated into the rice terraces. New materials are laid on the pit floor.
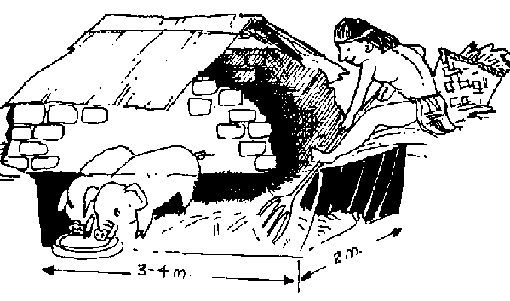
The old bedding is collected
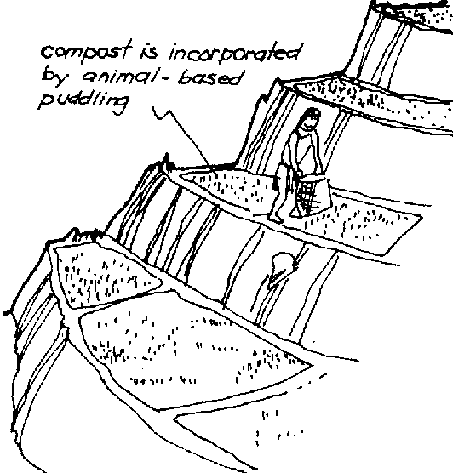
Bedding is collected and used as
fertilizer
