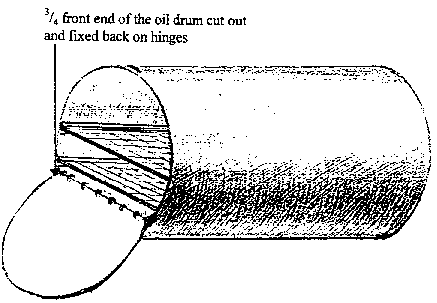
The oil drum oven mainly consists of a used, but non-rusted empty oil drum. One end of the oil drum is altered to form the door of the oven. Three quarters of the end plate is cut out and re-connected to the uncut end piece by means of three hinges (view image). Four metal runners are fixed to the entire length of the inner drum wall. Two racks are then made out of stiff mesh and placed along the runners. These form the shelving upon which the baking tins and trays will be placed (view image).
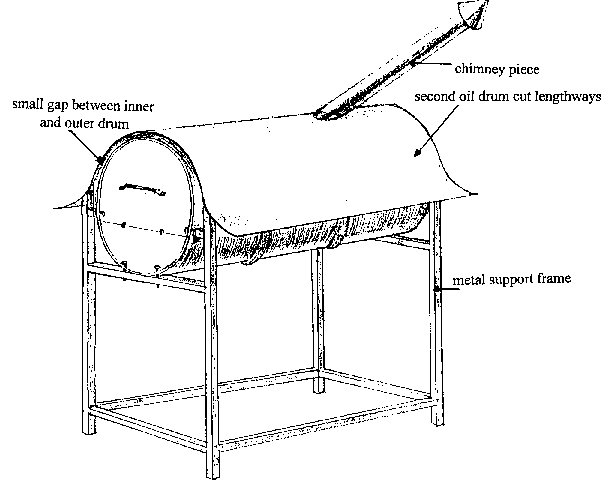
The central oven drum (view image) needs to be supported on a metal frame, its uppermost surface covered with a metal outer casing and a chimney piece put in place. The metal support frame is made from pre - formed galvanised steel rods - approximately 2.5 cm square. Where the metal support frame runs up the side of the central oven drum, there should be a one inch space. The frame and the centre drum should be joined together with metal brackets, still retaining the one inch gap. The metal cover over the central drum oven is made out of a same sized, used but non - rusted oil drum. Both end pieces are cut from this oil drum and the main body cut along its entire length. This cover is secured to the support frame and central oven drum using metal brackets. A one inch gap is left between the central oven drum and the outer cover. At the rear end of the drum, a 10cm diameter hole is cut out of the metal covering. A 1.5m long piece of galvanised steel pipe is welded onto this cover.at an angle of 20° to the upper surface of the covering surface (view image).
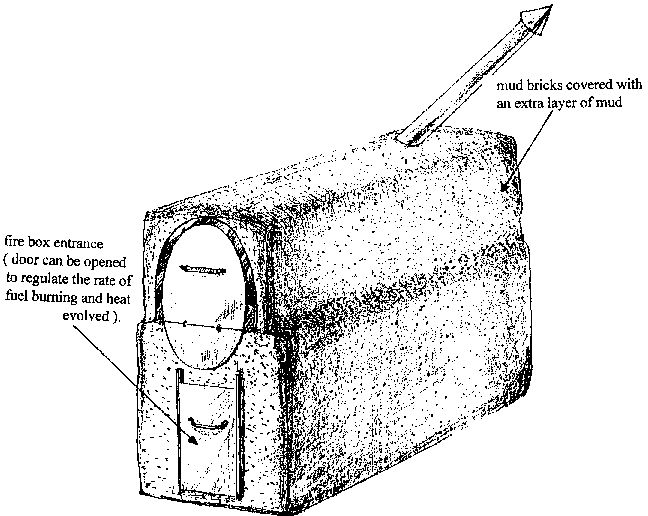
The main structure of the oven is now completed. The main structure should now be placed on a level, concrete surface. Once in place the front sides and back of the oven should be built up with a number of clay bricks. These bricks can be easily made from heavy, clay soil and some sand. A number of wooden moulds of dimensions 18 x 10 x 30cm should be made. Into these mould the clay and sand mixture is compacted. The moulds are then removed and the bricks allowed to dry slowly and thoroughly in the sun. It is probably necessary to experiment a little with the clay and sand mixture to get, bricks which do not crumble or break when handled. Once ready, the bricks can be used to build the support wall around the entire metal structure, leaving at the base of oven door end for the fuel chamber. The bricks are fixed together using more of the clay and sand mixture used to fabricate the bricks. The upper surface of the metal cover also needs to be smothered with clay and sand mixture. The small gap between the front of the centre oven and the metal cover should be filled with clay and sand mixture to stop heat escaping. The clay and sand layer on top of the oven will help insulate it and improve cooking temperatures. The only other remaining feature which needs to be built is the fuel chamber door. This is constructed of a piece of sheet metal to which a metal handle is attached. This is then fixed to the clay and sand brick wall using metal runners. The fuel chamber door should slide up and down rather than open outwards. An up / down sliding feature facilitates better control over the rate of wood burning in the chamber and consequently control over cooking temperatures (view image).
Before using the oven for baking, a small fire should be made in the fuel chamber and kept alight for as long as possible. Ideally a 24 hour period is best. This process allows the clay bricks to dry out slowly and "cures" the oven prior to its use. It prevents major cracks and break up of the clay wall during its use. Should any minor cracks appear in the clay walls then they should be filled up with more of the clay and sand mix.